Person
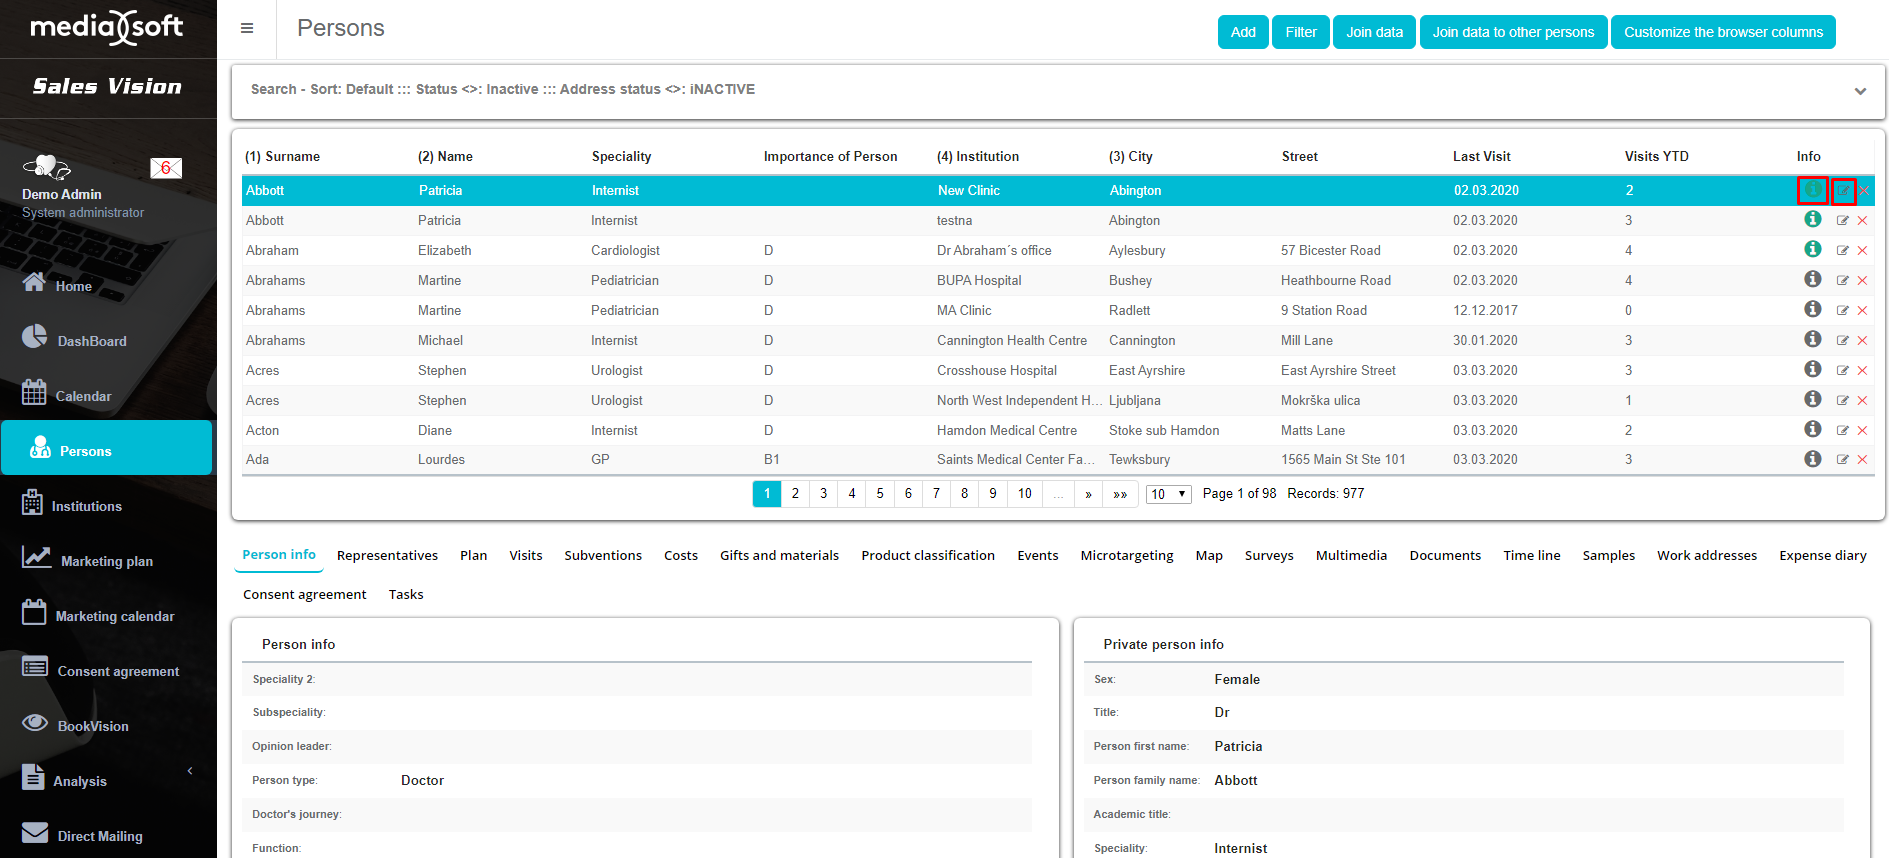
Person module gives you the overview of all the persons in your database. To enter it, press on the Persons icon on the main menu. Here you can add, change or delete persons and add different data. You can see the list of persons in your database.

Search filter
To narrow down your search, you can use two options. The quickest one is to use a Search toolbar on top part of screen to search by different criteria. While searching the data, character “%” is a wildcard that replaces one or more characters. For example, if you enter “%john” in the surname search, you will get the entire list of persons with “john” in the surname, like (Johnson, Johnny, …).

Another example, if you want to search all cardiologists from your database, under Specialty drop - down menu choose Cardiologist and click on Refresh button. New window with a list of all cardiologists will appear, also the number of total records and how many pages are there with selected criteria.
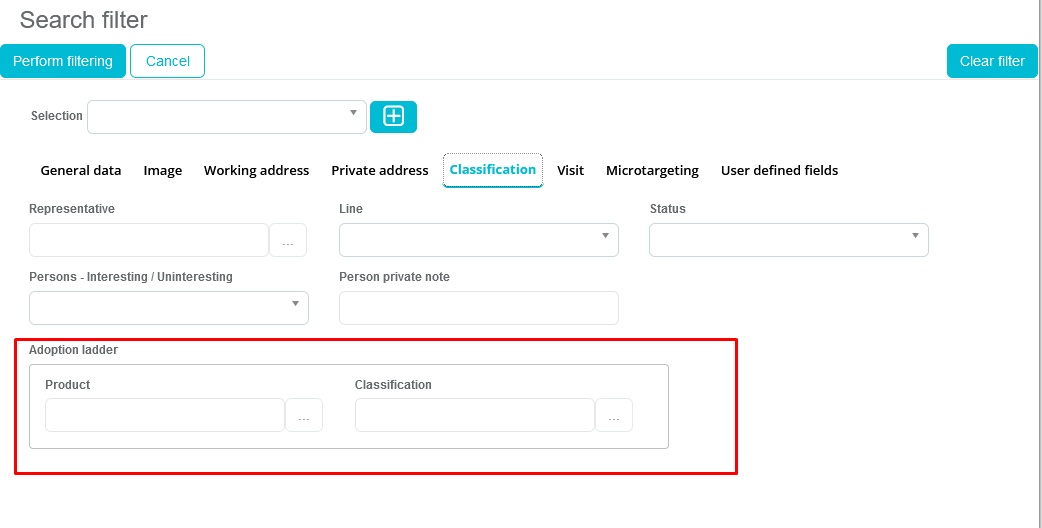
For more complex search, you can use Filter. Press on the Filter button on top right part of screen and window like the one on picture below will appear.
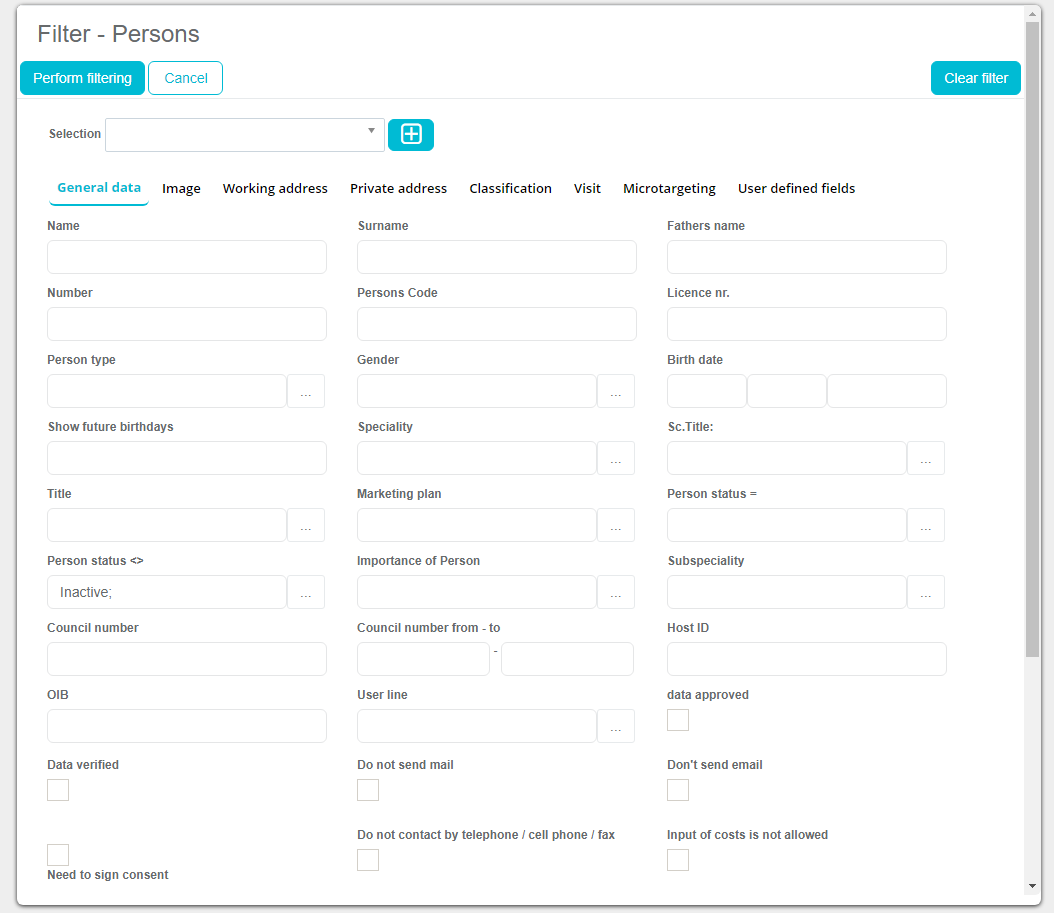
Selecting or entering specific criteria in data fields, you choose the parameters by which you want to filter the Persons (name, surname, type, gender, marketing plan…). Once you have chosen the parameters click on Perform filtering button, and all the results which meet the criteria will be shown. Different criteria can be enrolled in various tabs that are available (General data, Working address, Private address, Classification and others).
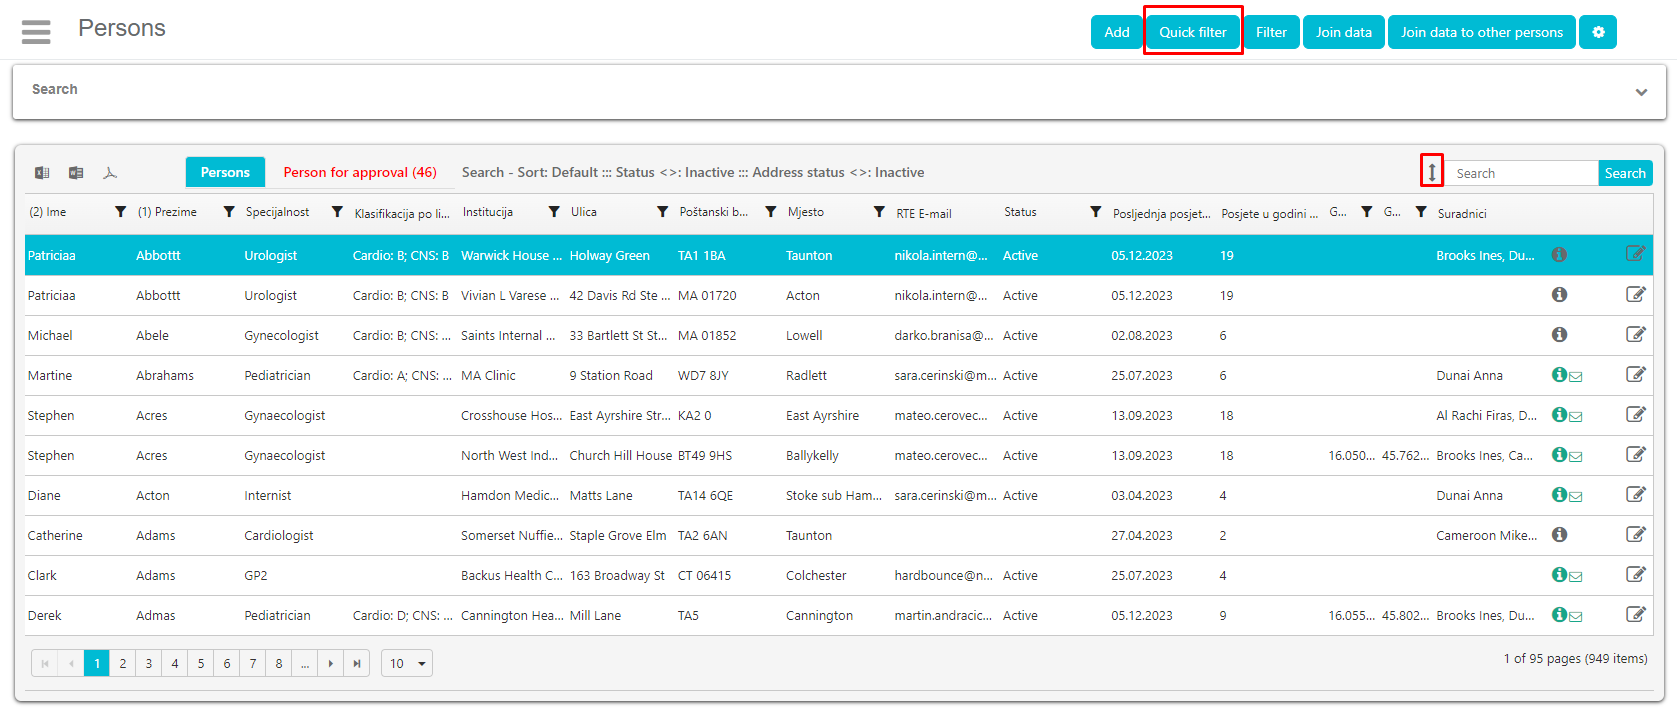
Quick filter
Quick filter doesn’t have as many parameters to search by as “Search filter” which we like to call “Deep filter”, but the premise is the same. We can access it by either clicking on the “Quick filter” button in the top right corner or clicking on the little button right of the search parameters, as shown in the picture below.
Adding new person
By clicking on the Add button on top right side of screen, next to the Filter button, window for adding new person will open. On top part of the screen there are nine options/tabs – Basic, Working address, Private address, Joined representatives, Image, System data, Additional person data, Working time and User defined fields. User defined fields will be explained later on. By pressing each button, new screen will open where you can enter data about a person. Basic is shown by default when adding a new person.

After entering all data click on Save button on top left side and person will be saved.
Basic
On Basic tab you can enter basic data about a person, like person name, speciality, birth date and so on by using your keyboard or choosing an option from drop-down list.
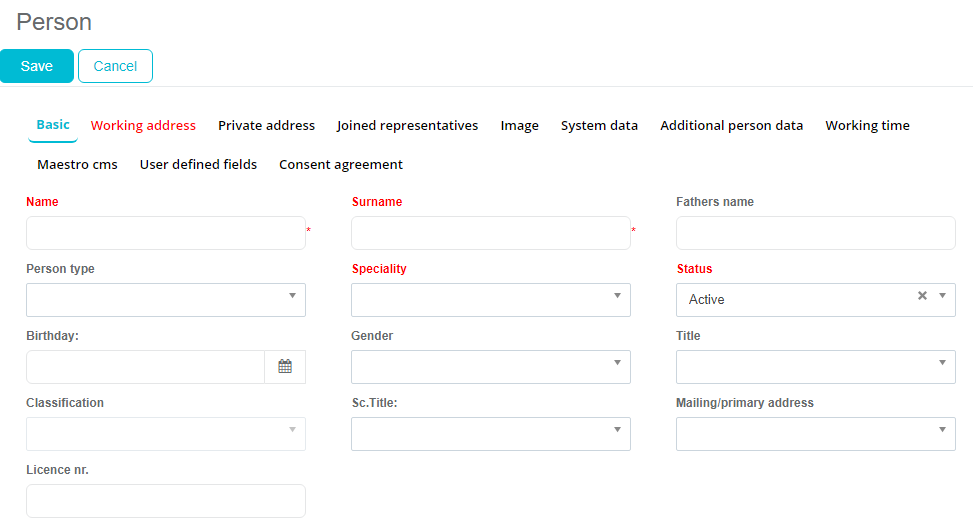
Fields Surname, Status and Speciality in Person view are mandatory. If you do not enter data for one of those fields and press Save button you will get a warning message. Other data you want to enter is optional.
Working address
Besides the basic information, the second tab is the Working address. There is also mandatory information that must be entered for each person. This data is closely linked with the information about the institutions.
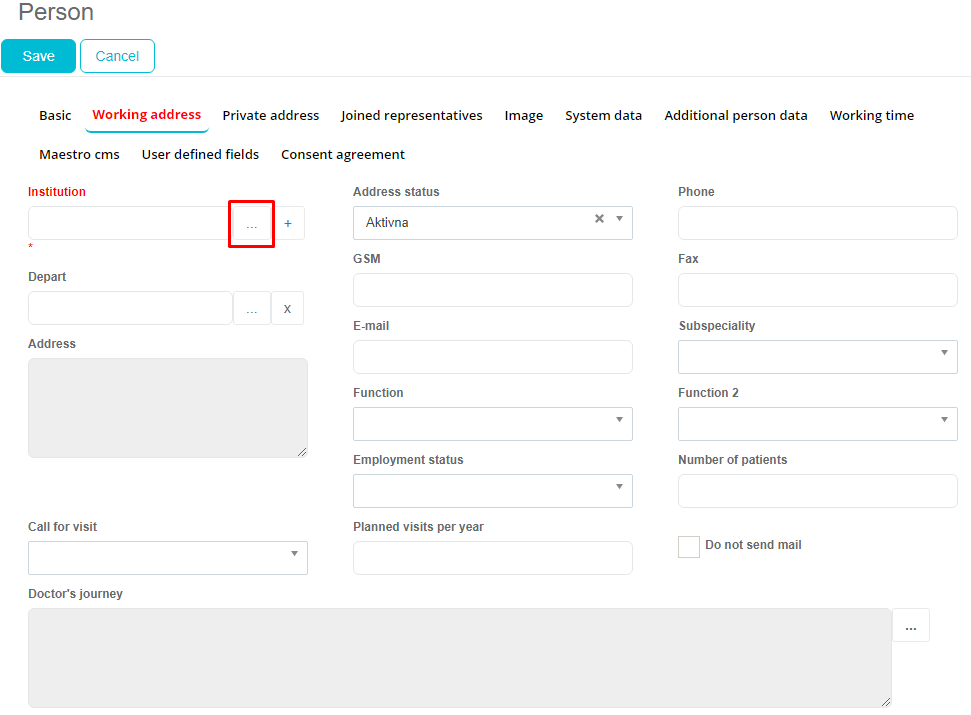
Here you can enter data for person's working address, like Institution where person is working, address status, city, phone and so on.
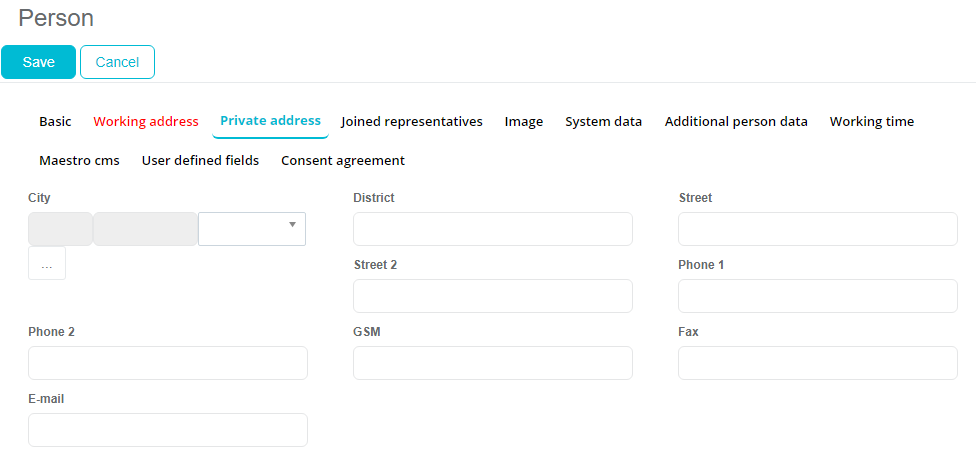
Private address
In this tab you can track information about the private data about person.

Fill the informations like Street, Phone, Mobile Phone and similar.
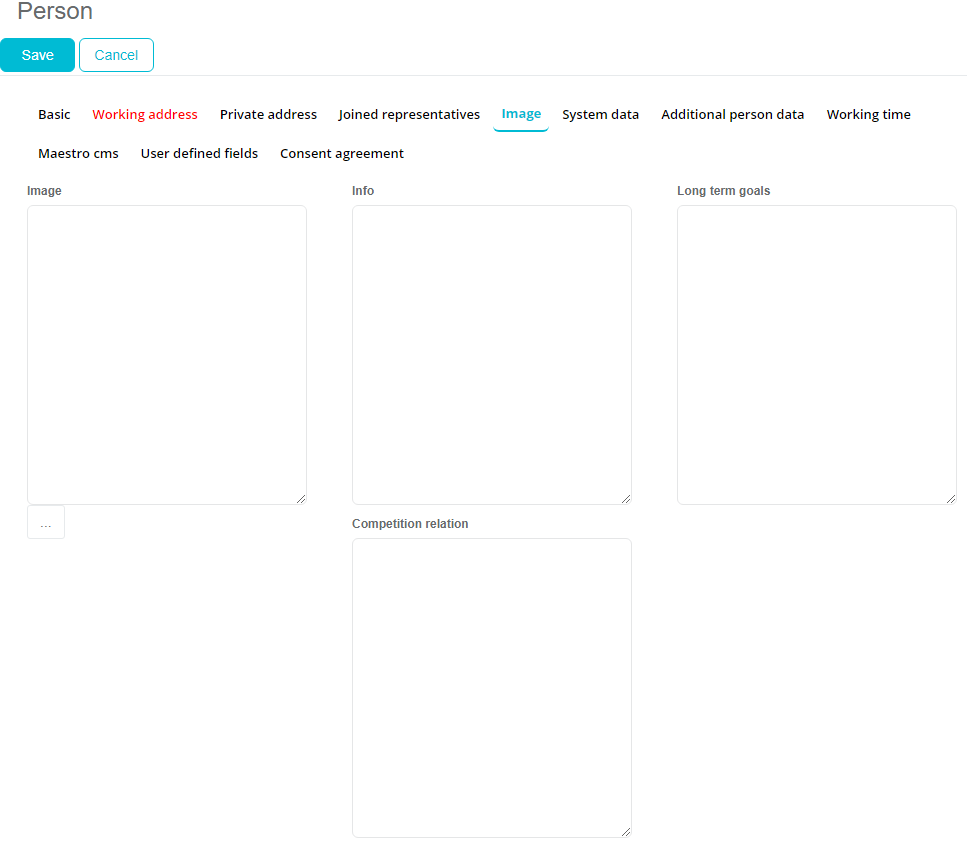
Image
Under Image tab you can write some more additional information, like sports, hobby or info.
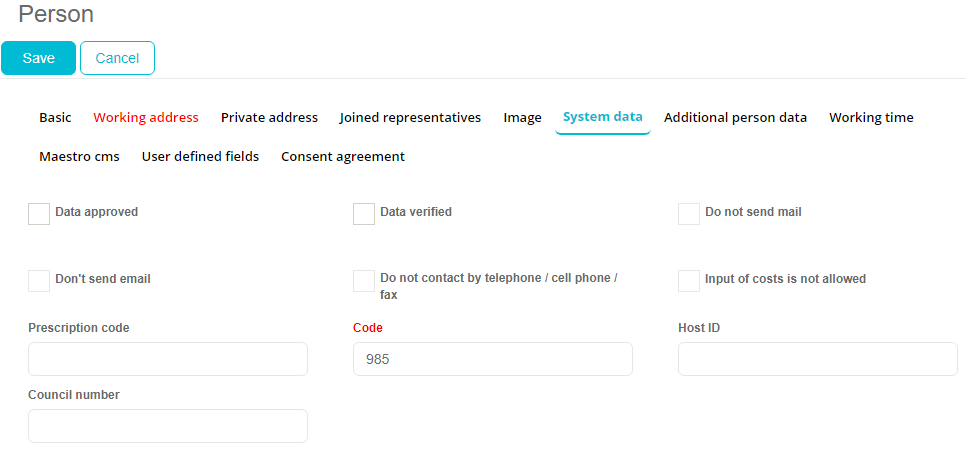
System data
This tab is used for additional system data.
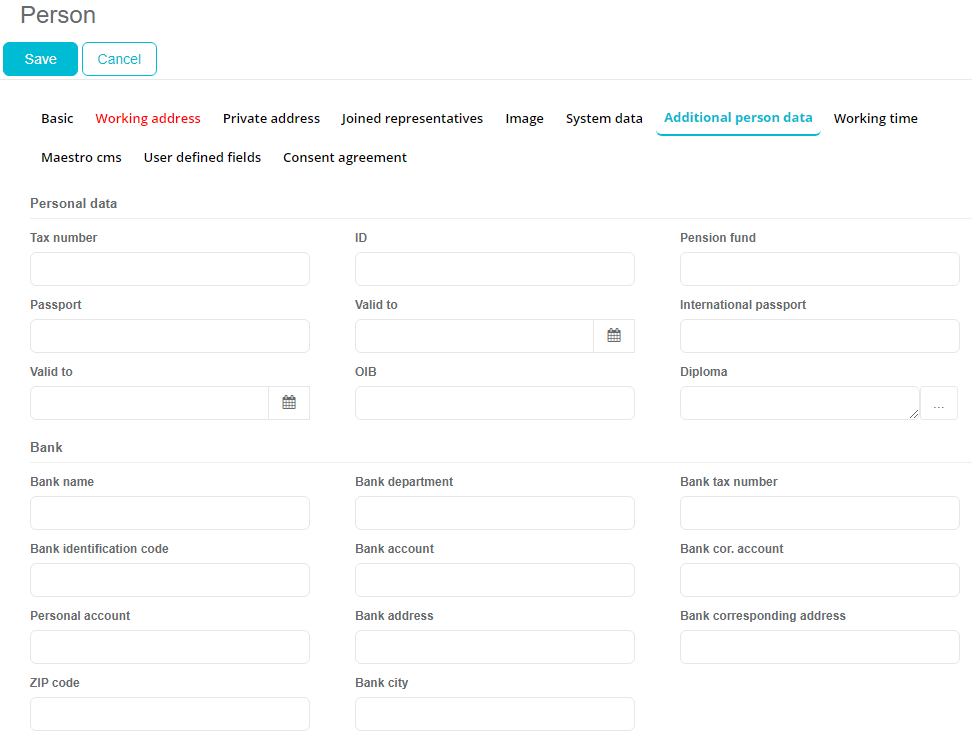
Additional person data
Under the tab Additional person data you can write more personal information like Passport info, Bank account info and similar.
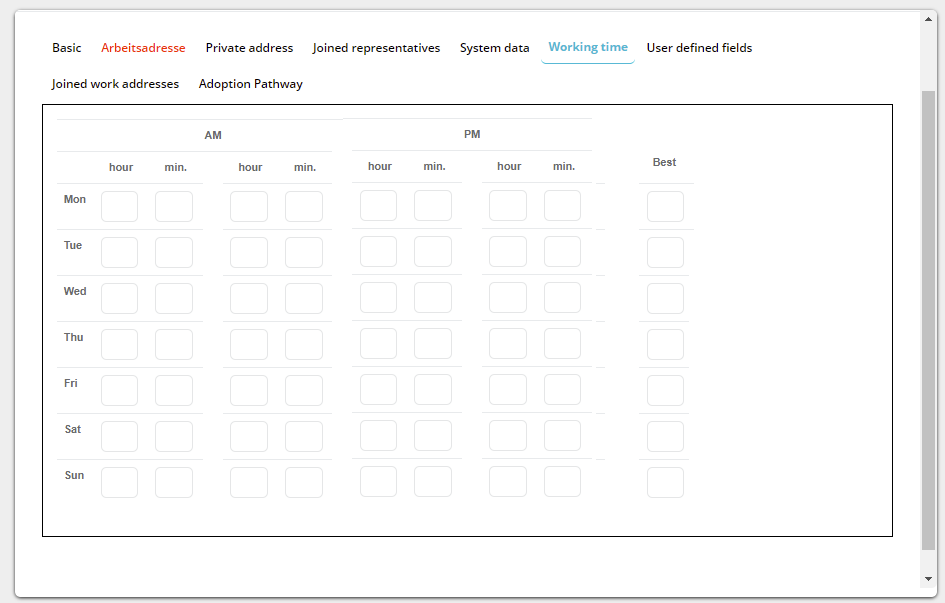
Working time
Under tab Working time you can set when person is working and enter additional info about that.
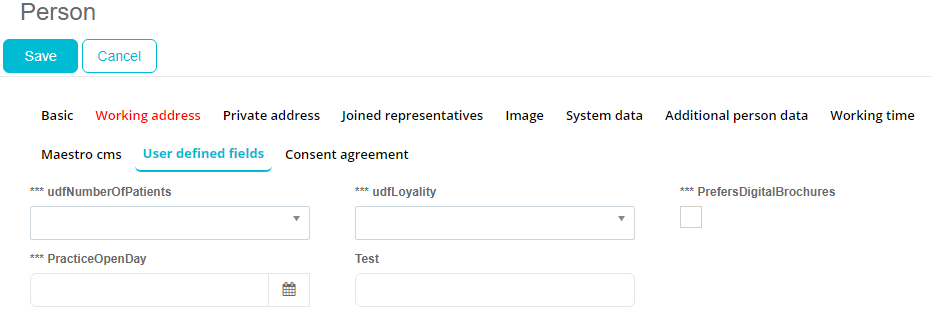
User defined fields
User defined fields tab is use to enter info about fields that are created by Admin. This will be explained in details later in manual.
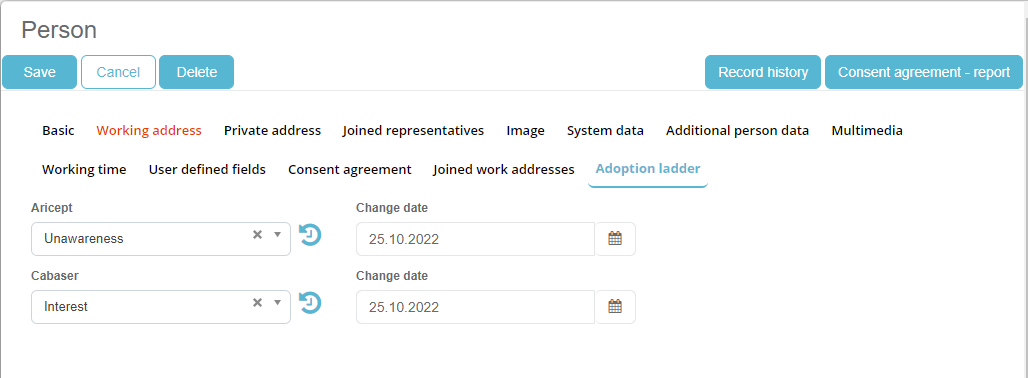
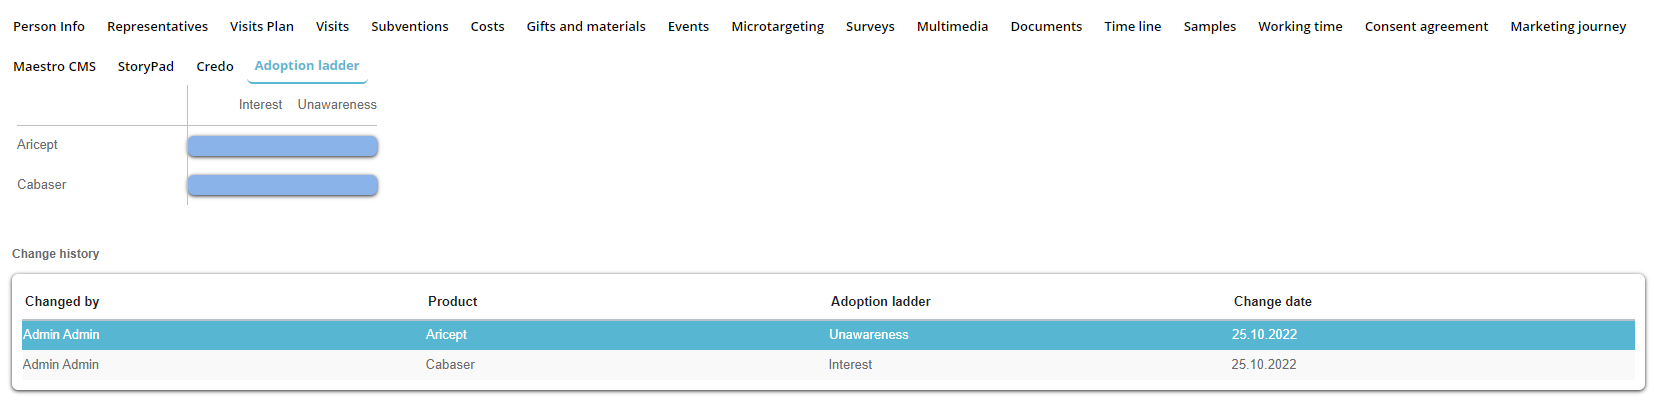
Adoption ladder
Feature that shows products added to the adoption ladder with a dropdows menu where you can select the stages defined in the codelists in the admin. When a stage is entered, a new field pops up named Change date which is populated with today’s date by default. There is also a small “Time button” which shows the history how the values are changed; date of the change and user who performed the change.
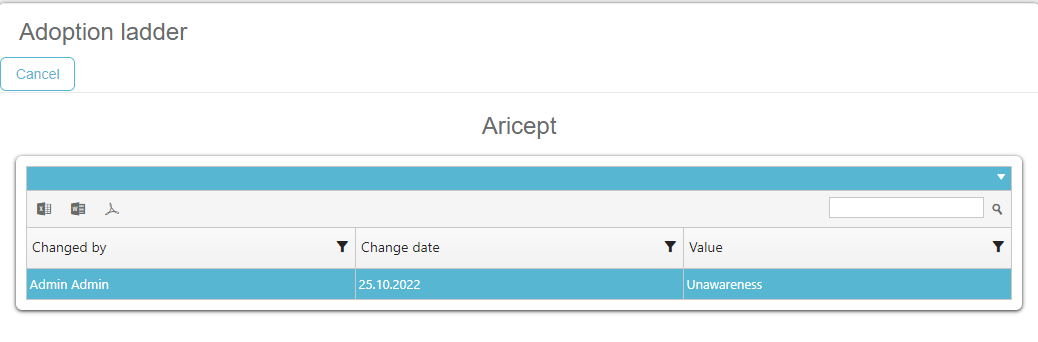
Filtering by adoption ladder product and classification is also possible in deep filter of persons module. When using the filter for Adoption Ladder, the application returns persons that comply with parameters used (combination of product and classification).
Editing and deleting persons
To change the data for a person, first it is necessary to select a person which you want to edit. When you find a person, simply click Change button. The same view as on adding a person will be shown. You can edit data here under tabs and press Save when finished.
If you want to delete a person from the database, select the desired person and click Delete. You will be asked to confirm the delete, just click OK (be sure you want to delete selected person because this can not be recalled).
Person tabs
Lower part of the window shows detailed overview of the selected person’s data. Details are grouped in several tabs: Person info, Representatives, Plan, Visits, Subventions, Costs, Gifts and Materials, Events, Microtargeting, Map, Survey, Multimedia, Samples and Working time.

Person info
Person info tab shows some general information about the person such as: person type, surname, name, specialty, e-mail, phone, GSM, working address and more.

Representatives
Tab Representatives gives an overview of which representatives are responsible for the person selected. All representatives are listed along with the information when was the last visit, plan for the next visit and classification of the person for this particular representative. Uninteresting field shows whether a person is interesting for the representative or not. That means if the uninteresting field is marked as 1, the user (representative) does not see the selected person.

Sometimes there is a case that persons from certain institution have been joined to the representative which representative doesn’t want to / doesn’t have to see, so by clicking on the representative name and clicking on “Uninteresting” would remove that person from the person database of the selected representative.
Plan
Plan tab gives you a very simple overview of all planed visits for the person. System will give you the overview of all the plans, from all the representatives (and central users) who plan to visit the selected person. Sales Vision also saves all of the historical data about planning and that information is always accessible. On the right part of this tab you can find button Add for creating new plan. If you would like to edit a plan, just simply press on the plan from list.

Visits
Unlike previous tab, where only plans are shown, here you can see a complete overview of all of the plans that actually took place for selected person, with the information about the visit (date, representative, type of visit). Like on the previous tab, on the right part of the screen, you can find Add button for creating new visit, or you can press on a visit to edit or see detailed information about it.
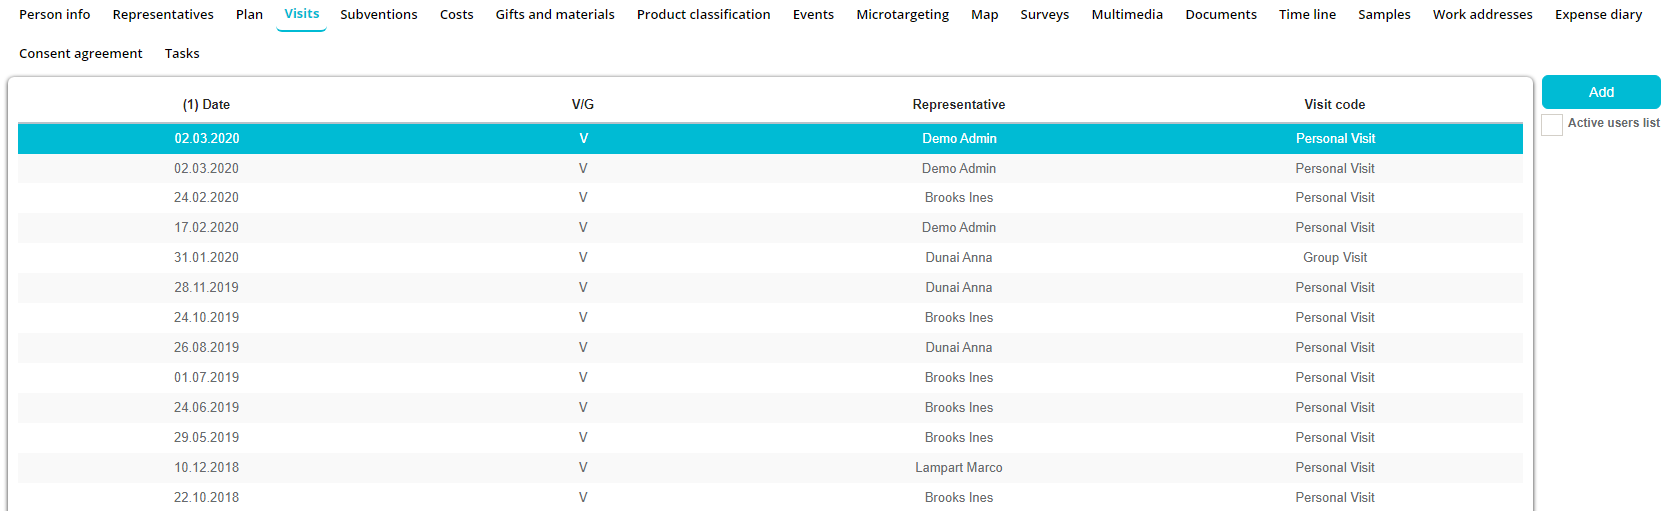
Visits was explained in details earlier in manual.
Subventions
If you click on the tab Subventions you will get a window similar to the one below. Here you can add a subvention for the selected person. To add a subvention click on the button Add.

New window for adding subventions will open. It is necessary to fill in all the details about subventions and press on the Save button. After saving, subvention appears on the list.

Costs
Costs tab gives an overview of all expenses that have occurred for selected person. Information shown in this window is cumulative for all costs occurred for the person. Costs for last three years are displayed.

Gifts and materials
By clicking on the tab Gifts and materials, you will see a list of all the gifts or materials that are given to the person. All information regarding the costs are recorded in other parts of Sales Vision, this represents only part of cumulative review of all expenses occurred for each person. Exceptional for this are the subventions which can be entered in this part of Sales Vision as well.

Events
Tab Events gives an overview of all the events on which selected person participated and in which role.
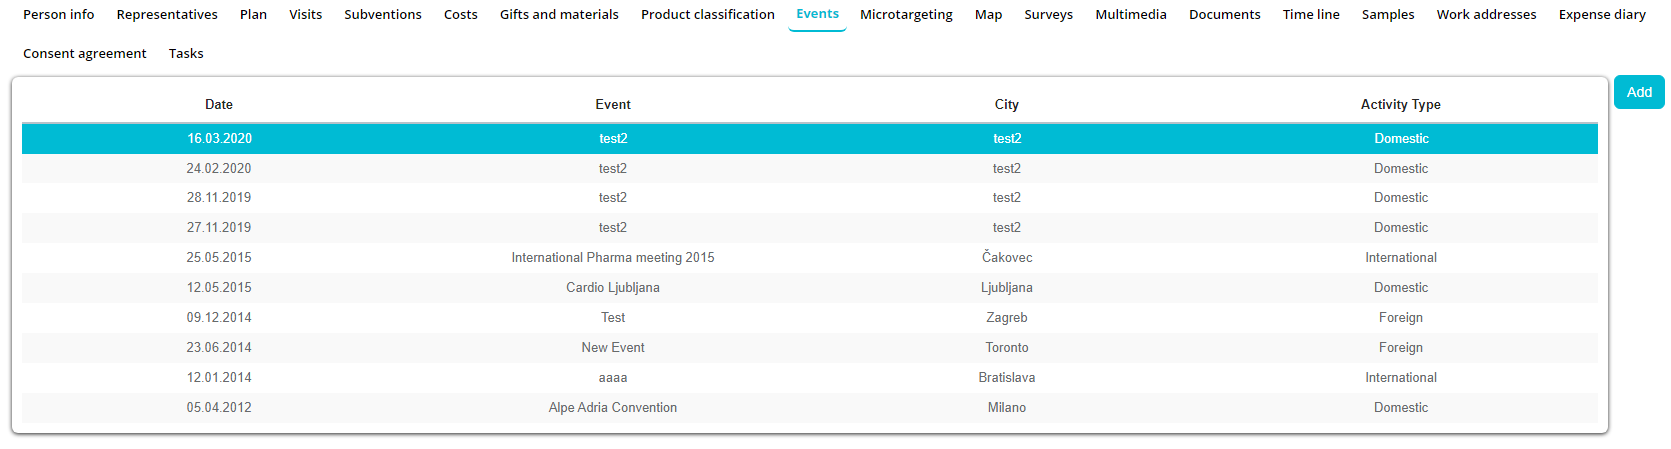
Adding new event for the selected person can be done by pressing on the button Add. After which new window to add an event will appear.

In this window, it is necessary to choose an event at which a person was and in which role the person participated.
It is not possible to add a new Event here. In this window, you can only choose from already entered Events. Entering the new Event is described in section Events under Calendar module.

Editing information about the selected person can be done by pressing on already created record in list.
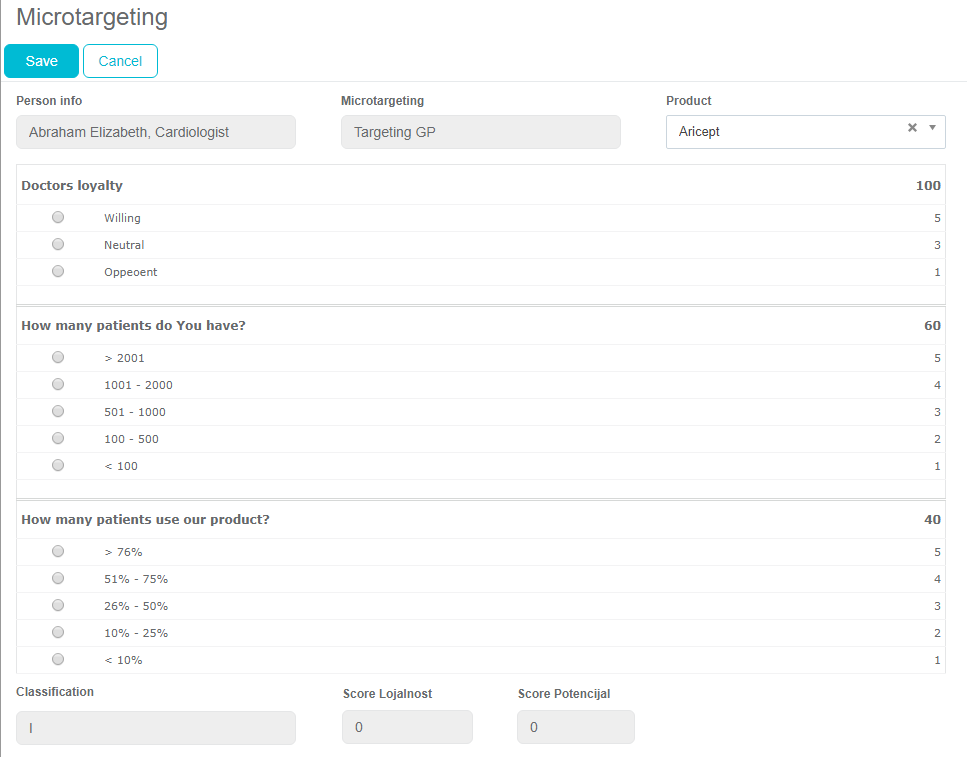
Microtargeting
Tab Microtargeting gives an overview of all microtargeting actions performed on this person, by all users.

Click on the Add button opens a new window for adding new microtargeting. Adding and editing Microtargeting will be explained in details later in manual.
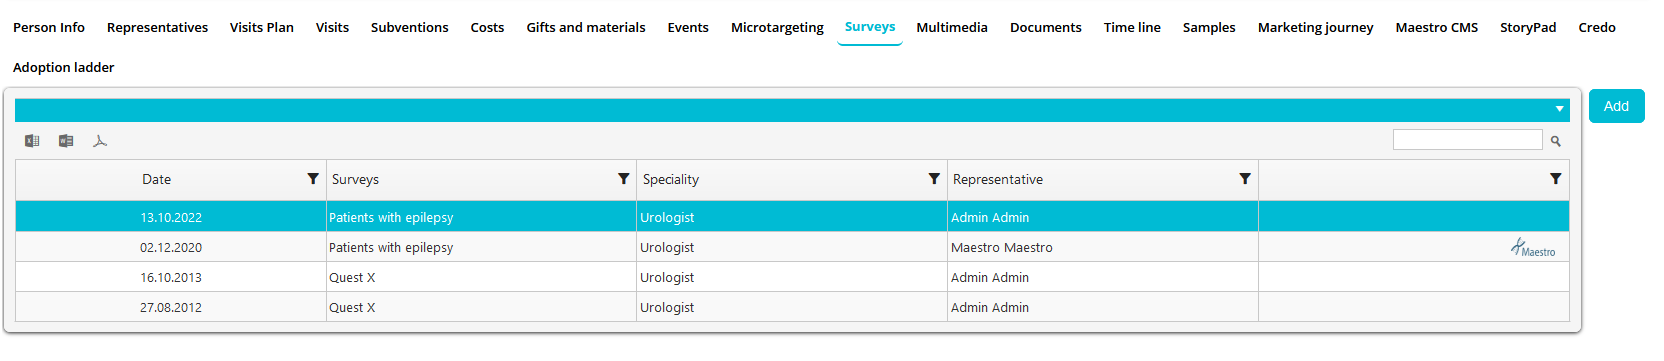
Surveys
In this module you can see columns: which shows us when the survey was sent/presented to the person Date – shows us when the survey was sent/presented to the person, Surveys - represents the name of the presented survey, Specialty – which specialty the person who was sent/presented to is, Representative – which representative sent/presented the survey By pressing on “Add” we can present a new survey to the selected person.
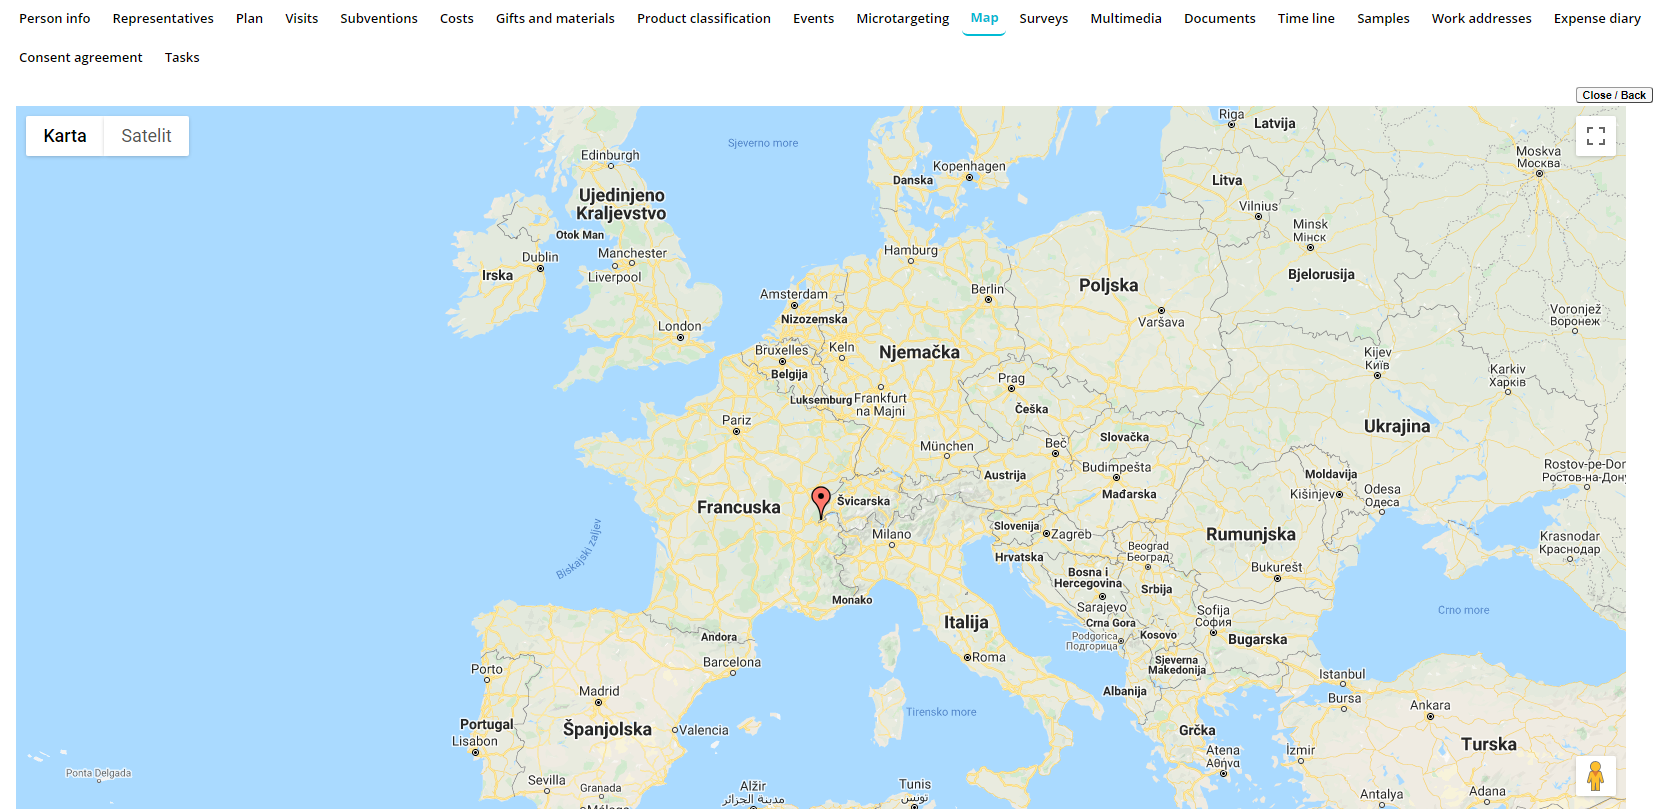
Map
In this module you can see the GPS position of the selected person on the map.
Documents
In the Documents tab you can upload or preview different sort of files: music, video and others.

Doctor’s journey
This is an option that allows you to track where each person/doctor have influence. To be more precise, it shows institutions on wich doctor/person have infuence. To access this option, you click on edit of a person or add new person, and under tab Working adress.
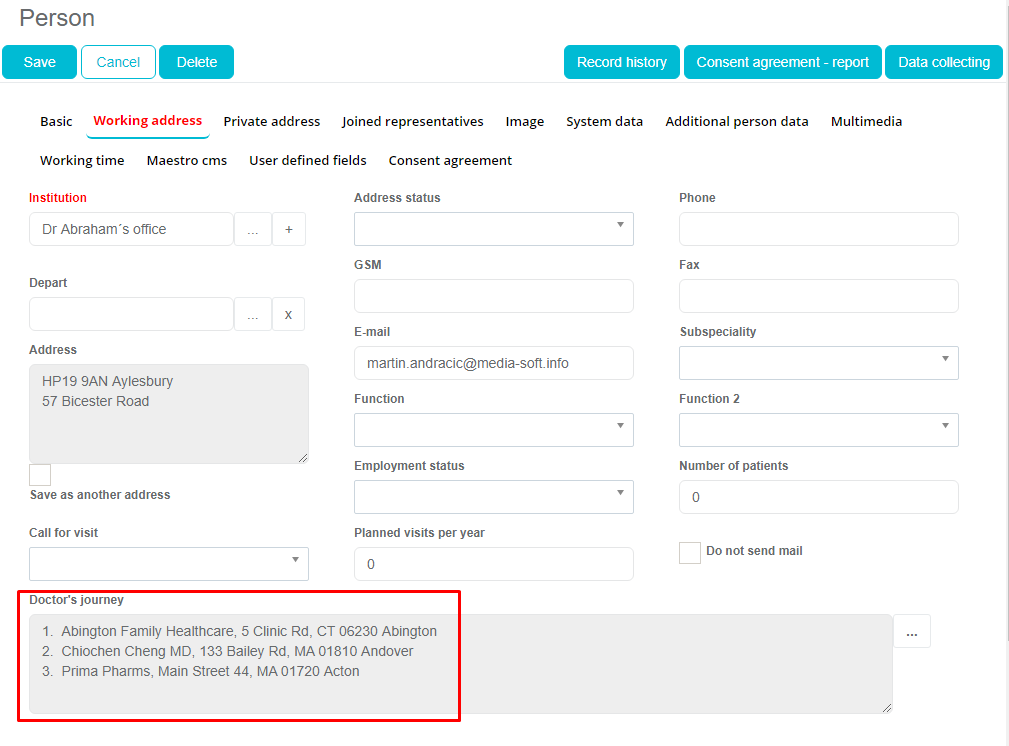
To add institution in Doctor’s journey, you need to click on “…” button and new window with list of all institutions will open.
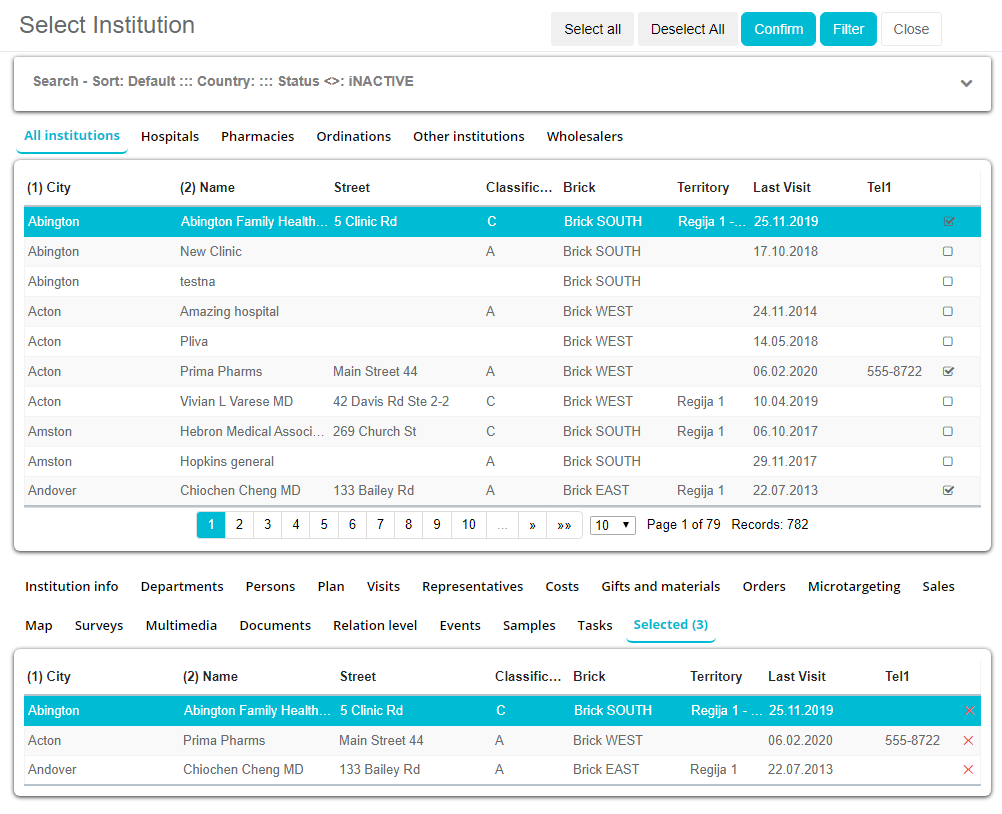
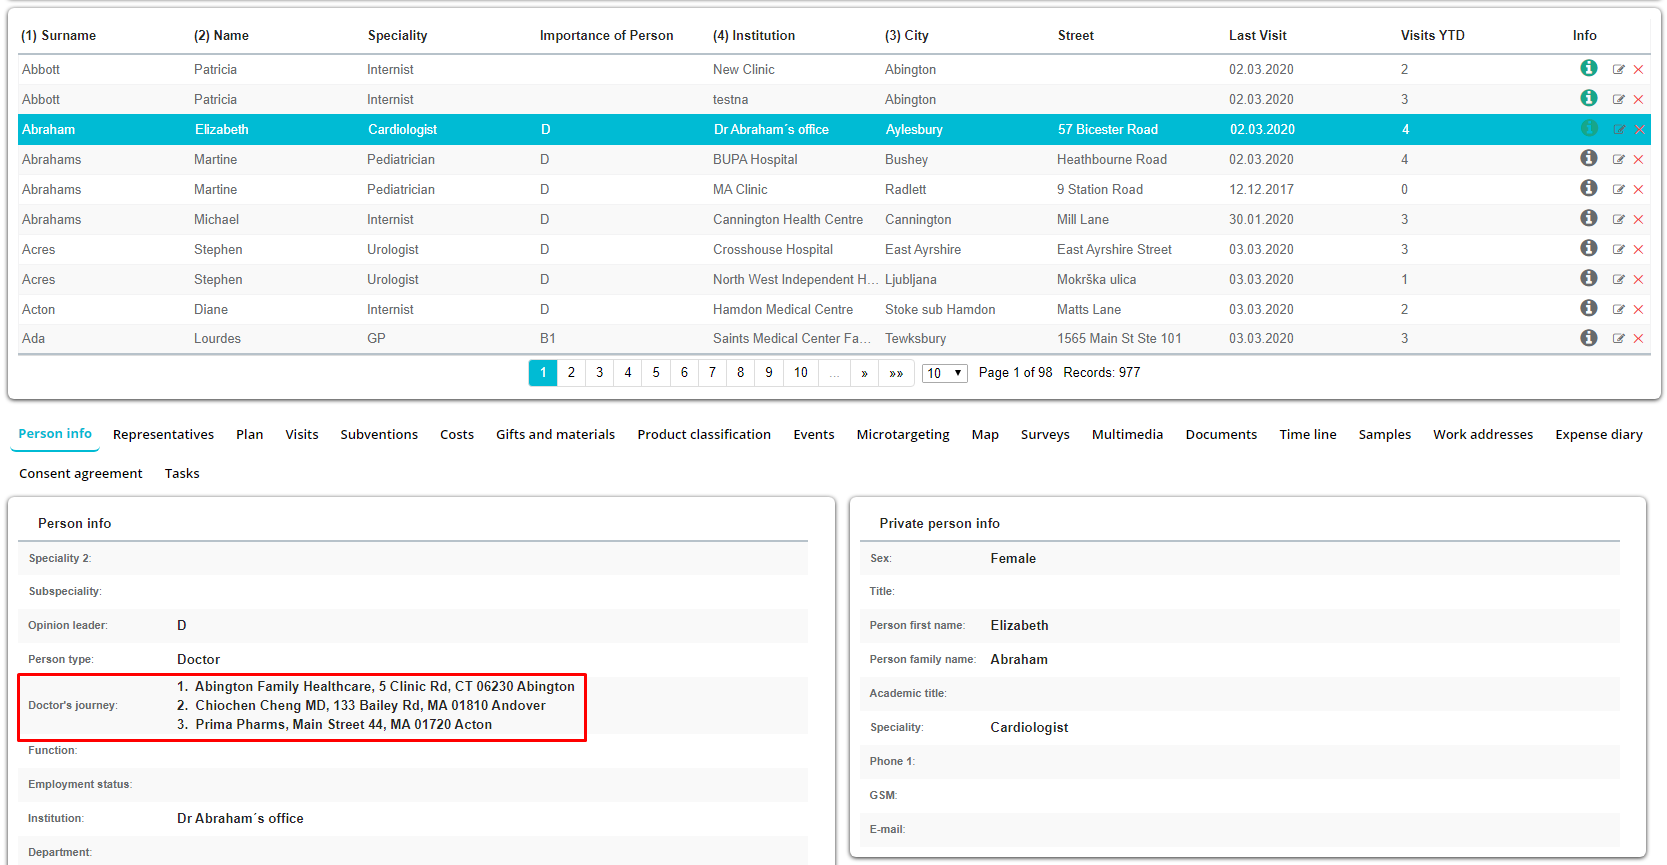
Once you have selected wanted institutions, you just click on the button Confirm. One thing that’s needs to be highlighted is once SR have made that connection, that connection will be visible in module Persons -> Persons info -> Doctor’s journey.
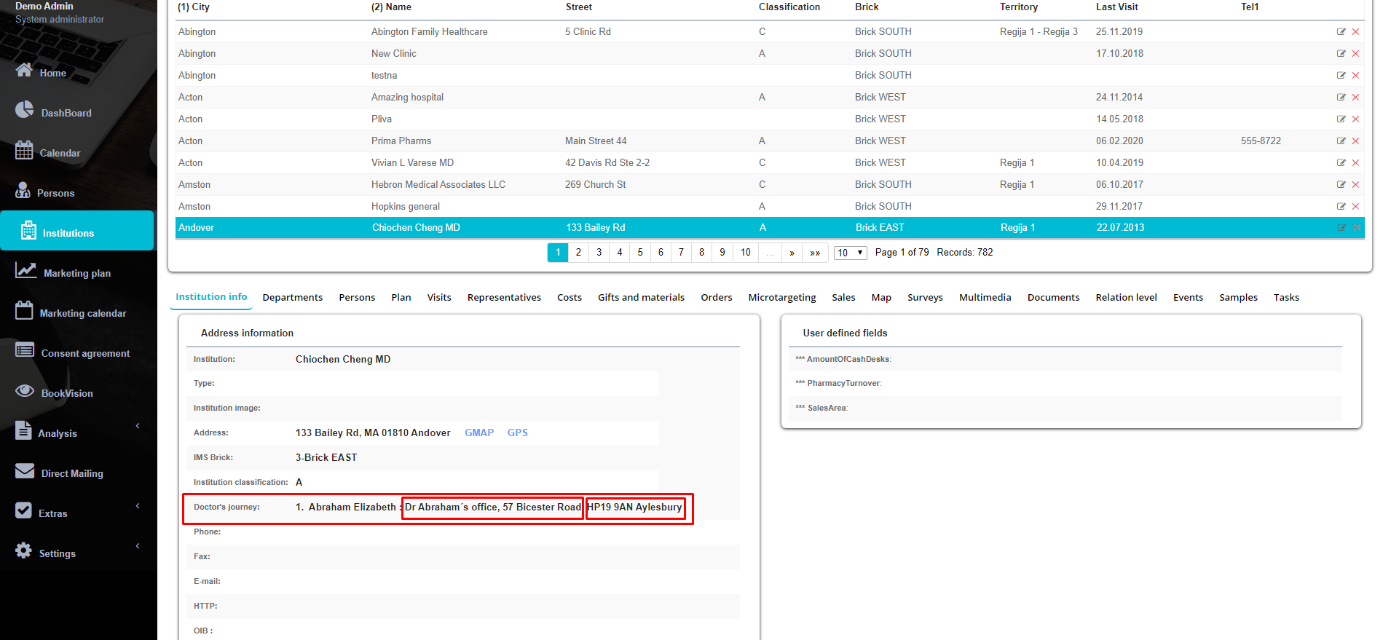
Under module Institutions -> Institution info -> Doctor’s journey , you can see if person have two working address, each working address starts with “:“ , and person starts with the number.
Maestro CMS
For each person in your database, you can create a Maestro Doctor Portal account by using SV Anywhere web platform. Use Maestro CMS tab to add new account for selected person. If Consent agreement module is turned on on your database, you will not be able to create an account without a valid (status obtained) consent agreement. If a user has stauts Expired for Consent agreement (consent agreement document has expired and agreement is no longer valid), his/hers Maestro account (login name and password) will be automatically changed and this person will no longer have access to Maestro Doctor Portal. To add a new account use Edit button.
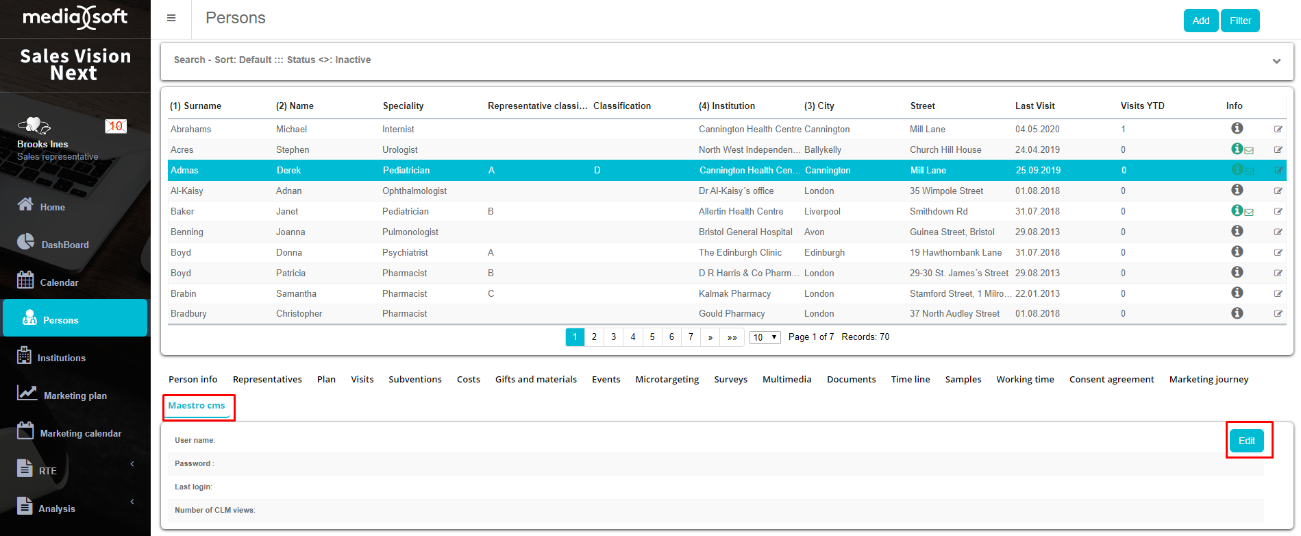
New window will appear. Write down user name and password and then save your entry.
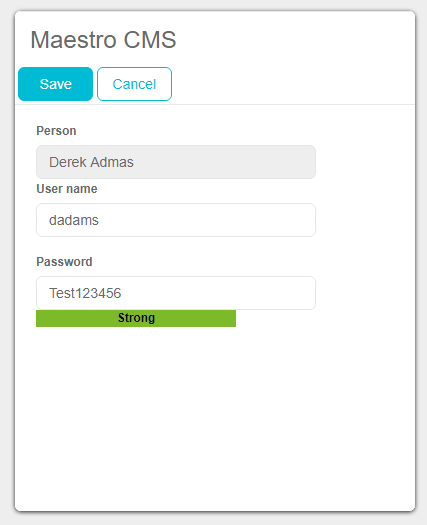
After you have saved this data, you can use button „Send login info to person via e-mail“ to send an email to doctor with information with login link, user name and password.
Adoption ladder
With the Adoption ladder enabled there is a new tab added in the Persons tab area. On the tab the list of products is displayed with the codelist stages next to the list of products. Additionally, there is a History of changes lower than the product list which shows which user has changes the status, name of the product, codelist stage name and date of the change.
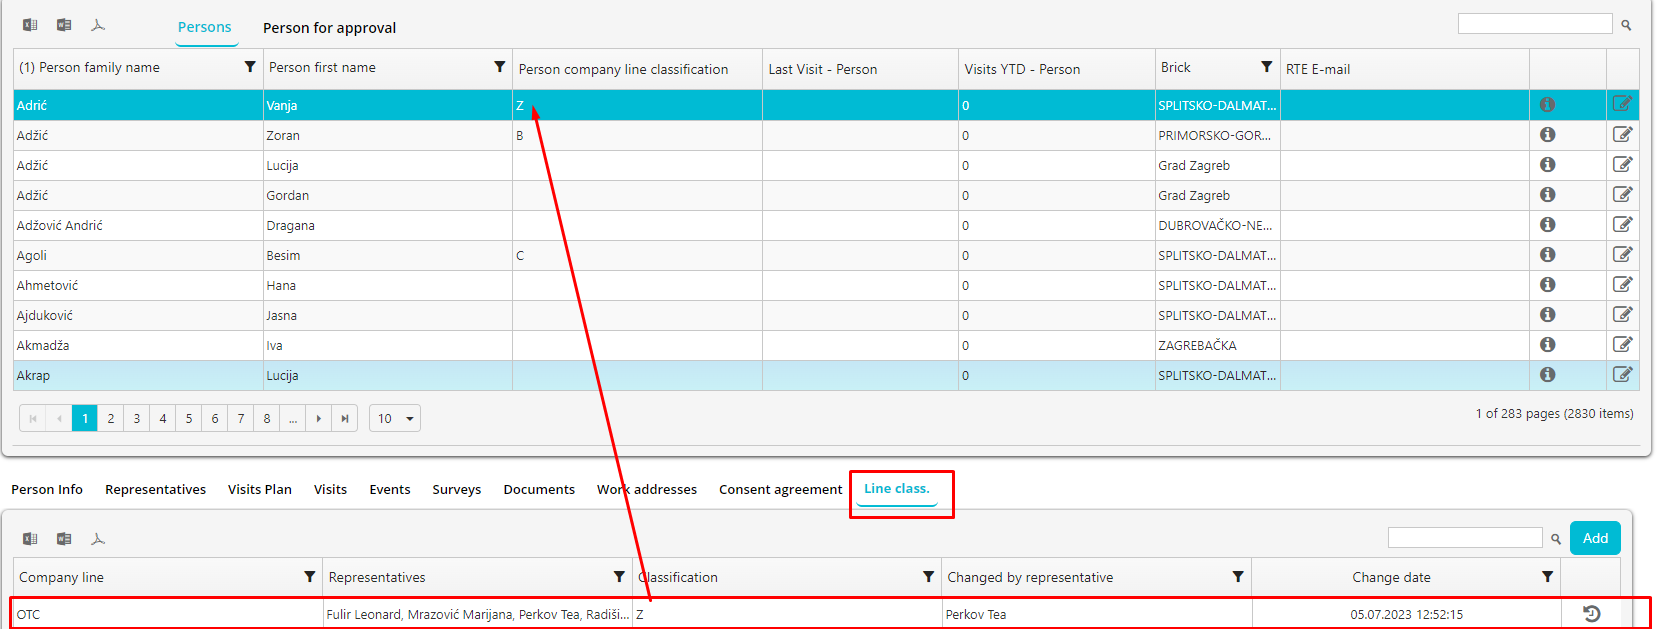
Line classification *
This tab is only visible if option 17 – Person classification is set to “by company line” (by default it’s “general”) in system options. User is able to add a new company line classification for the selected person by clicking on “Add”.
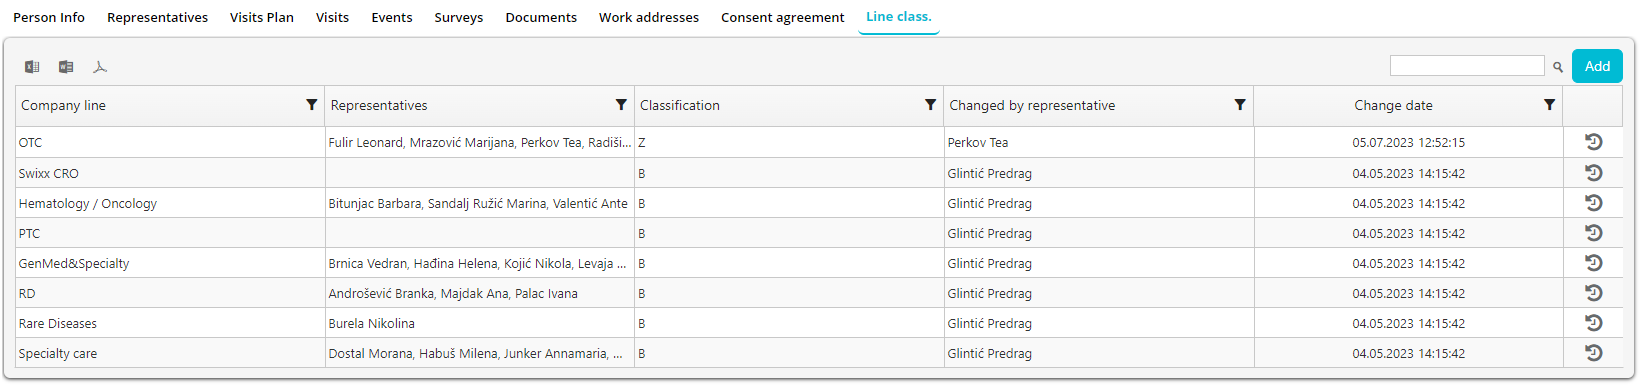
After pressing on “Add”, we are presented with this screen where we can add a new classification for the selected person.
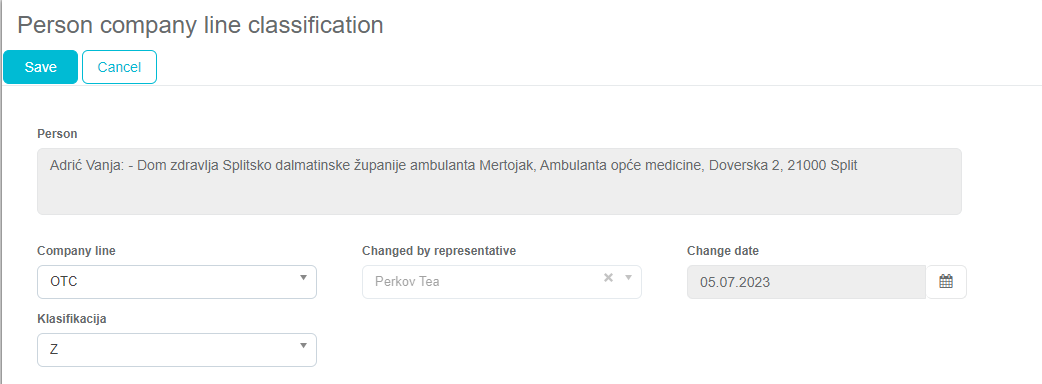
After adding the classification, we can see that person company line classification has been updated to the selected classification.
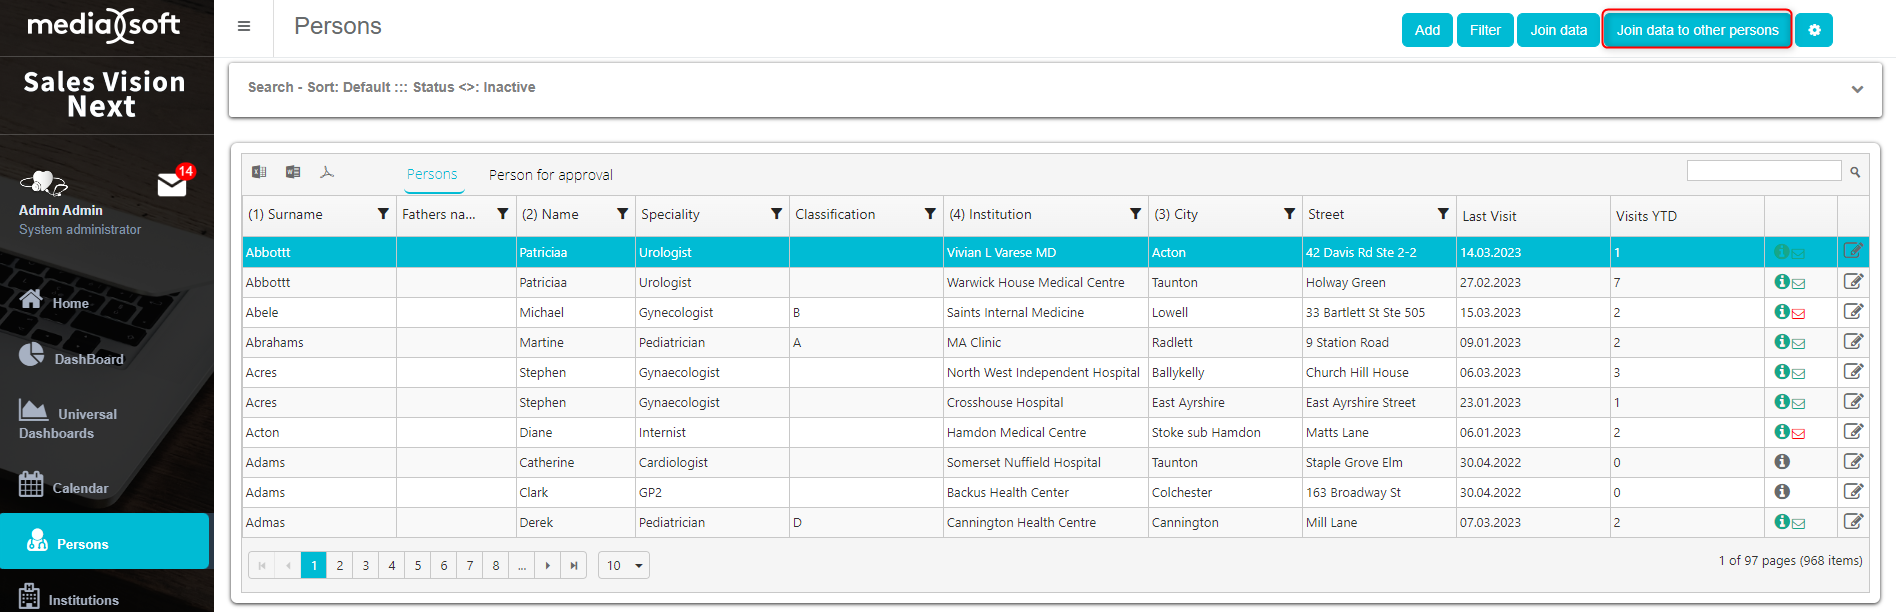
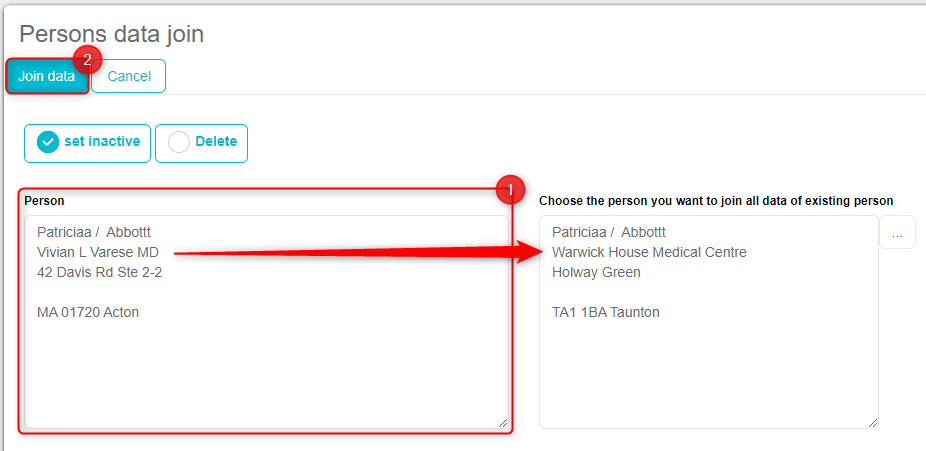
Join data to other person
Select person which data you want to join to other person and click “Join data to other person”.
Select person to whom data will be joined.

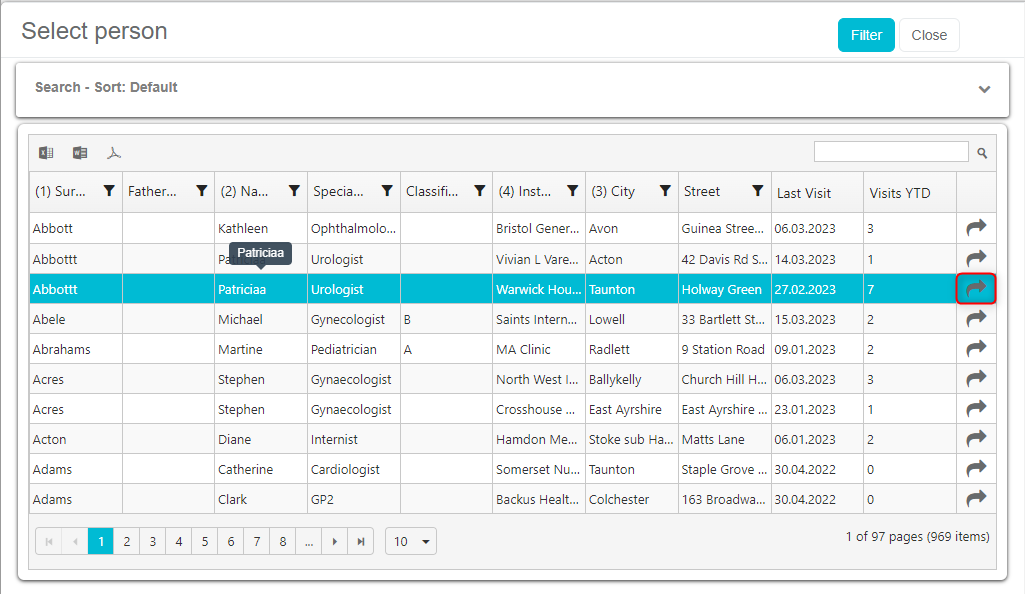
Person from the left will be joined to person on right.
Click “Join data” to join data of two persons and to delete/Set inactive person on the left side.
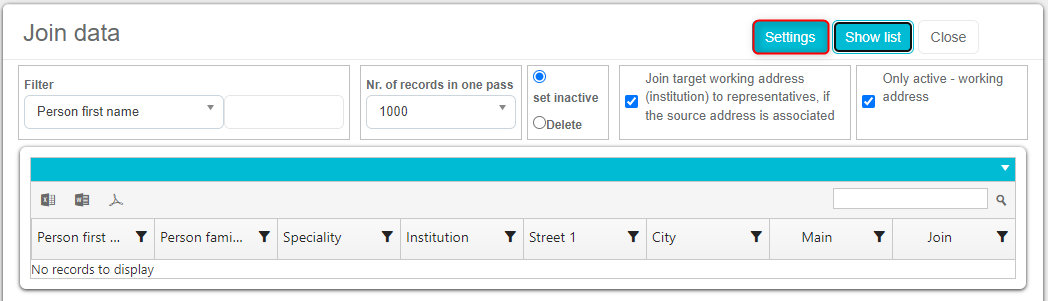
Join data – multiple persons

Click on Settings to define criteria for duplicates.
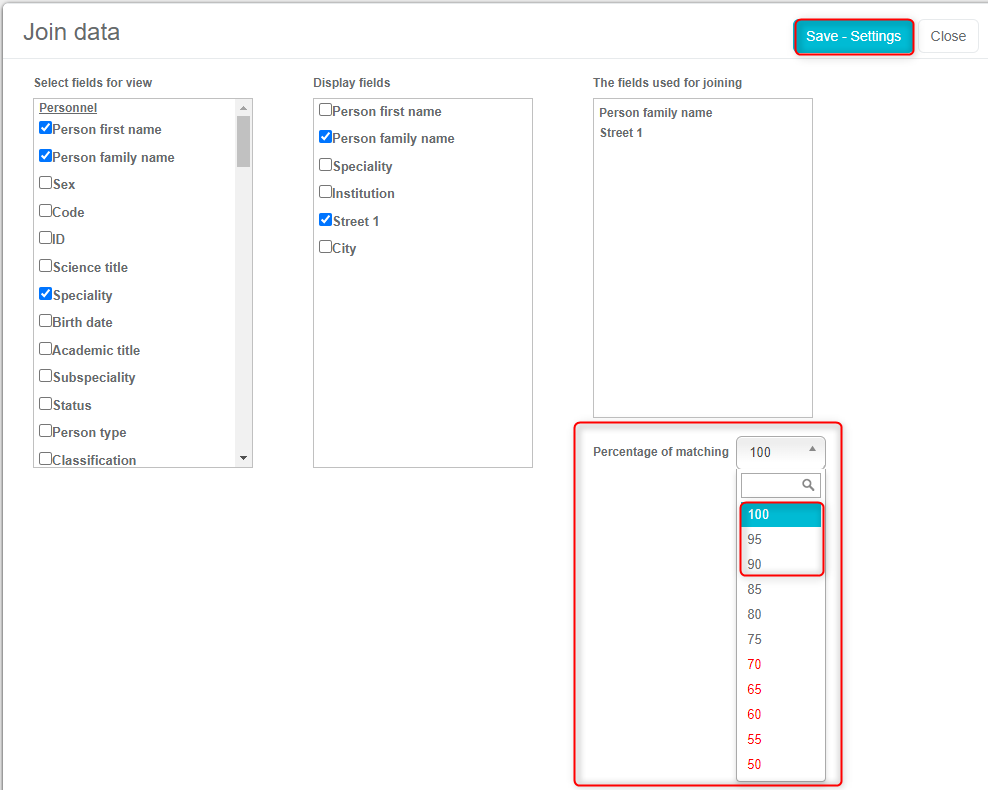
Select fields for view, display fields and fields for joining. Define percentage of matching, proposed match should be between 90-100% for best results and save settings.
Define filtering, number of records for showing on one page (the lower the number, the faster data will load), if the matched person will be deleted or inactive (our recommendation is to set it as inactive).

Filter duplicated data.

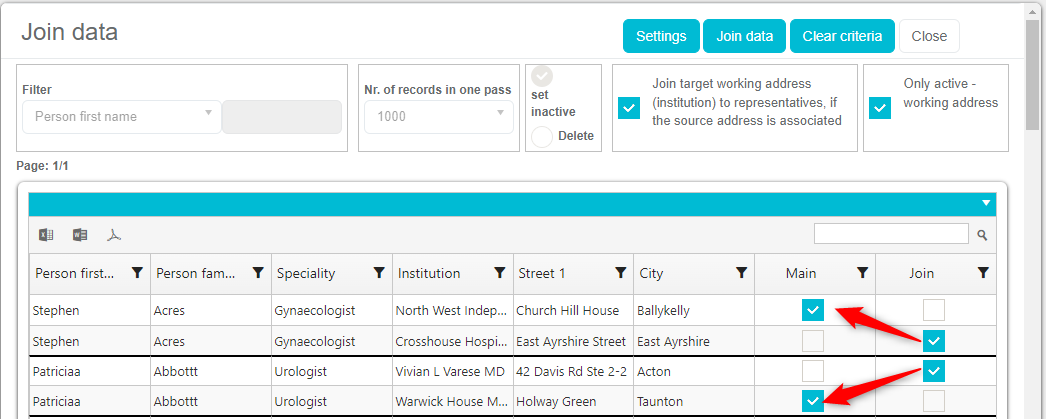
Check main record and check (JOIN column) which will be joined to the main record.
Uncheck all persons that you don’t want to join.
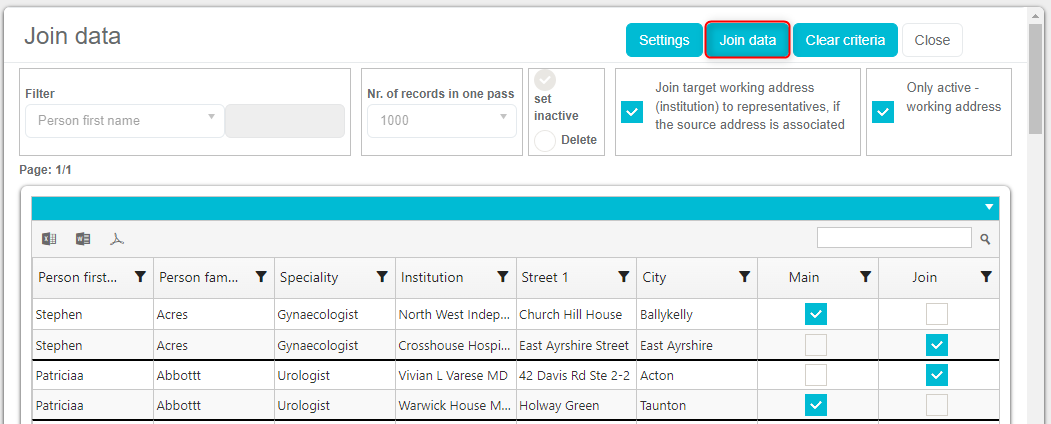
Click “Join data” to join data of all duplicated persons.
Browser customization
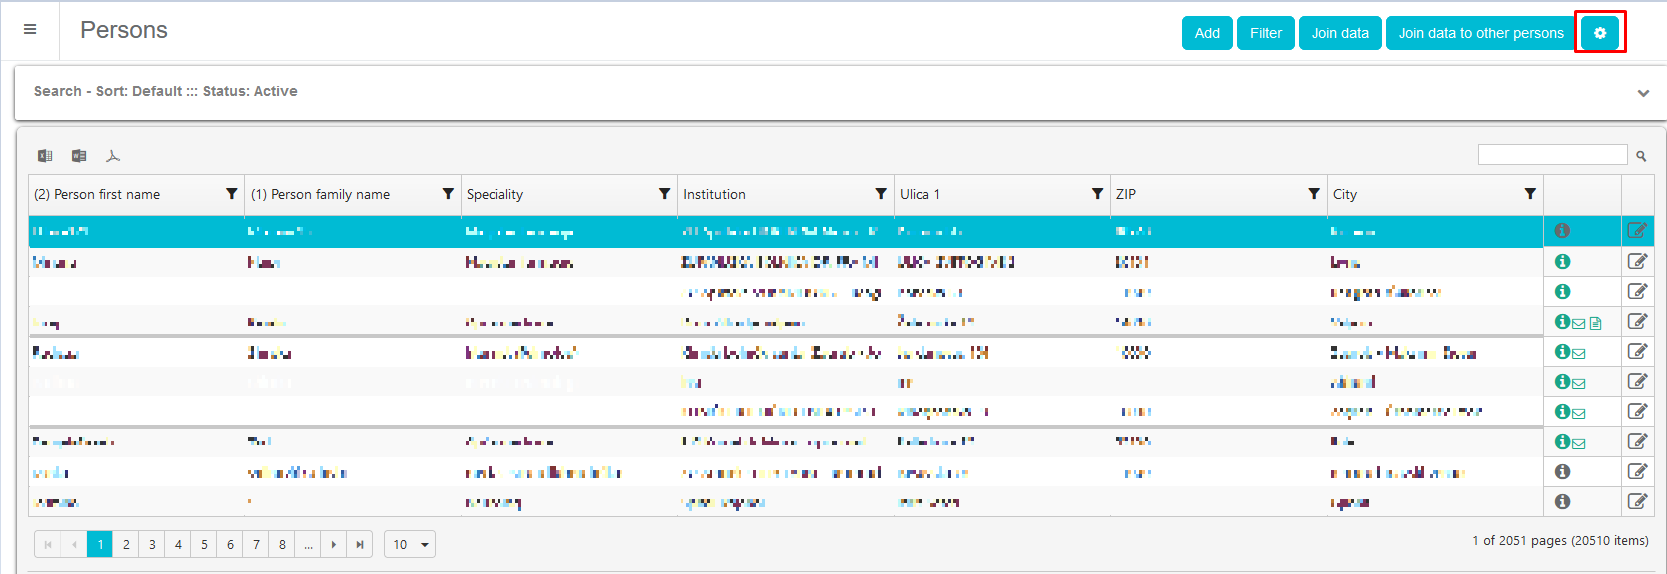
In “Persons” module main window you can customize browser.

By clicking on the wheel new window opens. Where user can edit look of his browser. Browse is by default as admin defines it, but every user can edit it for themselves.
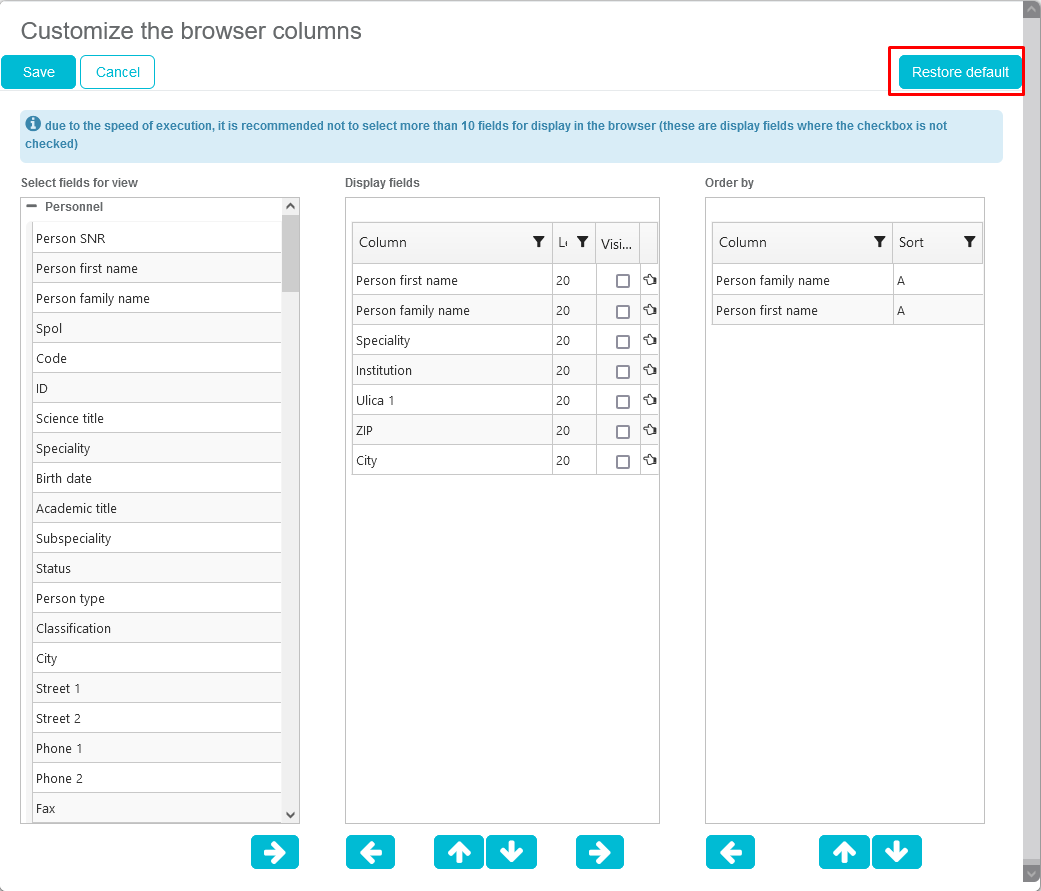
User can select fields that are displayed in his window. Admin can’t change it. Only user can return to default.
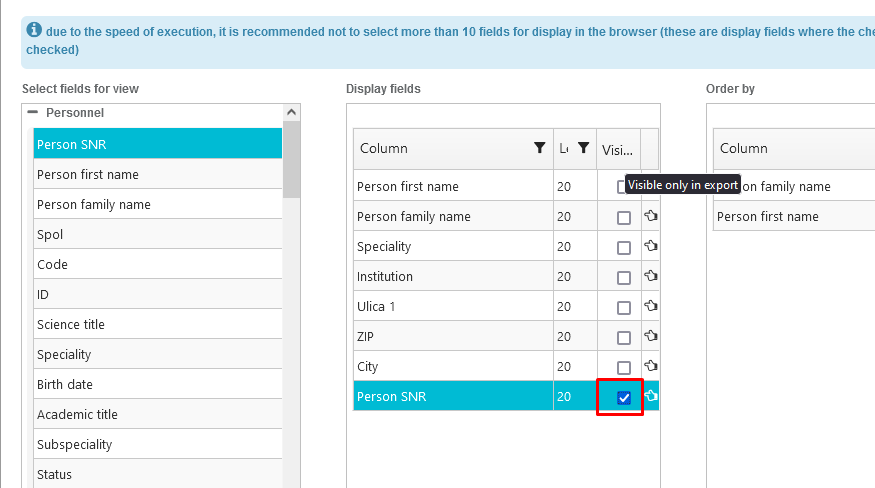
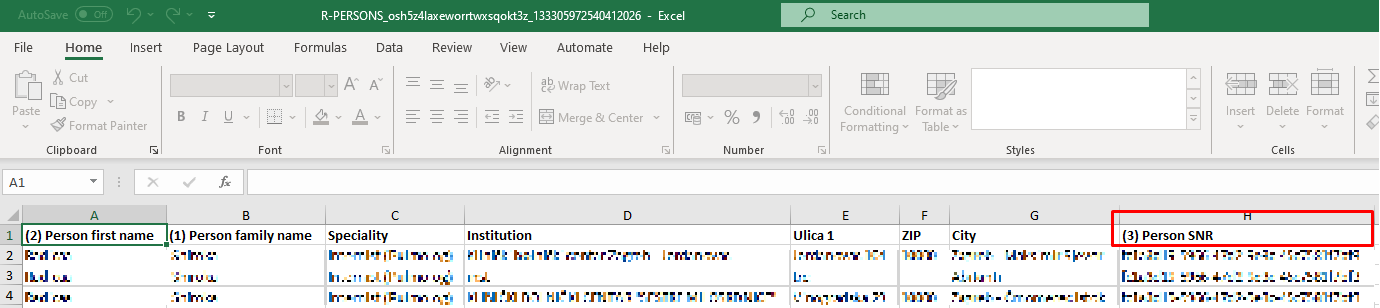
Also, there is a possibility of including fields that won’t be shown in the “Persons” module main window but when you go and “Export to Excel”, it will be included in the Excel.