Institution
In Institutions module we can search and edit existing institutions or adding new. Choose Institutions button in the main screen and Institutions module will open. By clicking on the tab Institutions, as shown on the image below, you will get a list of all the institutions in your database.
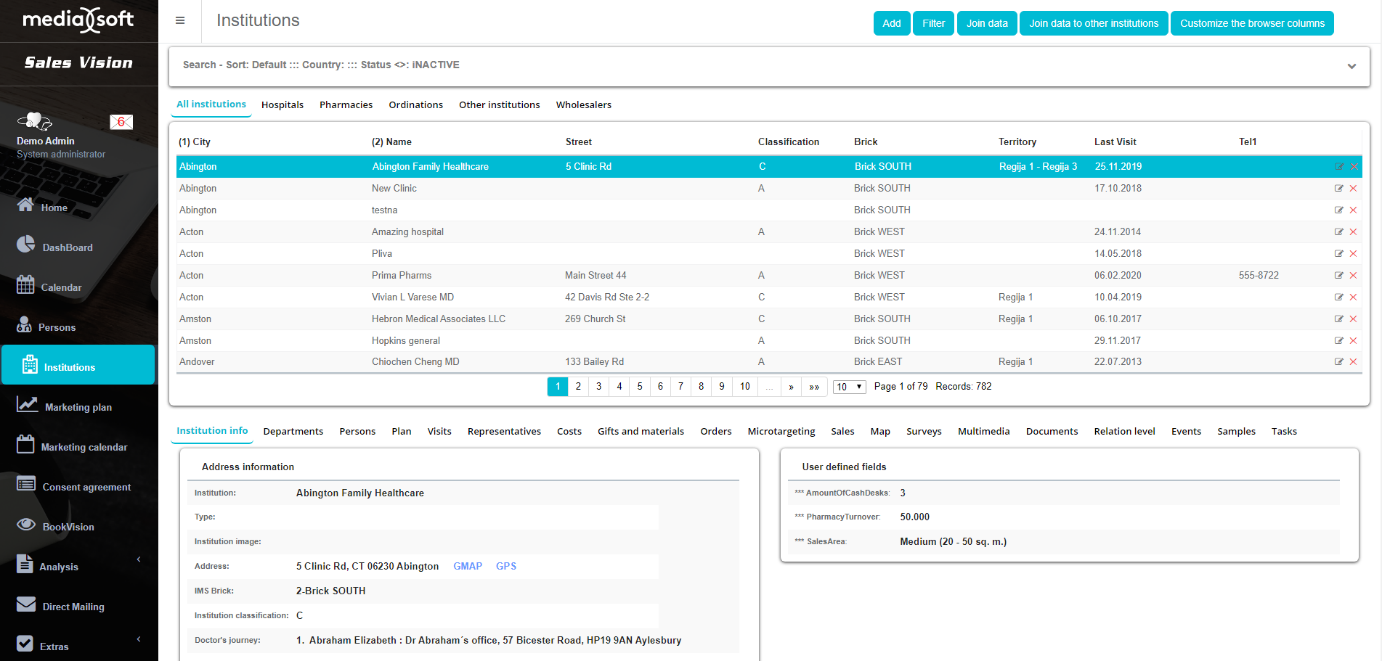
On the upper side of the window you can find filters where you can narrow your search by additional criteria (Search) like Name, City, Classification, MP, Country and Representative. While searching the data, character "%" is a wildcard that replaces one or more characters.

Institution filtering
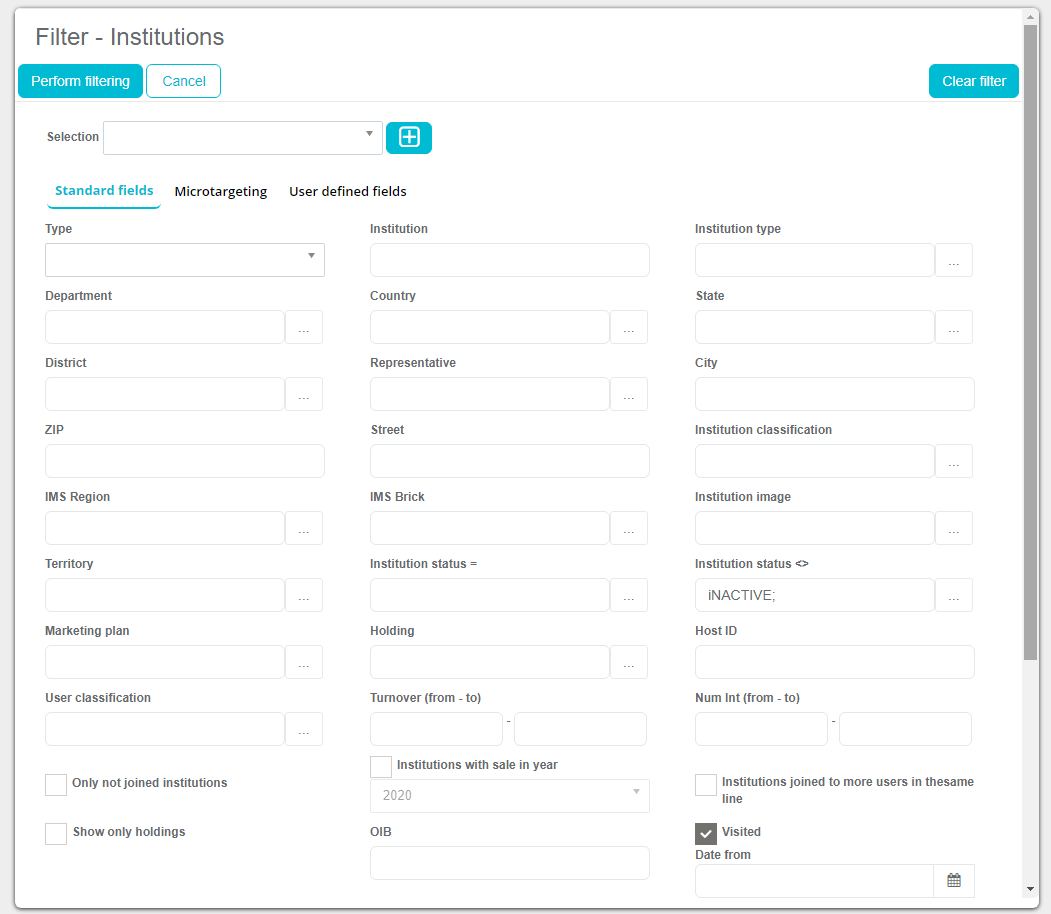
Filtering institutions works the same way as for person filtering, which is described in section Person. The difference between filtering people and institutions is only in the different information that can be filtered. This is how the window looks like after you click on Filter. You can filter by different sort of information (Institution type, Country, City, IMS Brick, Marketing plan…). Once you define the parameters you wish to filter press on the Perform filtering.
Quick filtering institutions
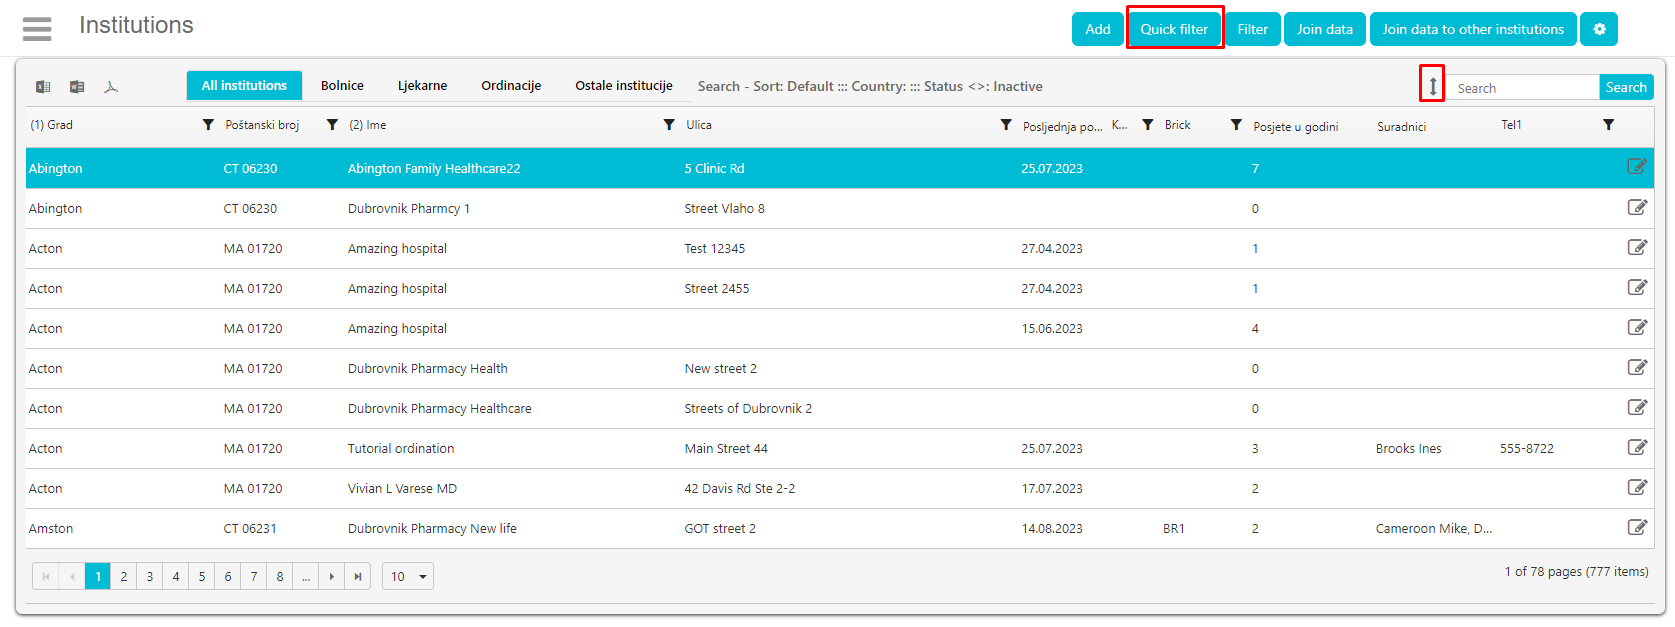
Quick filter doesn’t have as many parameters to search by as “Search filter” which we like to call “Deep filter”, but the premise is the same. We can access it by either clicking on the “Quick filter” button in the top right corner or clicking on the little button right of the search parameters, as shown in the picture below.
Add new institution
New institution can be added by clicking on the Add button, like on the picture below. Then a new window will open to enter the institution info.
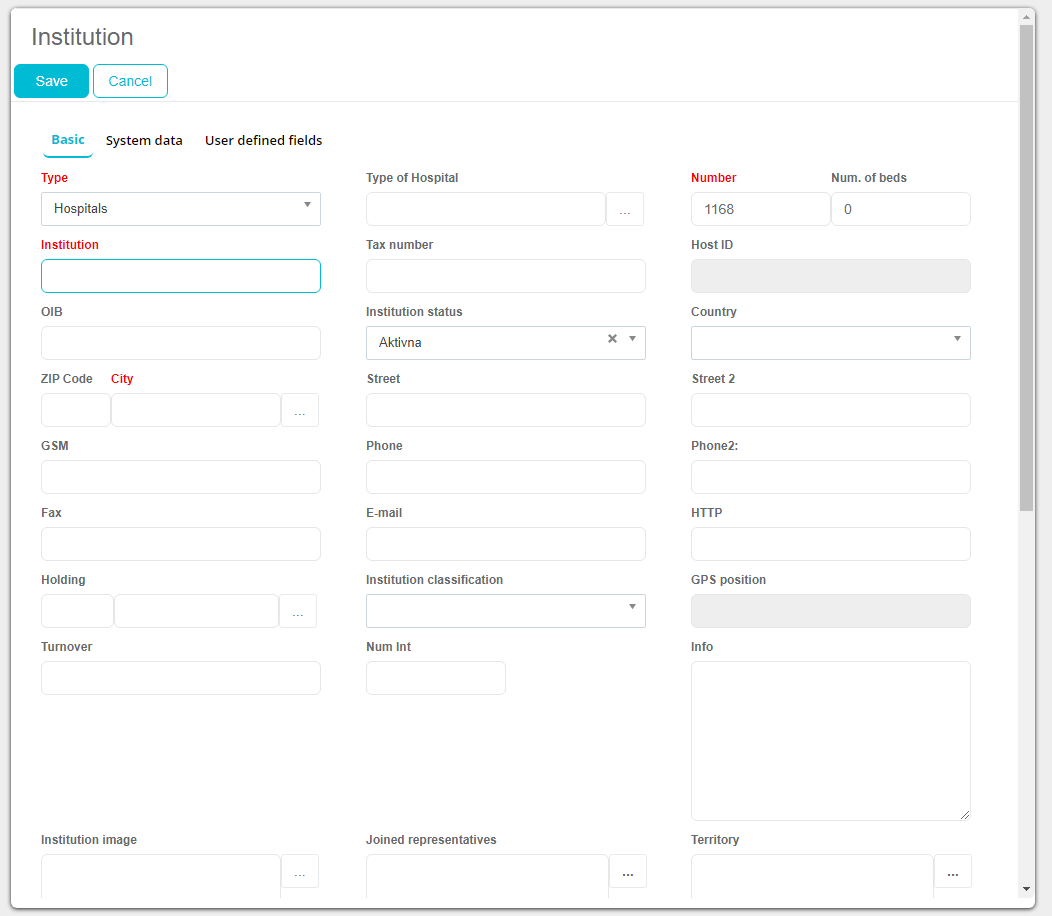
In this window, it is necessary to fill in the information about the institution, and once you are finished just click the Save button. Mandatory fields are marked with red text and red star. Along with these fields it is also mandatory to enter the address of an institution.
Editing and deleting institutions
Institutions edit can be done by pressing on Edit once you select the institution. New window will appear.

The same window will open as when you are entering a new institution. This information can now be edited, and it is necessary to click the Save button once you are finished to save the changes. You can delete any institution in the database, just selecting it and clicking on Delete button (as shown in the picture below). New Pop Up window will appear, to confirm the Delete just click “OK”.
Institution tabs
Identically as for person module, for the institution in the lower part of the window you can see a variety of additional information for each institution. Tabs that exist at the module Institutions are: Institution info, Departments, Persons, Plan, Visits, Representatives, Costs, Gifts and materials, Orders, Microtargeting, Sales, Map, Surveys, Multimedia, Documents, Events, Samples and Multimedia.
Institution info
This tab gives you an overview of general information about the institution, such as Institution Type, Name, Street, City, E-mail, Classification, Phone…
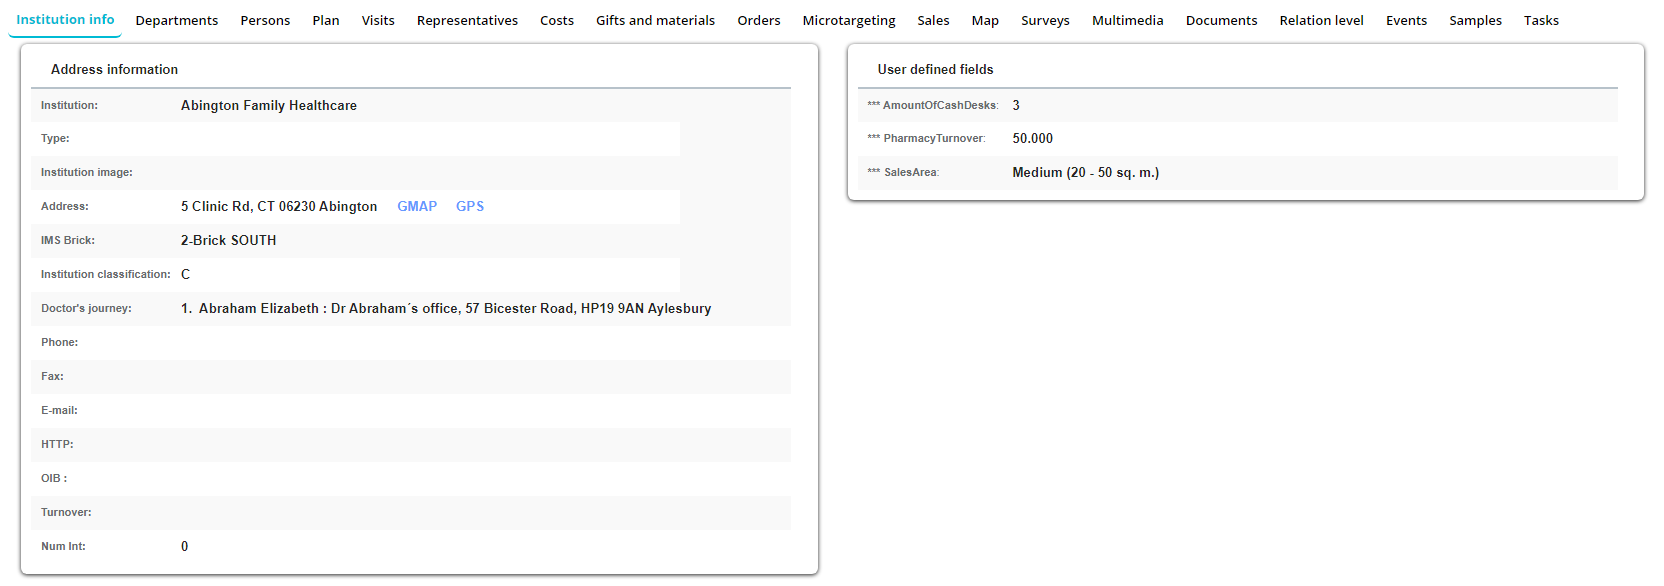
Department
Sales Vision offers the possibility of creating departments for all of the institutions and assigning persons to departments. In this tab you can add new departments, change the existing departments, and delete departments. This is possible by using buttons Add and Edit.

Adding, editing and deleting
Adding the department can be done by a simple click on the Add button, after which a new window will appear. Here you need to input all the information about the new department. Information about Department type has to be chosen from the drop - down menu, while the name should be entered in text, and this is a mandatory text field. After entering all the data, it is necessary to confirm with Save button.
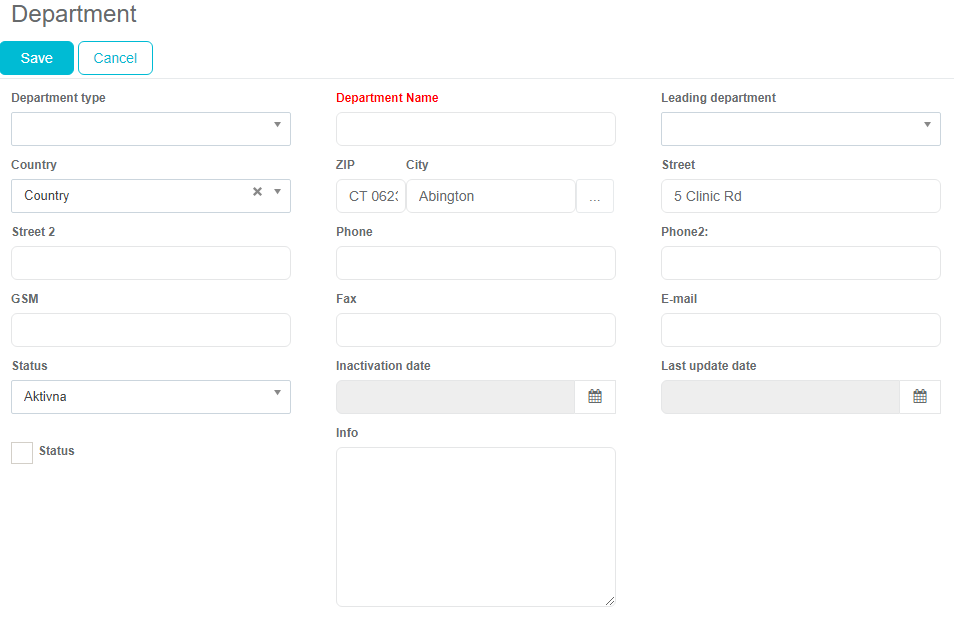
For editing the departments press on the Edit button, after a window will open (like for entering new department) and you will be able to make the desired changes to the department.
Joining persons to department
People who are listed as employees in the selected institution may be joined to new, created departments. Such persons will be listed as both the people working in the institution and as people working in the particular department. To join a person to a department, it is necessary to press on the lowest Add button. Choose working address, and then under Depart (as shown in the picture) you can see a department in which the person is working. Just to mention one more time, it is necessary to create a department before through the Institution tab/Departments.
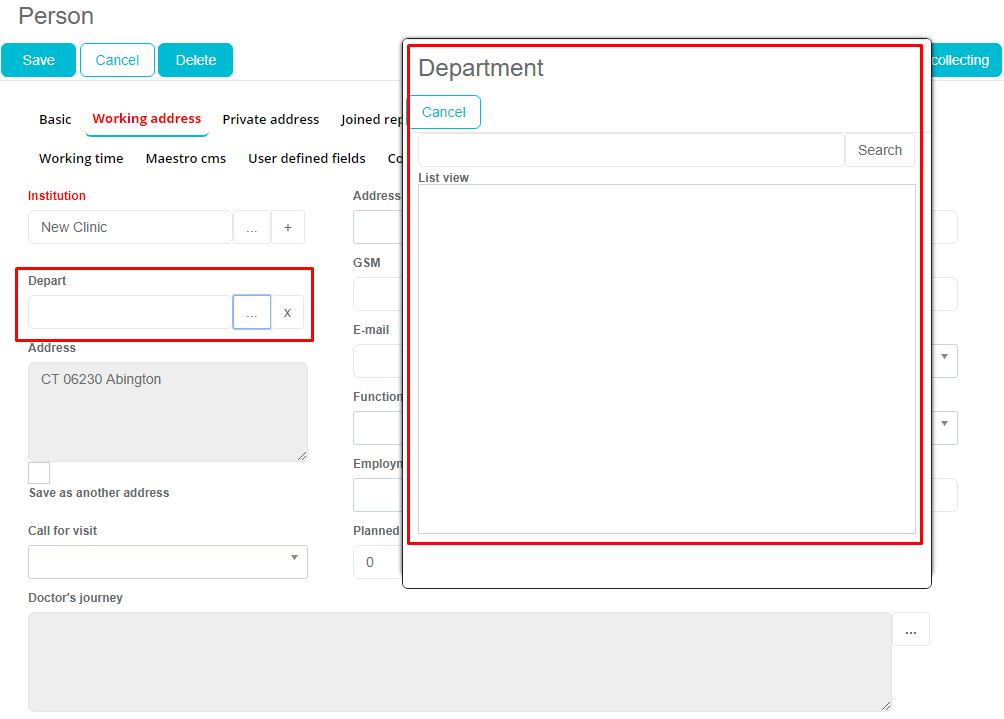
Once you click on the Depart, a list of all departments will be shown. Choose the desired one and click Ok.
After you have chosen the department click the Save button. *The Department is impossible to choose if previously not created as described earlier in this section.
Persons
Here under Persons tab, you can see which persons are working in the chosen institution. If you wish to add a new person to the institution, click the Add button.

A new window will open for entering the information. Mandatory fields are marked with red text. Once you input the information it is necessary to press on the Save button.
Plan
Tab plan shows the entire planned visits which were stored in the Sales Vision for this institution. You can see the history of visit plans, dates, representatives and additional info for every planned visit. You can also add new visit plans. Add button is used to add new visit plans for the institution.

Once you click the Add button a new window will open to enter the information about the visit plan. Here you need to input the information which Representative is planning a visit, for which Date/Time, Visit code (personal visit, group visit…), and input additional information about the visit. Once you have entered all the preferred information about the visit click Save button.
Visits
This tab shows the overview of all the visits to this institution or their employees.

Here you can see the history of all the realized visits for this institution. If you want to see detailed information about any visit, click on visit to open it. If you want to add a new visit, use the Add button. After you press Add button a new window will open for entering a new institution visit. Here you need to input the information about the visit, mandatory fields are marked with red text (Representative, Visit code, Date). Under Person you can even define which persons that are working in this institution have you visited. Once you are finished, click the Save button.
Contracts
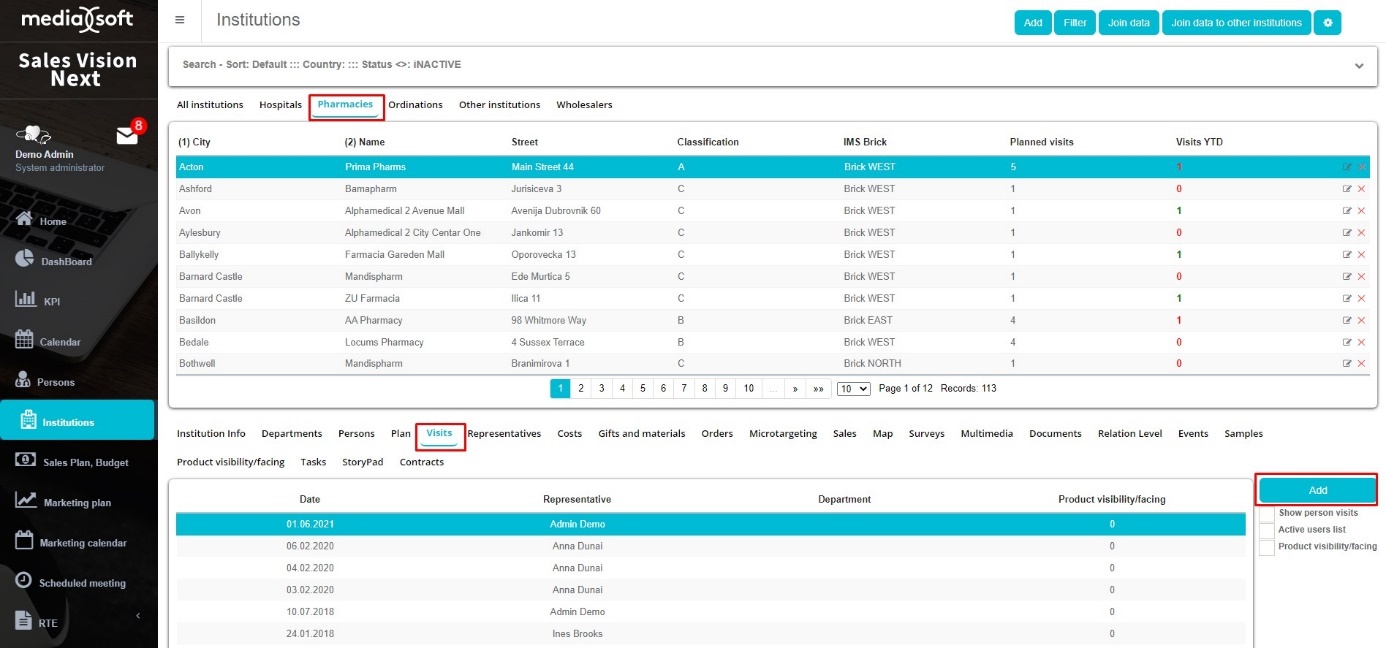
In order to choose the "Contracts" option, at the "Institutions"

you have to choose Pharmacies and then "Visit"
Then select “Add”.
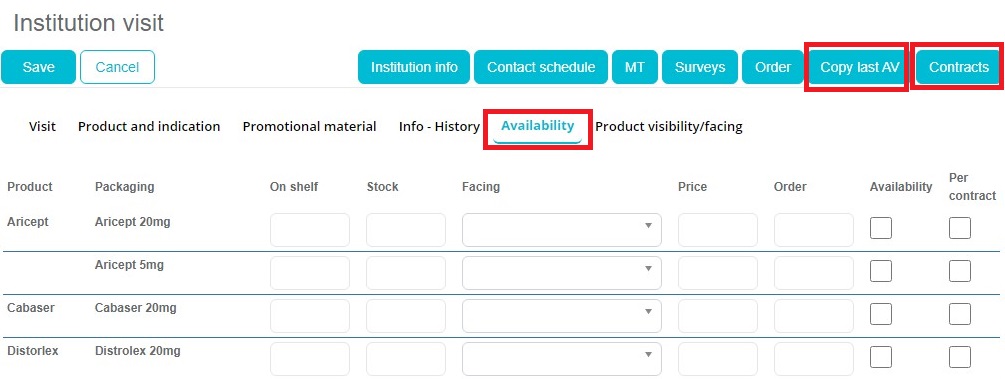

Fields “On shelf” and “Stock” determine how many products should be on the shelf and how many products should be in stock. If number of products is less then it is in contract, number of products becomes red color. If number is higher than determinated, number becomes green color.
Fields “Facing” determines which side the product should be facing. For example: front side, rear side, top side..
Price. How much product cost.
Order. How much is ordered.
Checkbox. Here is specified whether the product must be available or ordered by contract.
Copy last AV
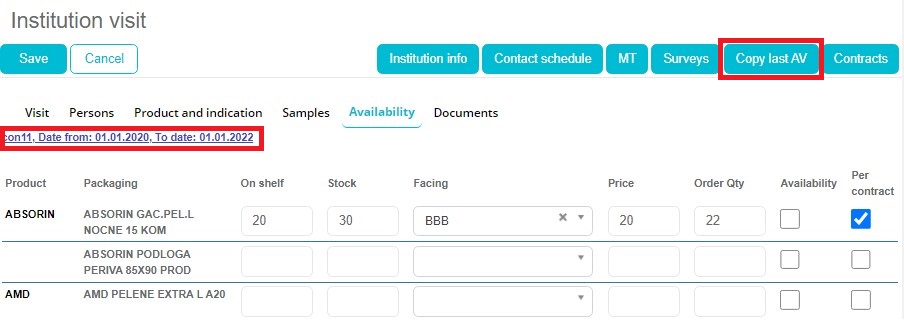
In upper right corner is button “Copy last AV”. When you click on this button it last contract is loaded (with date from when is it from). You can edit it, and save it as another (new) one.
Contracts
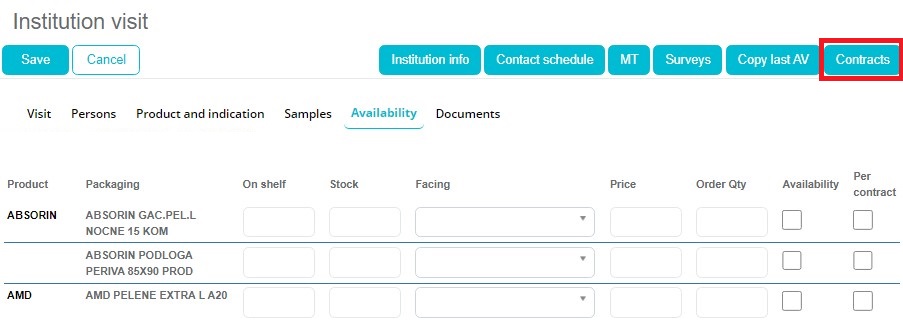
For chosing “Contract” click on the button “Contracts” in the upper right corner.
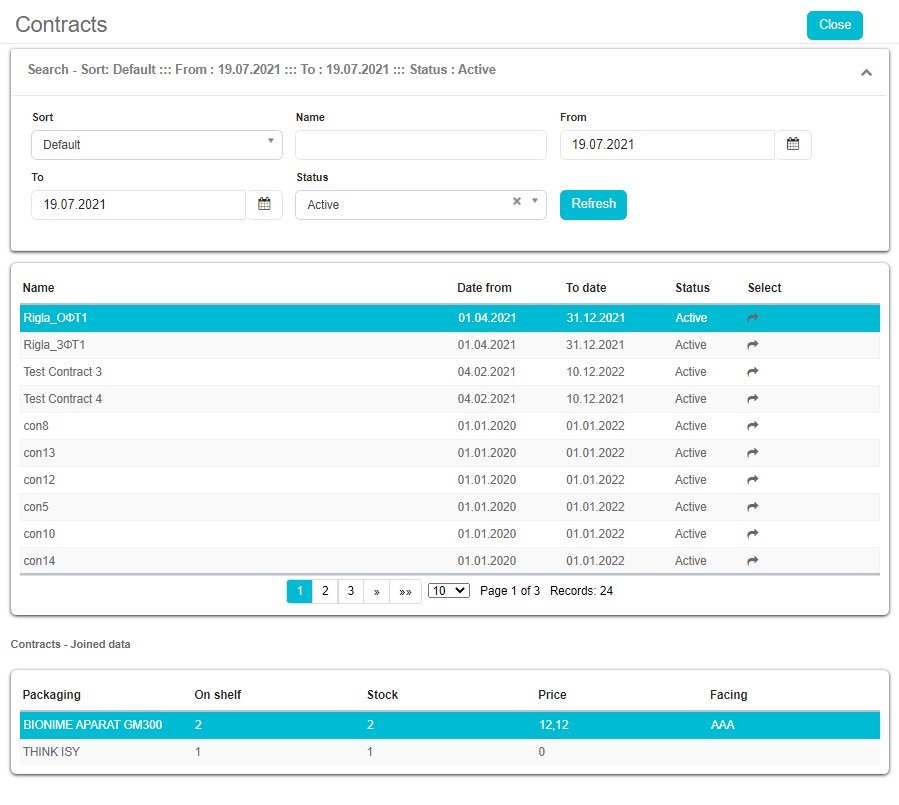
Sort: in Sort field you can sort contracts by name, date from, to date, status. Name: in this field you can chose specific contract by entering its name. From To: if you want contract from specific date, you can enter from when to when and contracts from that period will be filtered. Status: you can select between active or inactive contracts.
In middle window are listed contracts that mach your filter parameters.
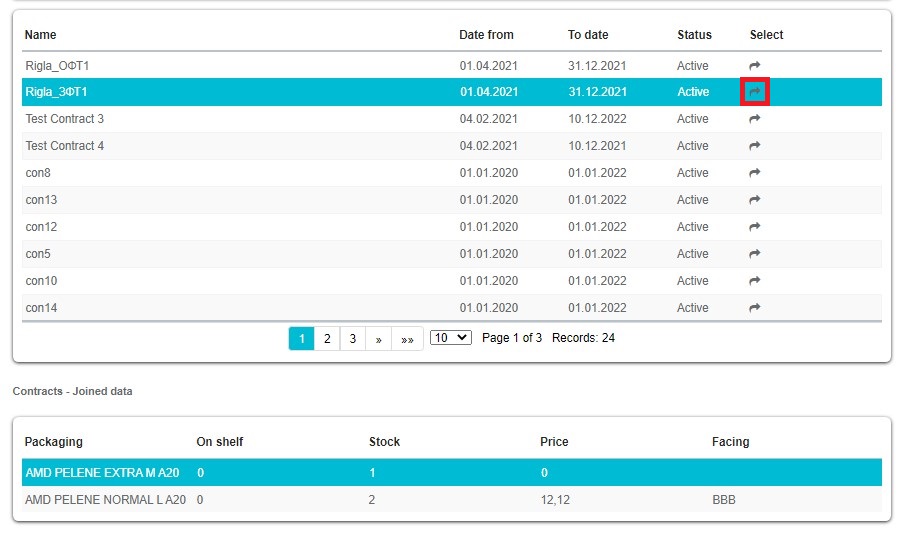
When you click on contract in bottom window is his preview. To select specific contract click od arrow below “Select”.
Representatives
Here you can see which representatives are covering and are responsible for this institution. There is the basic info you can see, like Representative, Phone, GSM, Visit date.

Costs
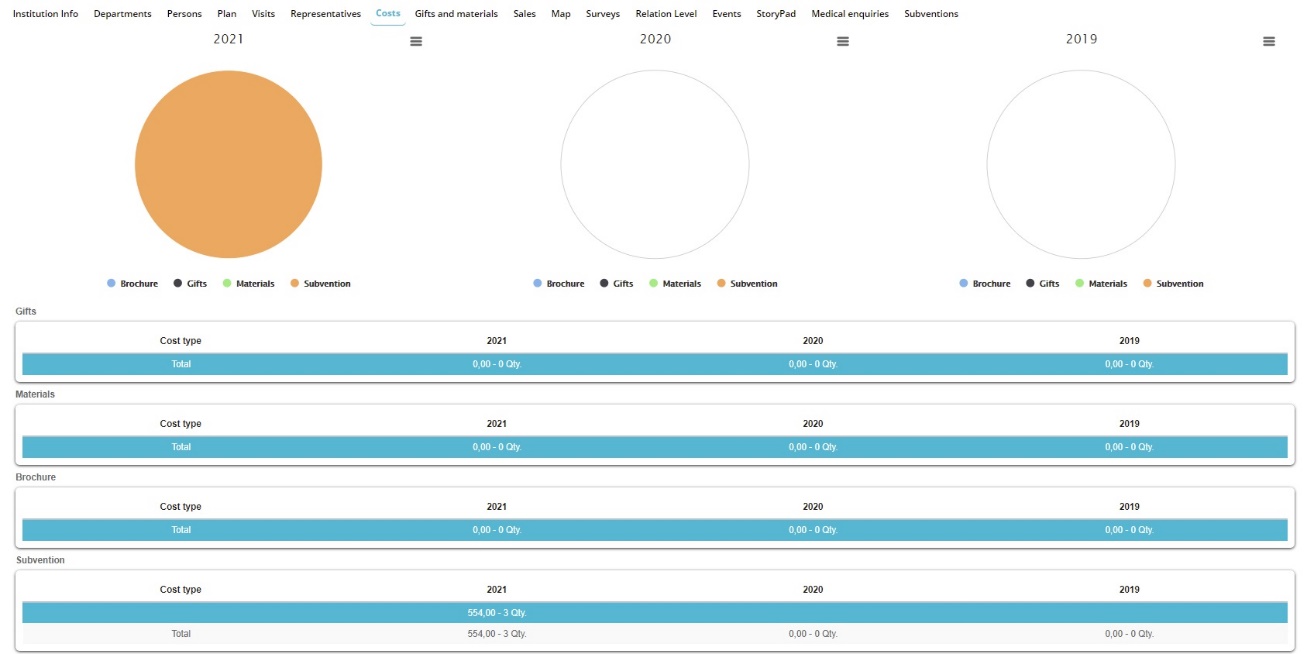
Costs tab gives an overview of all the expenses that have occurred for this institution. This can be almost everything you consider a cost (dinner, drive…). All this can be defined in the Admin part of Sales Vision.
Gifts and materials
There is also possibility to see all gifts and materials which were spent to this institution. Click on tab Gifts and materials to see this information. You can see what was the product, gift, quantity, value and year.

Orders
Under the orders tab you place orders for a specific product in the desired institutions. You can see on which Date the order was placed, who was the Representaive and what is the Value of the order.

If you wish to place a new order, press on Add button (as shown in the picture below).

Then a new window will open where you need to choose the Product Packaging, Quantity and then Value is automatically calculated. Once you are finished press on the Save button.
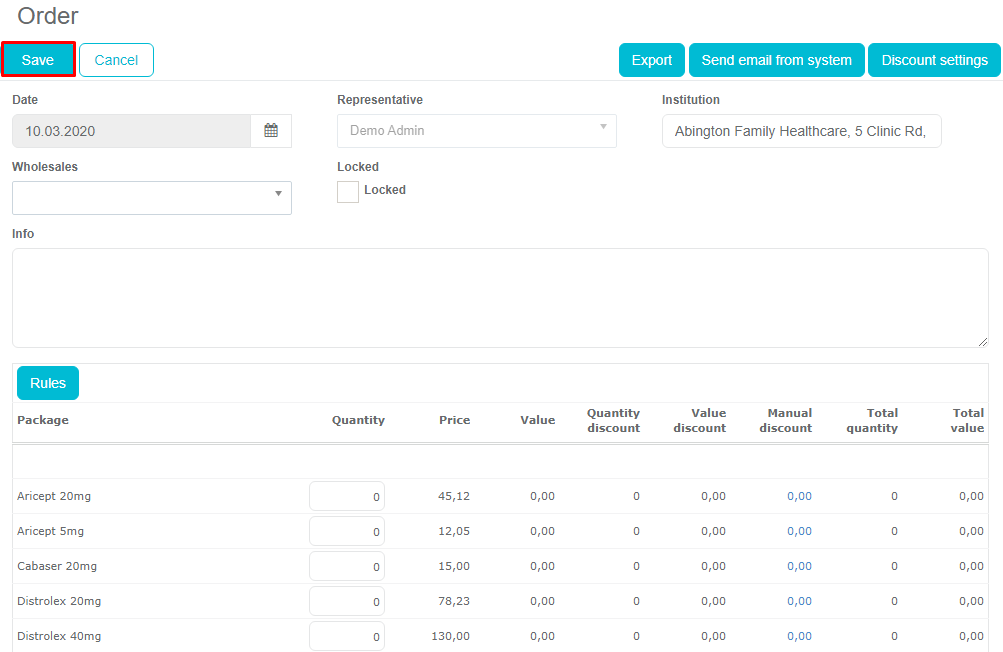
Your order will be visible under Orders, as you can see in the picture below.

Discount settings This is option that appears when you adjust options (614,615) in AnyWhere Admin. It appers on request and it allows you to manually insert discount, wheather it is some percentage (%) or exact amount of your budget.
After you click on Discount settings, new window open’s, where it is shown amount of budget that you have and option Manual entry discount. You need to check that box and then it is activated.
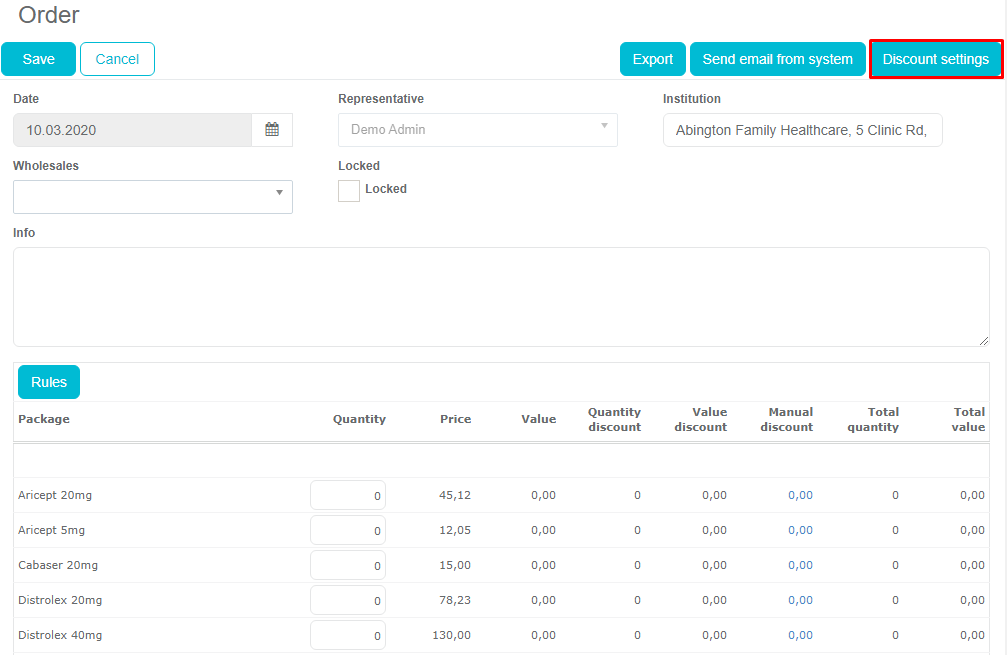
In the next step you enter quantity and total value is summed automaticly.
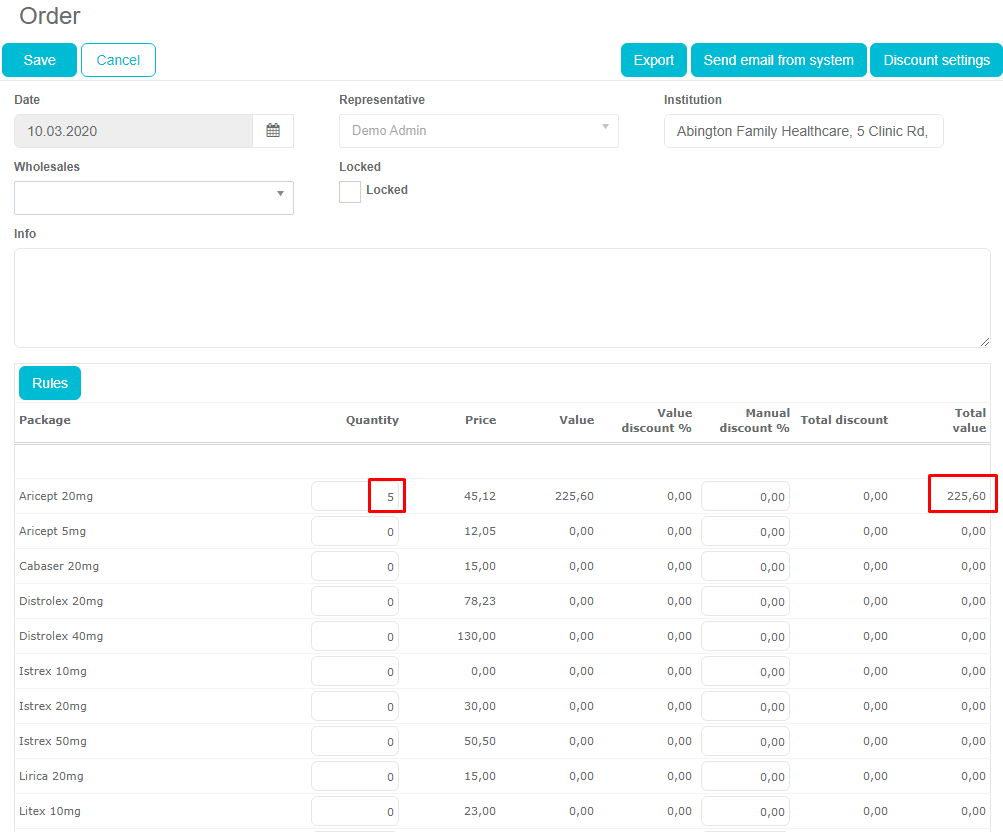
To see how Discount settings work’s you scroll down the list of packages and now you can click on the sum number underneath Value discount.
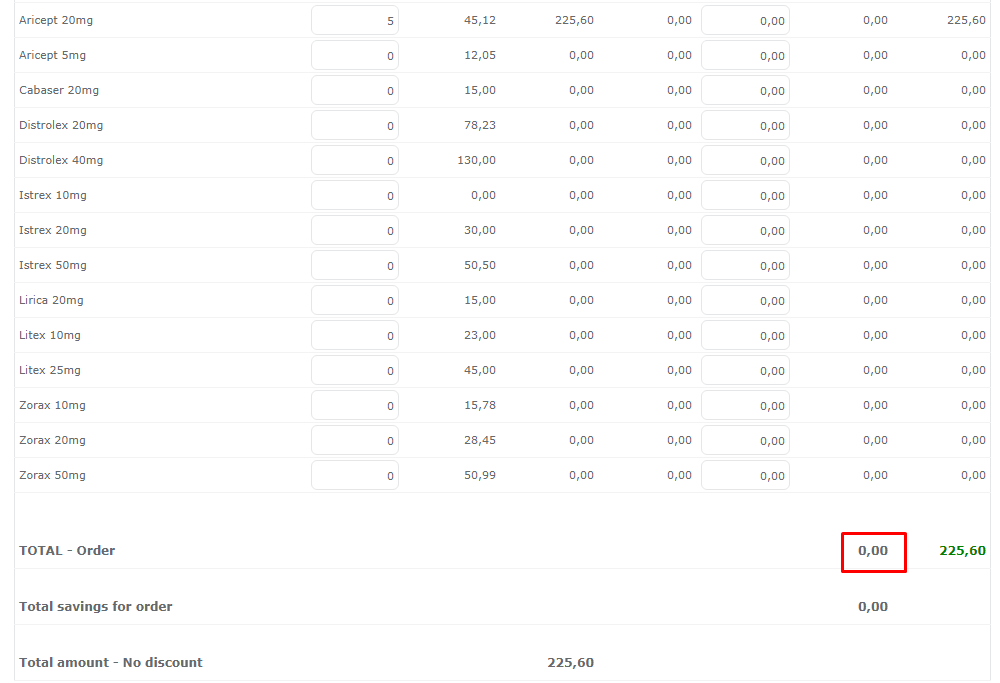
When you click on it, window open’s where you can add discount in percentage format (%) or in number format (Value discount).
Thing that needs to be highlighted is that, when you enter Value discount, that amount that you have entered is taken from your Remaining budget.
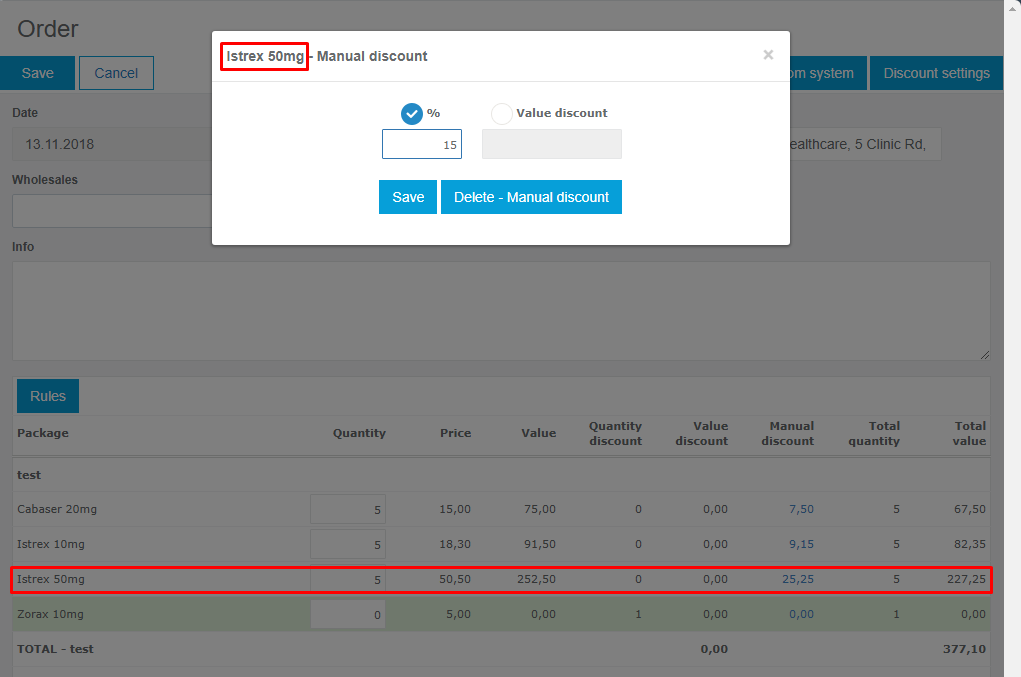
We recently upgraded this tab with few additional options. To see this option under tab “Orders”, option 614 need’s to be activated in SV AnyAdmin. First of all, when you enter amount of products that you want in order, and if that amount satisfy rule, you will get one free product just like it is defined in the rule. In this case (picture under) this free product is “Zorax 10mg”.

Next thing is when you want to add discount, you can add discount for all product’s in one. When you enter quantity of wanted product, you go to “Discount settings”, and enter manual discount for all packages.
When you choose option to add manual discount to all packs, window will open and you enter percentage of discount that will affect all products.
List of products will be shown and now you can even adjust discount manually for single product. All other product will be affected by manual discount to all packs, but that one you choose will change “Total value” by our percentage discount that we enter (picture under).
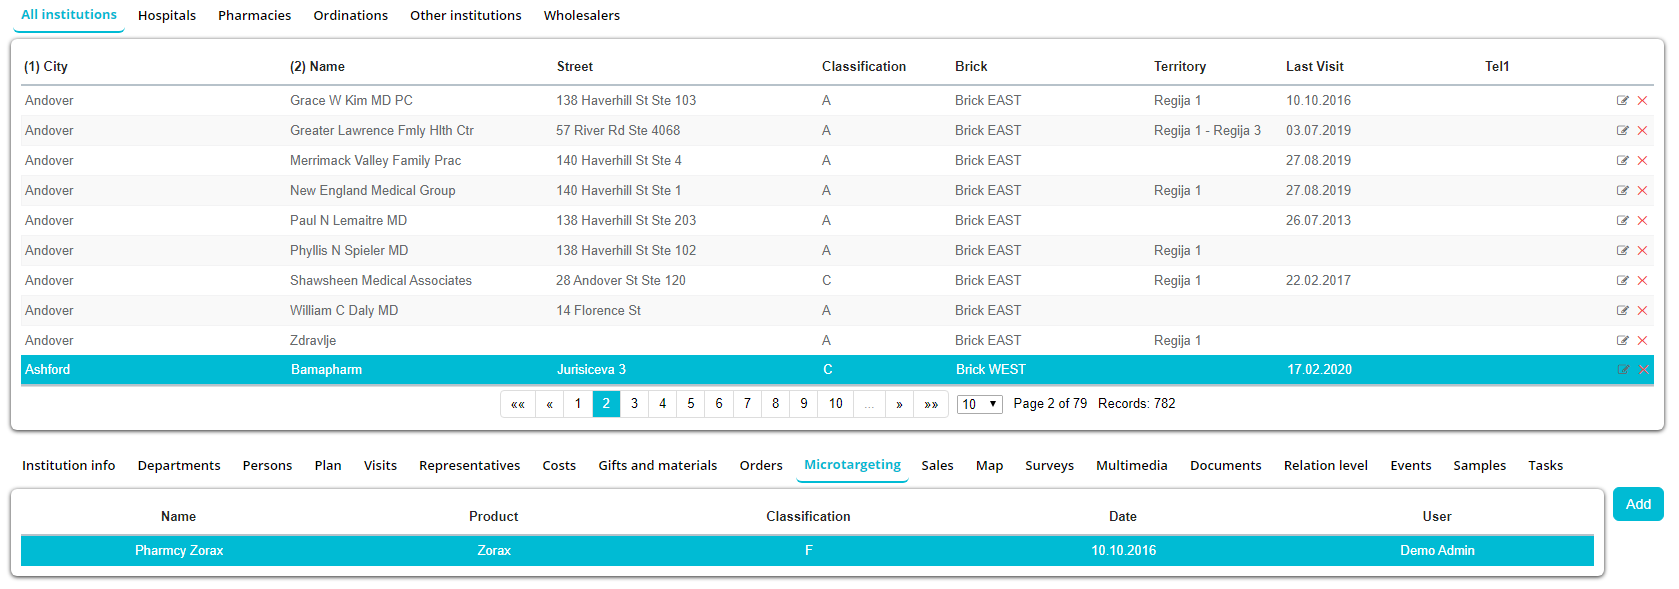
Microtargeting
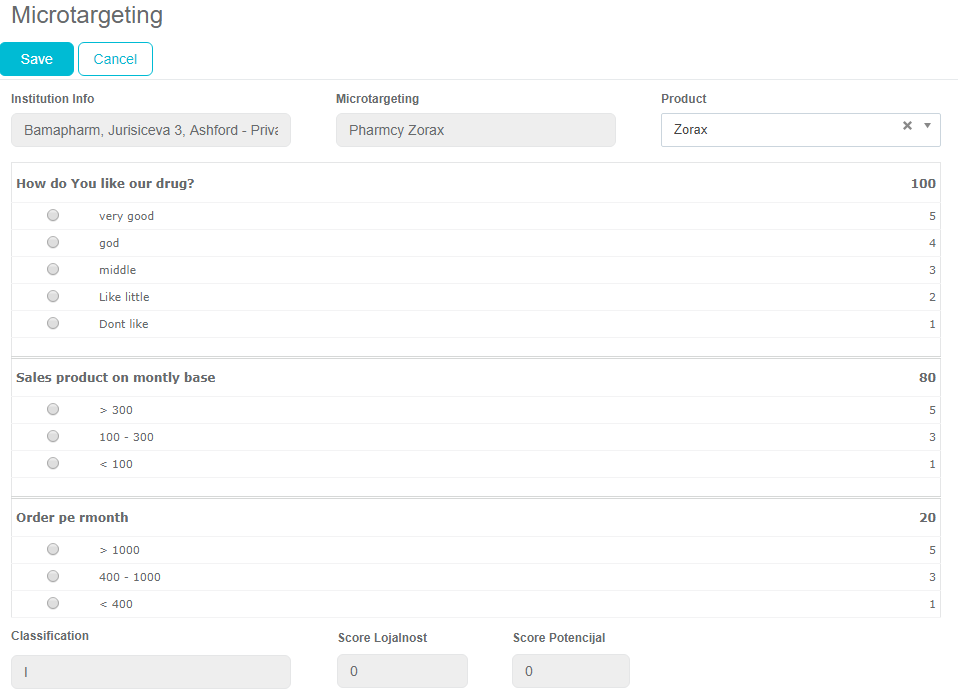
Steps for adding a survey to the MT are the same as the ones in adding inside Persons module. After you have chosen Microtargeting, click Add button, and a new window will open.
Here you need to answer the questions. You have 2 groups of questions; Group X and Group Y. Group X are the questions that have an exact, measurable answer. Group Y are questions with the subjective answers. Every question has a Ponder, but this value isn’t visible.
After you are finished with entering the all the information press the Save button and a classification will be made.
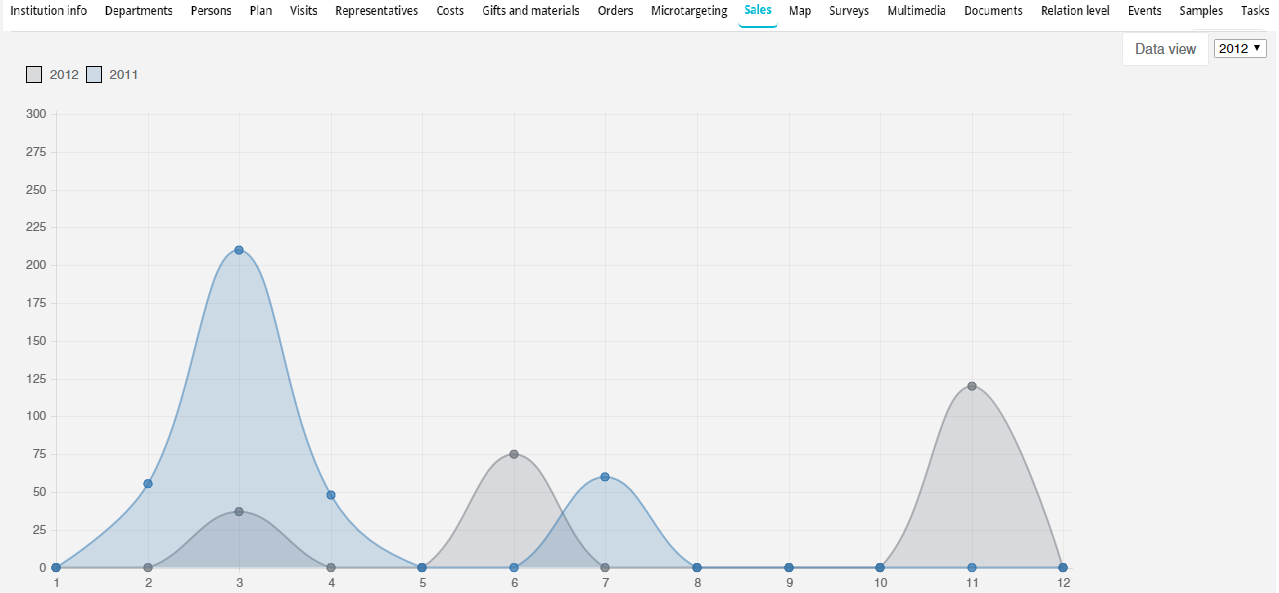
Sales
This tab is used for a graphical representation of sales within a particular institution.
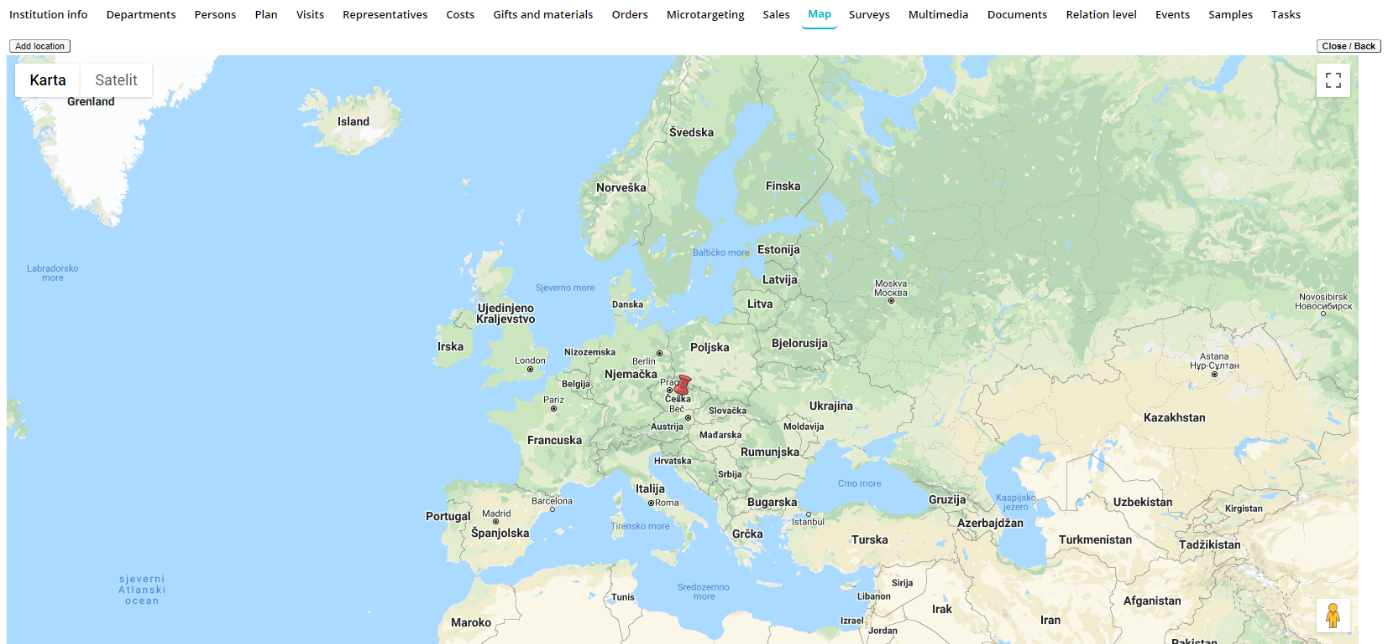
Map
In this module you can see the GPS position of the selected Institution on the map.
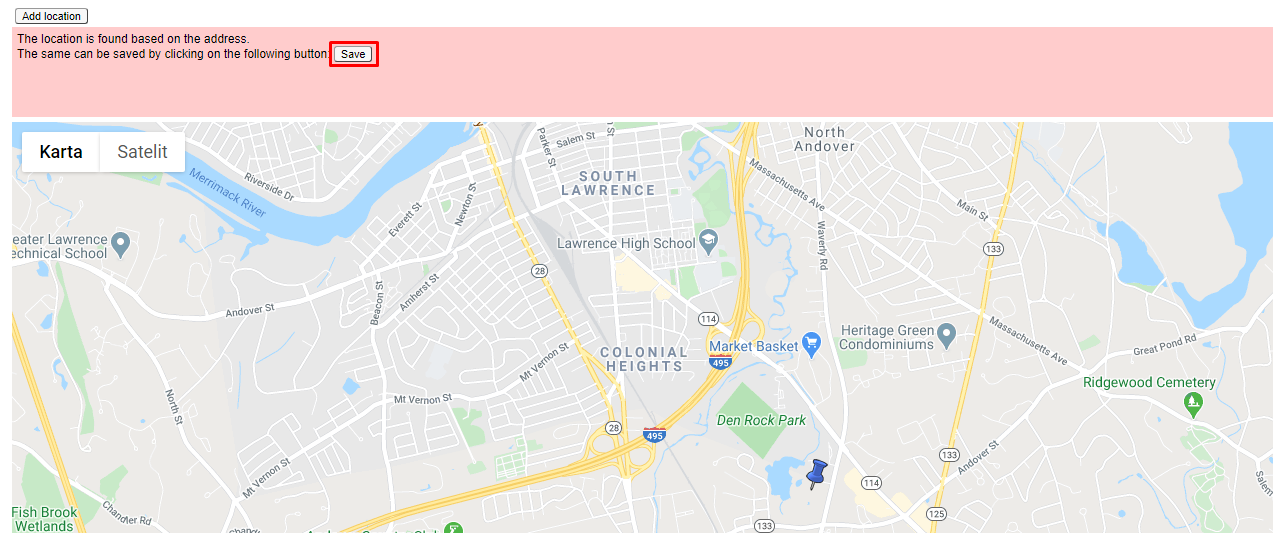
Also, there is functionality of location search on map based on address of an institution. For all institutions without GPS location, Sales Vision will suggest a location on map based on institution's street and city. User will get an info note marked red that location is found based on the address.
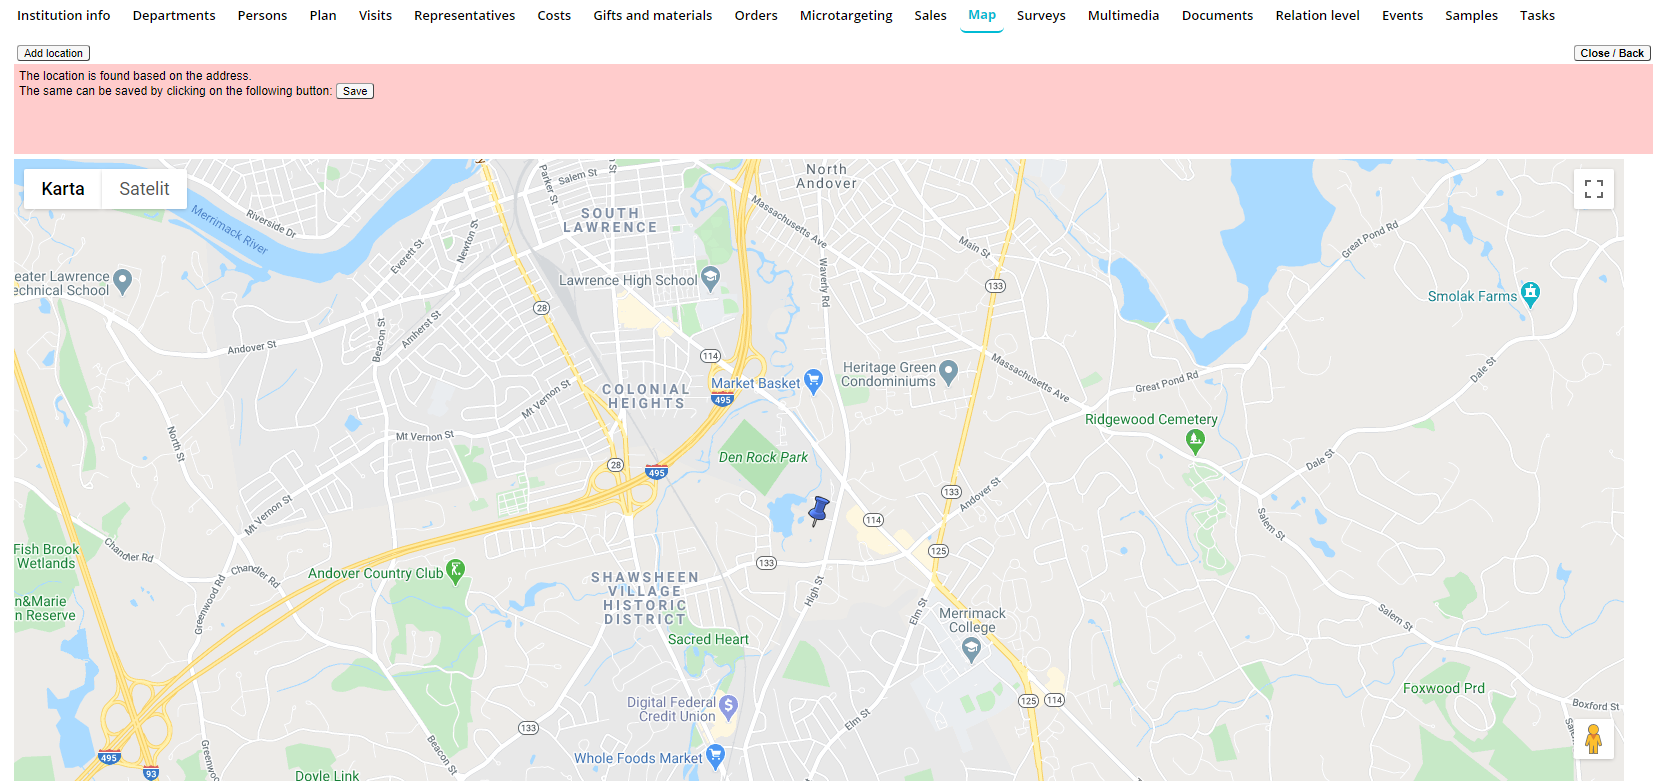
Use Save button to save location marked on map.
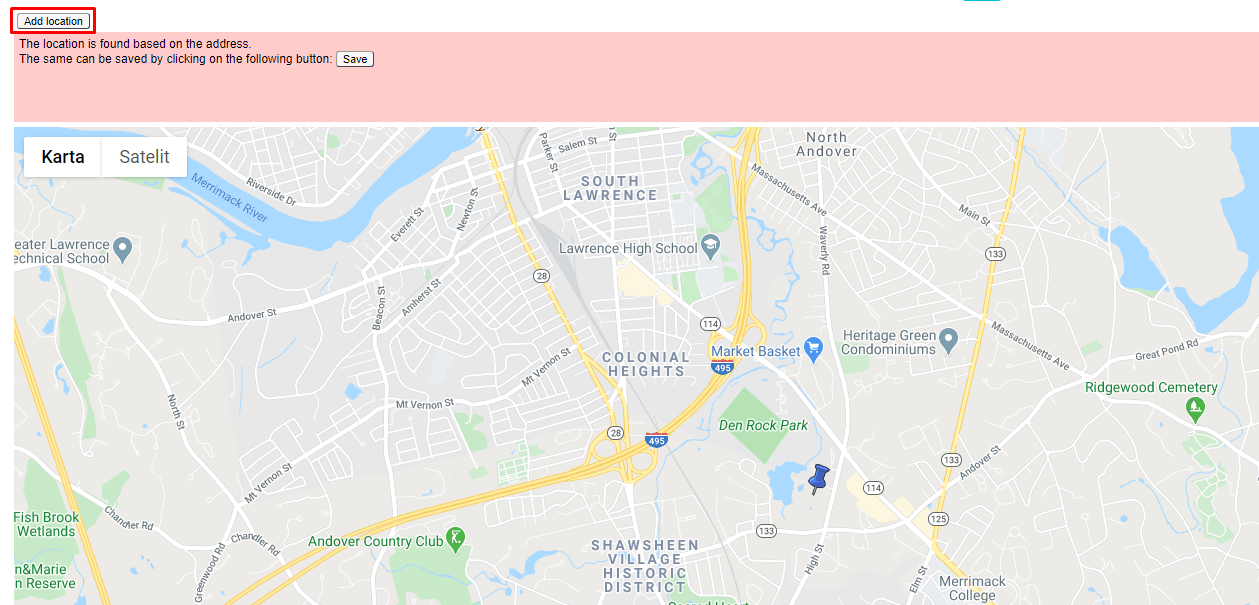
You can always add new location manually by using Add location button if suggested location is not accurate enough.
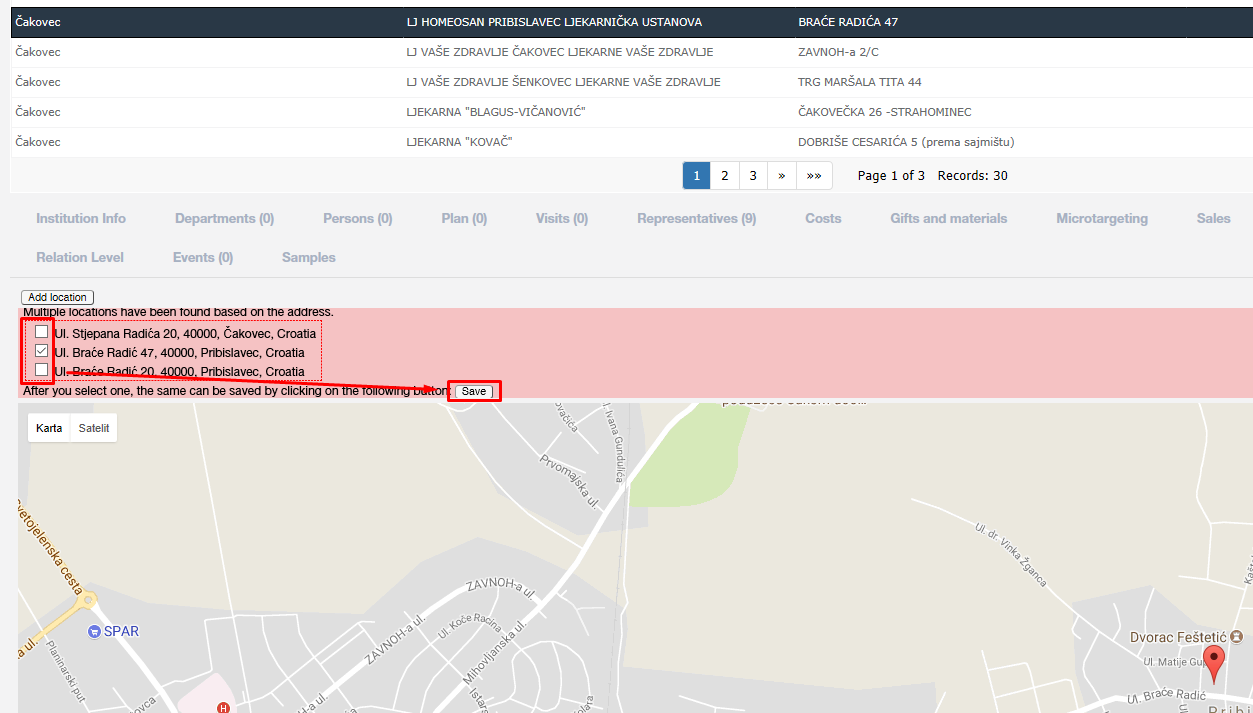
There can be exceptions where system will find more than one suggested location. For such examples you will have possibility to check correct location by using checkbox next to the location and use Save button to save your selection.
Surveys
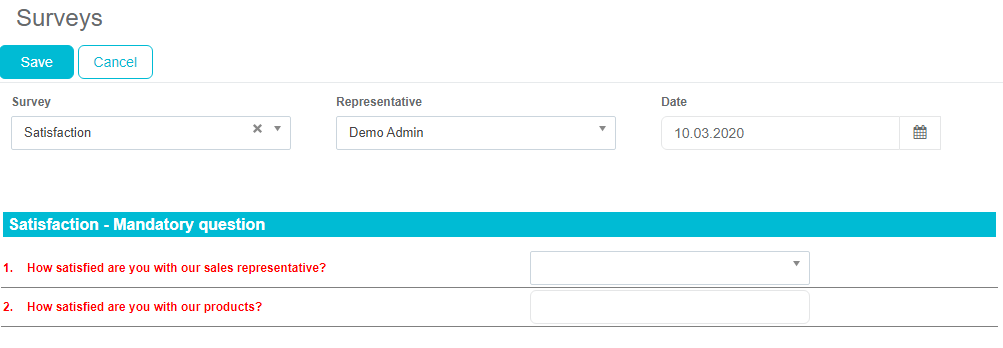
To add a new survey, clik on Add button under Surveys tab and fill in the data. To view an existing one, click on the survey to open it.

Once you press on the Add button, screen like this will appear. Here you can select a Survey, name of the representative and date. Below you have a Question tab where you write the questions and select the answers. Once you are finished just click Save. A new Survey will appear in the list, as you can see in the picture. To edit the Survey, just click on it.
Samples
This tab allows us to review the samples we have given to a particular person working at a selected institution.

Documents
In this Document tab you can upload or preview different sort of files: music, video and others.

Tasks
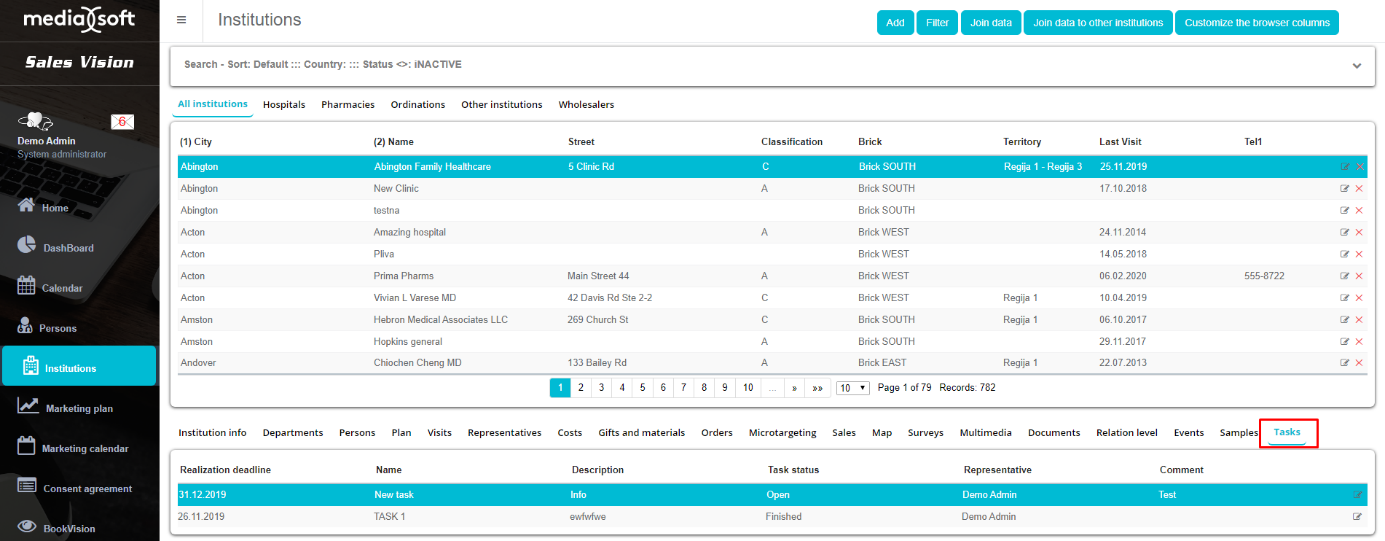
Tab Tasks show tasks that are connected to chosen Institution.
Contracts
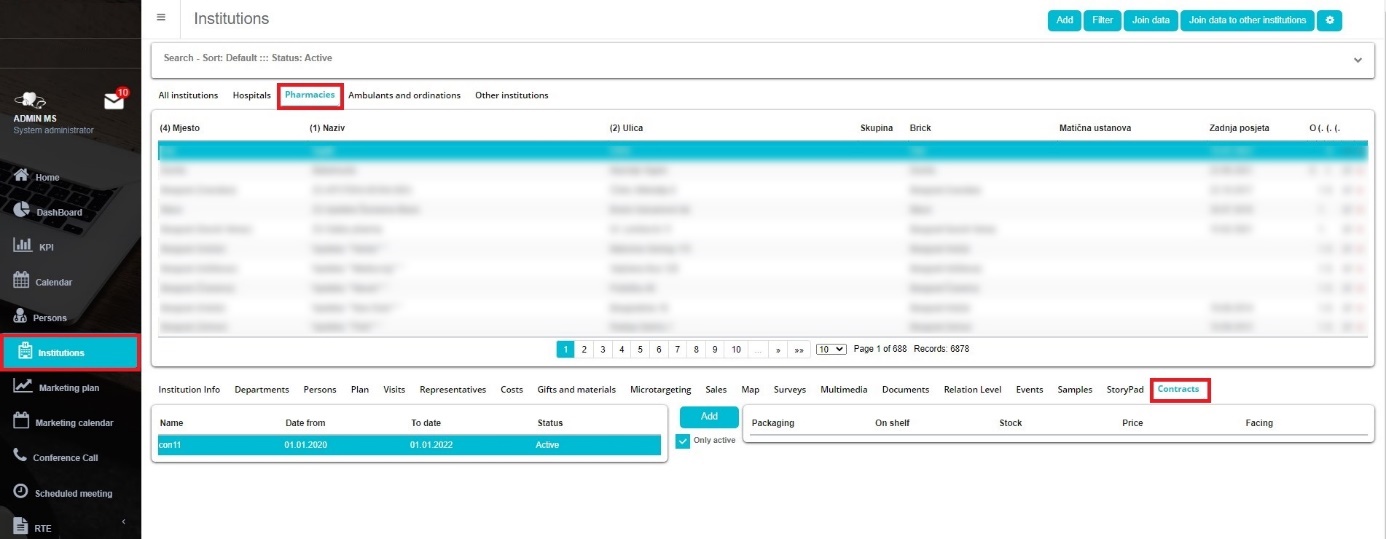
To enter “Contracts” chose “Pharmacies” then “Contracts”. Chose contracts and click on Add button.
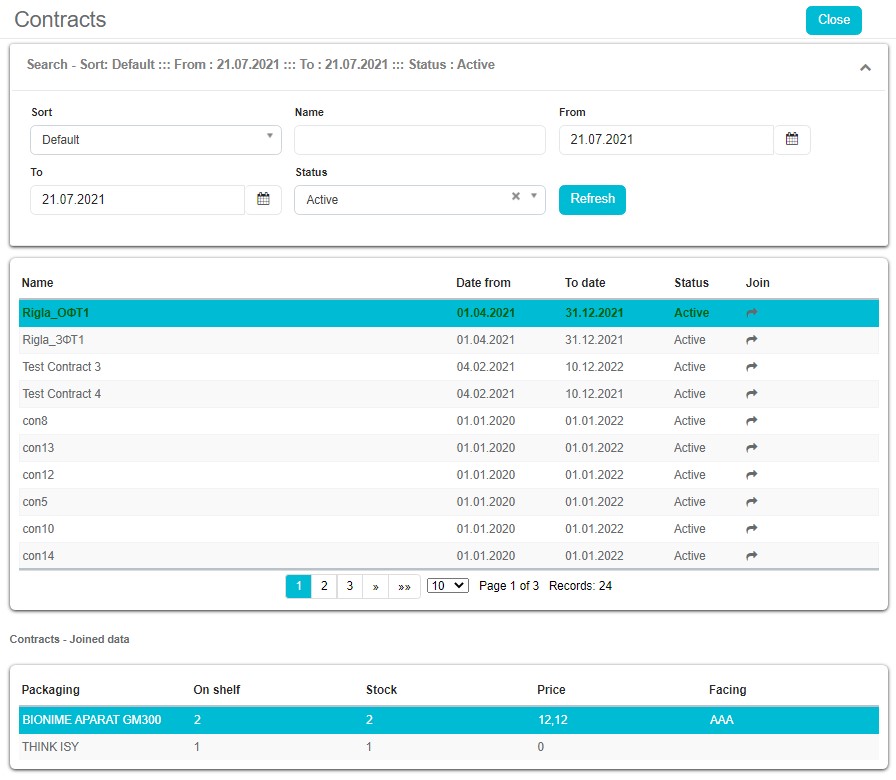
In the upper part of window, you can filter contracts by name, date (from – to) when they are active, and status (active, inactive). In the middle part of window there is a list of available contracts. In the bottom part of window content of chosen contract is shown. Packaging, Stock, Price and Facing.
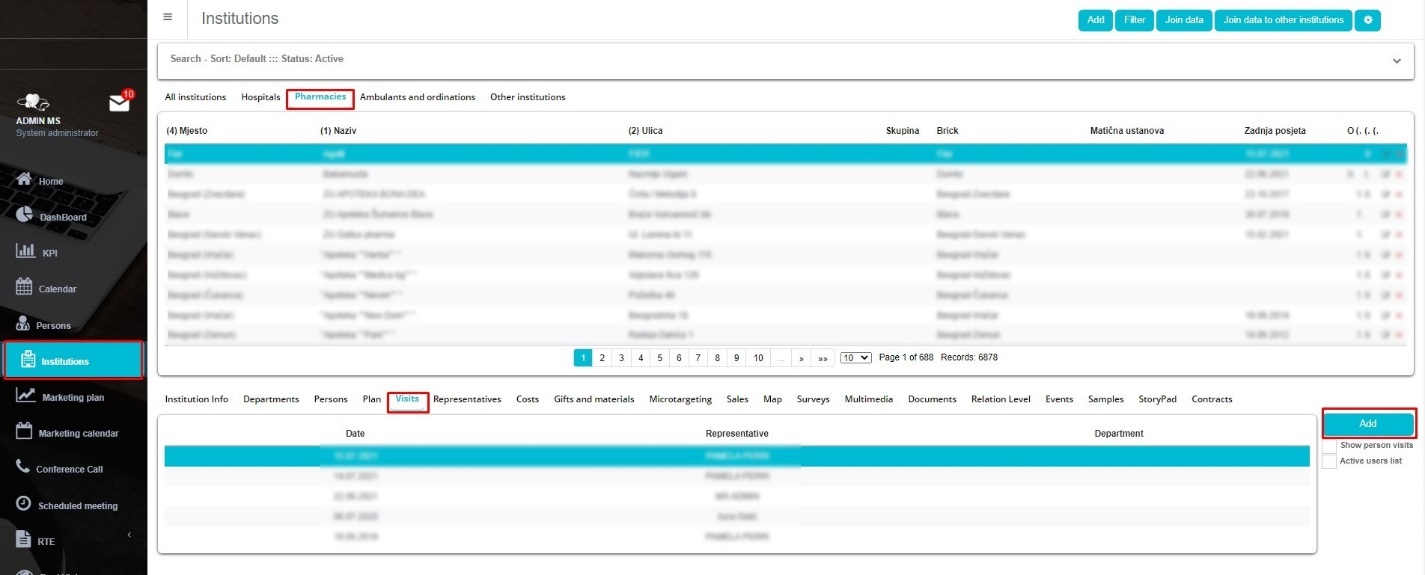
To add a new contract, select Institutions – Pharmacies – Visits then click Add.
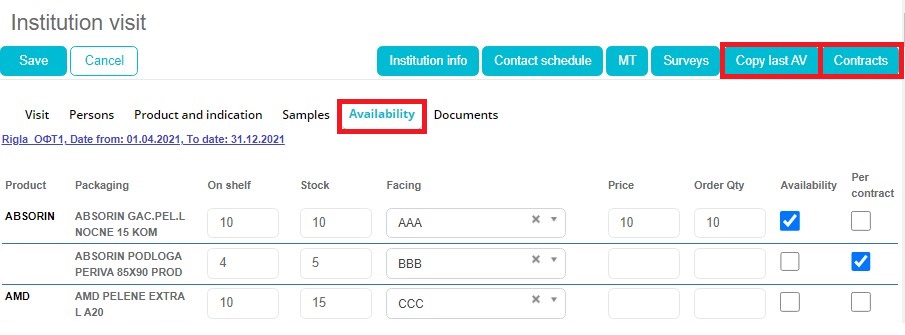
Select Availability. New window will appear with options for creating new contract. Product – product name Packaging – packaging type On Shelf – how many products must be on shelf Stock how many products must be on stock. Facing- on which side is the product turned (front, back side) Price – price of product Order Qty – how many producta have been ordered Availability / Per contract – if products are always available, or or only per contact

“Copy last AV” When you create new contract, if you click on the “Copy last AV” data from last contract will automatically be copied to new contract.

“Contracts” When you click on “Contracts”, new window will open with list of all contract that ara available.
Adoption stage per indication
If option to use Adoption stage per indication is turned on, on Instituion edit from new tab will appear. Functionality of Adoption stage per indication can be turned on/off only by members of Media-Soft team.
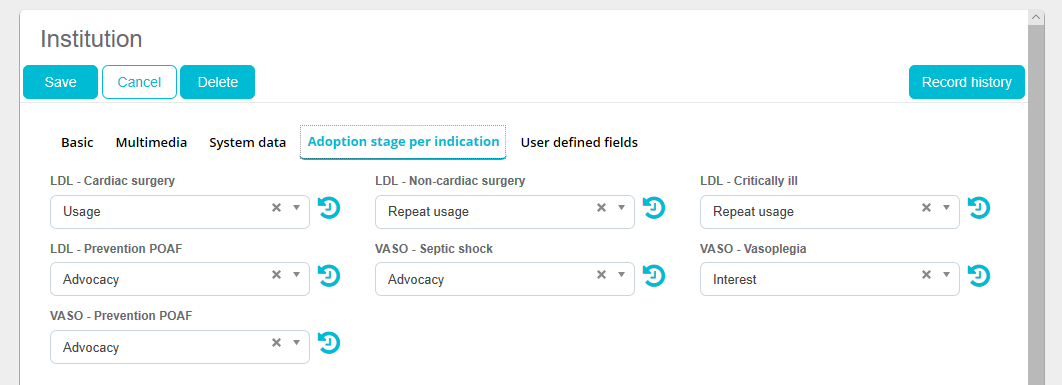
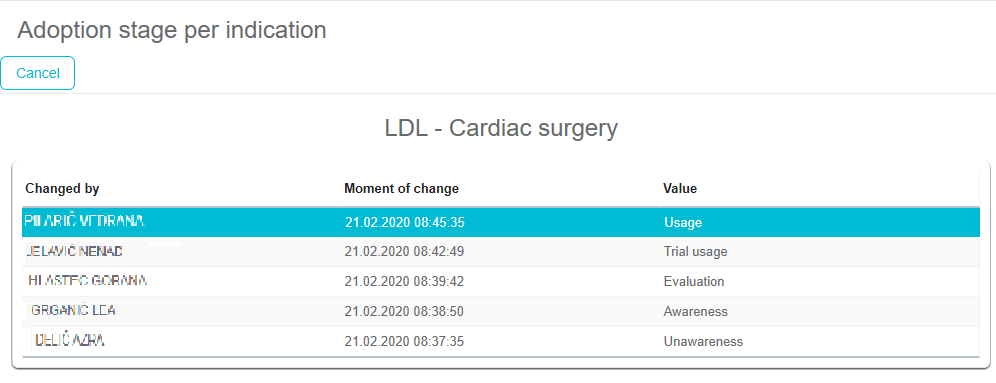
For each Adoption stage, Record history is available by clicking on Arrow image with name of the user who has changed the record, date and time of change and to what value.
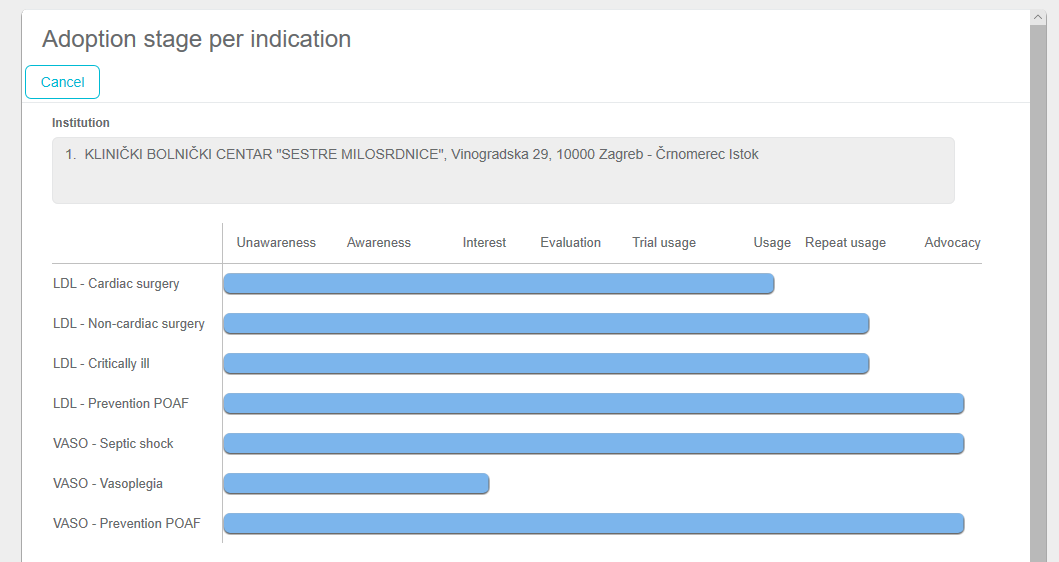
Info of Adoption stage is available on Institution info.
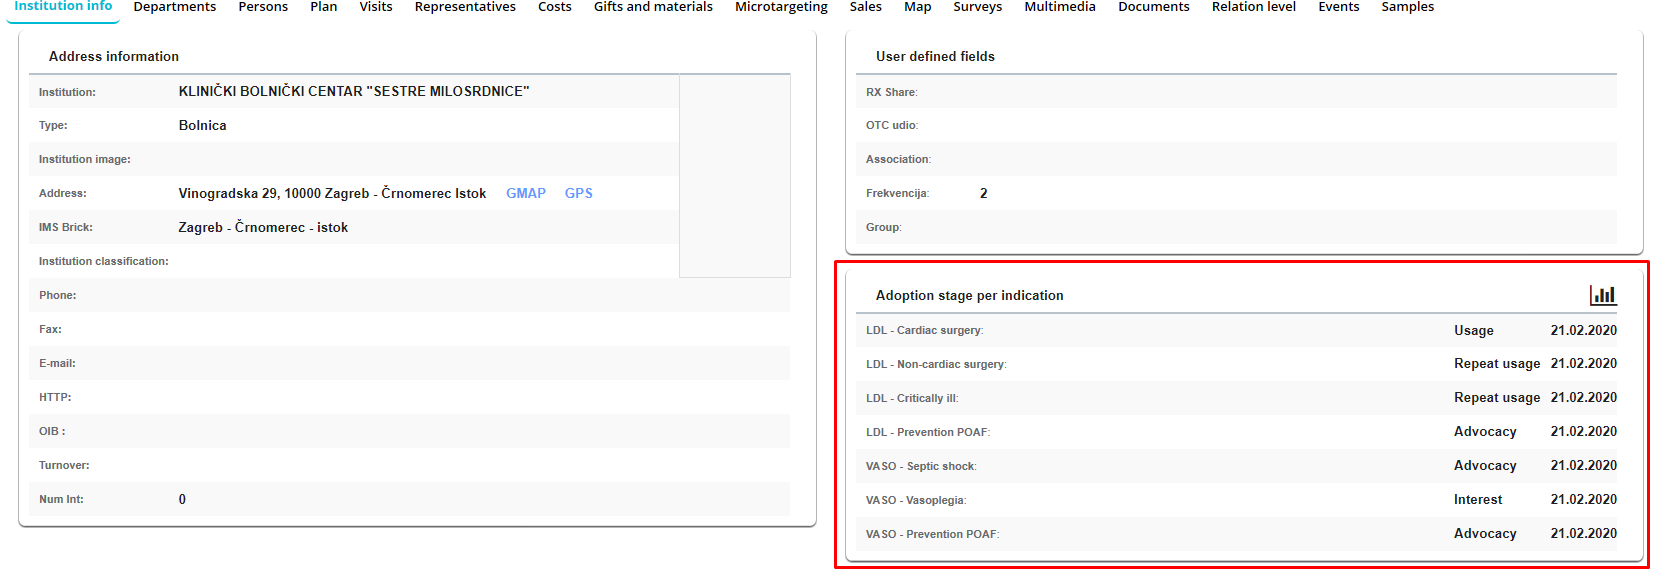
By clicking on Dashboard icon graphic view will appear.
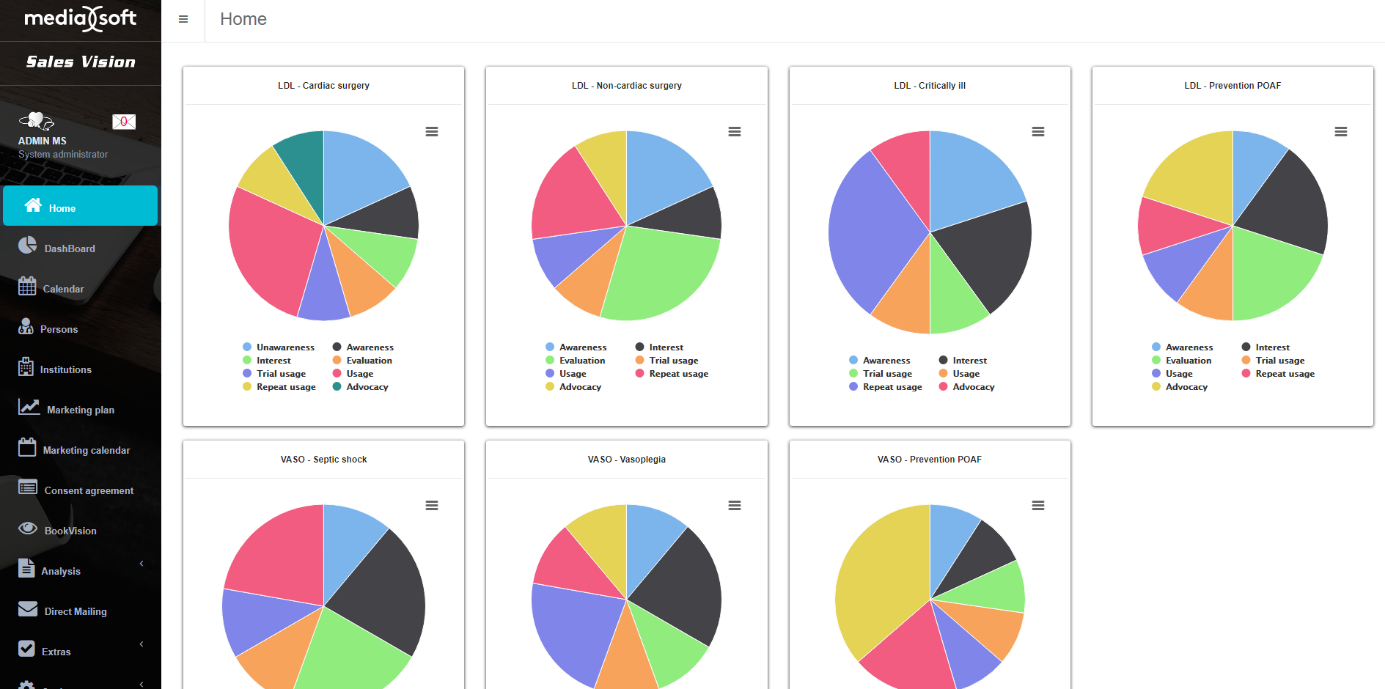
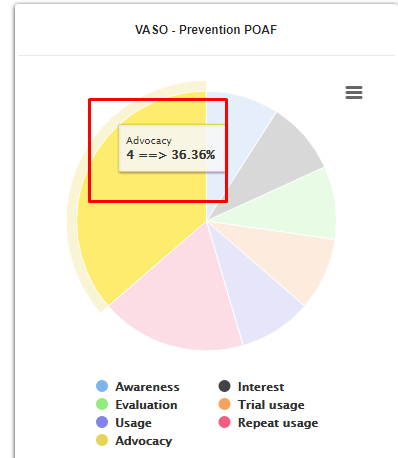
Different homescreen dashboards are available on home screen regarding Adoption stage showing the summarized overview of all adoption statuses per each indication, for all institutions. These numbers are displayed in percentages.
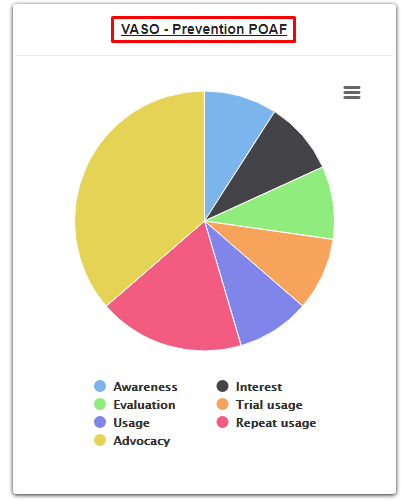
By clicking on the name of the chart, list of institutions and their values for selected stage will appear:
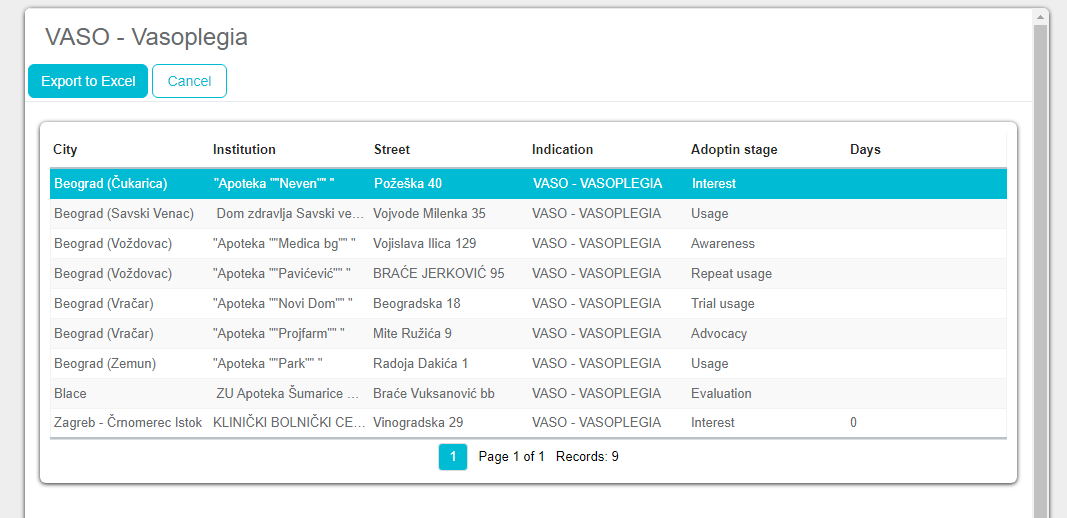
By clicking on each area on dashboard, list of institutions for selected stage will appear:
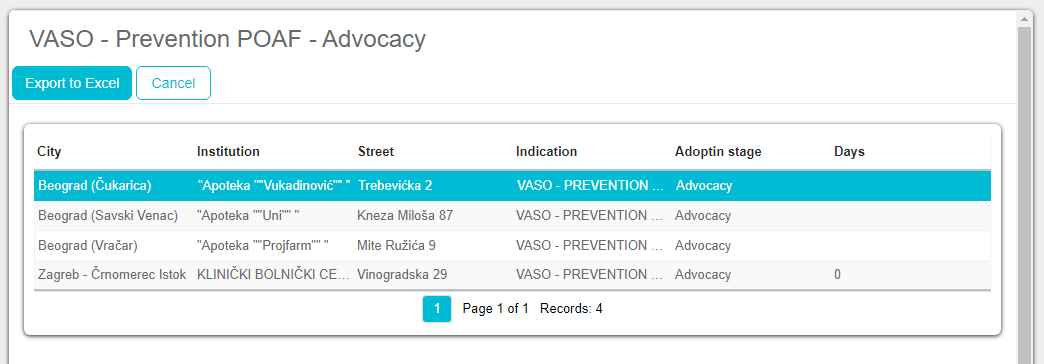
By clicking on Export to excel button, user has the possibility to export the list to excel.
Browser customization
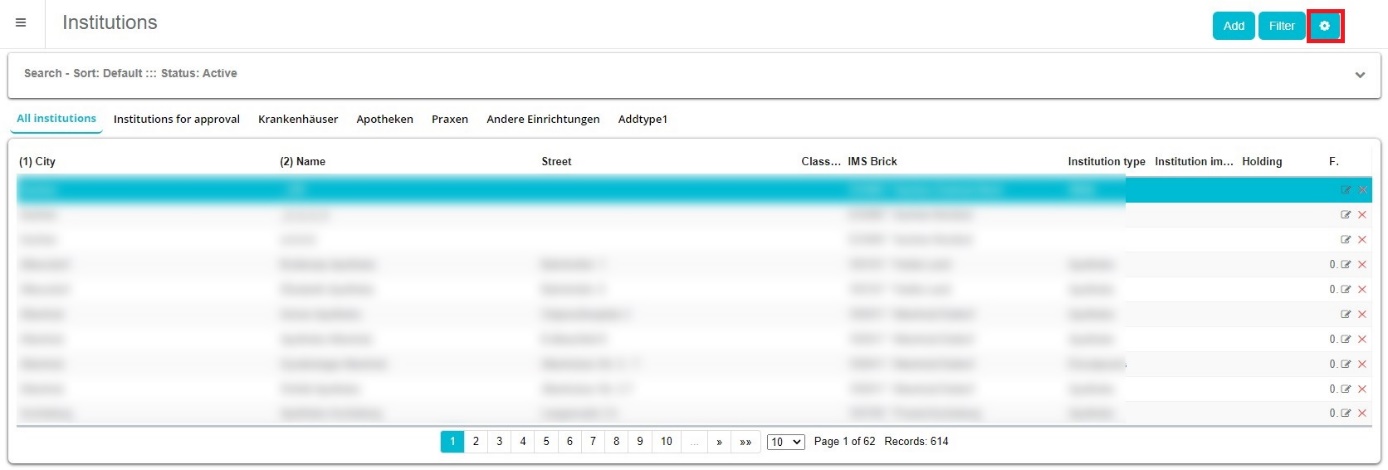
In “Institutions” module main window you can customize browser.
By clicking on the wheel new window opens. Where user can edit look of his browser. Browse it by default as admin defines it, but every user can edit it for him self.
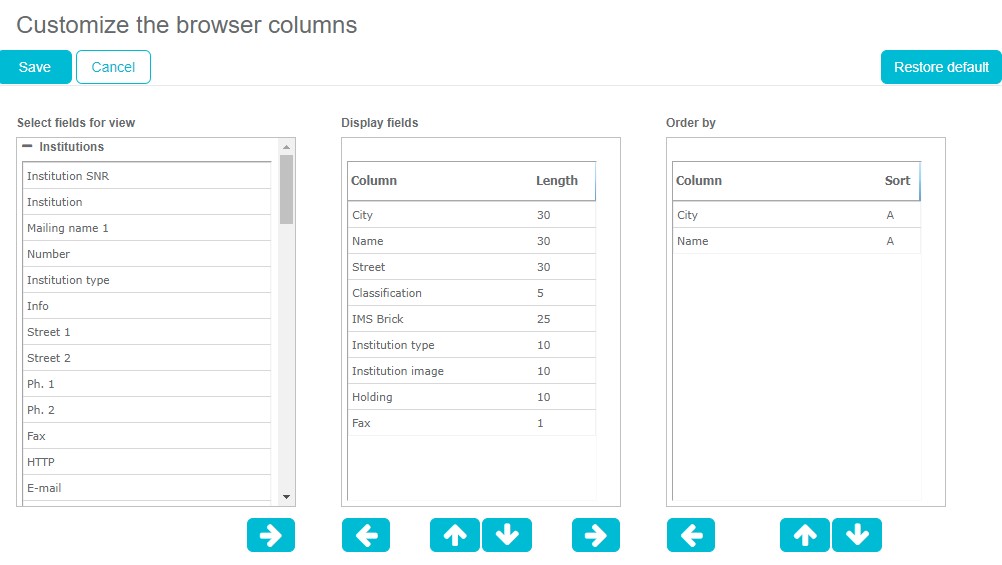
User can select field that are displayed in his window. Admin can’t change it. Only user can return to default.