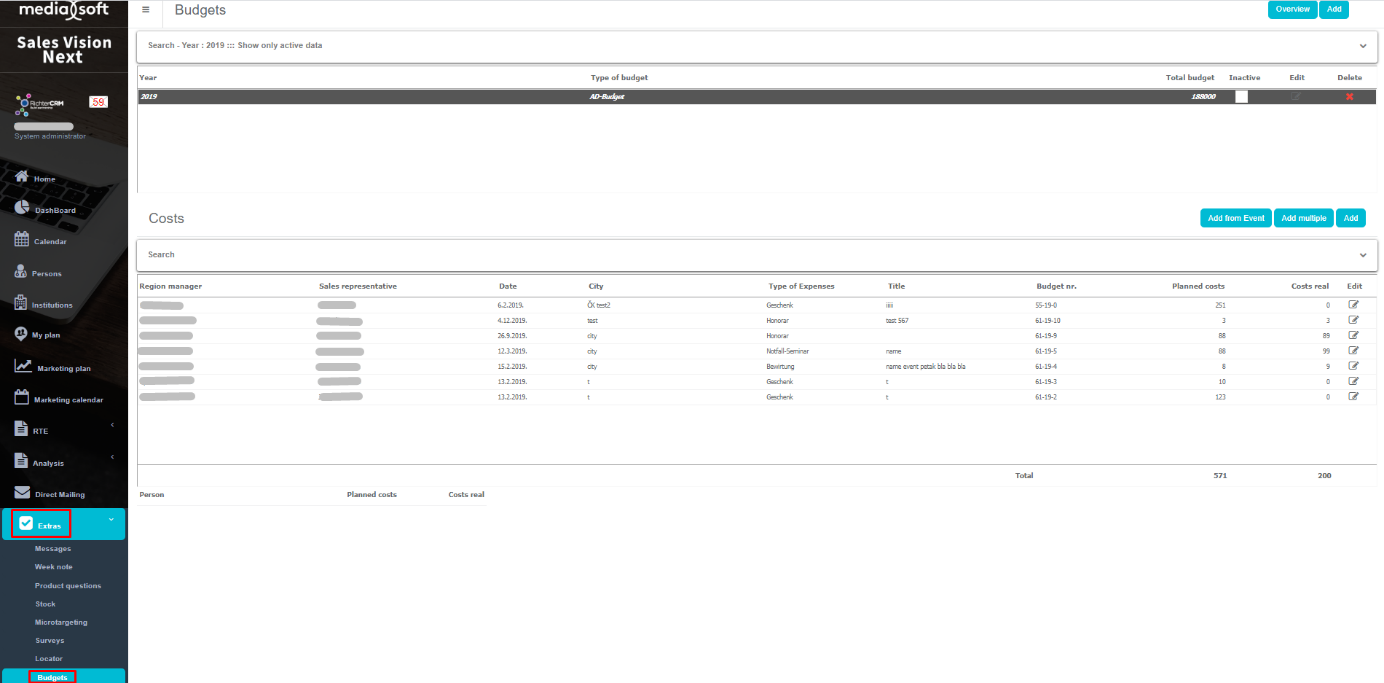
Extras
Messages
Module Messages is accessible after you place the pointer of the mouse on Extras, and drop down menu is shown and there you can access Messages module. Module is used for sending messages to colleagues, administrators or regional managers.
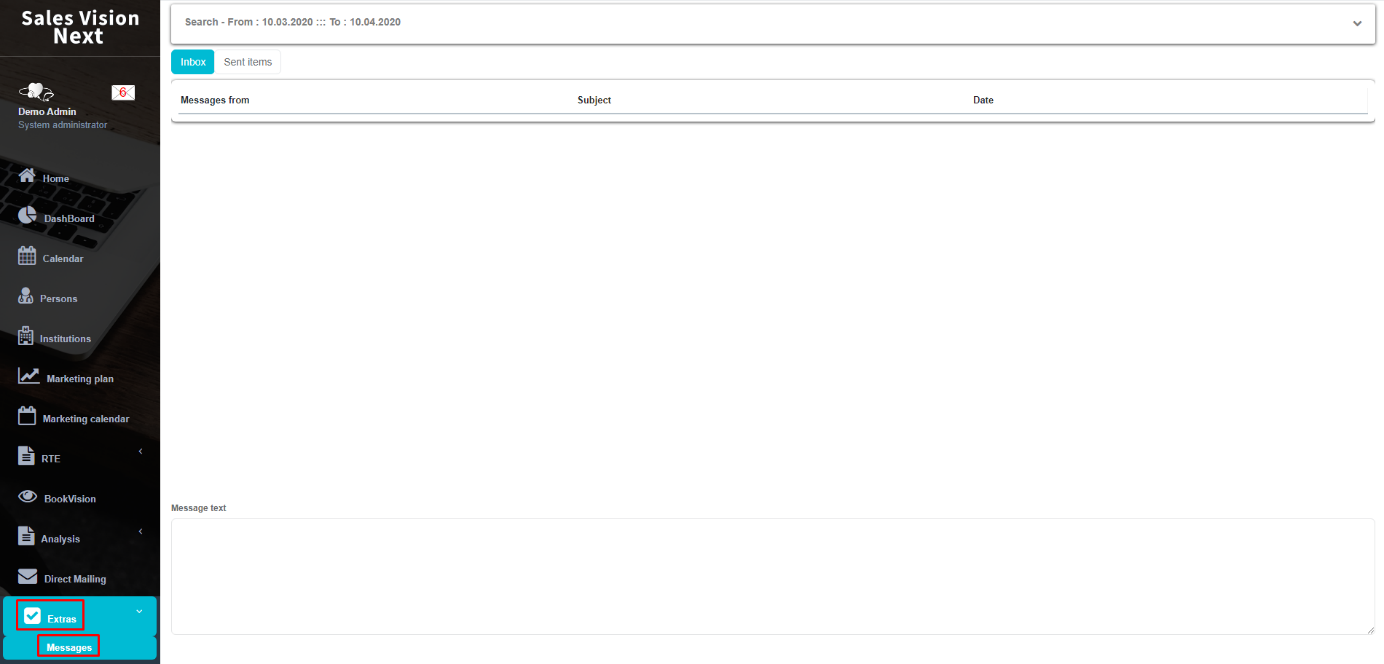
On the left side of the screen is your Inbox, Sent Items, and the Filter, where you can track messages from your colleagues, or by a period of time (From - To). In the center of the screen you can see Messages from Inbox or from the Sent Items. On the bottom of the screen you can see the text of the selected message. On the upper right side of the screen there are 3 possibilities: Delete, New Message and Reply. Delete function deletes the selected message, there is no verification. Reply is a possibility to reply to the a specific message.

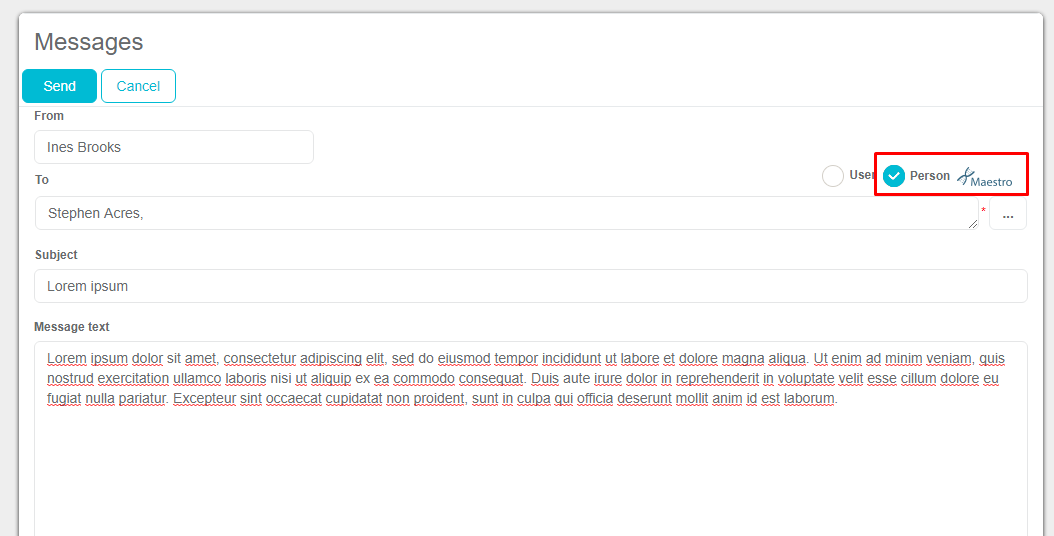
Click on the button New message and new window opens: “From”: Sender (you) “To:” Receiver of the message

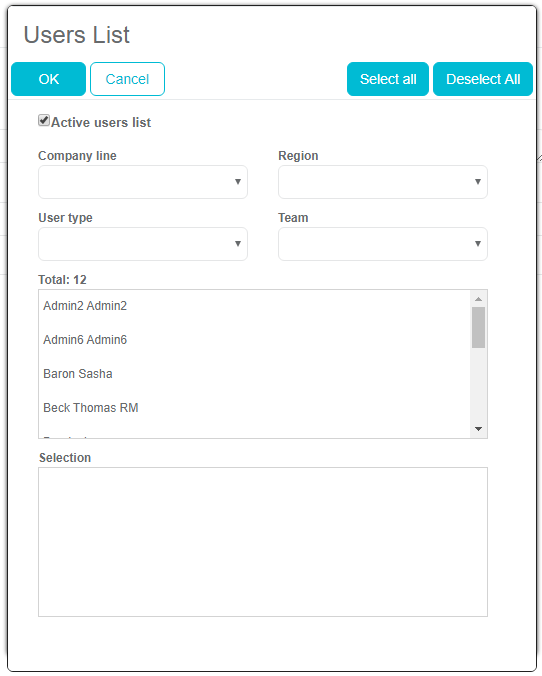
To select the receiver you have to press on “…” button. New window with a list of possible receivers will appear. Click on the persons you want to send a message to. Names should appear in the selection list. Choose the receivers and click the OK button. In the Message text field you have to enter the text of message. To send a message just press the Send button.
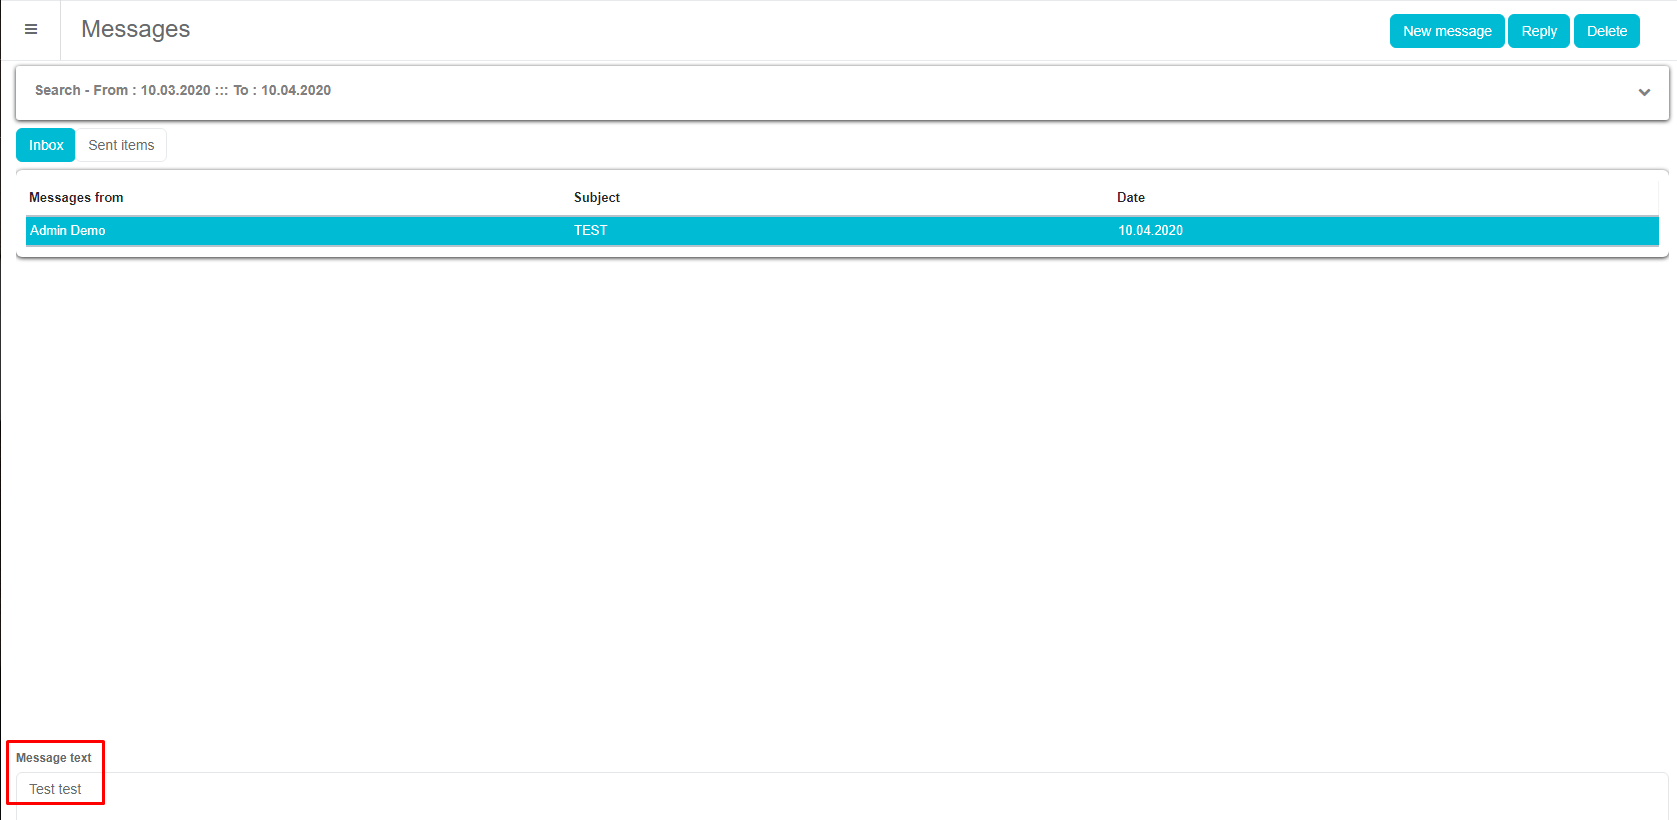
Received messages are visible in the message screen. If you want to read it, press on message. Message will display.
If module Maestro Doctor Portal is turned on, new radio button will appear and you will be able to send messages to persons from your database (selection between User and Person radio button in the upper right corner) and send them reply if you have received a message from a person.
Week note
A Week note is a module where representatives can write different week notes. To access it, press Extras and then press on Week note to open the module. This is how the module looks like once you open it. On the top of the screen you can see different filters; you can filter by representative, date from and date until.

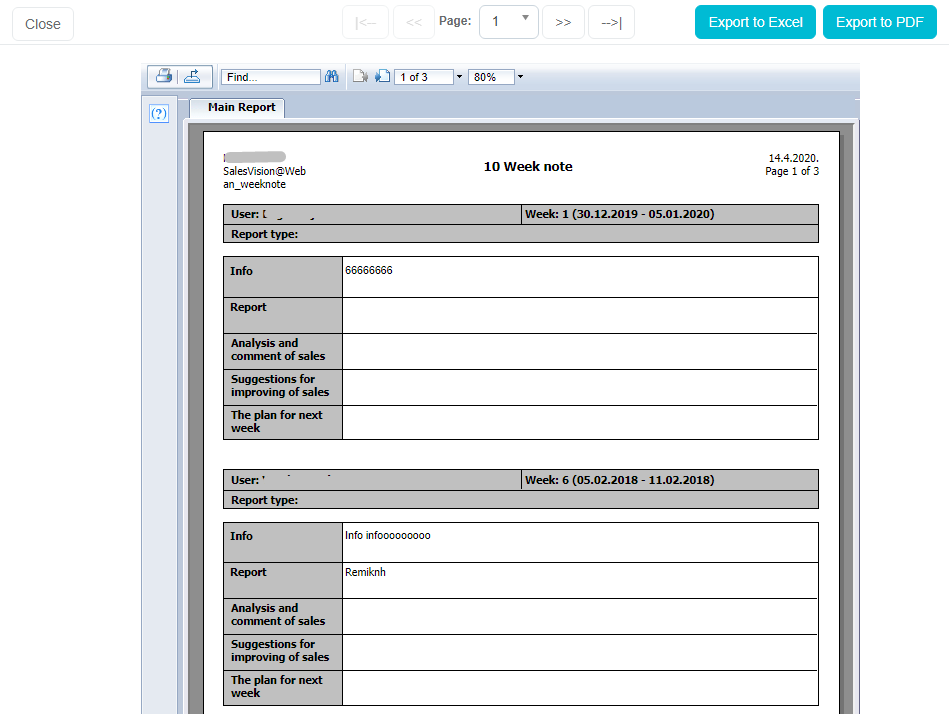
Below that you can see the Notes. You can see the Information about the Date, Week, Year, Representative and Report Type of added note. When you enter a note, it will appear here. If you want to get report, press Report button. A new screen like on picture below will appear.
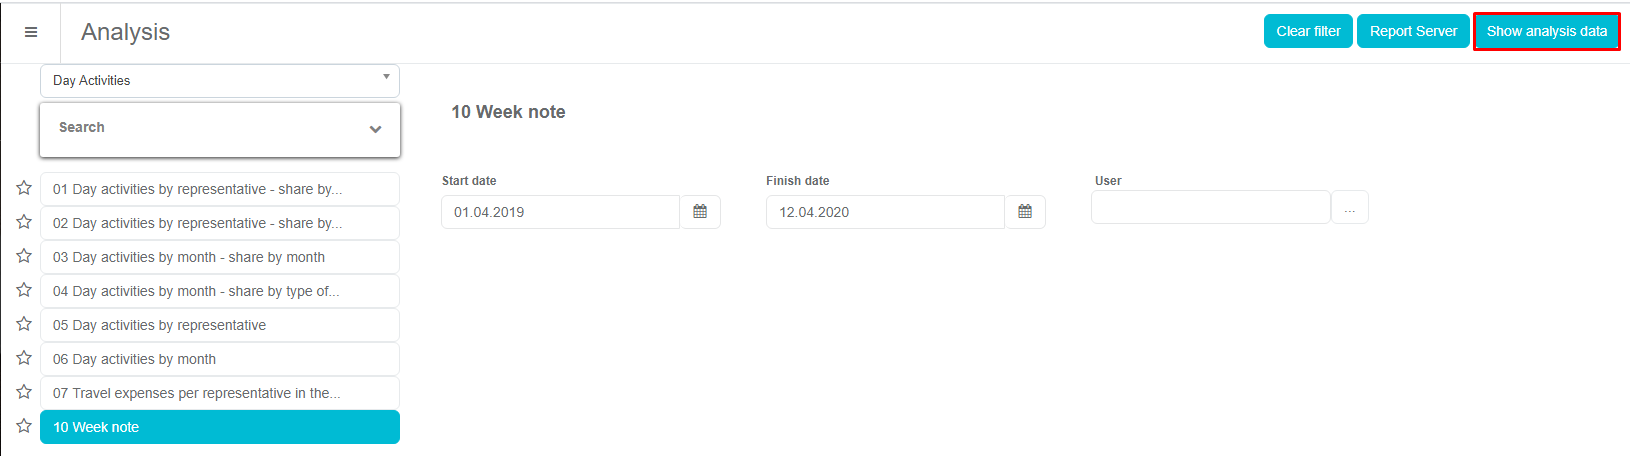
When you choose options that you want, press Show analysis data. A new window will open with data. You can export, print and search document. When you are finished, press Close to return back to notes.
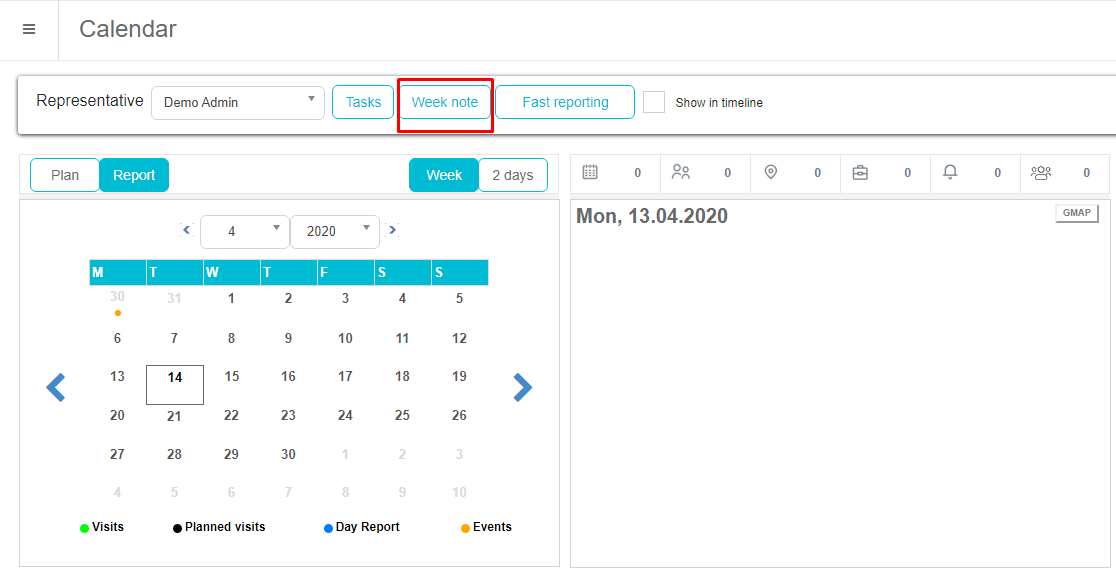
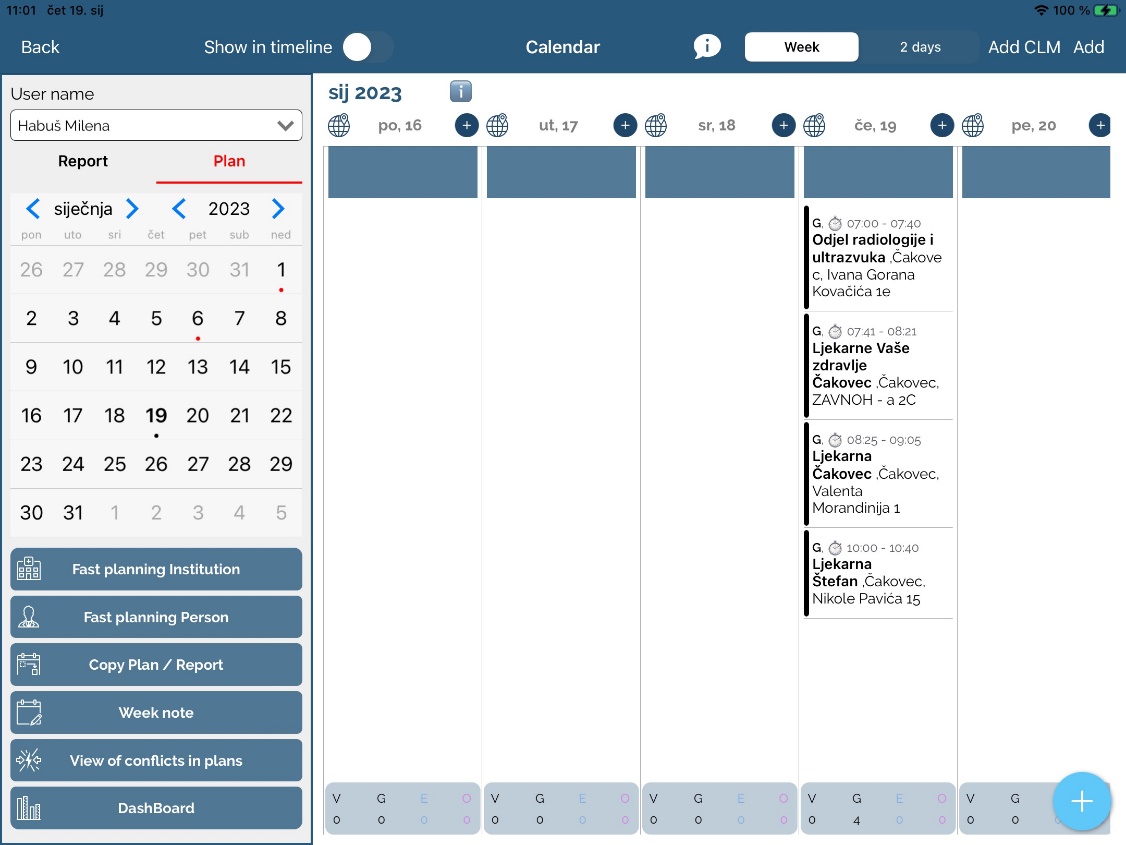
Also, a Week note can be added by using the Calendar module. To access it, press Calendar. On top of the screen you can see buttons. The marked button is used for adding a Week note.
By clicking the button, a new window (like in picture below) will show up. When you enter data, press Save for saving.
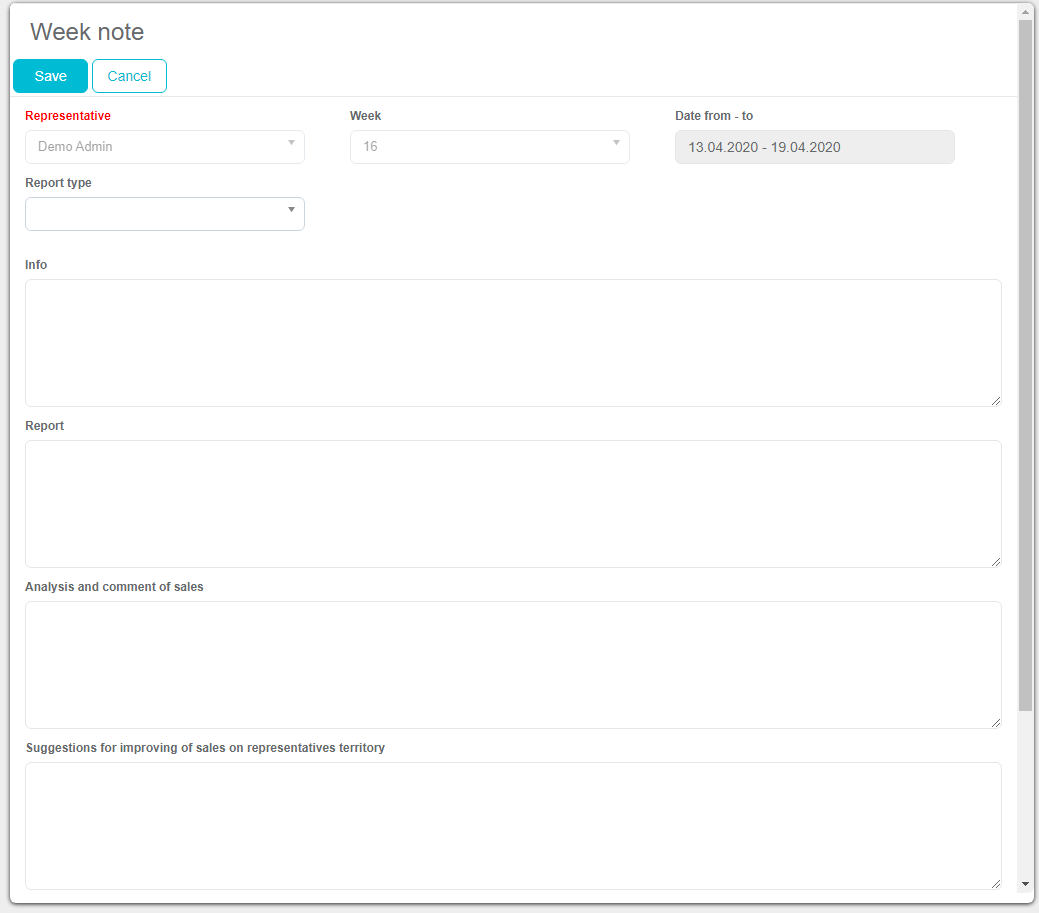
All notes can be seen in Week note module as was described earlier.
Product questions
Module Product questions is used for data exchange within the company. If a user has a question and does not know or is not sure in the answer, he/she can simply make an inquiry to his/hers colleagues by using a module called Product questions. New product question can be saved in SV iPad version, but it is not possible to make an answer, only to view it.
A product question is a module where Sales representatives can write different questions about specific products. If the SR does not know some facts about the product, he writes down the question and the RM or SM answers it, and afterwards it is visible to all Sales Vision users. To access Product questions place the cursor on Extras and then click on Product questions to open the module.
This is how the module looks like once you open it.

On the top of the screen you can see different filters; you can filter by representative, product or date.
Below that you can see the Questions. You can see the Information about the product, representative, date, what was the question and the status of the question.

On the top right there is a toolbar where you can make New product question, and create different reports.

Stock management
User stock quantity shows samples quantity on stock together with input/output. User stock output allows us to see output quantity per date together with the person, country and city info. For User stock input we can see the entry date and quantity for each input. Stock overview module is used for tracking the amount of samples, gifts, promotional materials or any products. To access Stock module, place the cursor on Extras and then press on Stock to open the module.
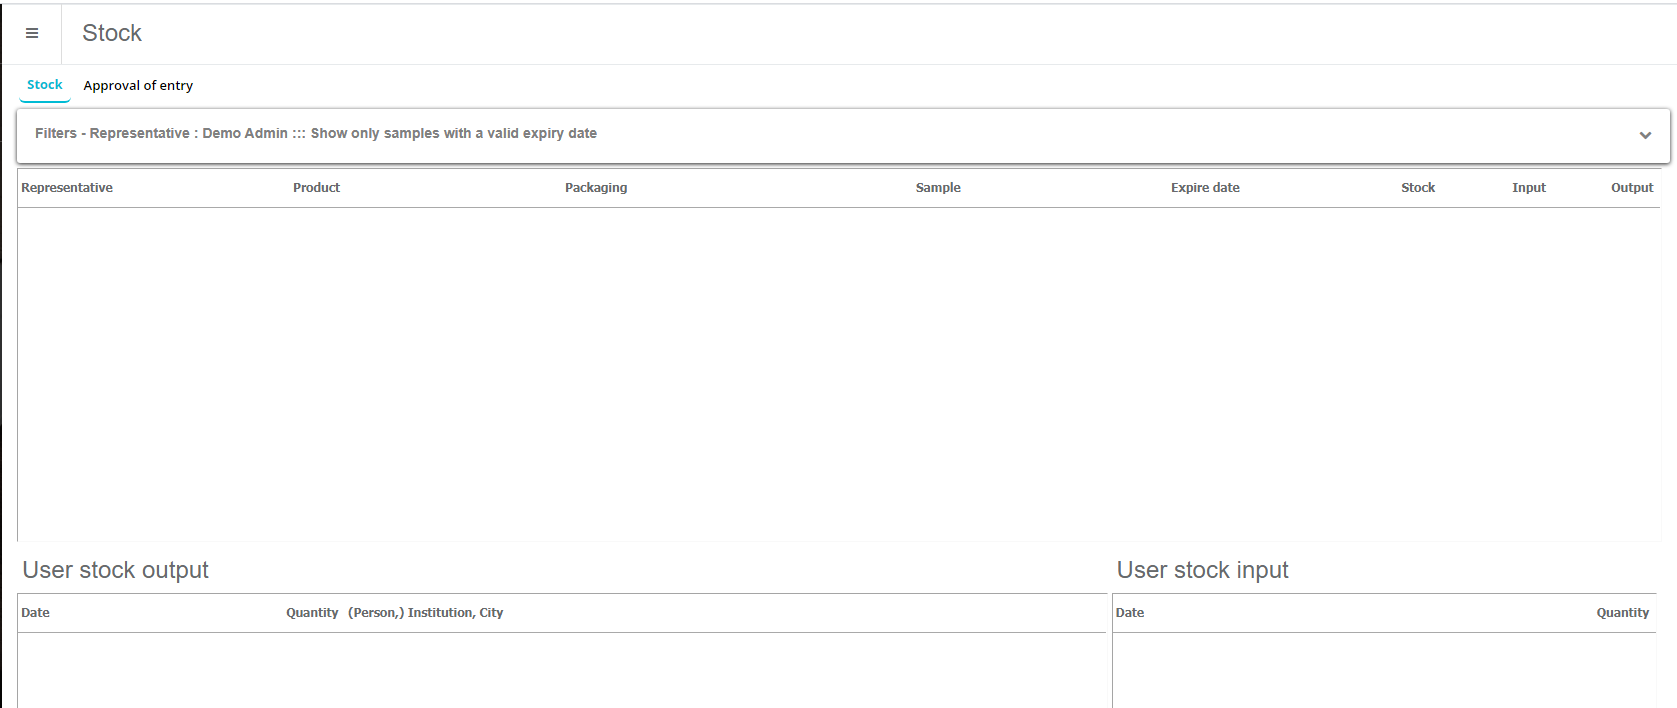
This is the main screen once you open the Stock module. On the upper part of the screen you have additional filters for filtering the data.
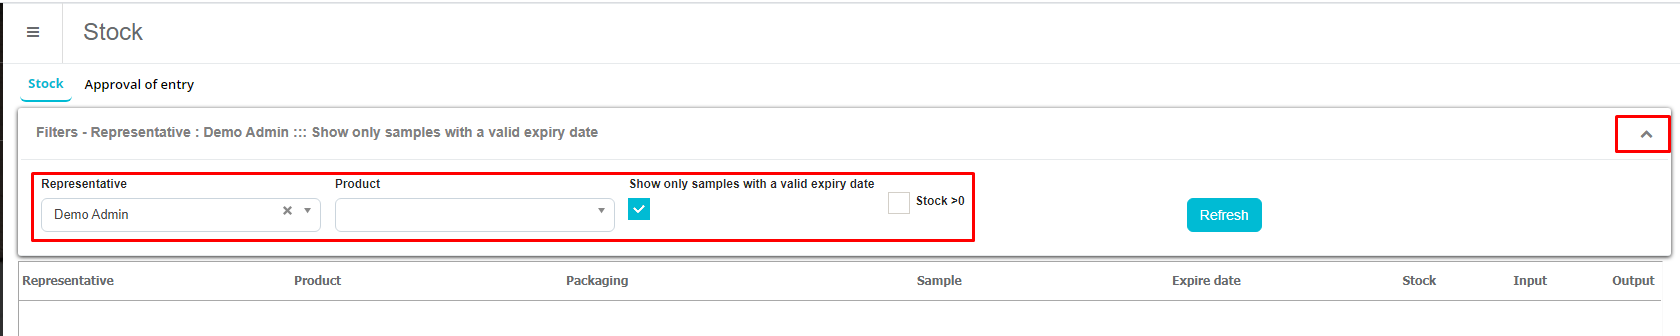
Selecting a user shows the stock for that particular user. You can see gifts, samples, promotional material along with quantities of any product that user has on his stock. The data can be filtered by product or stock item (gifts/samples/promotional material). Every stock item has its own history, so that it can be listed by users, persons, dates, outputs or inputs in the analysis section of the window. User stock output and User stock input shows the data of stock changes done by selected user.
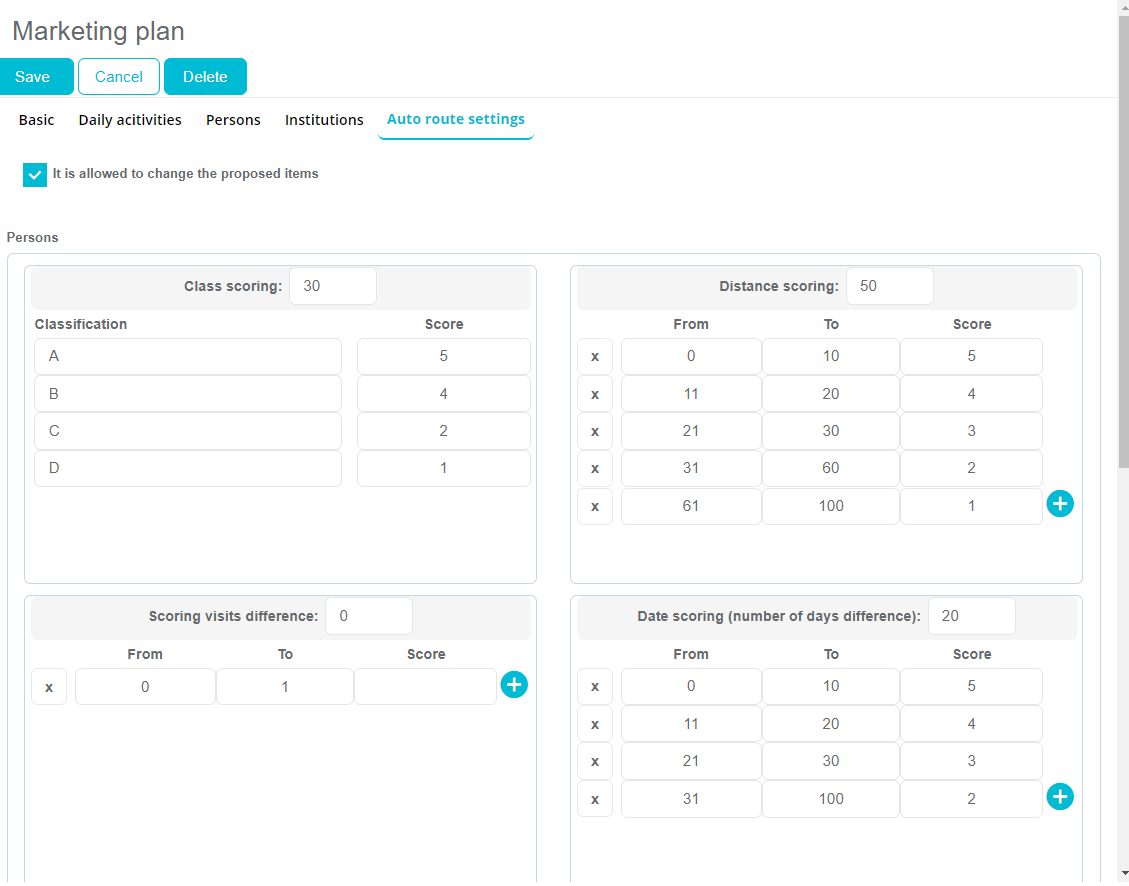
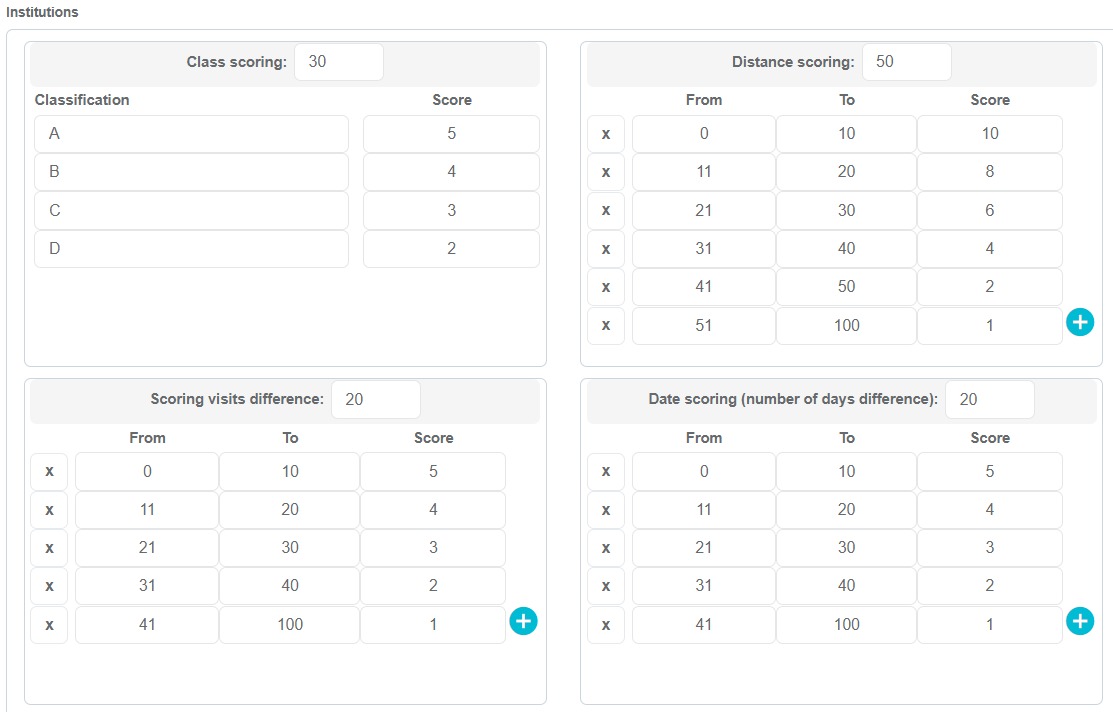
Microtargeting
To access the Microtargeting module, place the cursor on Extras and then click on Microtargeting to open it. Microtargeting is a module for classifying persons and institutions. Themicrotargeting window is similar in form and function as in Persons and Institutions module; users can add new microtargeting, filter and open an existing one.
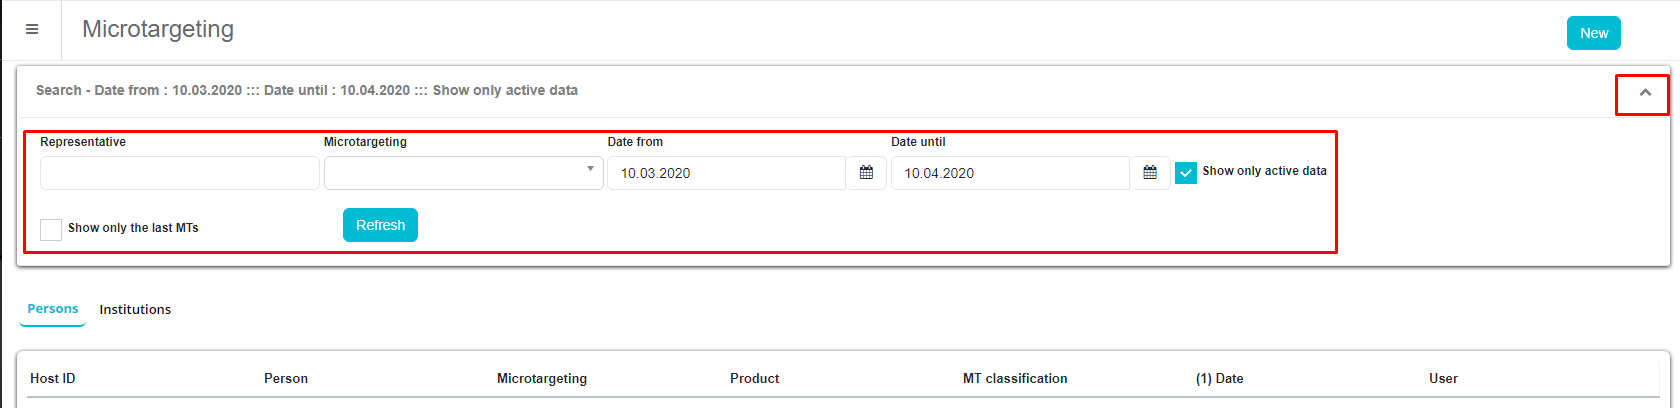
Once you open the module this is the main screen. When you lower down the filter, you can do the filtering by date, microtargeting type or person/institution. Changes between showing institution microtargeting or person microtargeting are done by clicking on the Show dropdown box above the Refresh button.
Adding new microtargeting
To add a new Microtargeting click on the button New on the right side of the screen. After clicking on it, you need to select the person/institution from the standard selection window. To select it click on choose.
The questions for microtargeting are divided in two groups, Group X and Group Y, and every group can have more questions. Every answer of every question has its own ponder/weight, and it affects on the classification of that person or institution. Current score and classification view boxes are located in the lower right corner of the microtargeting window. Important thing is that once you save the answers, you can see the classification of person/institution.
Microtargeting analysis
You can also run different Microtargeting analysis (overview of questions/answers, classification…), and they can be found in the Analysis module – Standard reports – Microtargeting.
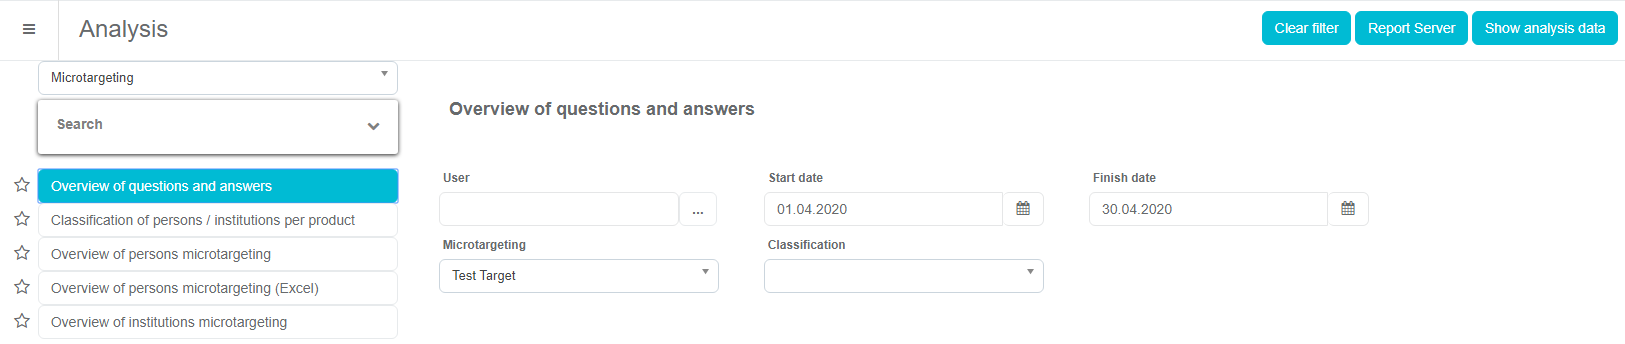
Just like with other analysis, you can use filter to narrow down your search.
Surveys
A Survey is a module where you can create different surveys for persons/institution. To open the module place the mouse pointer on Extras and then click on Survey. To be able to use this option, questions and possible answers must be created by the administrator in the Admin part of Sales Vision. Then you simply choose the answers to the questions. This is how the main screen of the module looks like once you open it. On the upper part of the screen are filters where you can find already created surveys by name, representative, start/finish date and IMS brick. In the middle of the screen you see a list of already created surveys with the additional information about the Date when it was created, for which Person, Specialty and which Representative conducted the questionnaire.
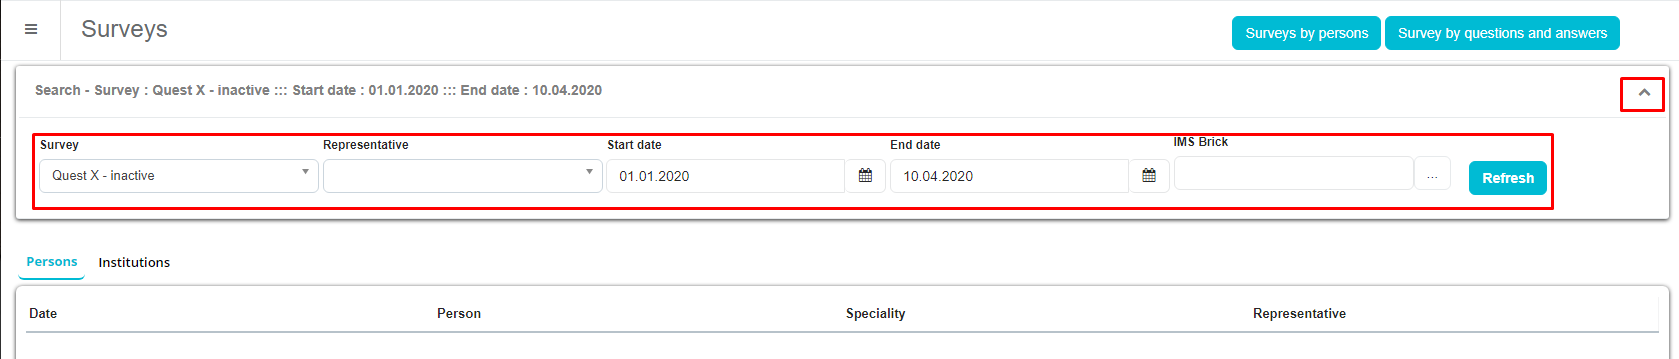
On the upper left part of the screen you have the possibility to switch from person/institution surveys.
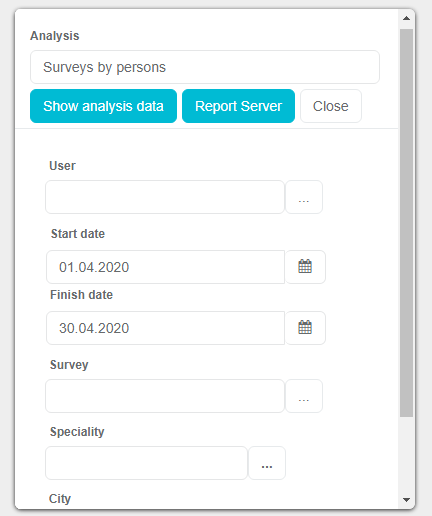
On the right top side of the screen you have the possibility to make ad hoc reports for surveys. Two reports are available Surveys by persons and Surveys by questions and answer. Once you select the desired report, press on it and a new window will open where you need to enter the parameters for the report. When you are finished press on Show analysis data to see the report.
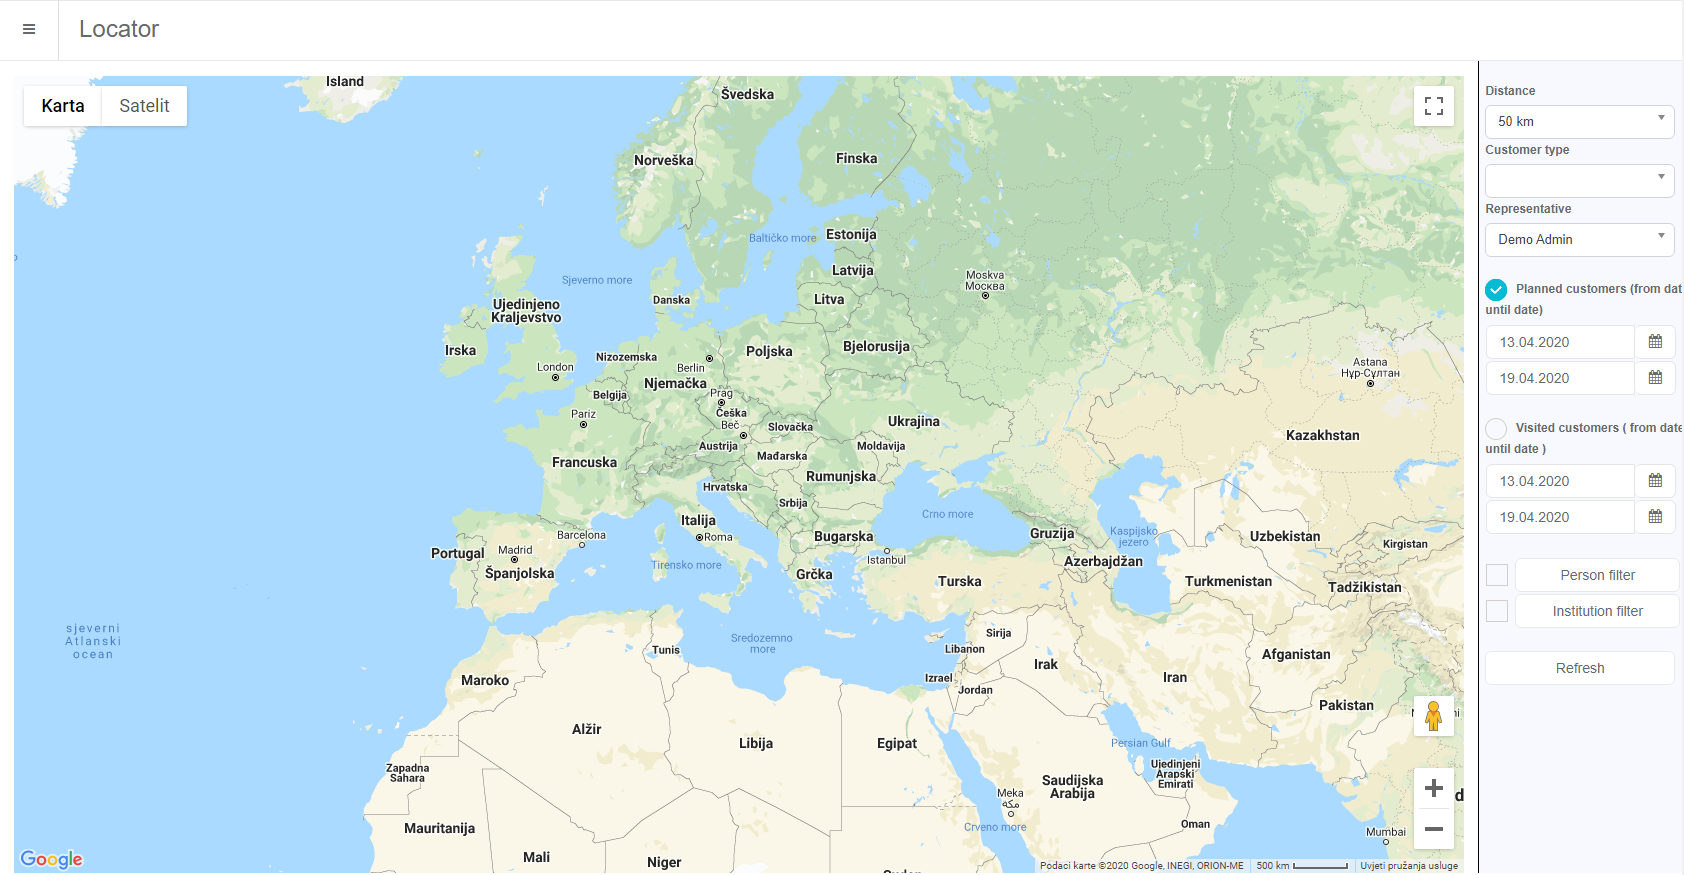
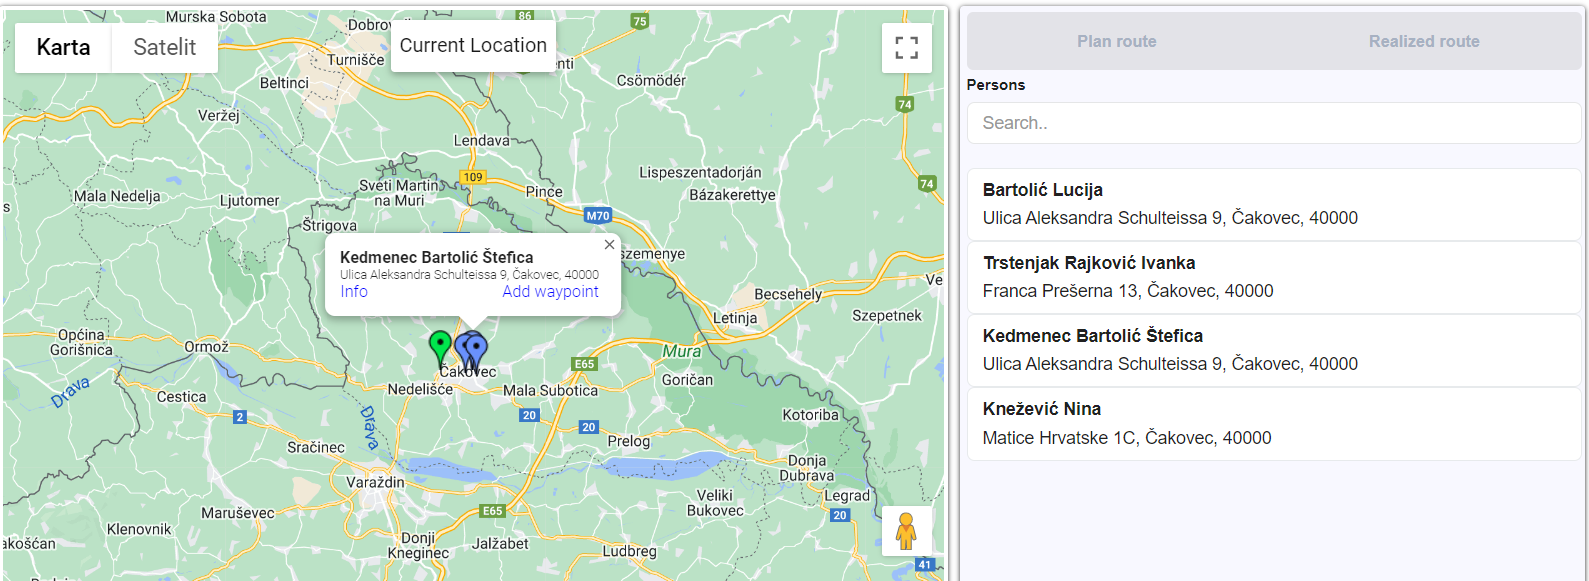
Locator
Locator is a module where you can use Google Maps and GPS coordinates, to find and track different institutions/persons on the map. This is how the module looks like once you open it. You can see a map, and on the right side you have different parameters for searching persons/institutions on the map. You can filter by distance, customer type, planned and visited customers, persons/institutions filter.
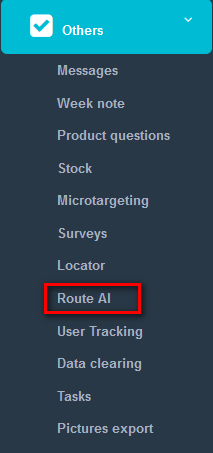
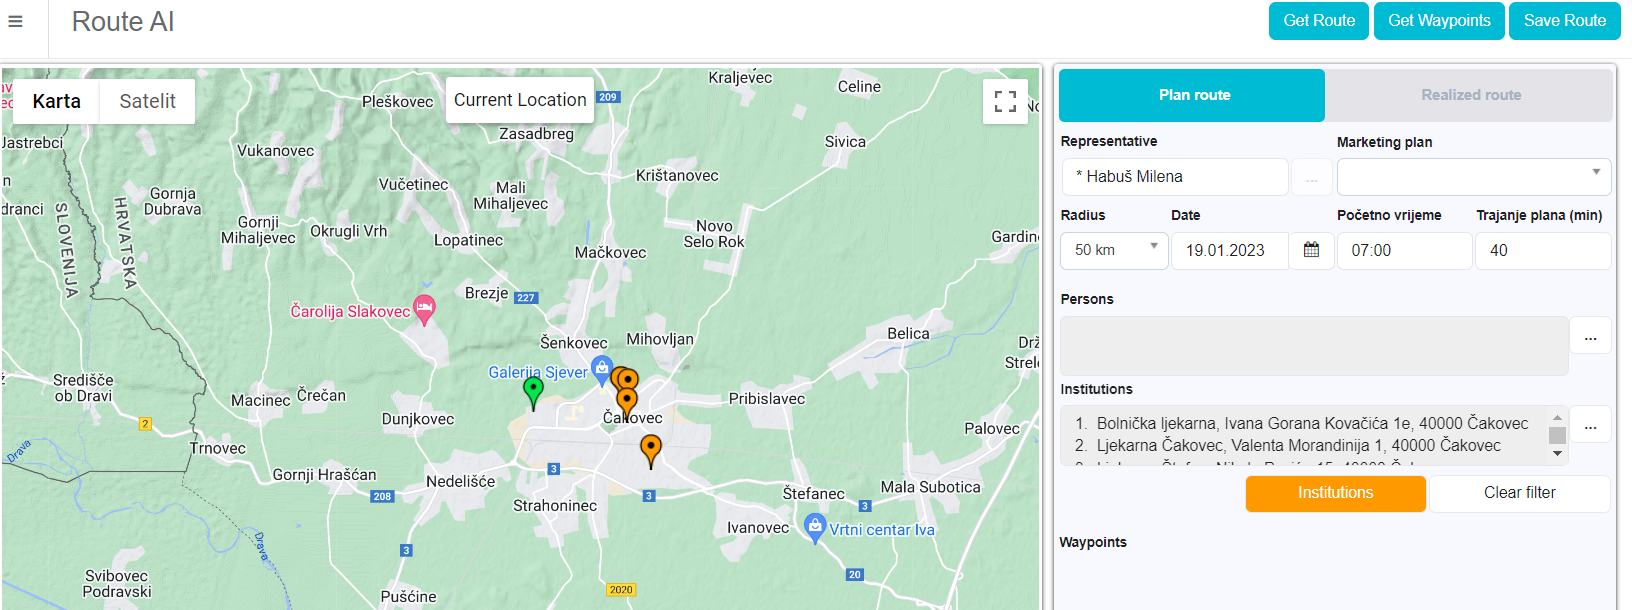
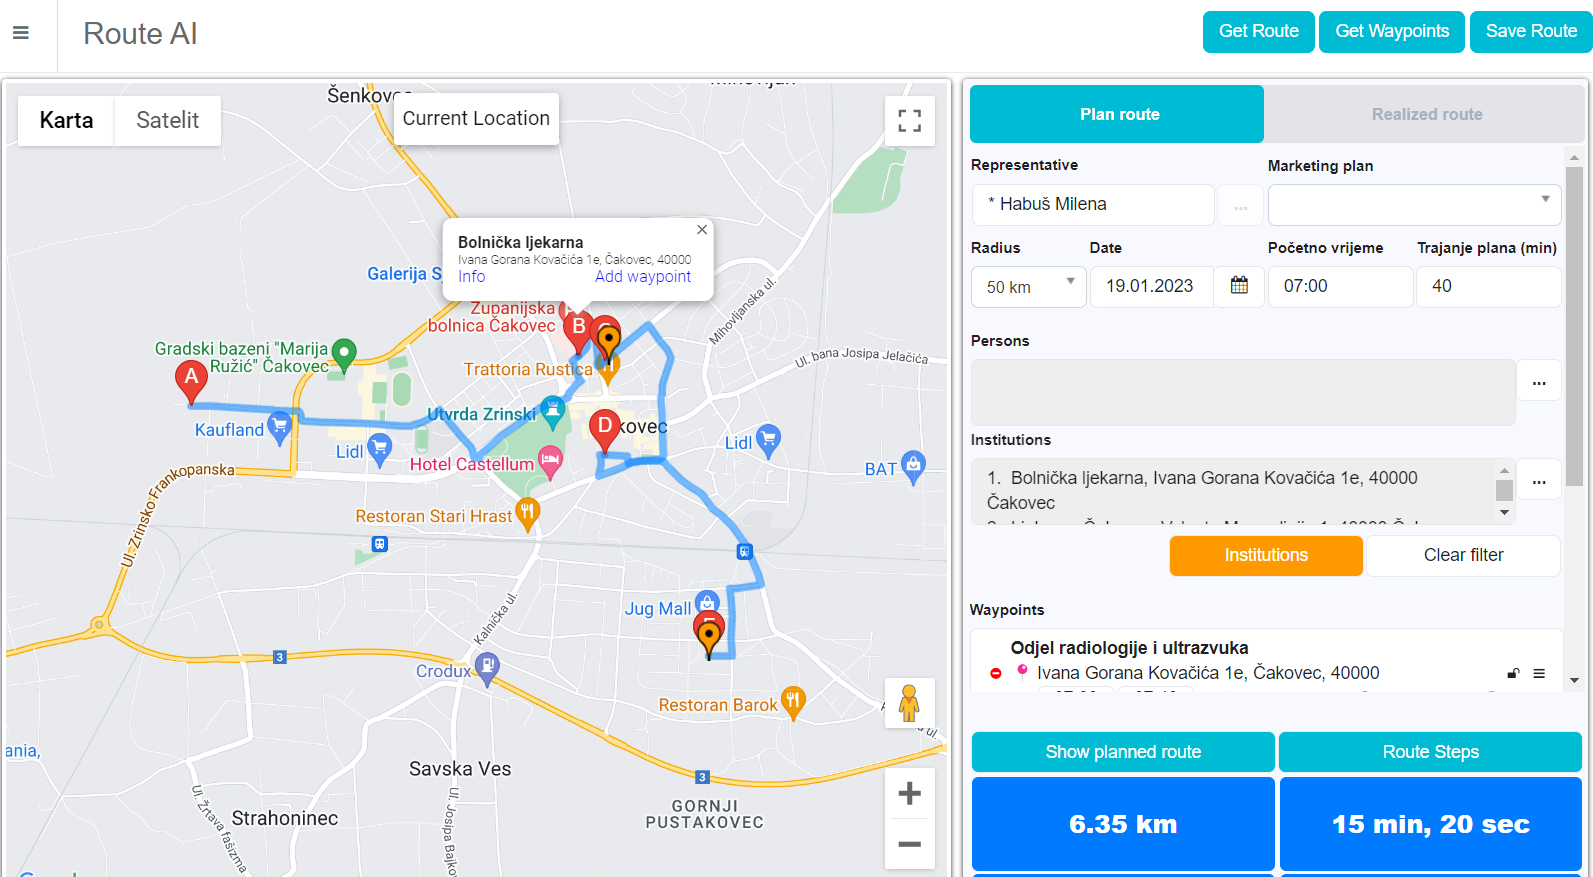
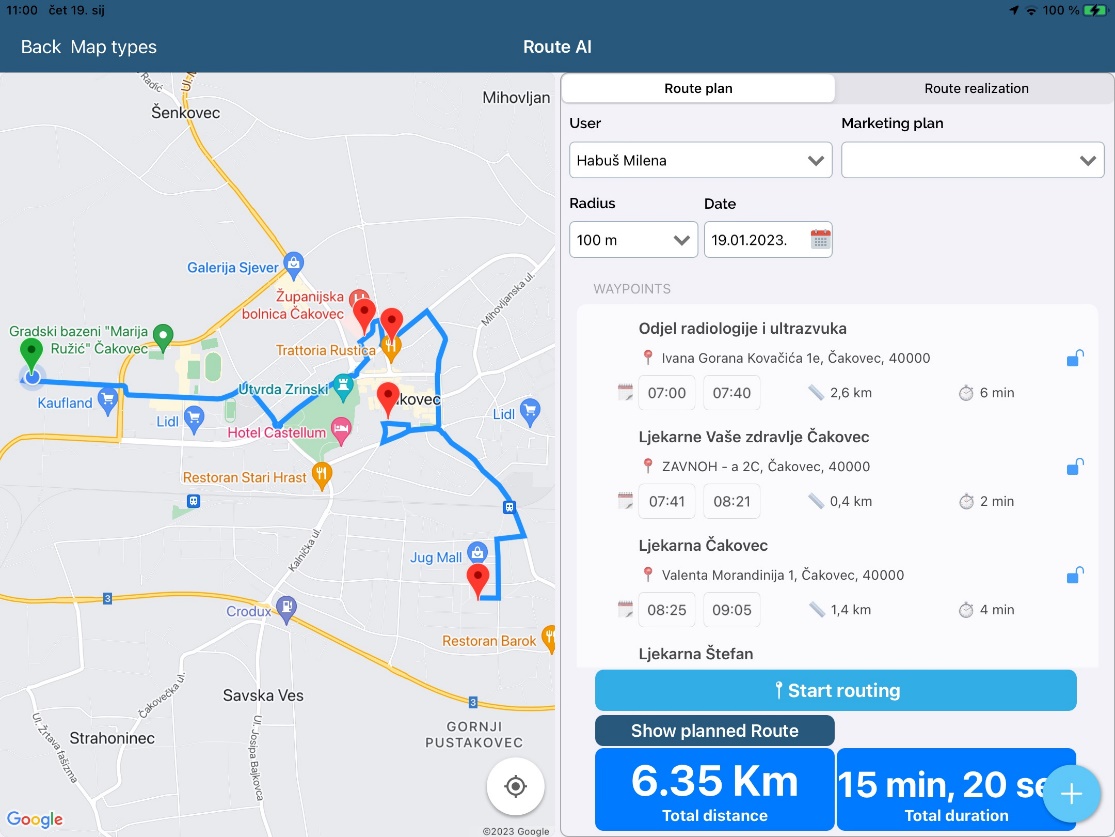
Route AI
Module Route AI is positioned in the “Other” category.
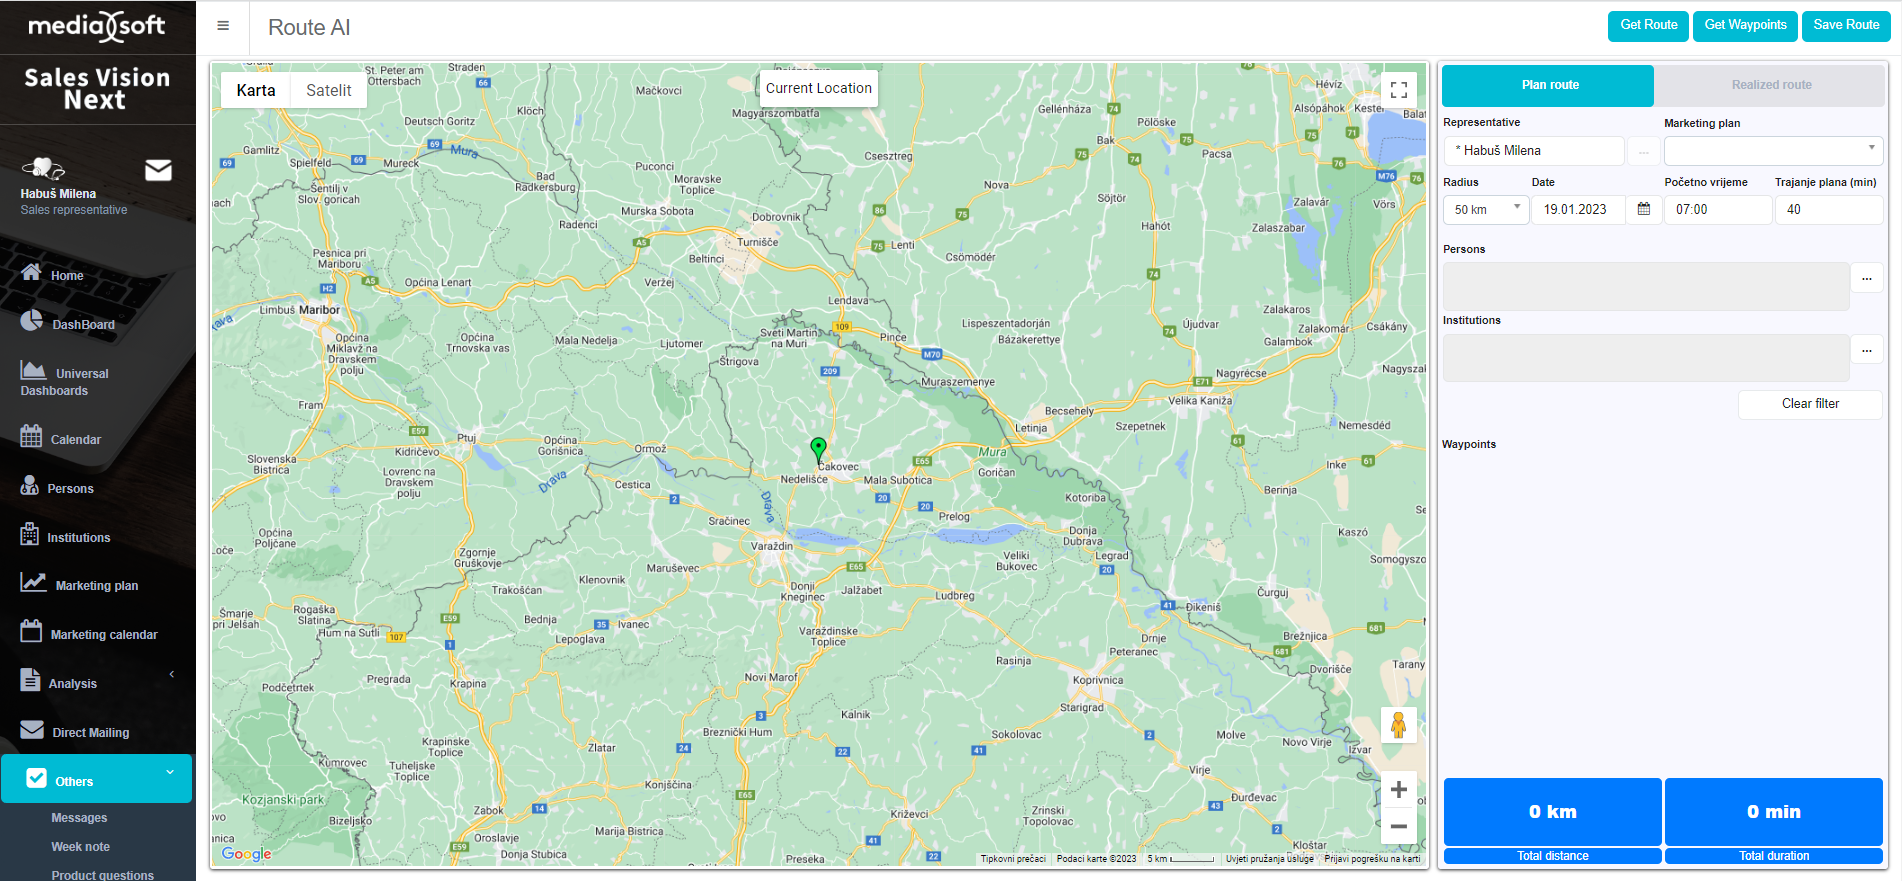
This is how the module initially looks like. Searching by the Representative, System administrator can switch between SR’s to show past routes.

After logging in as Sales rep, this is the initial screen of Route AI:
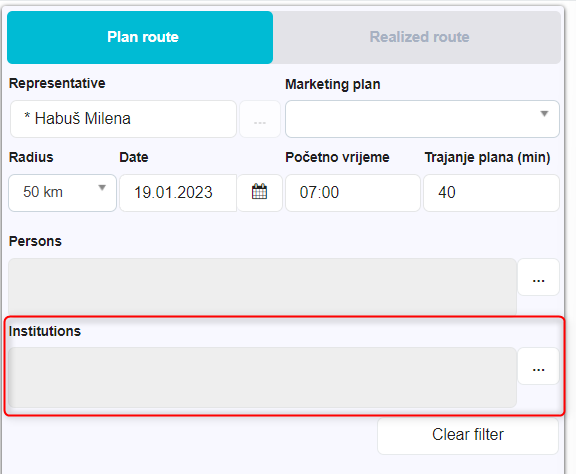
Institutions picker:
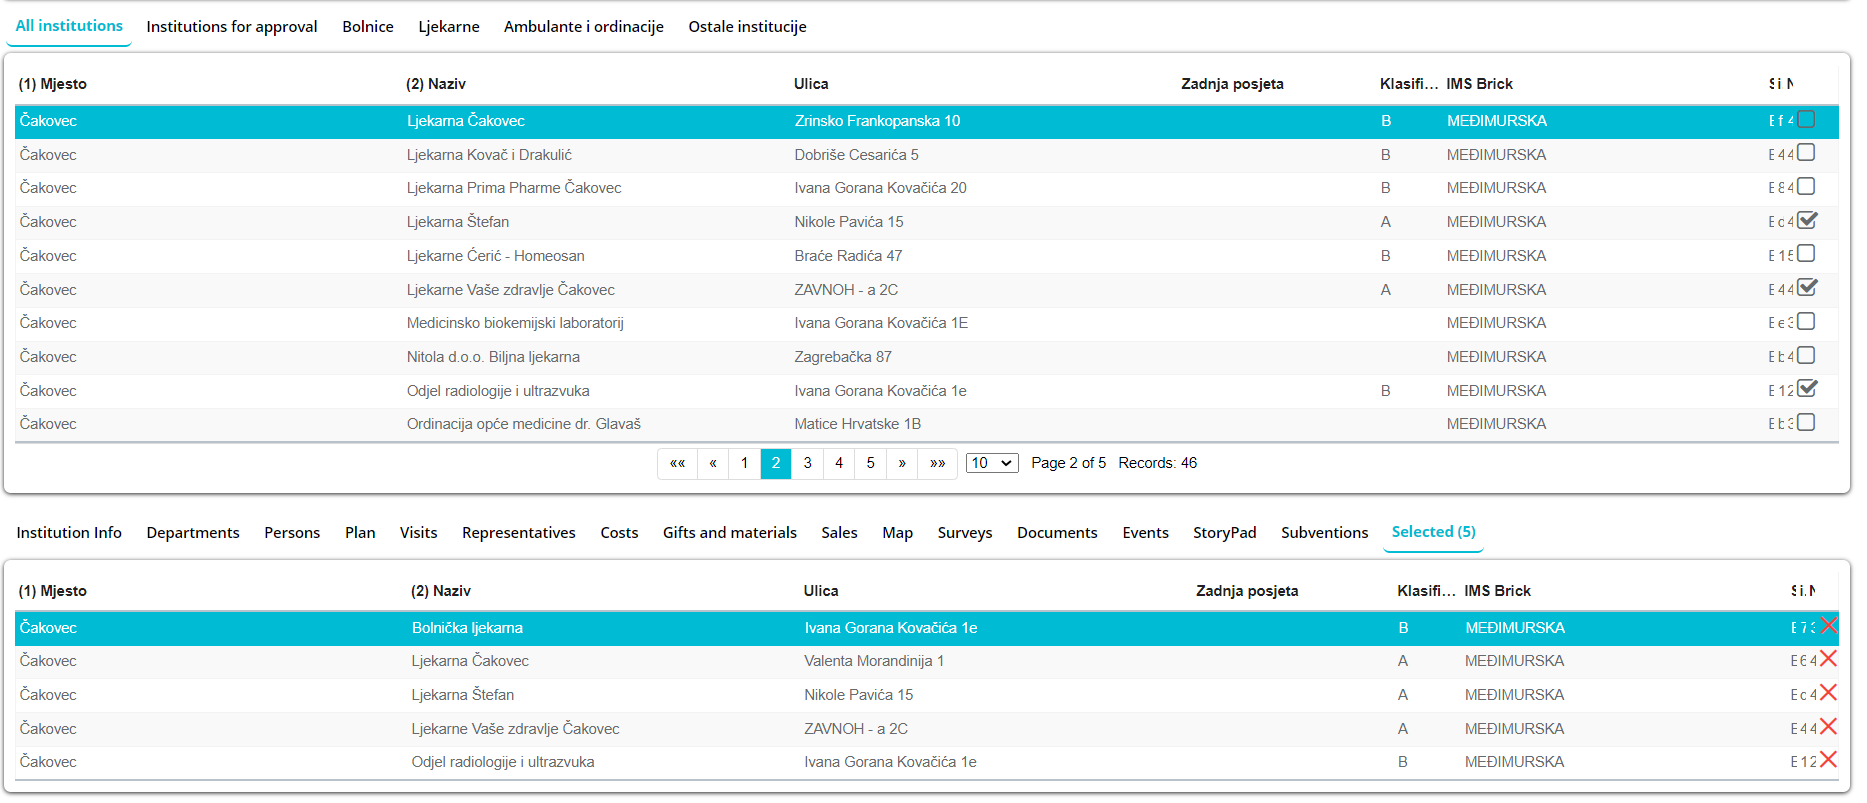
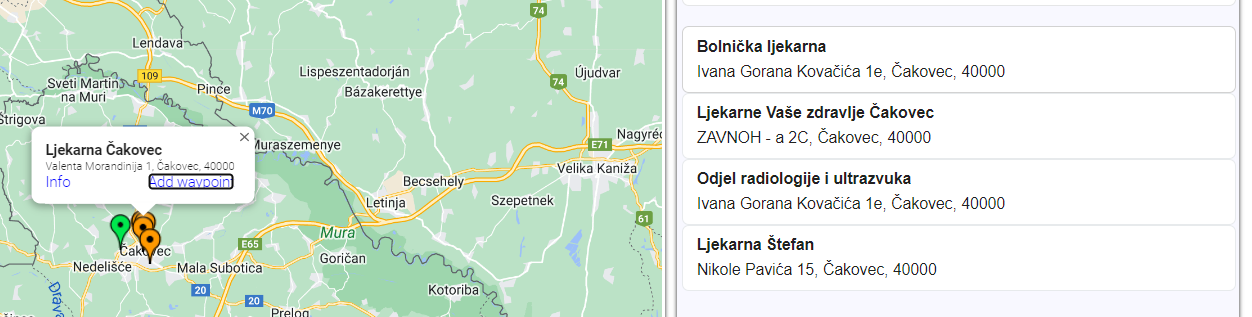
On the map, you will see all the selected institutions from the list:
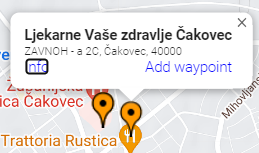
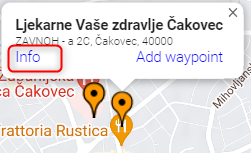
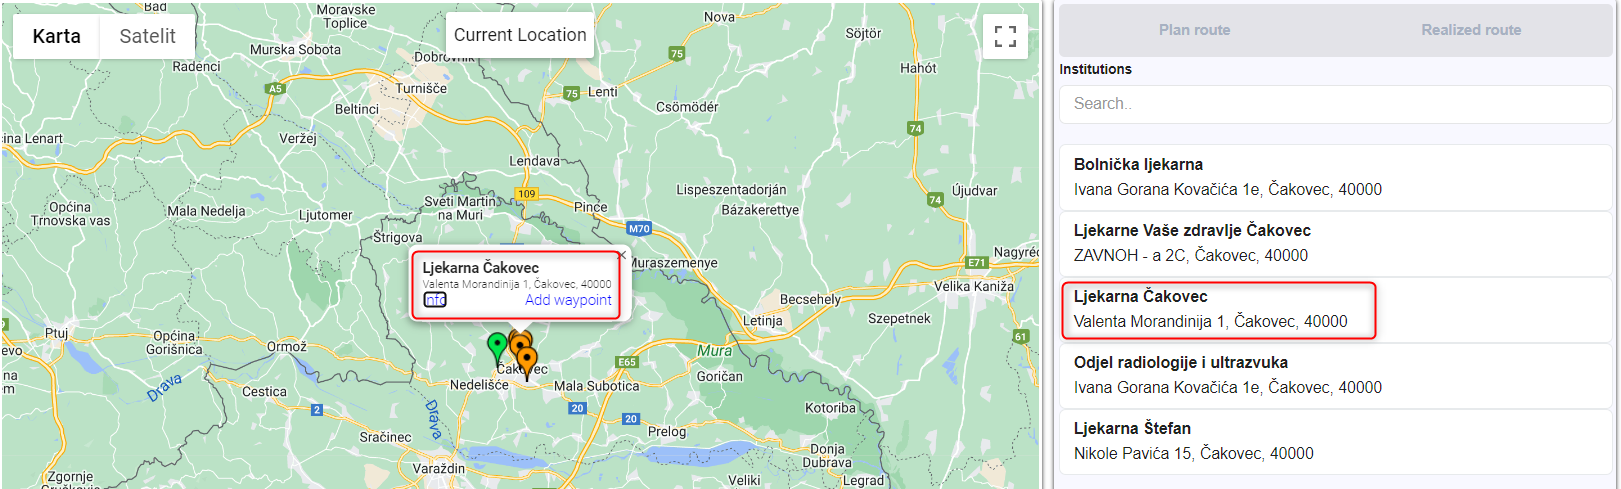
By clicking on one of the institutions, you will see short info about the institution.
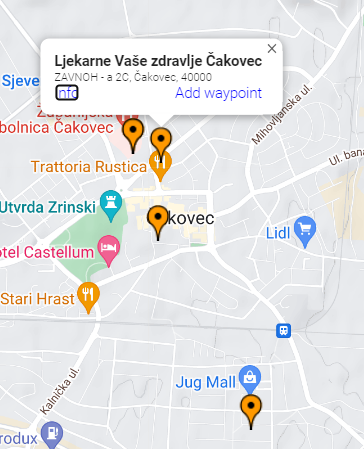
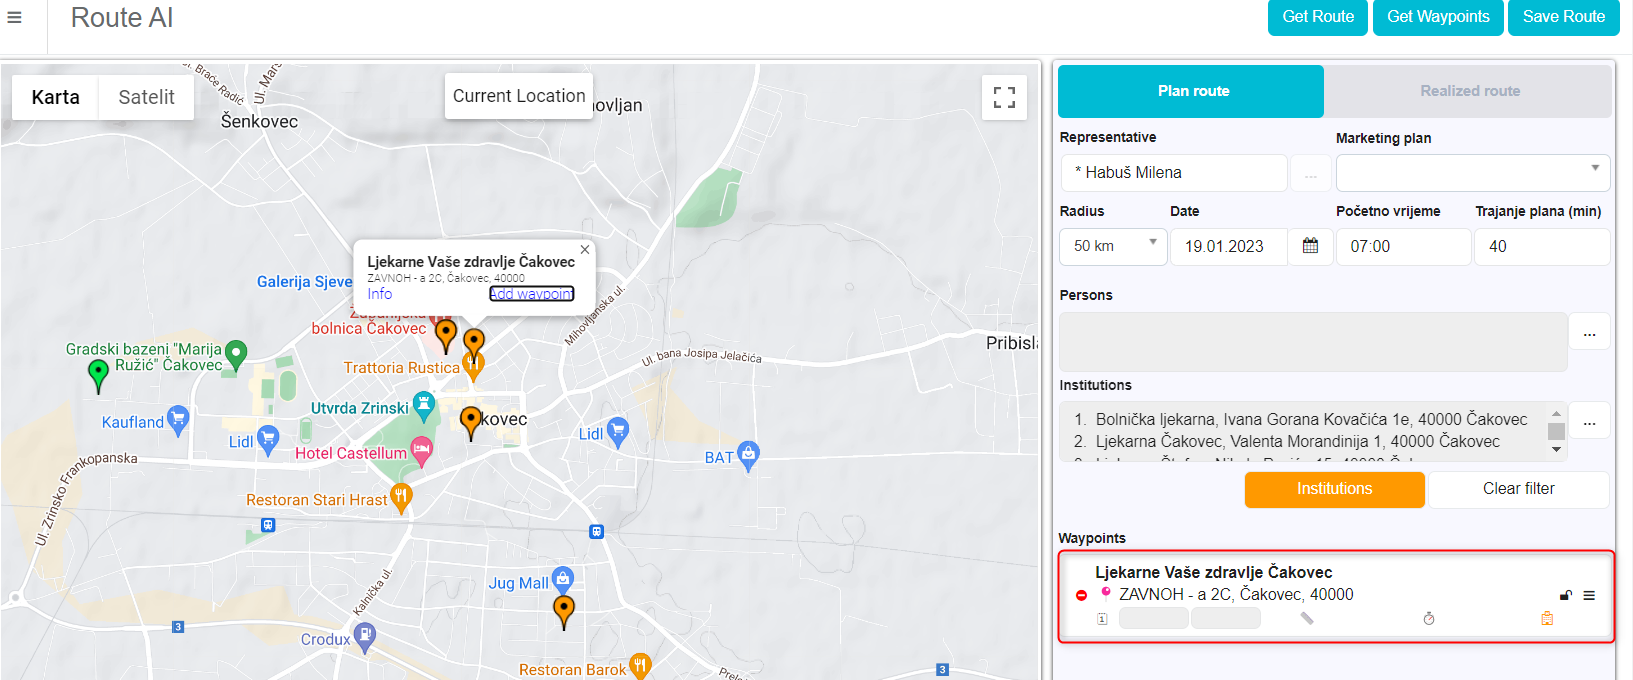
For adding new location based Waypoint, click on “Add waypoint”:
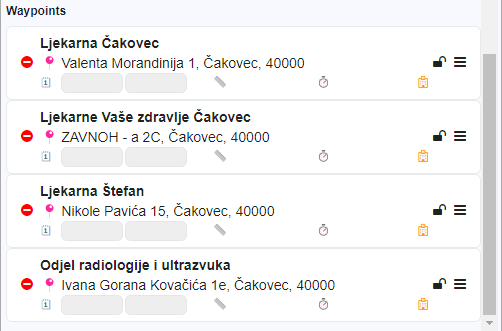
New waypoint on the list:
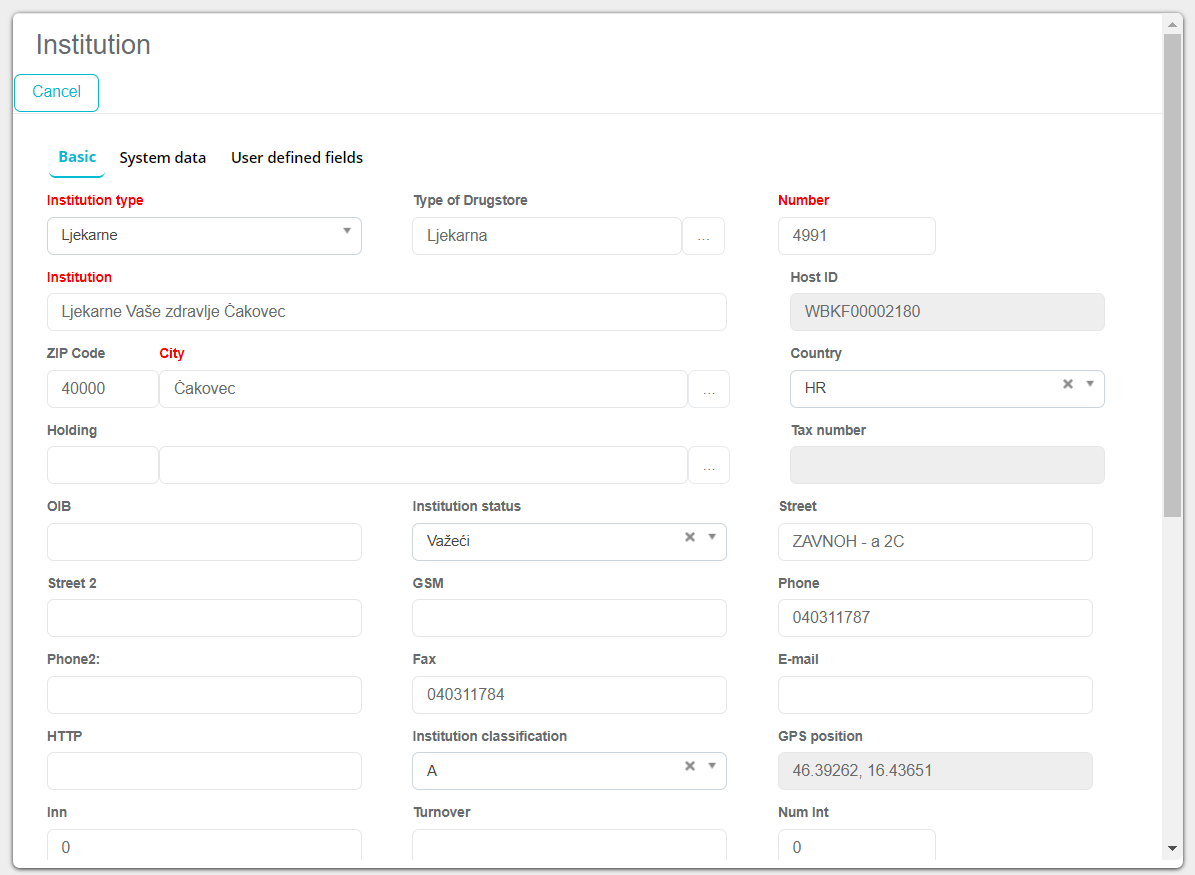
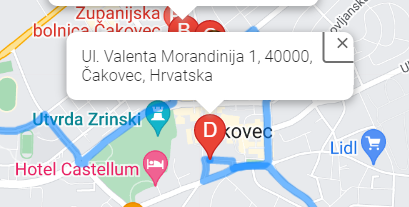
If you click on “info”, the Institution wndow will open up.
You can check the data and edit if you have the rights.
The waypoints are added by click on the button “Institutions”.
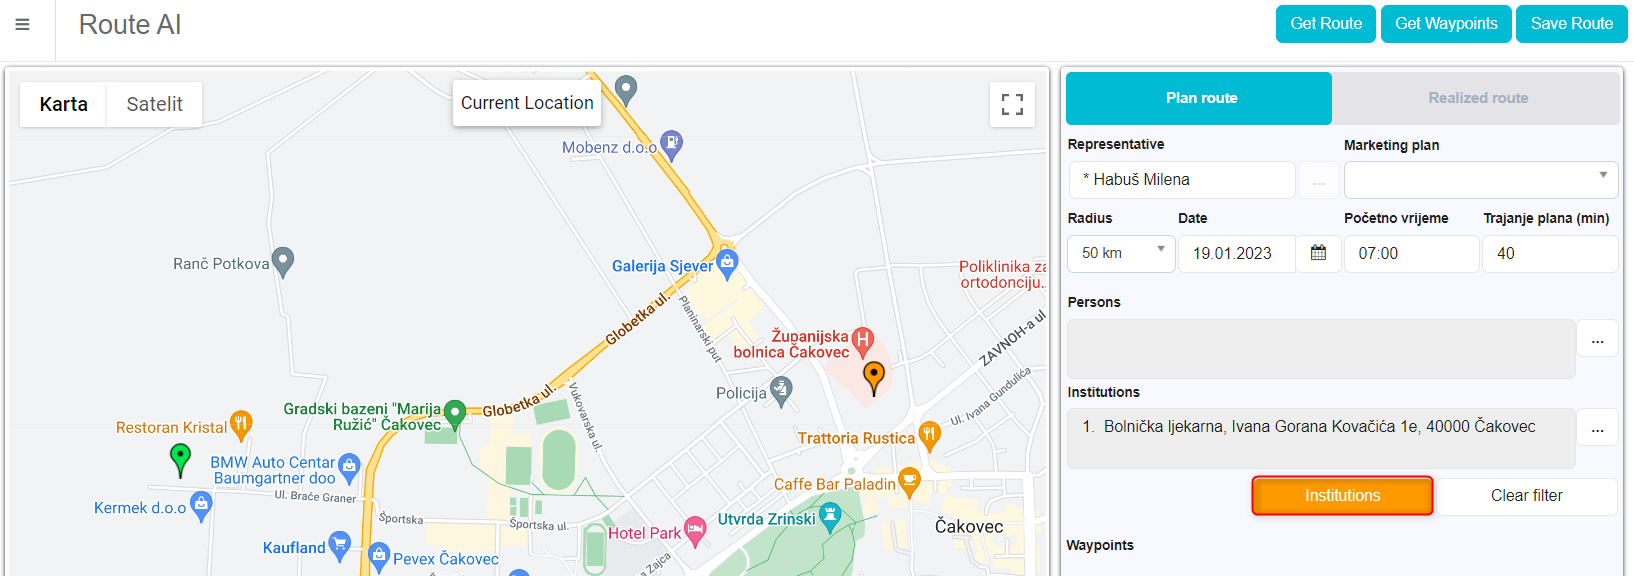
The list is opened on the right part of the screen – You will see all selected institutions.
When you add a waypoint, the institutions disappear from the list.
To get back to the initial screen, click on “Plan Route”:

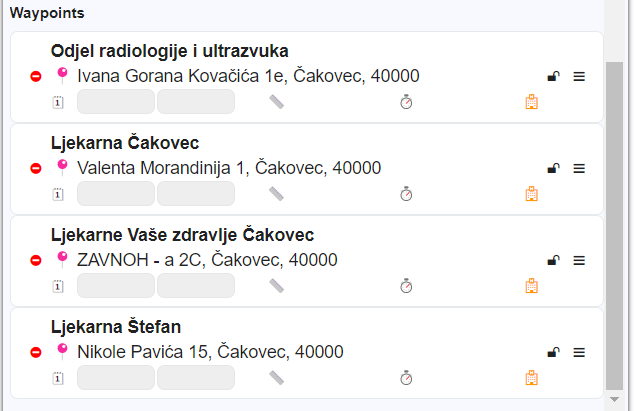
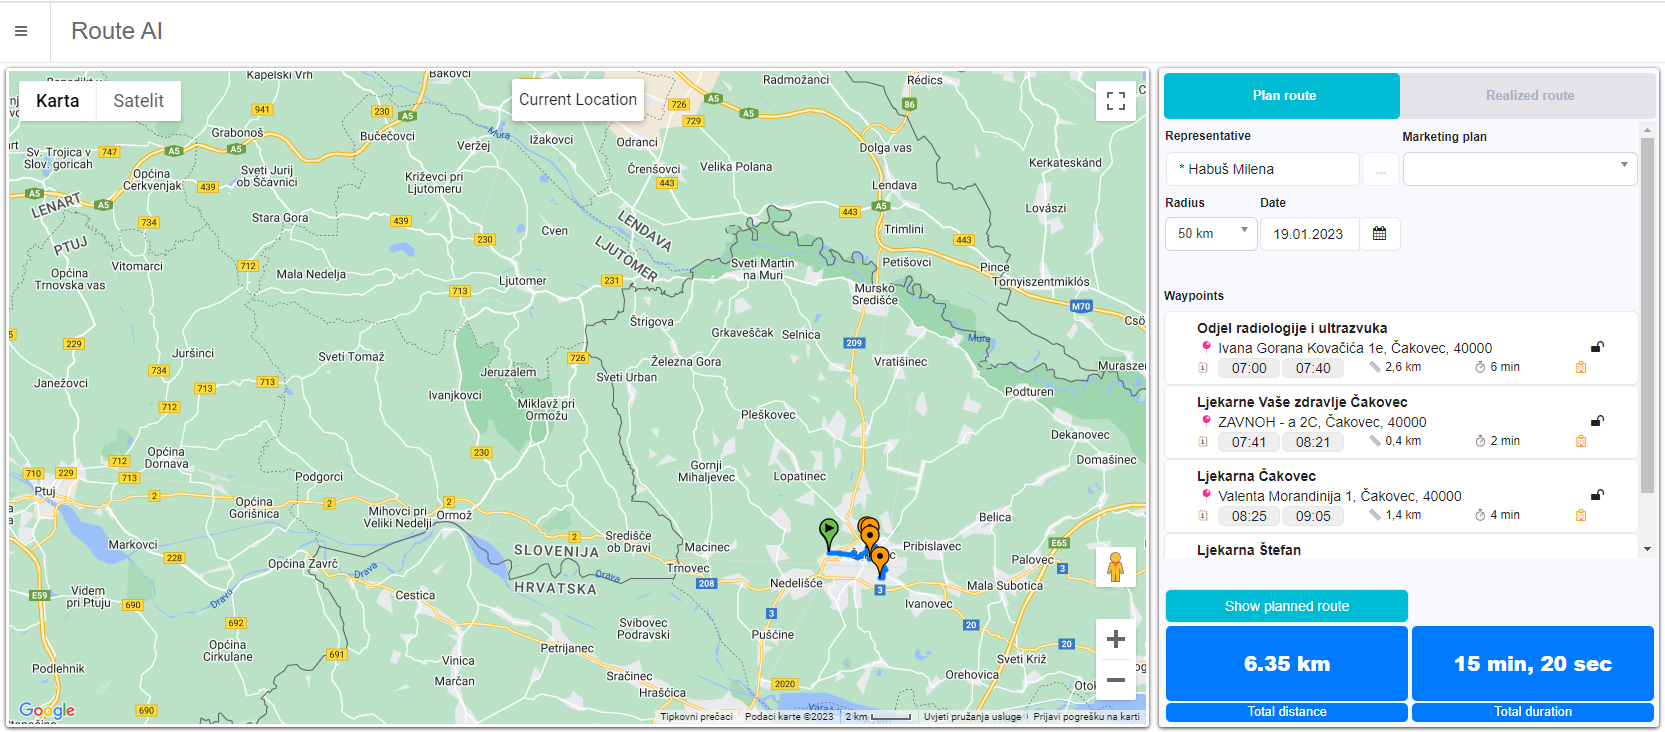
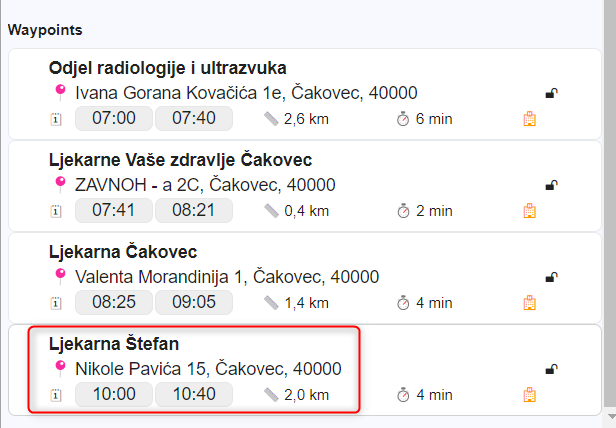
List of created Waypoints:
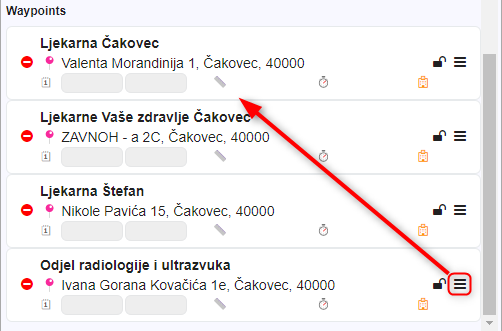
Clicking on three lines as marked on the picture below, you get a possibility to change the order of locations (drag&drop).
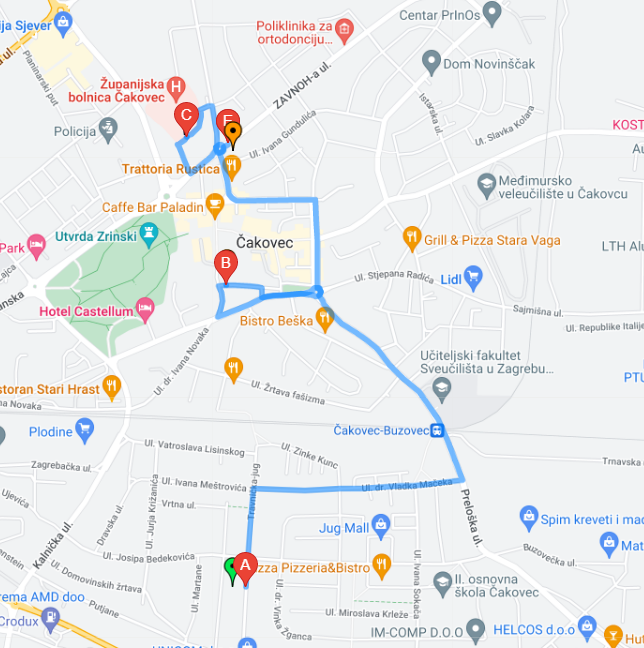
We set up the route order and click on “Get Route” to set up the route:
Again, by clicking on the location waypoint, institutions info is shown.
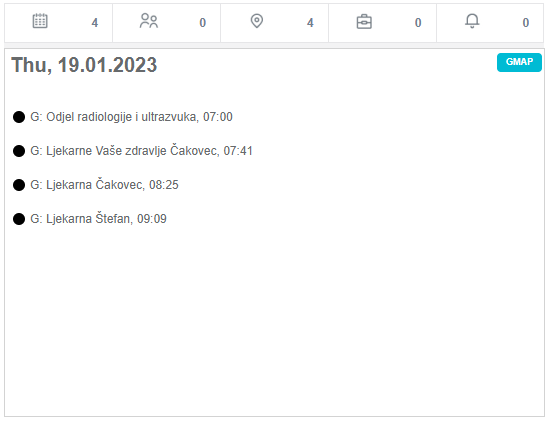
Save Route:


By saving the route, the visits plans are made. Here is the view from the Calendar.
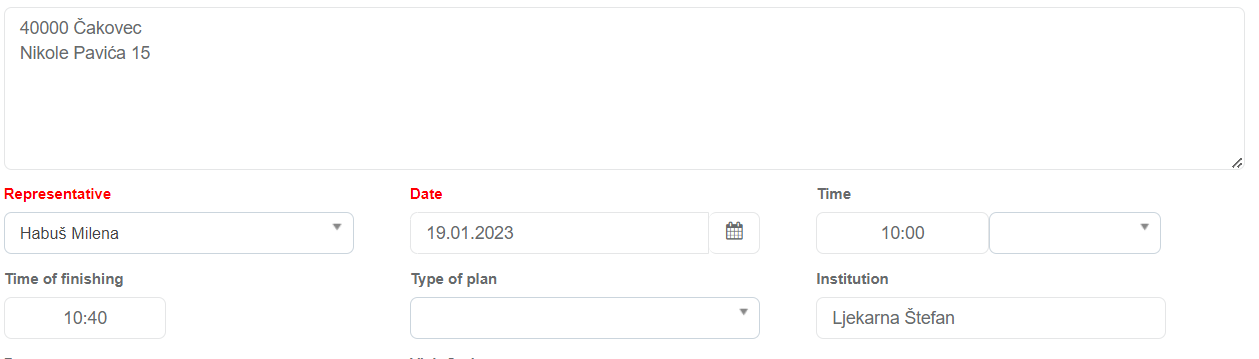
Let’s say we want to change the visit time of the last institution on the calendar, which is now 09:09-09:49
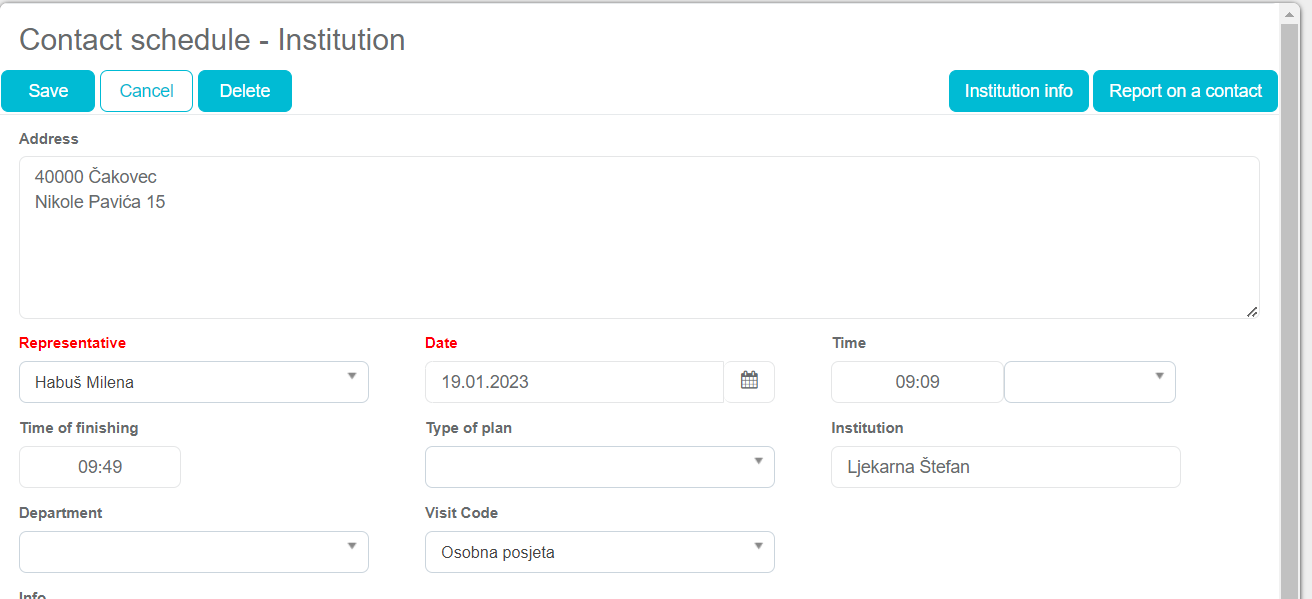
When we change it and save the changes, time is also updated on the Route AI:
Plan and Route on the iPad:
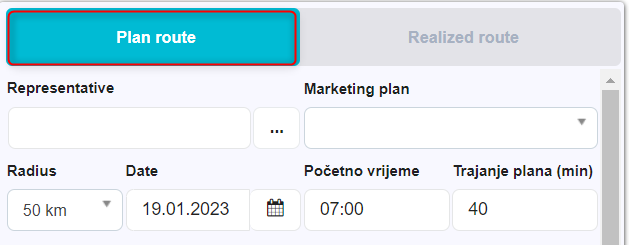
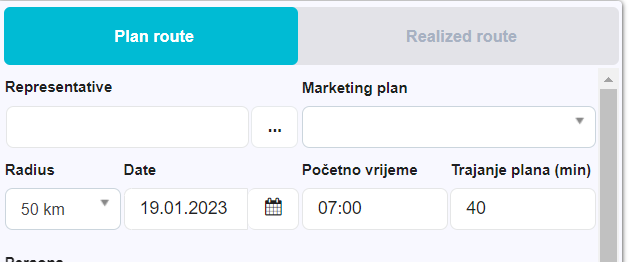
Route creating for person visits will be explained now. First, we choose desired date and select persons from the person list (IMPORTANT: option for fetching person location from institution is turned on – 227 – Show the coordinates of institution for person).

To add waypoints, click on “Persons” button:

You add waypoints by clicking on the person cards and clicking on “Add waypoint”.
You go back to the Route by clicking on the button “Plan route”:
Some added waypoints:
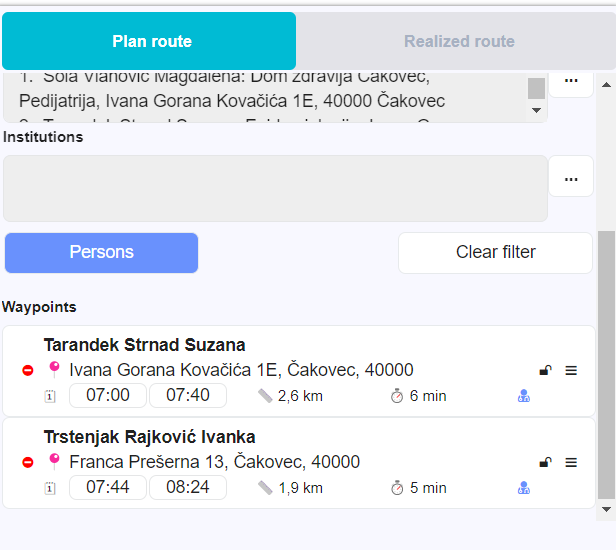
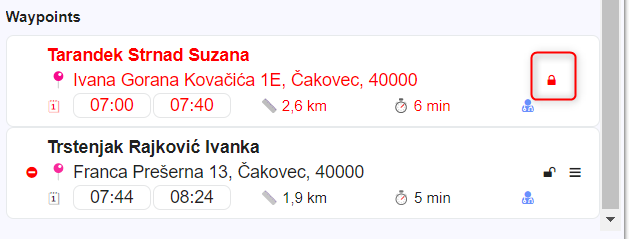
Waypoint locking – to lock a waypoint, click on locket button and once the waypoint is locked, it turns red – in this case, no other waypoint can take place of the locked waypoint.
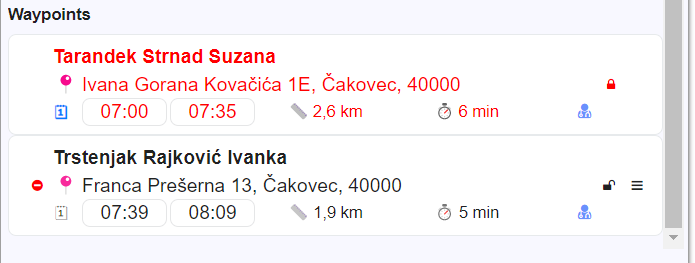
From the system option 777, the visit duration is set to the route plans. If you change visit duration here, it changes in the route accordingly:
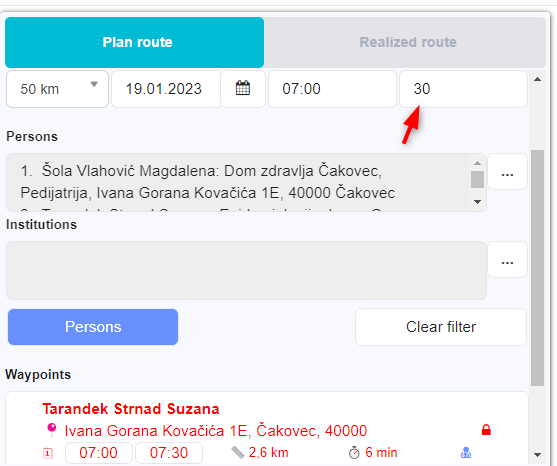
If you edit on one plan, the time changes in the other plans:
Route with Marketing Plan by selection
After adding customers to the marketing plan, we can just click on “Get Waypoints”.
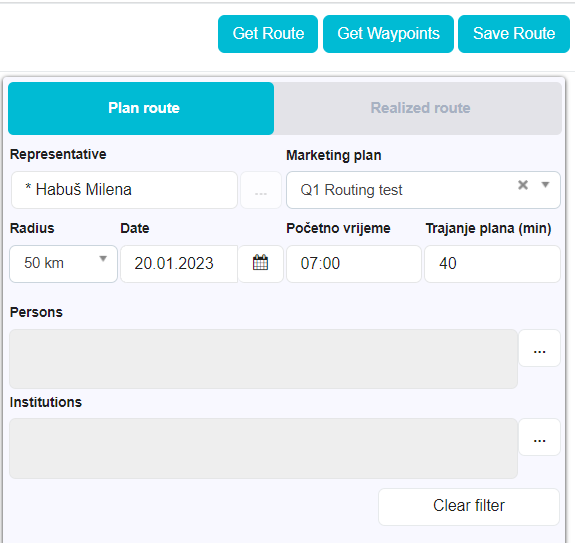
Click on “Get Route”:
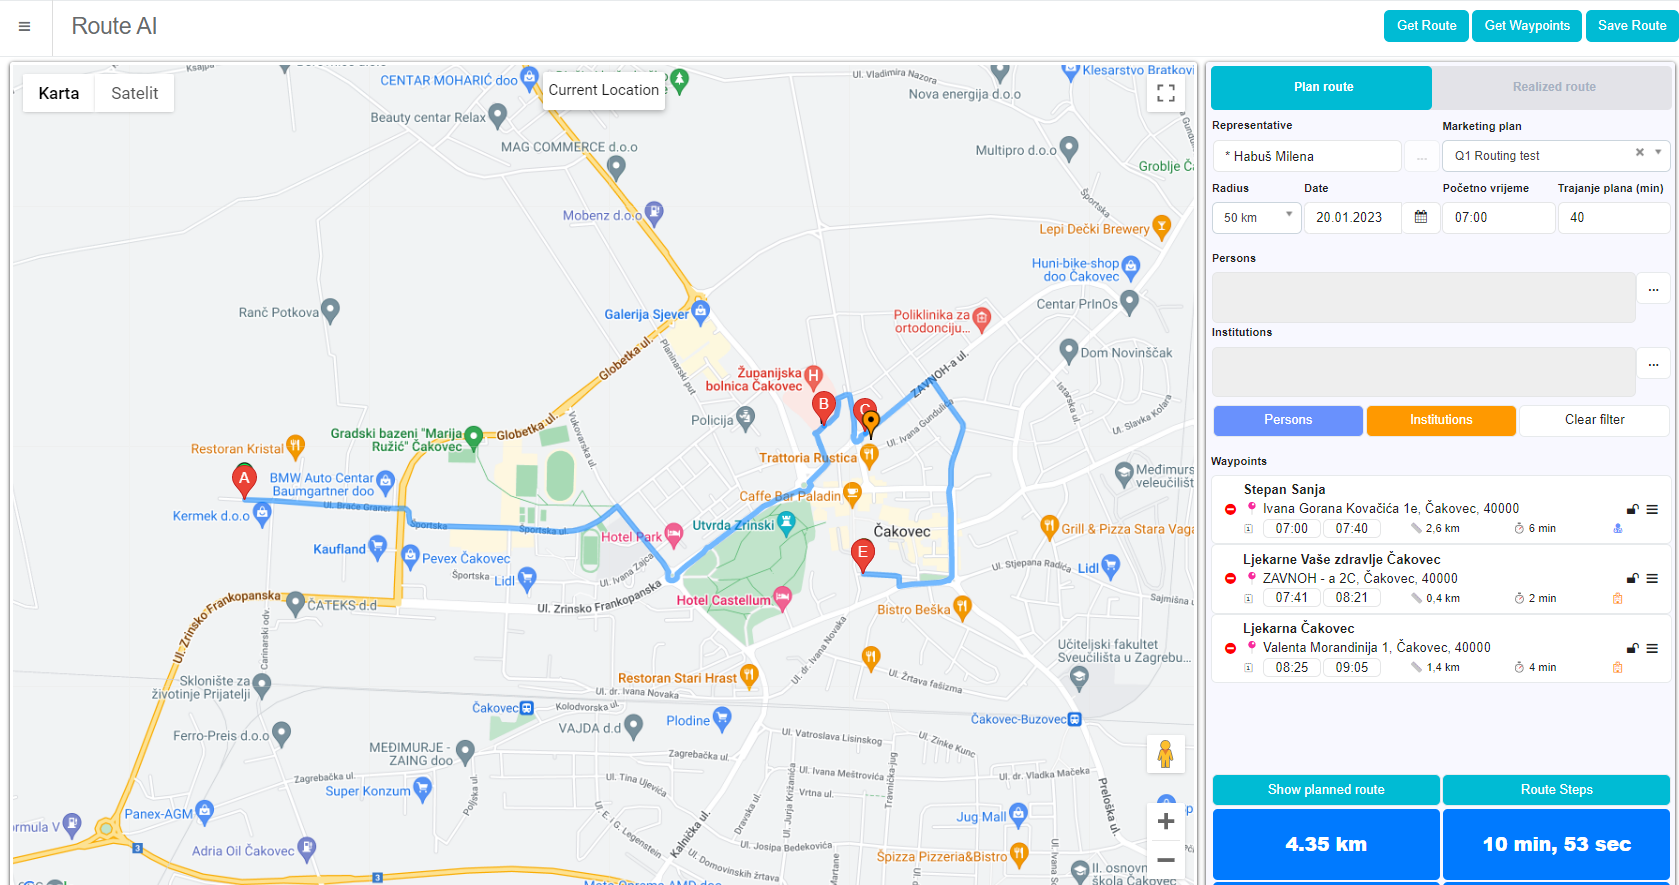
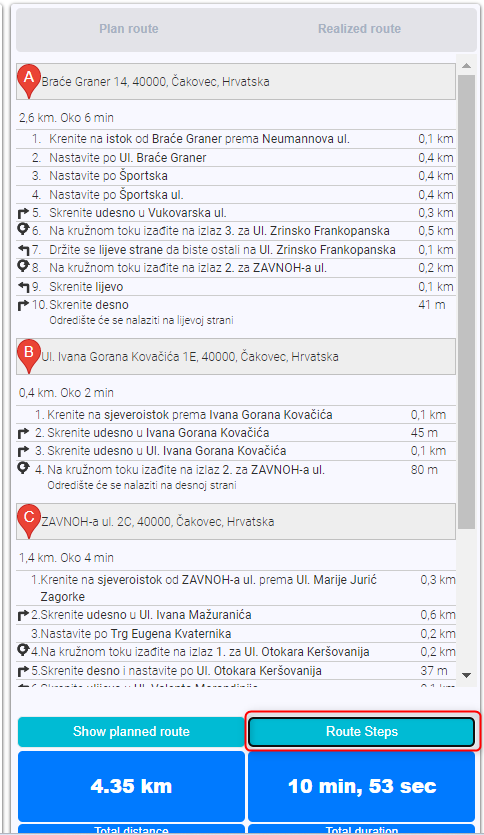
Click on Route step shows the instructions for getting to each location.
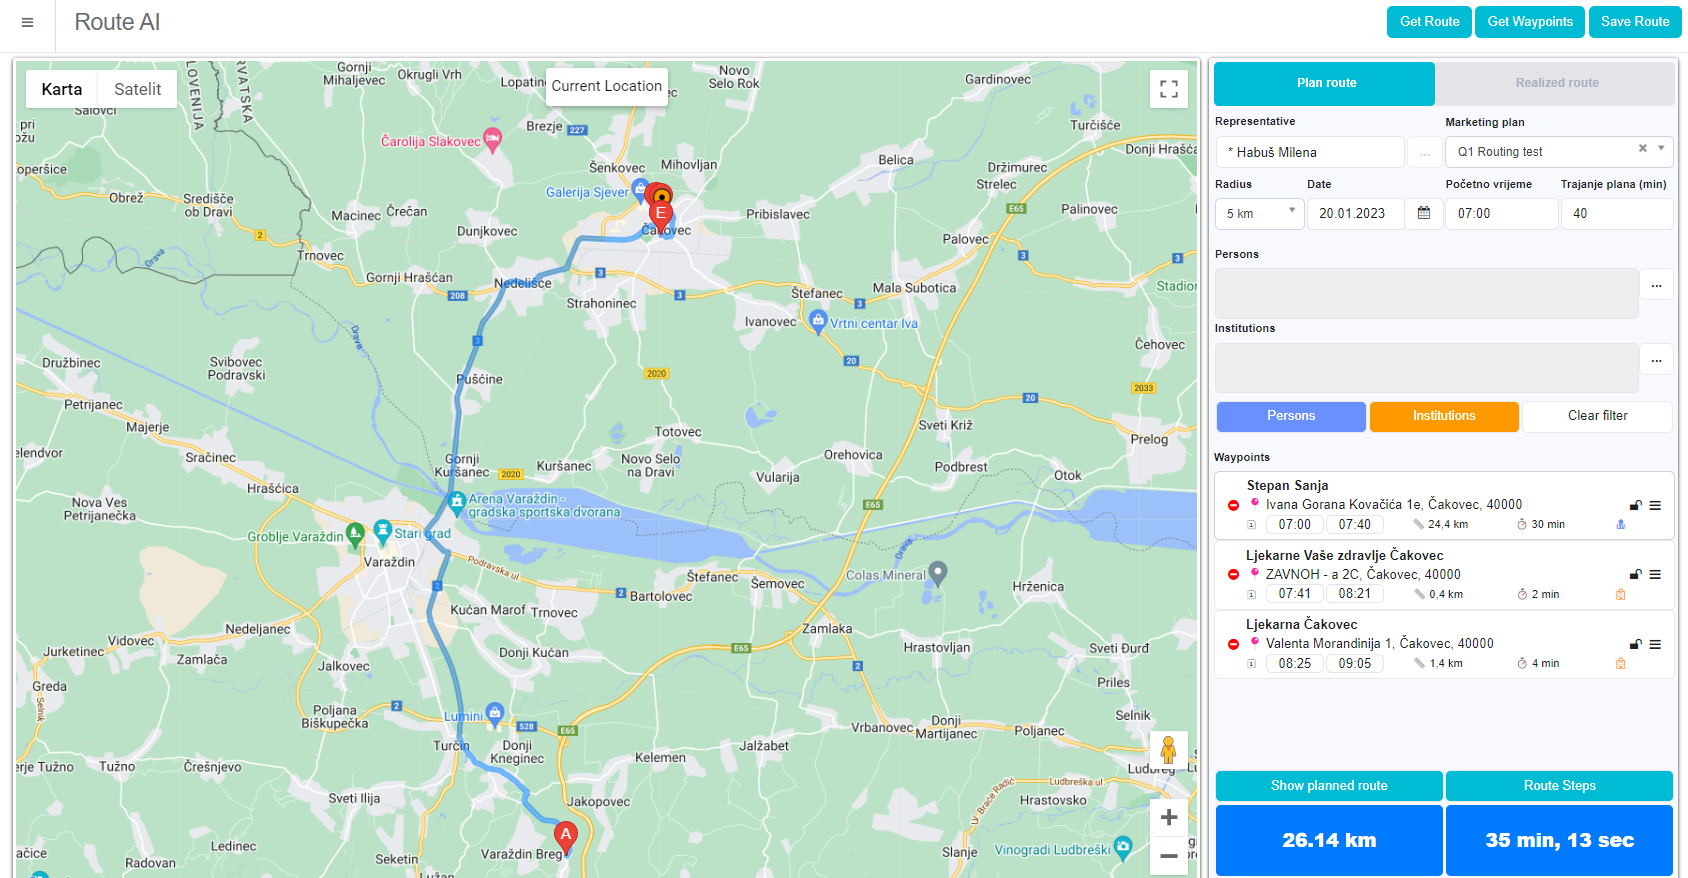
By clicking anywhere on the map, you can set up starting location (green colored pinpoint):
When you set up a new starting location, click on “Get Waypoints” again to recalculate the route.
Budget
Introduction
Budget management module helps in planning and tracking the company budget in top-down hierarchical approach, starting from the sales director at top position, and distributing it on second level, where regional managers further distribute their region’s budget to their sales representatives. There can be several types of different budget categories, which are fully customizable on definition level. After budget is distributed on sales representative’s level, they can start tracking investment on certain budget types (categories). There has been created a possibility to printout all incurred costs from sales representative. Sales manager and regional managers can freeze the current budget, whereas regional managers should be able to redistribute assigned budget from one sales representative to another.
Definition of budget types
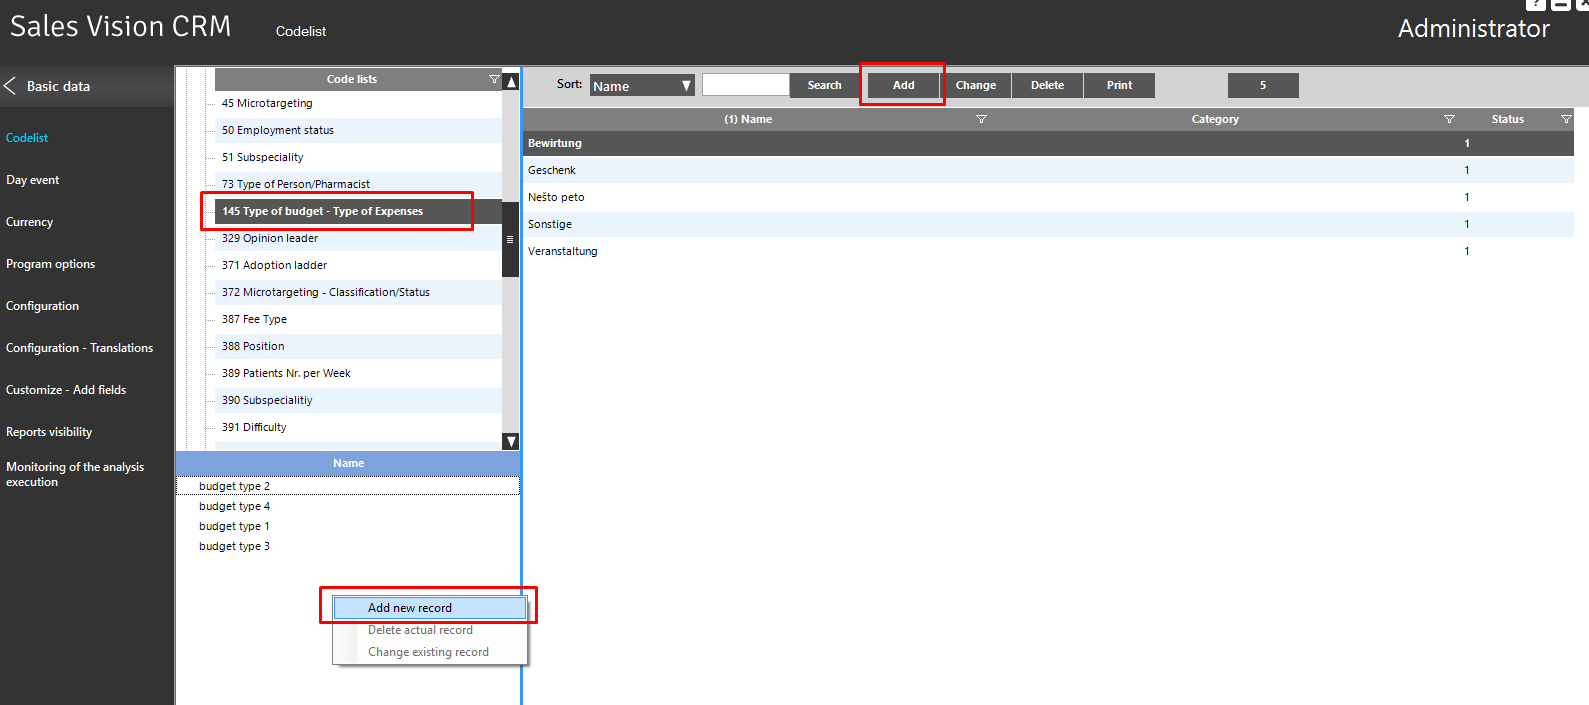
Budget management module allows a flexible definition of budget categories or types, which can be defined by administrator in Codelist section in Sales Vision Admin application.
Budget management module preview
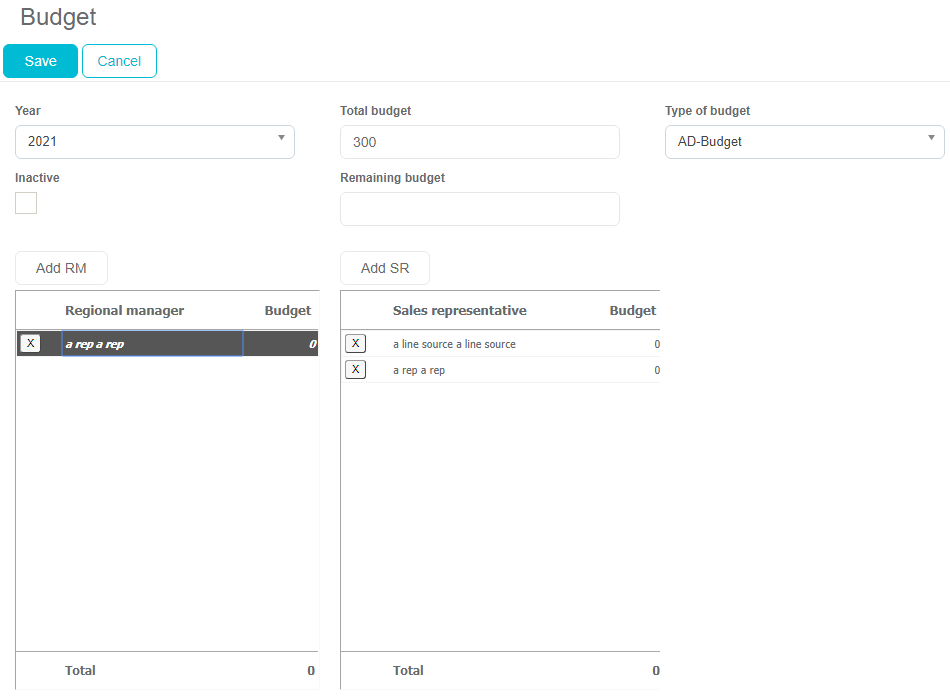
Admin can create a new global initial budget in Sales Vision Anywhere, under Extras Budgets module.

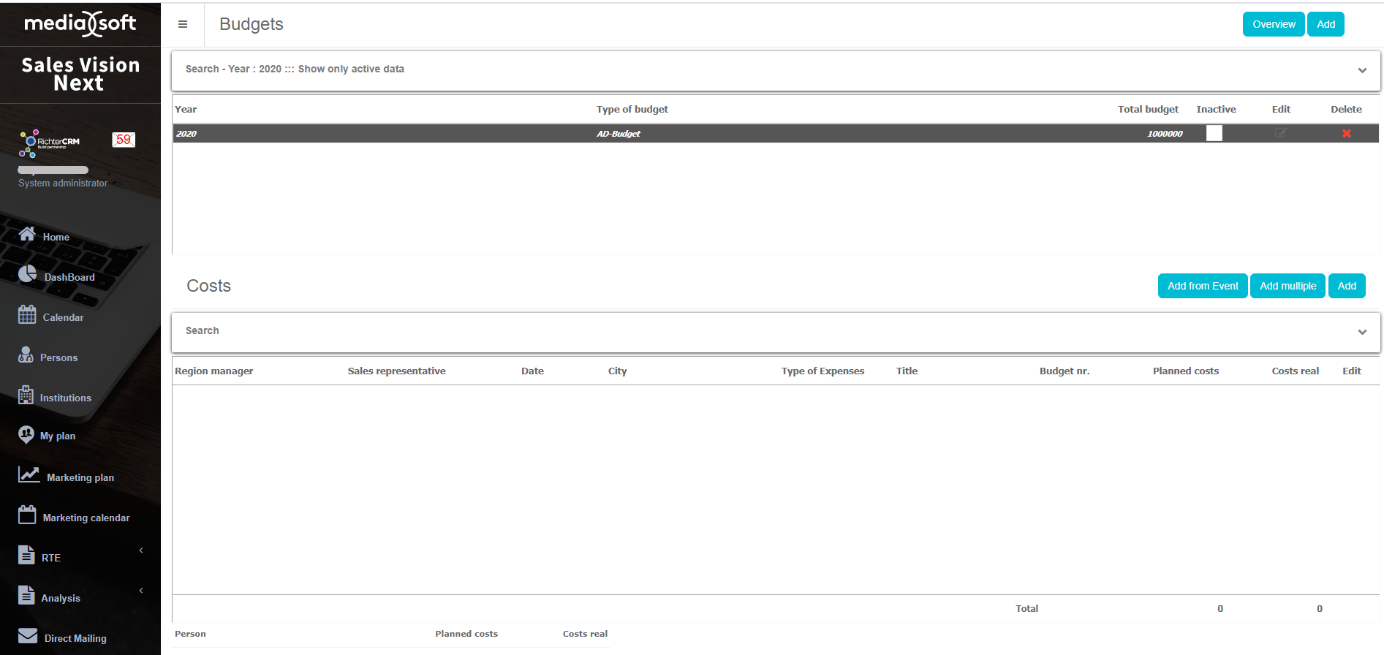
In general preview screen of Budgets module, sales manager can see the list of all created budgets for current year and a list of all costs for selected budget, add new budget or run analysis.
Sales managers (HQ users) have highest privileges in this module, they can create a new initial budget, distribute budget further to regional managers, alter existing budget (reduce it or enlarge it) and delete existing budgets. They can also put budget as inactive (freeze it). Regional managers have limited privileges in Budgets module – they can open existing budgets, and further assign and distribute budget amount given from sales manager to their respective sales representatives. But, they can’t delete or create new budgets. Sales representatives can only preview created budgets, they can’t alter initial budget or create a new budget (read only role). Sales representatives can enter and track their planned and actual costs through budget removal.
Search
A search is used to narrow down list of your budgets. By default all active budgets for current year are shown. Use drop-down button to open search part of module as shown on picture.
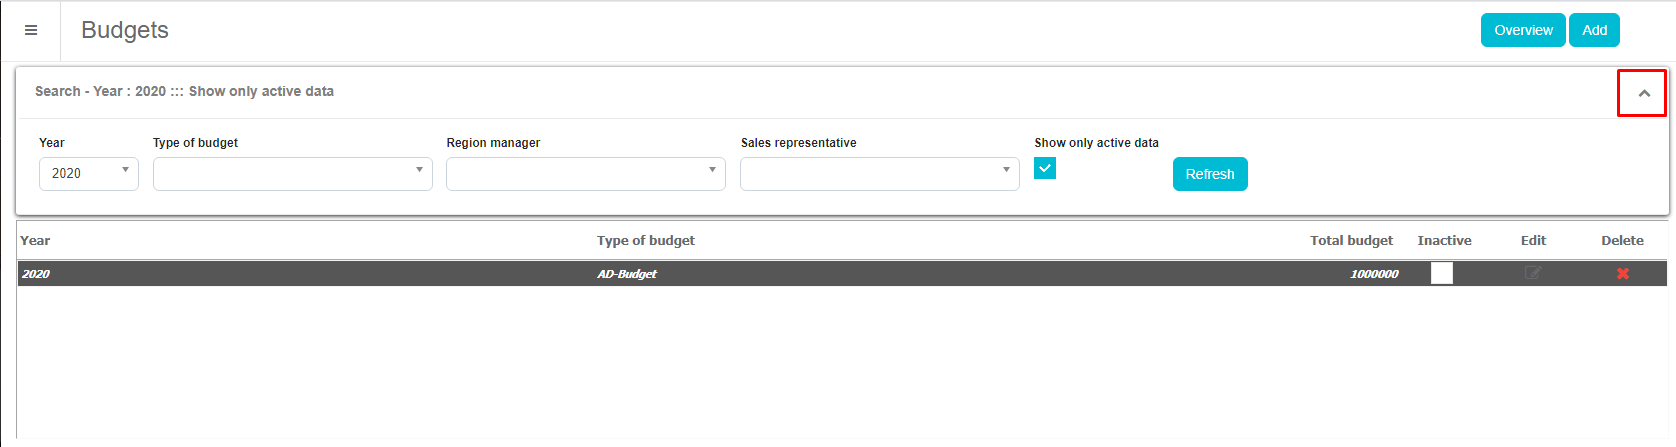
Here you can search by year, type of budget, RM, SR and Active/Inactive data. Click Refresh button to run filter.

Defining a new budget – Sales manager level (HQ user)
When creating initial budget, sales manager defines total budget amount, selects a year for which budget will be valid, and adds RM’s (Regional managers). For every regional manager, sales manager can add budget amount which will become total budget amount for his region. At a later stage, regional manager will distribute this amount among his sales representatives. Amount given to RM’s, cannot be larger than total budget amount. Click Add button in the right upper corner to add new budget.
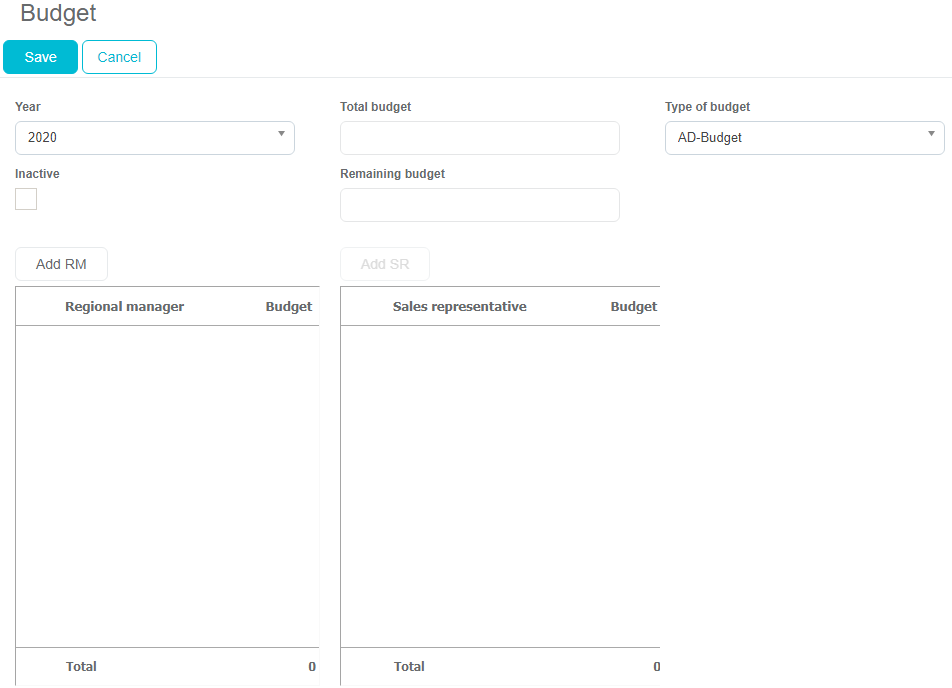
Choose year of the budget, add amount and select type of budget. Then add RM’s and amount you want to give them. Click Save to save your budget.
Defining a new budget – Regional manager level
After sales manager defines initial budget and distributes it to regional managers, every regional manager can advance to further distribution to his sales representatives, giving them certain budget amounts that cannot exceed total budget amount received by sales manager. This can be done by using Add SR button.
Adding event and costs – Sales Representative
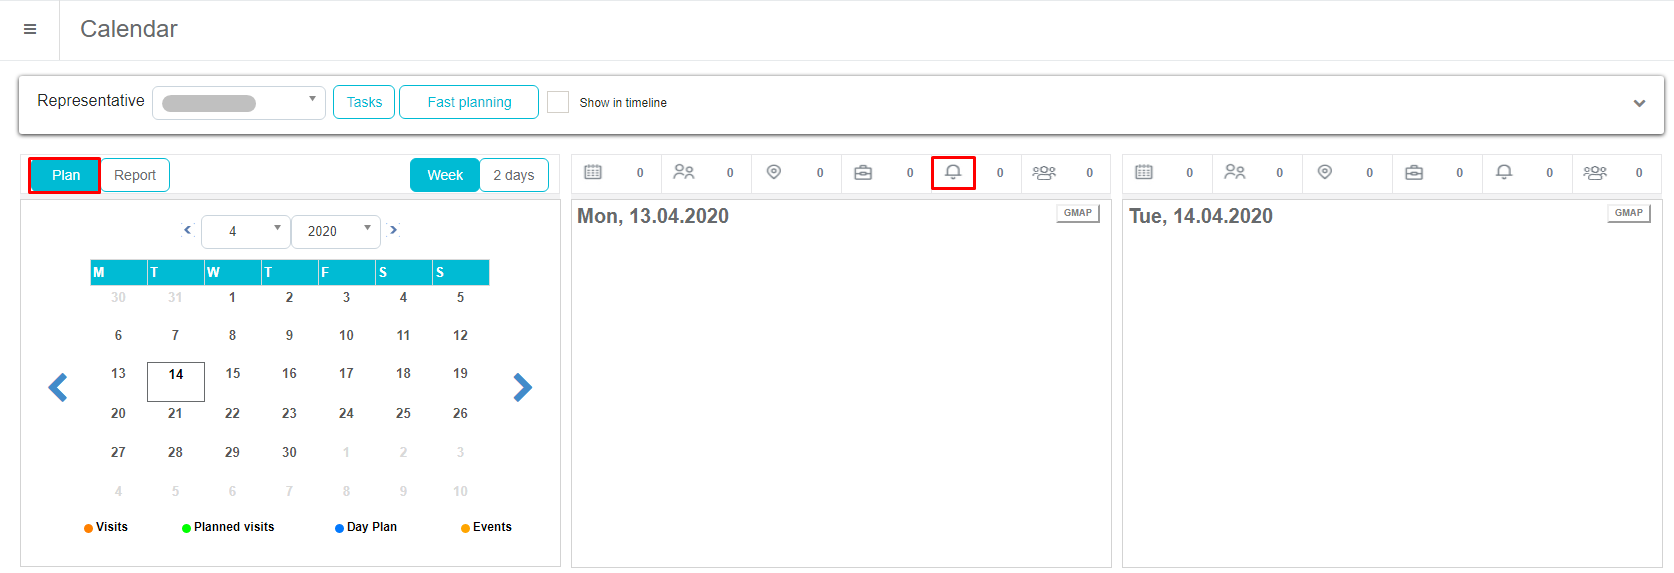
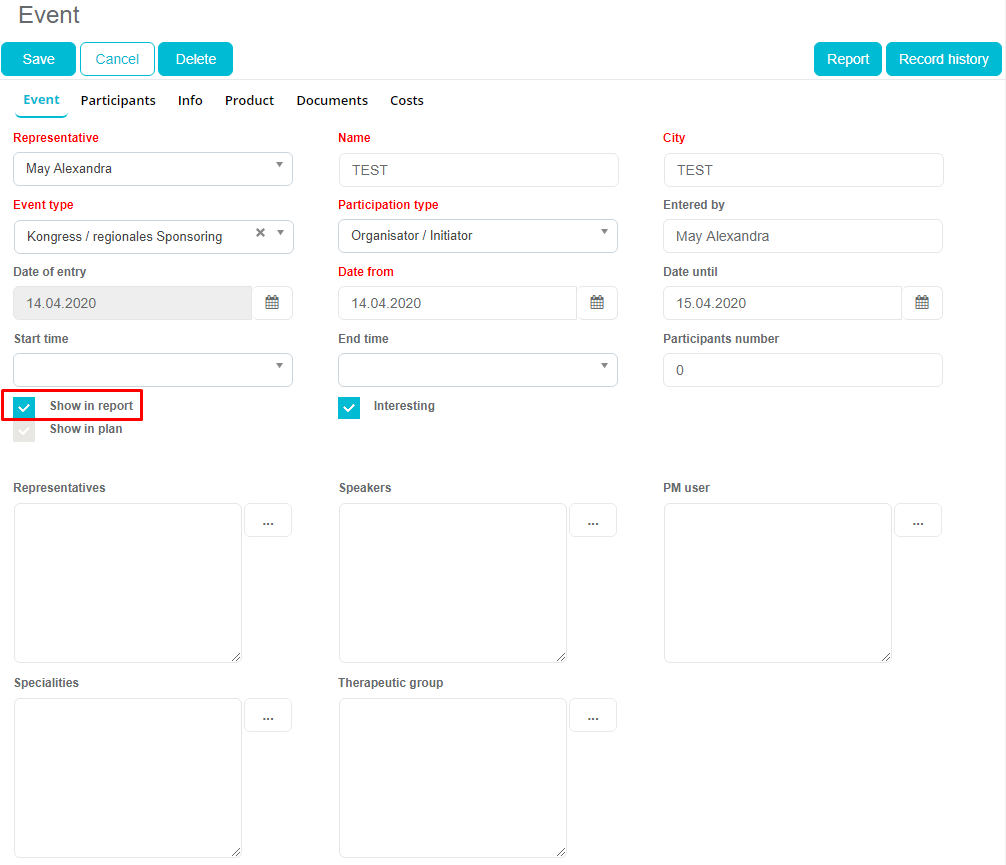
Costs can be entered only on already created Event. That means, before entering costs it is necessary to add event. To do that, go to Calendar, press Plan tab and press on button New event.
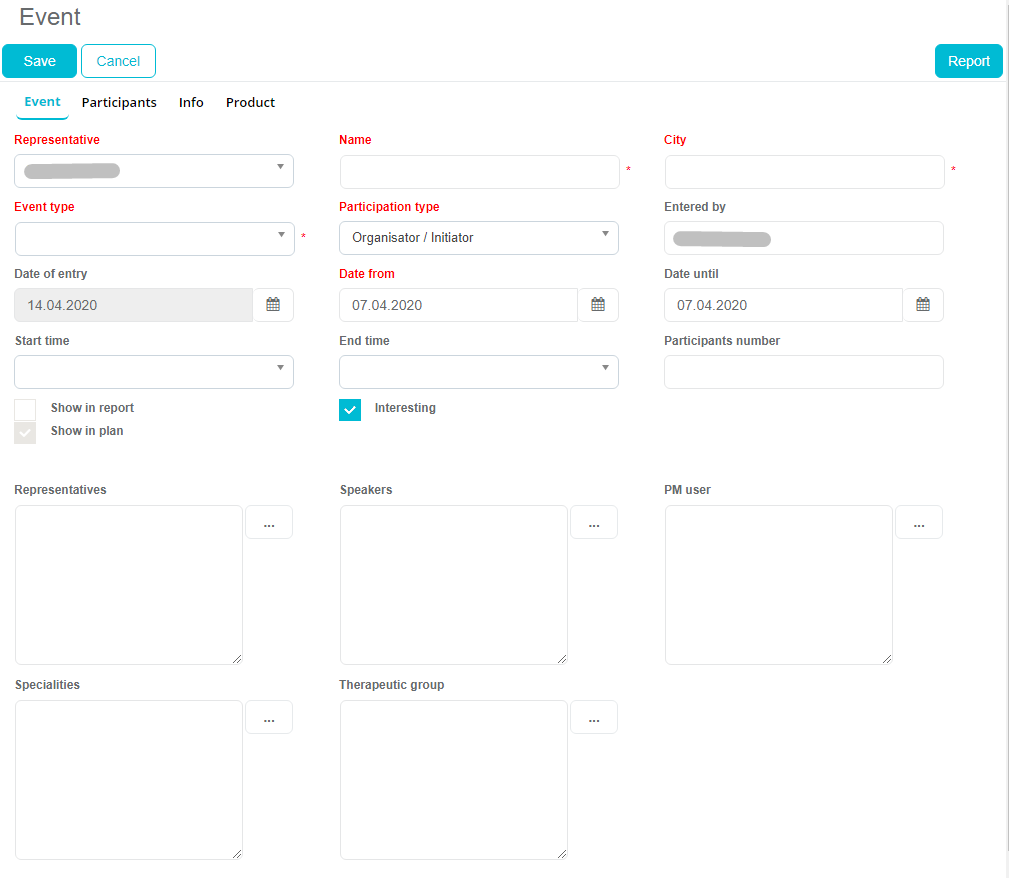
When the event opens, fill all required data. Fields Representative, Name, City, Event type, Participation type and Date from are mandatory so you will need to enter them in order to save Event. Checkbox Show in plan is automatically checked.
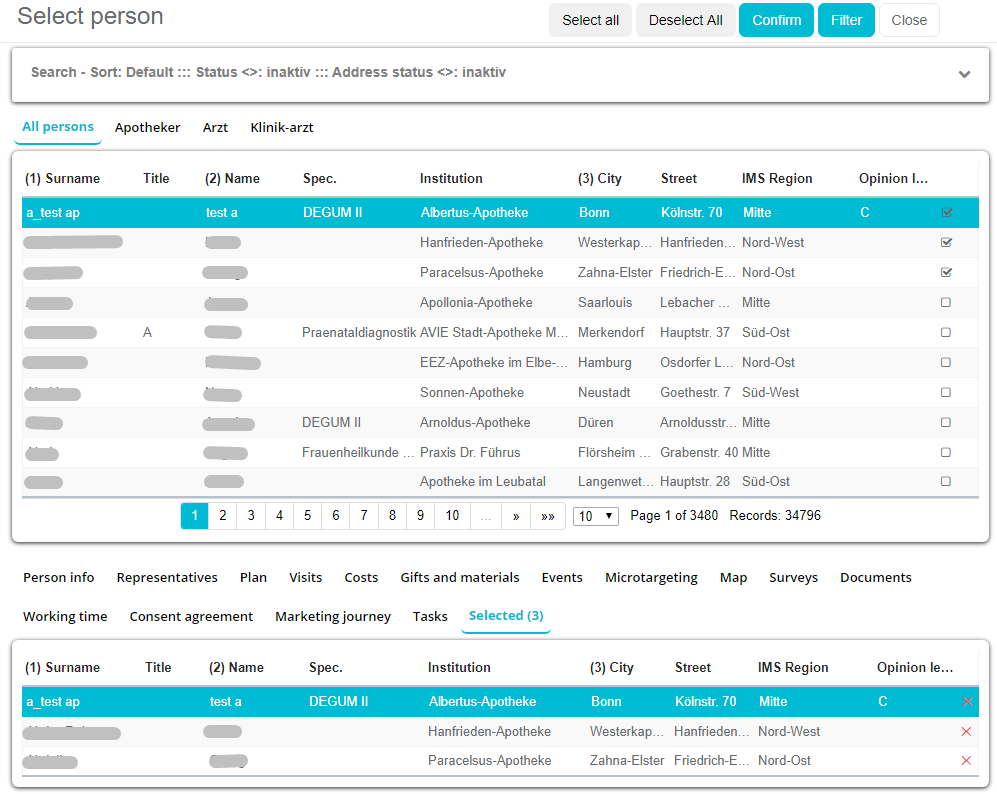
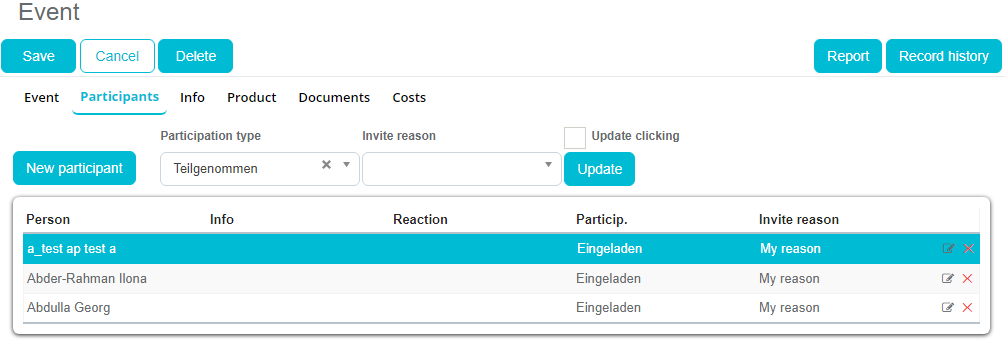
Adding Participants is also mandatory (depending on option in Admin). Go to second tab Participants. To add new one, click on button New participant.
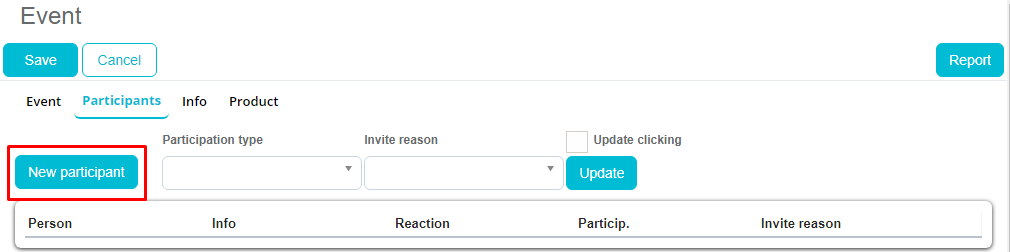
Choose persons that were on event and click Confirm. They will be added.
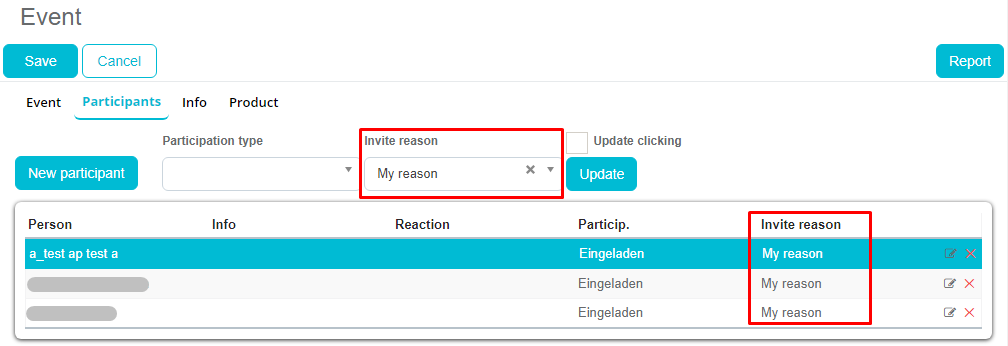
If event is Show in plan and Event type is one that is set in Admin – Options, invite reason will need to be filled on at least one person. To do that, choose desired reason and click Update. This will update for all persons in list. If you want to update only for one person, enable checkbox Update clicking and then simply click on person. It will update only for person that you clicked. Also, it is possible to edit by clicking Edit button and then choosing desired reason.
After entering all data, simply click on Save button.
Now, when Event exists, it is possible to add Costs. There are three ways to enter Costs. Through Event Through Person module Through Budget module
Through Event Open created event and you will see new fifth tab Costs.
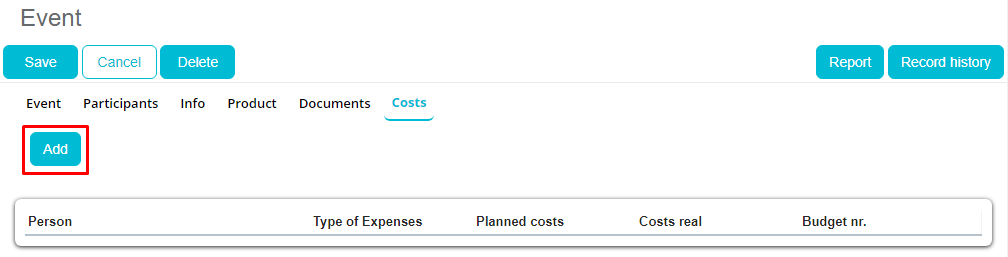
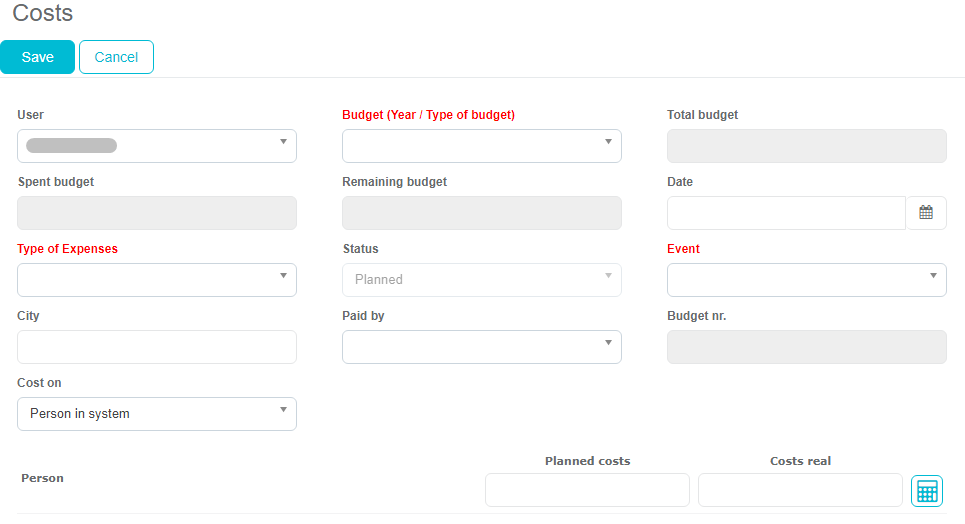
Click on Add button will open new cost. Some fields will be filled automatically, but some of them needs to be entered by user. Some of them are also mandatory.
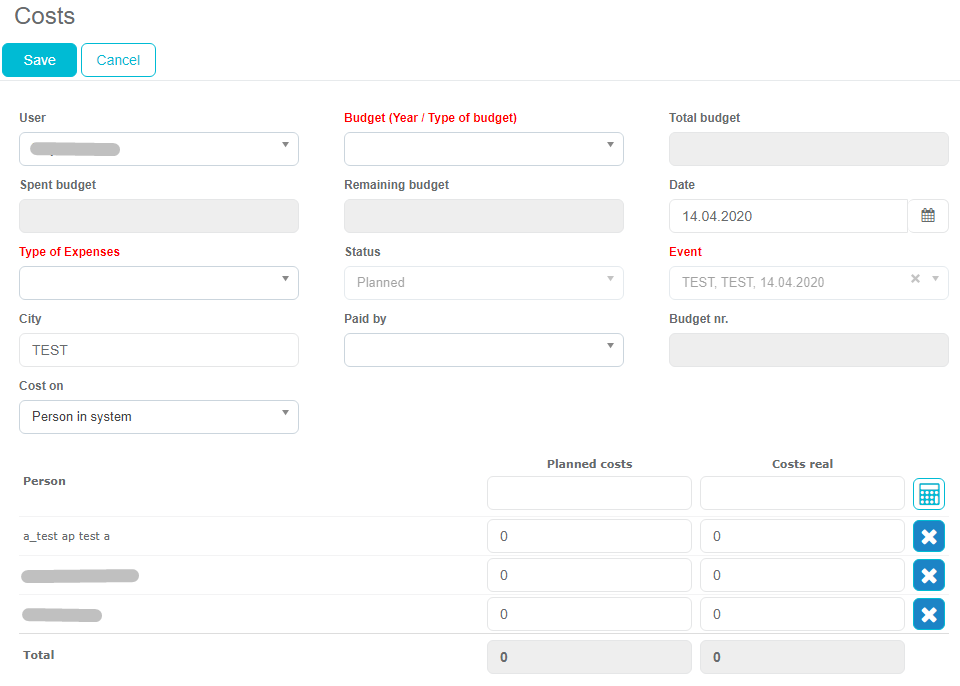
List of all fields: User – automatically filled with logged user, Budget (mandatory field) – selection of budget where cost should belong, Total budget, Spent budget, Remaining budget – automatically filled from selected budget, Date – automatically filled with date from event, Type of expenses (mandatory field) – selection of type for cost, Status, Event – automatically filled from event, City – automatically filled from event, but can be edited, Paid by (mandatory field on when Show in report is selected) – choosing who will pay cost, Budget nr. – filled automatically when cost is saved, Cost on – choosing for whom is cost intended.
Below all fields you can find list of all participants/persons and costs that belongs to specific person.

Planned costs can be added by entering total planned costs and by clicking calculator. It will automatically calculate through all person/participants by the same amount. The same thing is with Real costs. Simply enter amount and click calculator and it will automatically calculate through all. Costs can be also entered manually person by person. Simply enter amount on person for Planned costs and Real costs.
Beside entering costs, person can be deleted from cost by clicking Remove button. It will remove person and Total costs will be calculated automatically. After entering all costs, press Save.
Also, costs can be entered on persons that are not in Sales Vision by choosing Person out of system. When that is selected, three new fields will be shown. Field Person for entering Name, Planned costs and Real costs for entering costs.
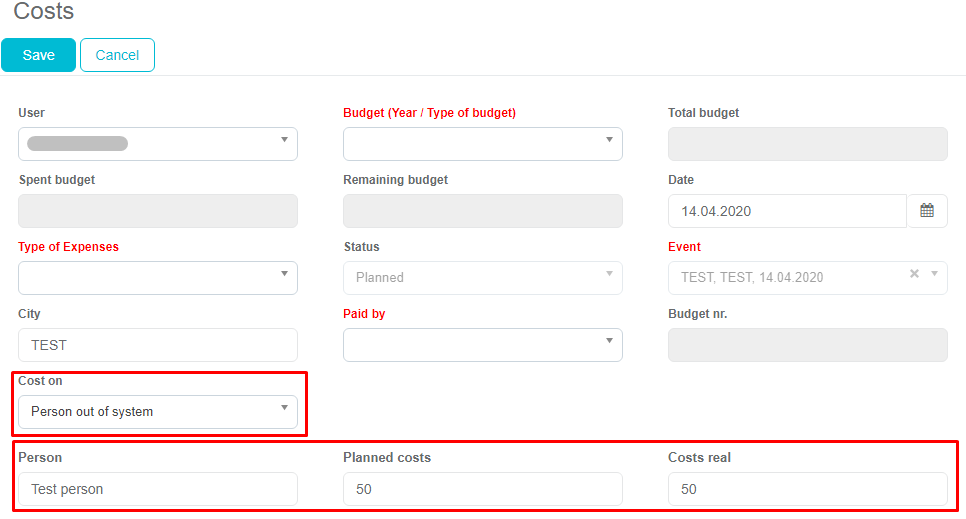
After entering all costs press Save. Once costs are saved, there is no possibility to change them.
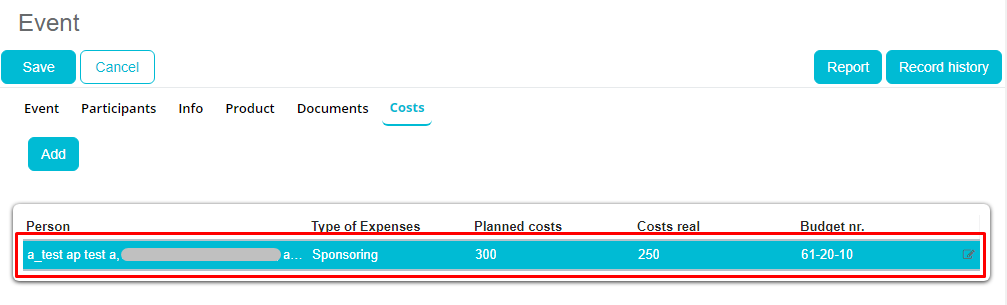
Costs for all persons will be shown on list. It is possible to preview them by clicking Edit button on the right side in list of persons. Costs on that person/persons will be shown with all fields disabled.
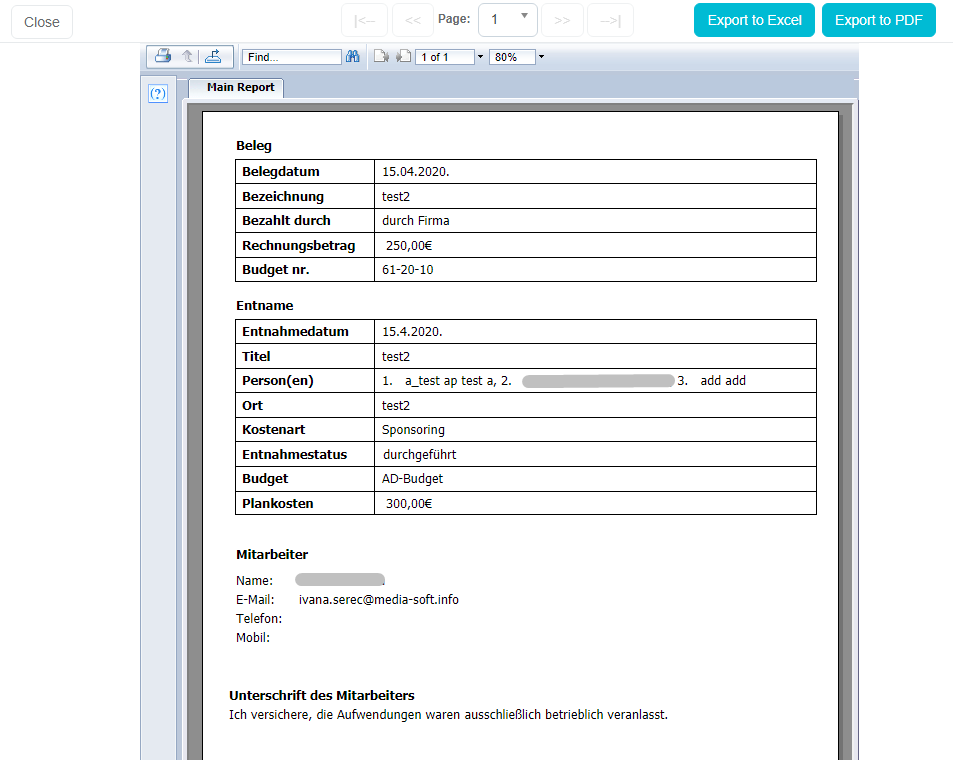
When editing, it is possible to print/save costs in PDF or Excel. To do that click Print preview.
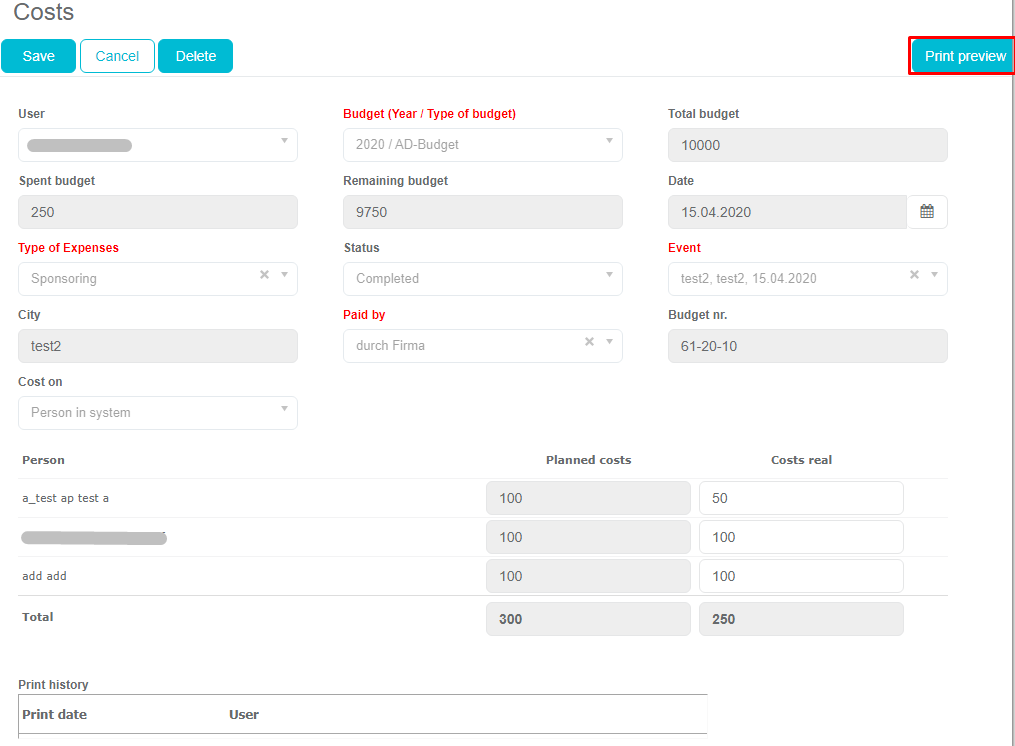
New window will open with all data from event and cost like Date, City, Name of event, Costs, Participants and similar.
To finish event, checkbox Show in visit needs to be selected. This can be done only if event is saved earlier as Show in plan. By opening saved event, simply click Show in report.
If there is Option for mandatory entering participant enabled in Admin, at least one person/participant must have their Participation type as Attended (Attended can be set in Admin as Codelist and Option). Attended on person’s Participation type is must have because there is no point that event happened if nobody was there. To set Participation type, click on second tab Participants. In Participation type select Attended and then click on Update button. This will update for all persons in list. If you want to update only for one person, enable checkbox Update clicking and then simply click on person. It will update only for person that you clicked. Also, it is possible to edit by clicking Edit button and then choosing desired type.
After entering all of the data, simply click on Save button. Once Event is finished (selected as Show in report) there is possibility to change it in defined period of time (that period can be set in Admin – Options). After that, there is no possibility to change any data about the Event.
Through Person module Adding costs is also possible through Persons module. Find desired person, click on Costs tab and then click on Add button.
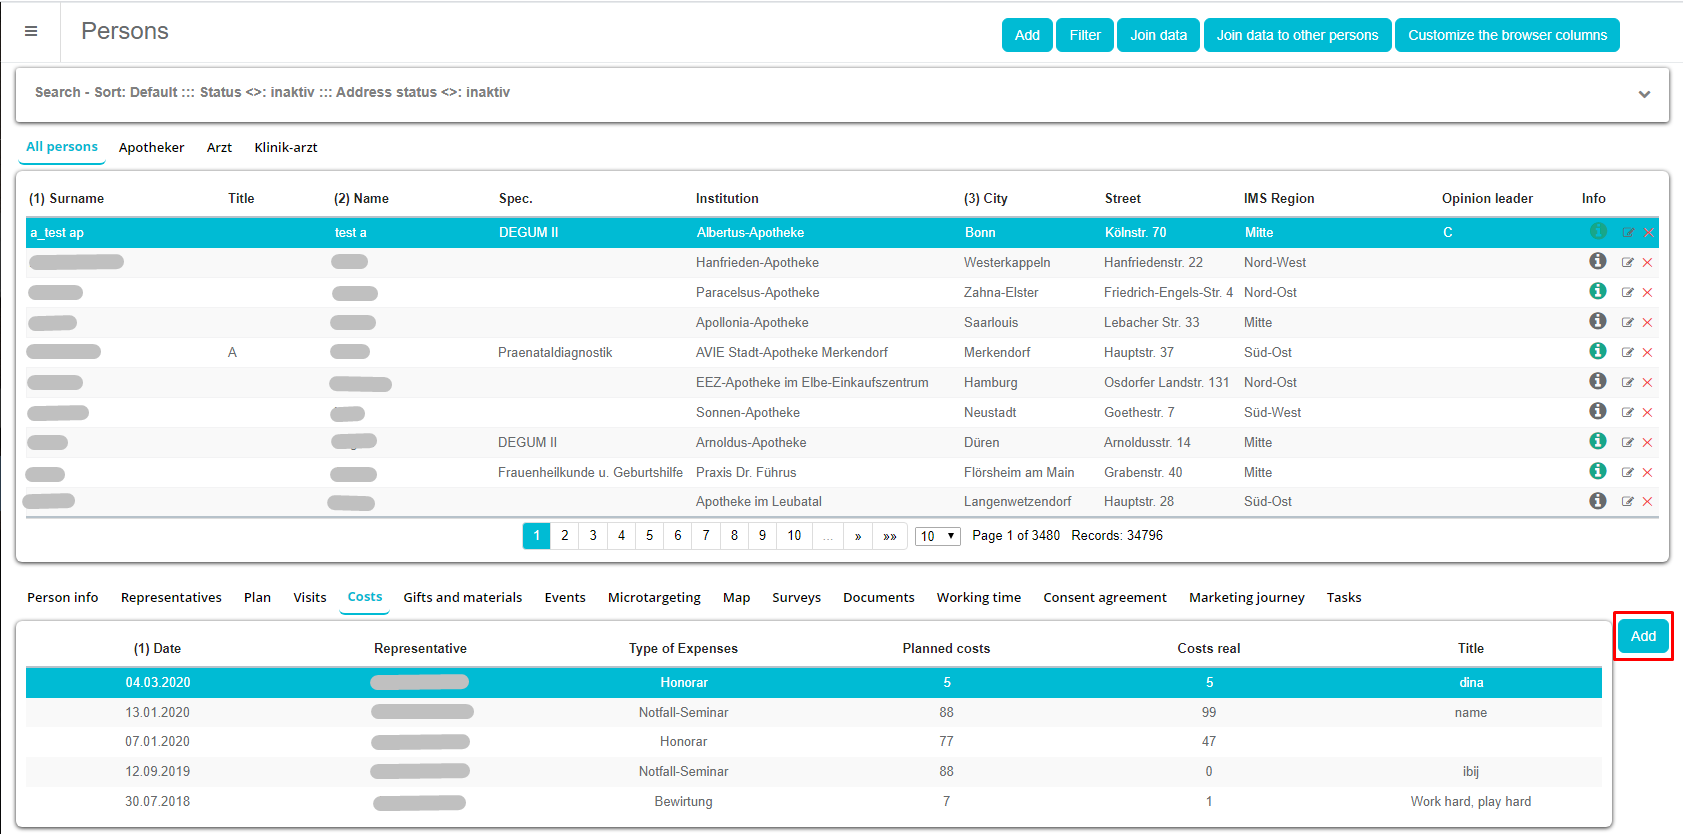
Everything is the same as adding costs through event. Only difference is that here you need to select Event on which will cost be made.
Through Budget module Except preview costs on event, there is possibility to view them through Budgets because they are related to it. Module Budgets can be accessed under menu Extras – Budget. On top of the screen is list of all Budgets with information about it. Below that is list of all Costs and Persons that are related to selected budget. Cost that we added before is listed here.
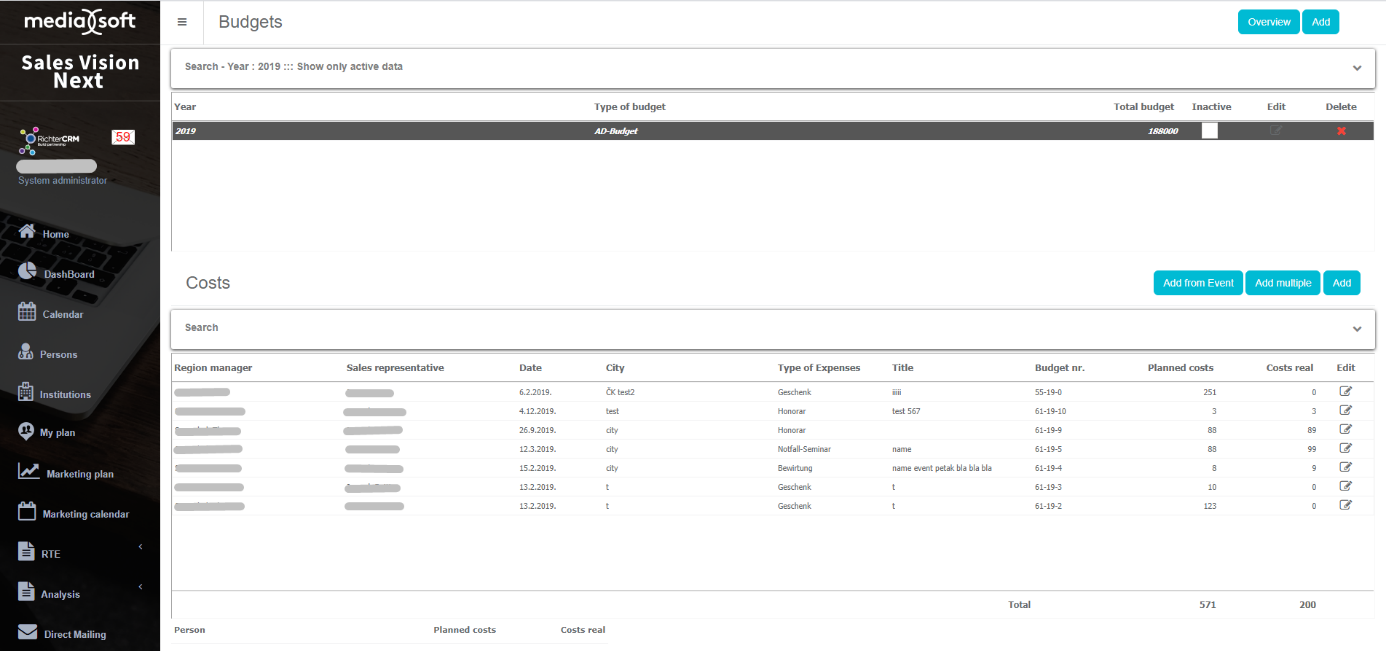
Also, costs can be added here by clicking Add multiple which will open window for adding costs to Person in Sales Vision or button Add which will open window for adding costs to Person out of Sales Vision. Everything is the same as adding costs through event.
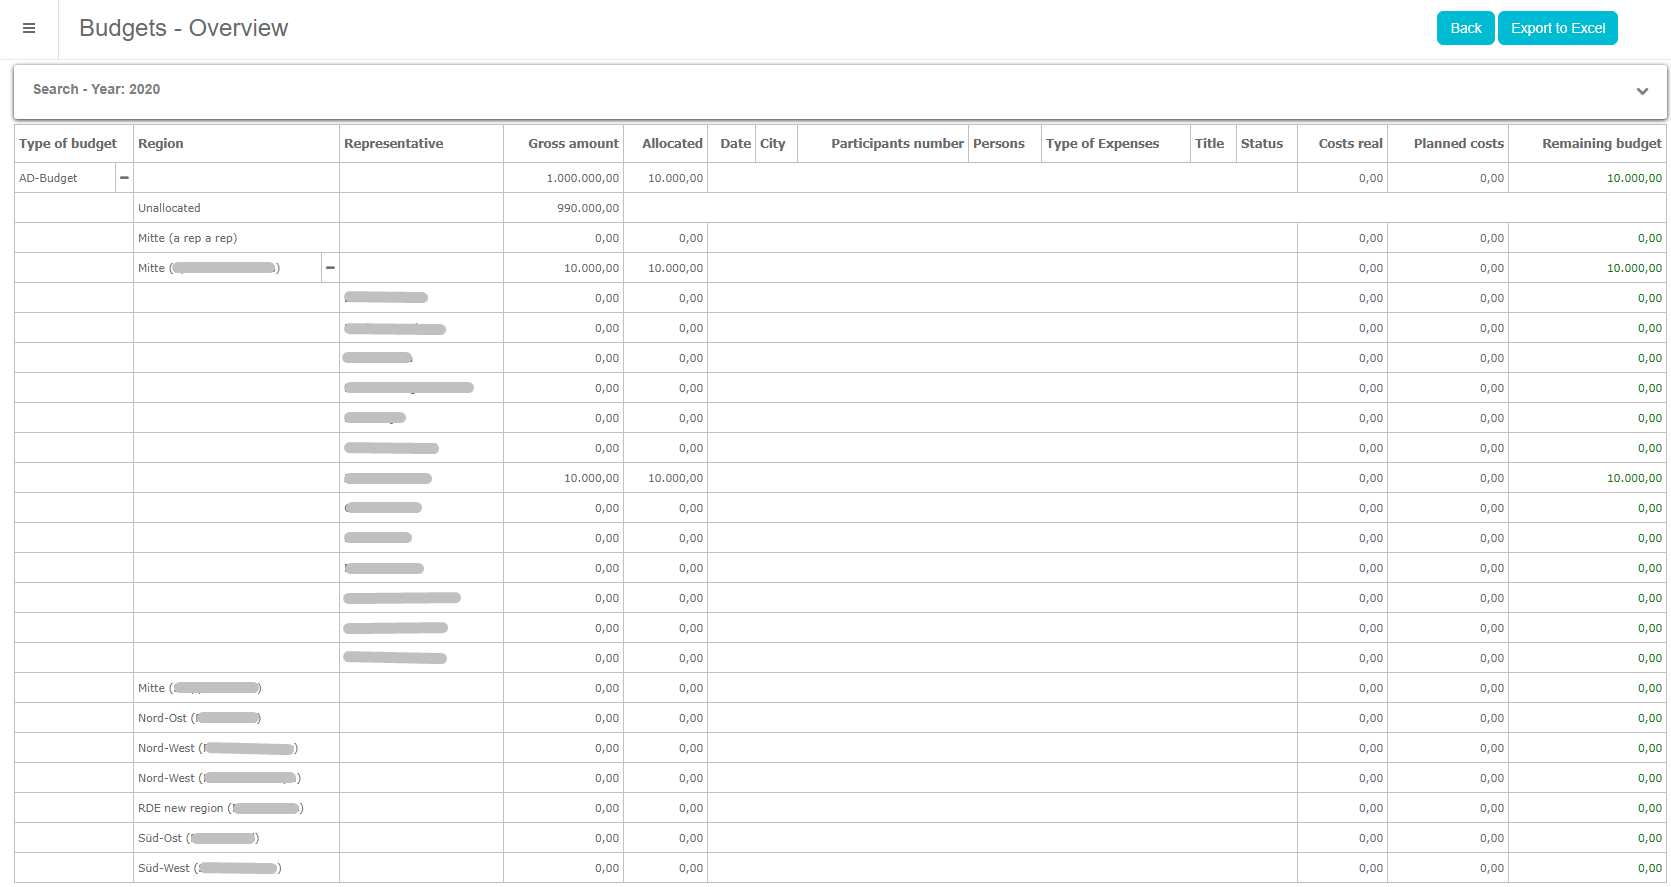
Overview of budgets
Budget module contains list of all entered Budgets, list of Costs per Budget and few options. On top of the screen is filter for Budgets and list of all Budgets with information about it. Below that is list of all Costs and Persons that are related to selected budget. Cost that we added before is listed here.
On top right part we have buttons Overview. Overview is giving us table with all detailed data for budget like Name of representative, Date, Person/participant, Planned costs, Real costs and similar.
Budget analysis
Analysis for Events and Costs are available in Standard reports – Events.

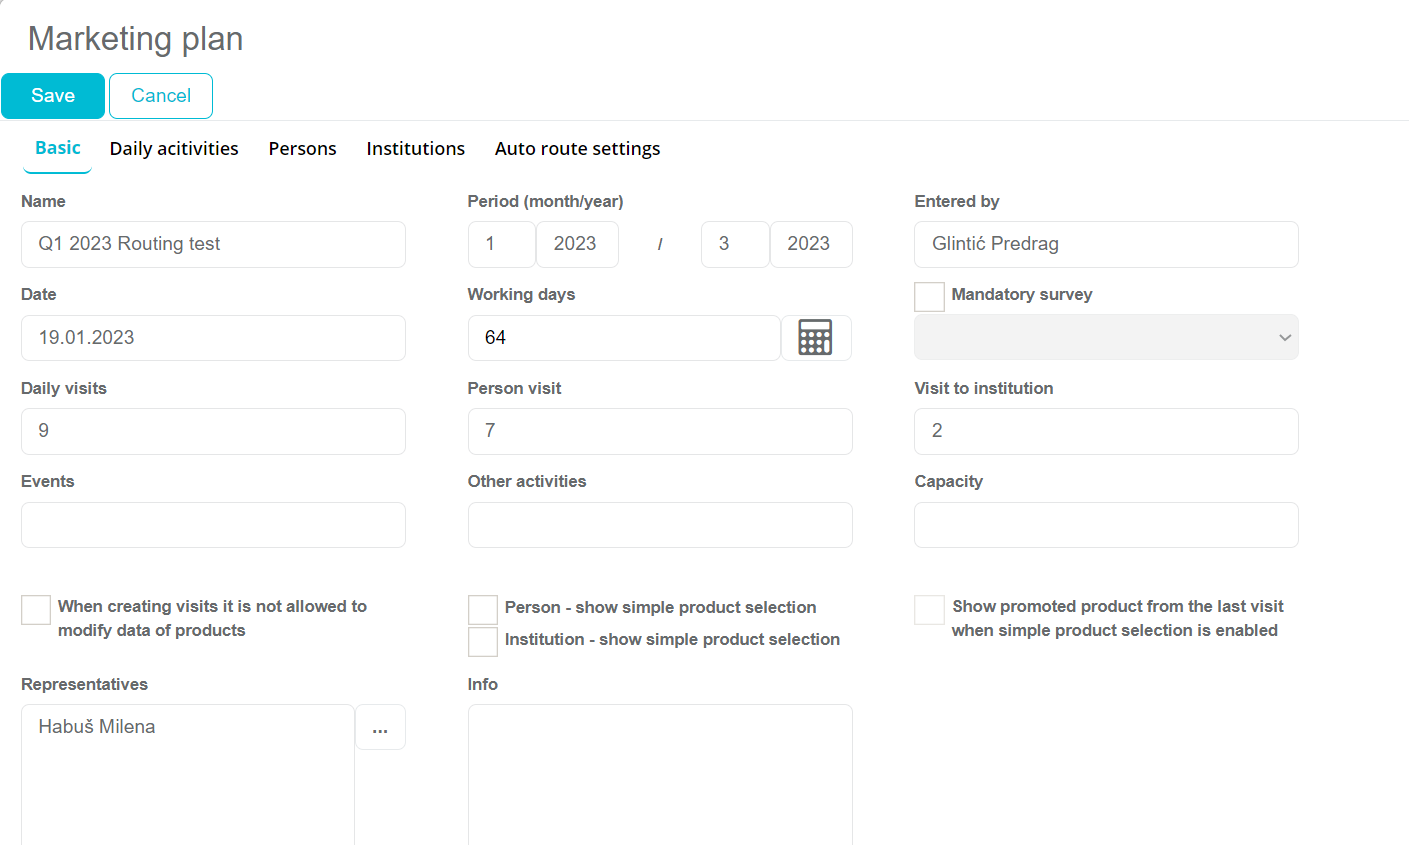
Sales plan *
Sales Plan module is located as a submenu in Others menu., It is available only for System Administrator and HQ users. Depending on the setup, the data source for plan could be Wholesalers sales or IMS sales imported in the Sales Vision database. This module enables sales planning on a country and products level and drilled down to brick and packaging level.
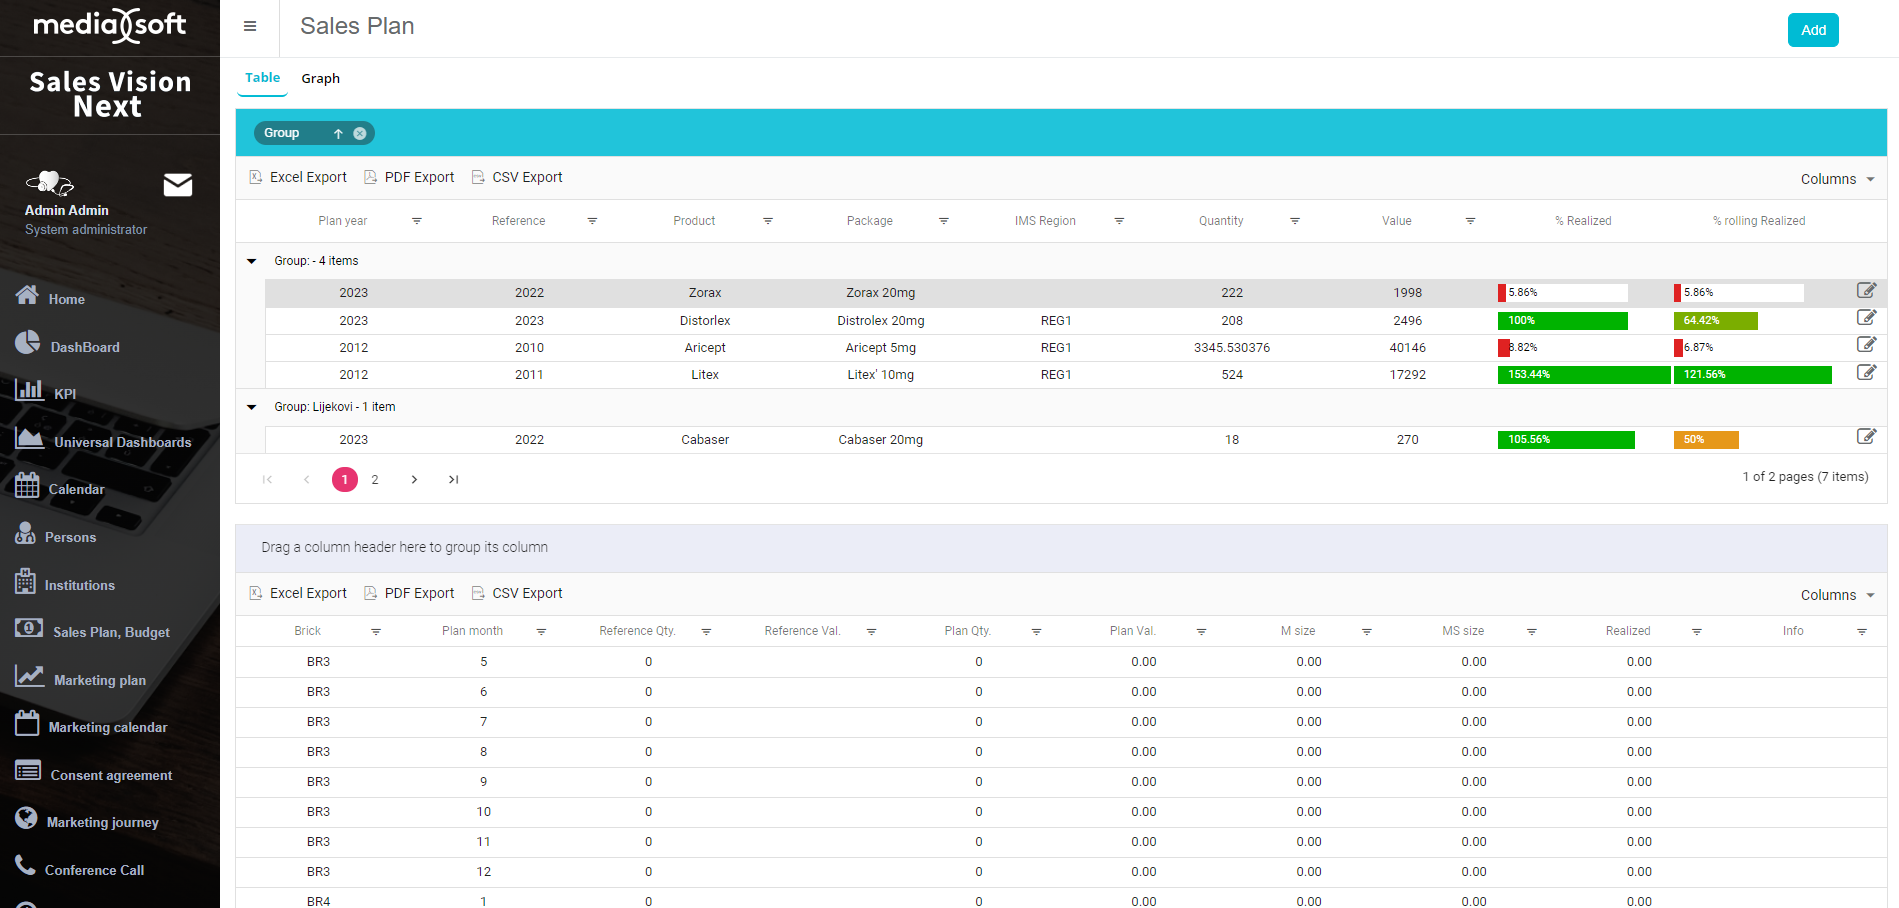
Sales Plan module offers two different layouts: Table and Graph. Table view is divided into several parts: Add button in the upper right part to add a new definition of the sales plan

Preview of saved sales plans with the possibility to display them grouped according to different criteria, export them to Excel, PDF or CSV, and to filter the list
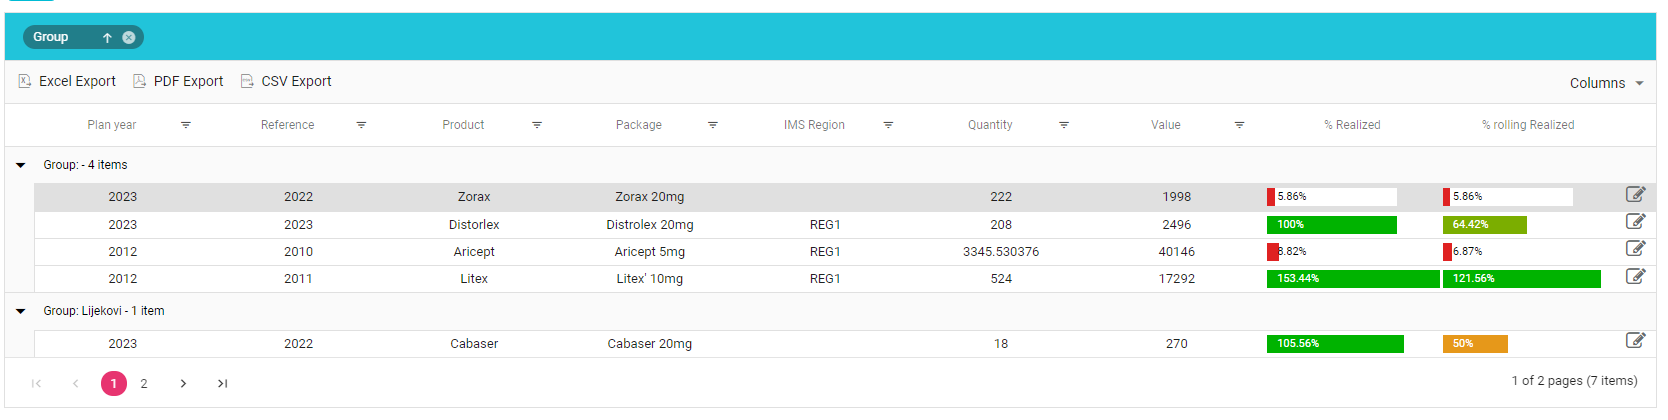
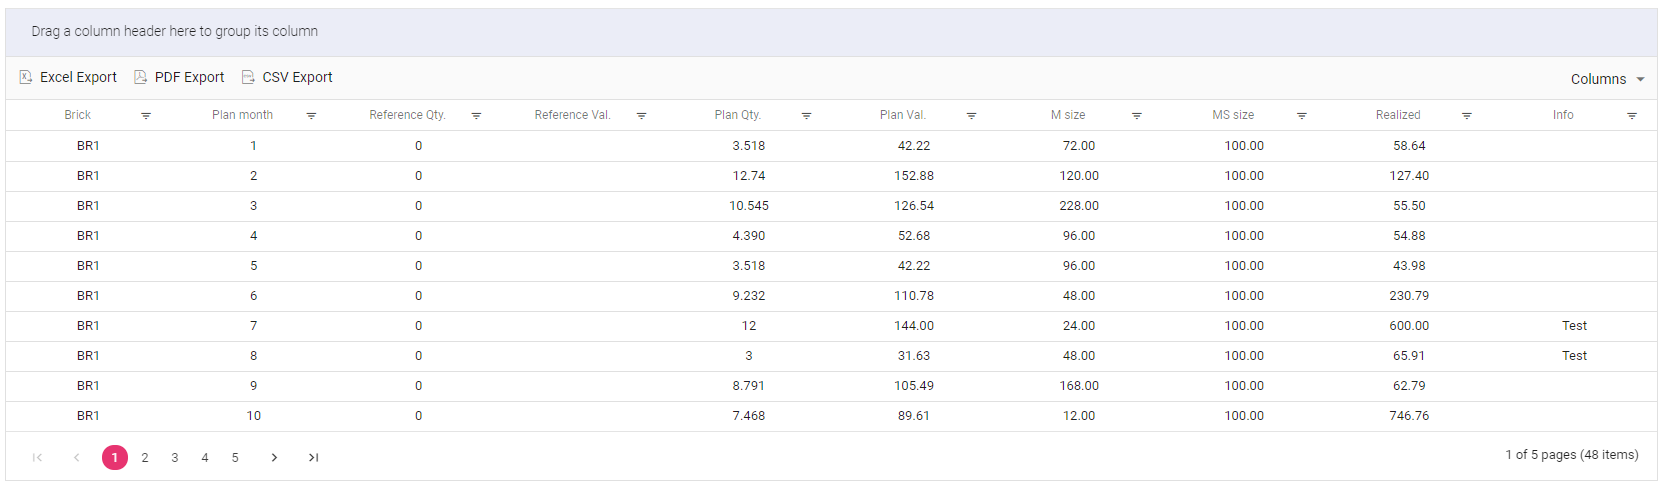
In the lower part of the screen, for the selected sales plan, division by bricks and months with the possibility to display them grouped according to different criteria, export them to Excel, PDF or CSV, and to filter the list
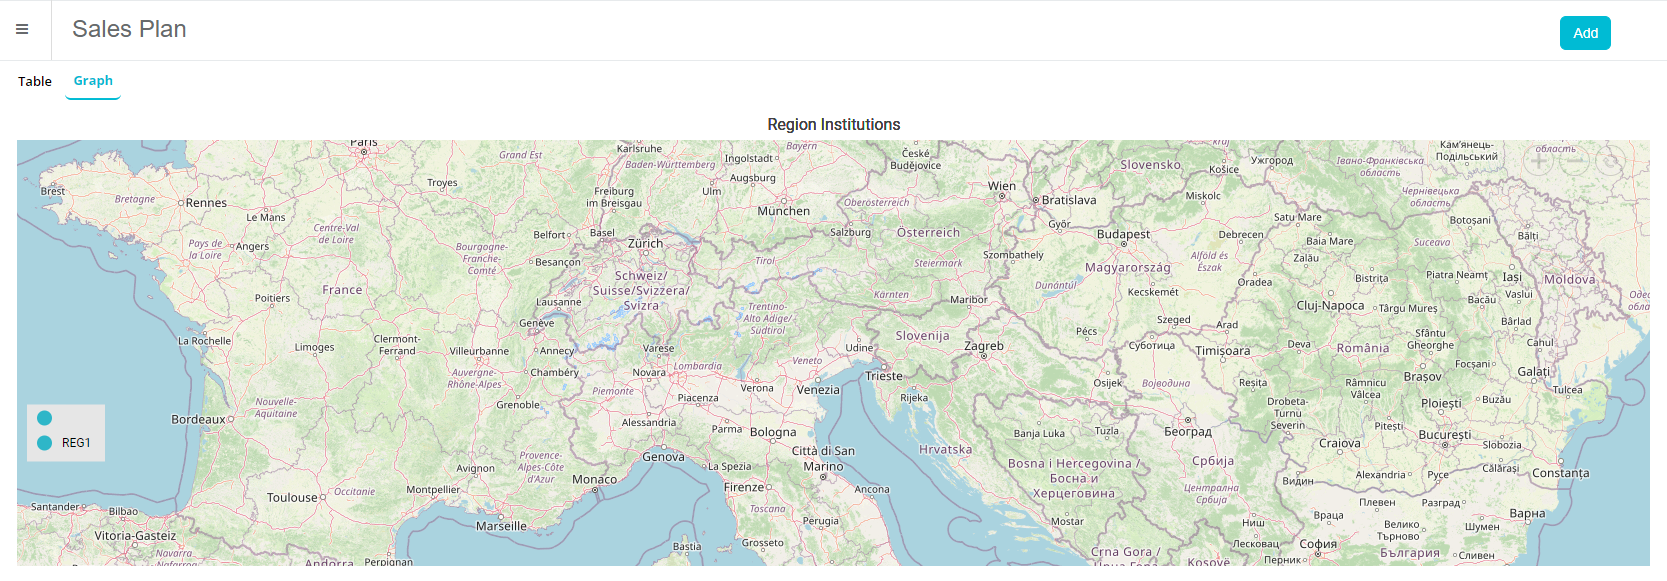
On tab Graph we show location of a region, to be more precise, value of sales plan.
Adding a new definition of sales plan
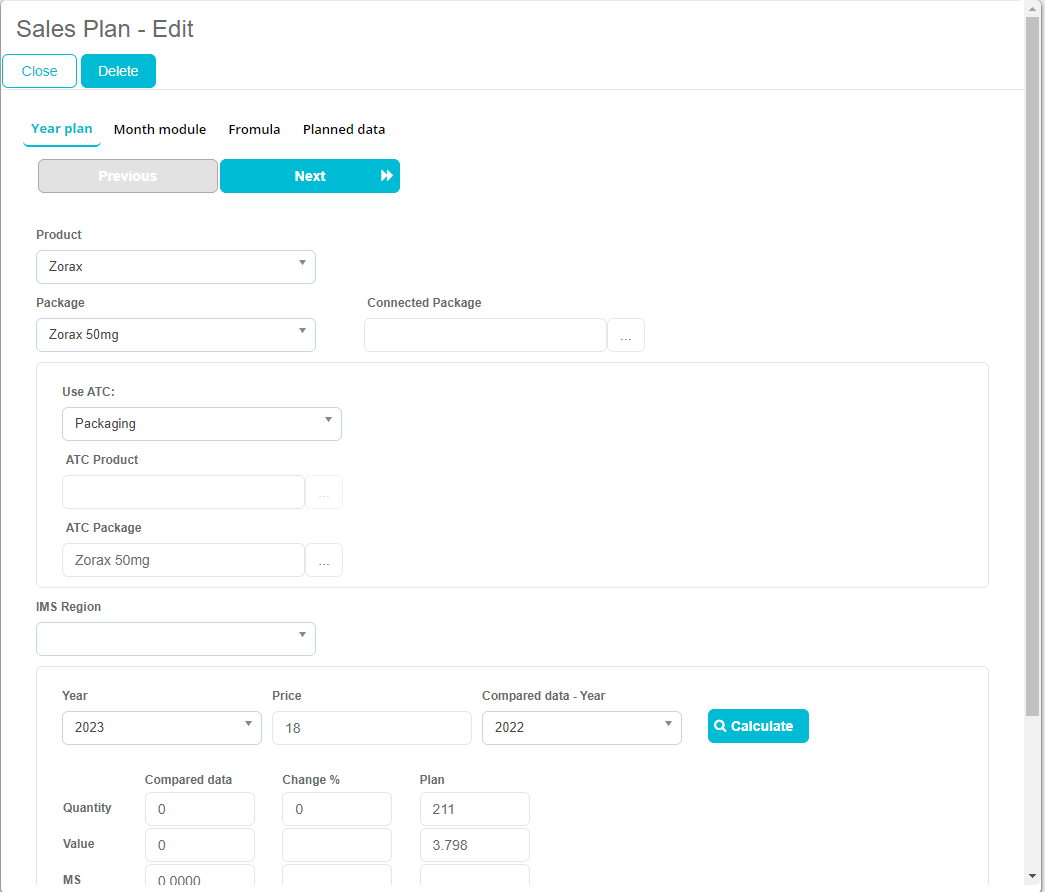
To add a new sales plan, click on an “Add” button in the top right corner. You will be presented with the following screen:
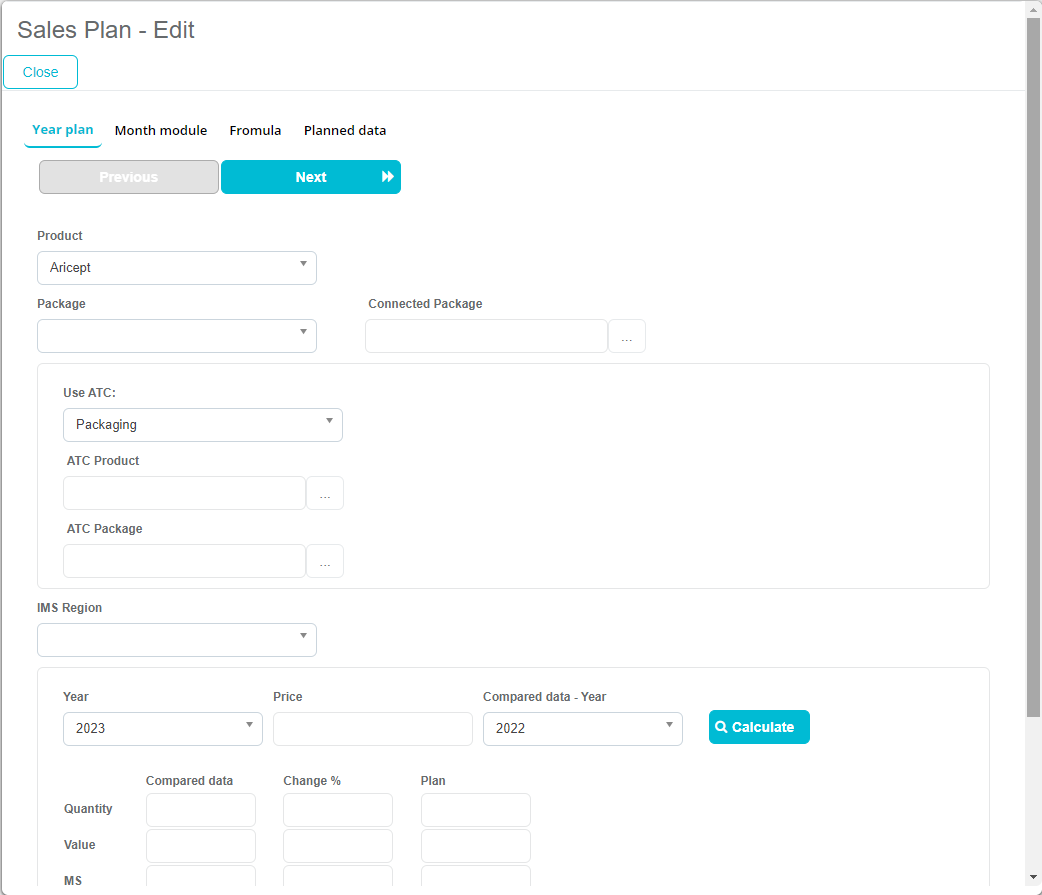
In here you have to select Product, Package, Year of the sales plan, and planned quantity. If you were to click on “Calculate”, system would automatically calculate the planned quantity, value, MS, market size.
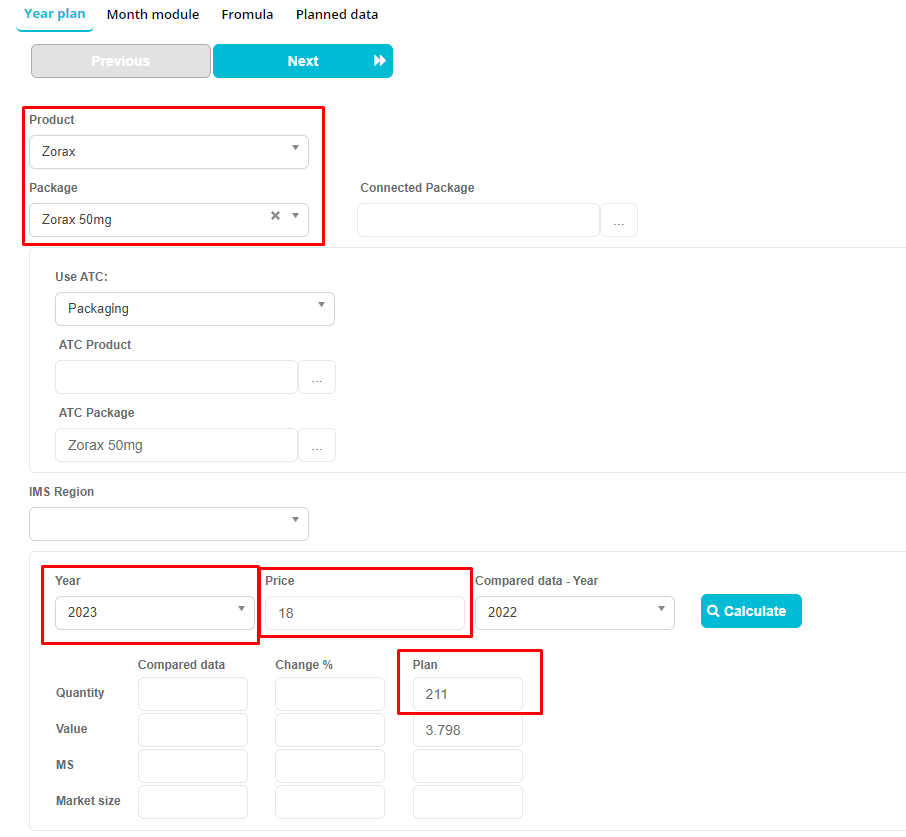
After inputting the required data, press on “Next”.
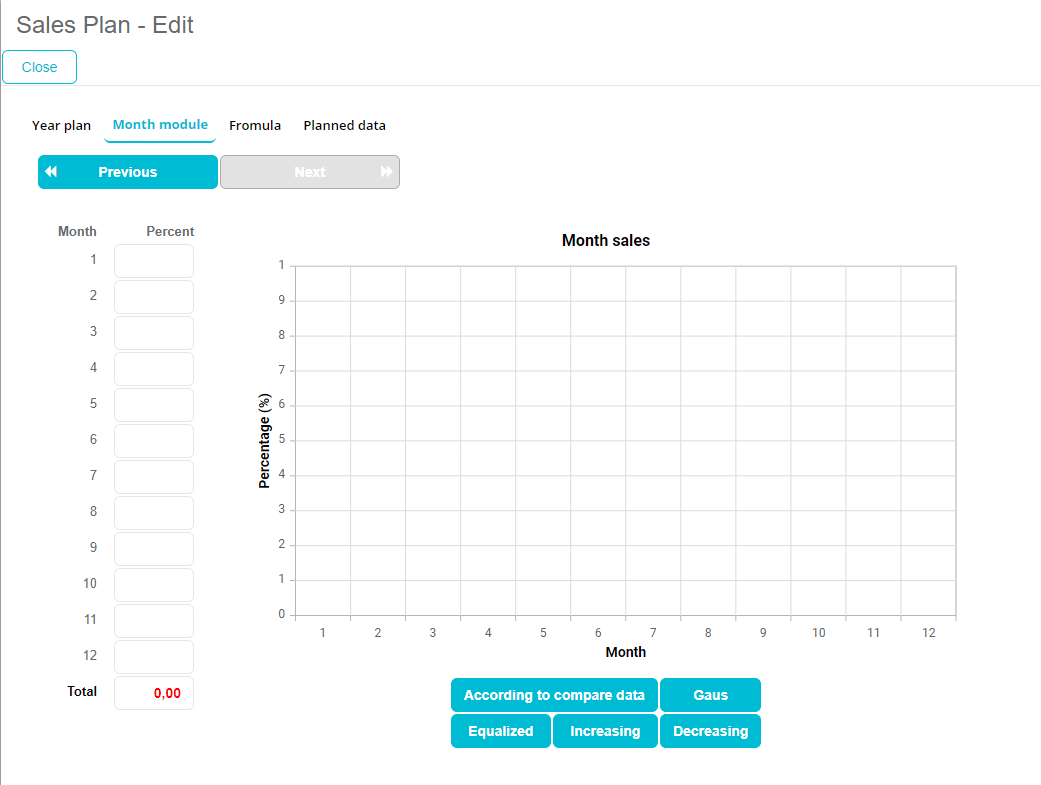
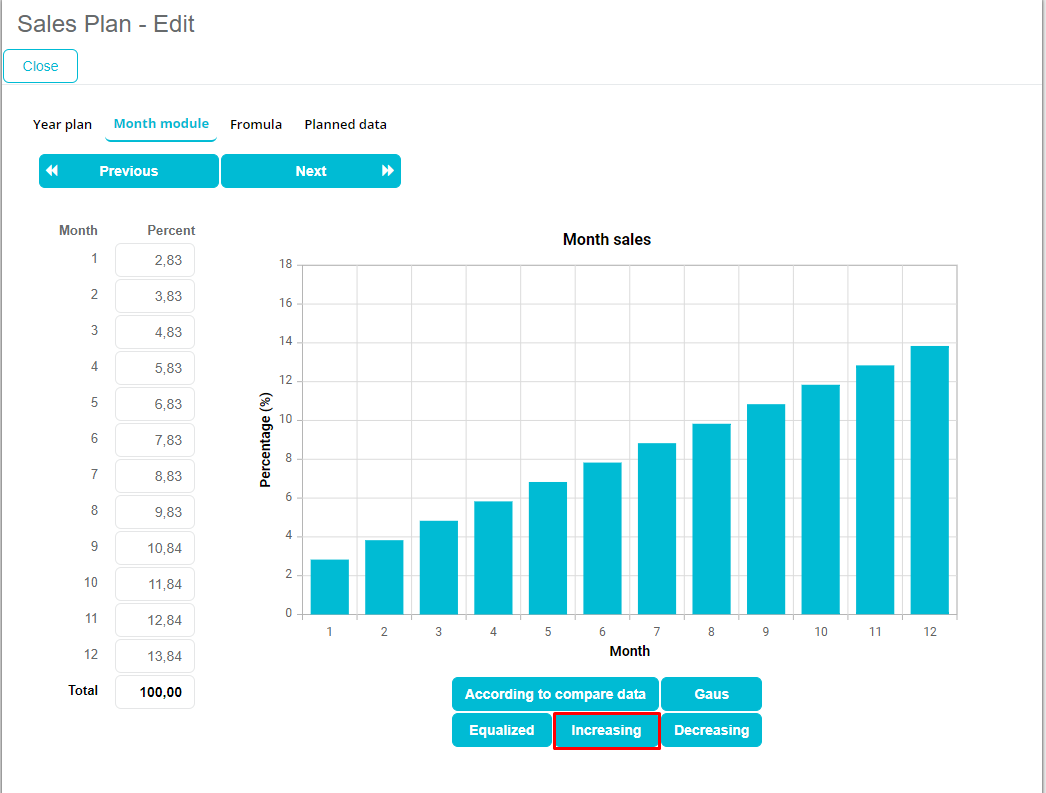
Next step is defining % of sales per months. There are some predefined buttons that will input the percentages or us, such as “According to compare data”, “Gaus”, “Equliazed”, “Increasing” and “Decreasing”, or we can input the values ourselves.
For our example, we have selected “Increasing”, and after doing so, we have to click “Next”.
The next step that we have to take is select the formula. We have 3 choices: “According to sales”, “According to market size” and “Variable”. After selecting the formula, click on “Divide”.
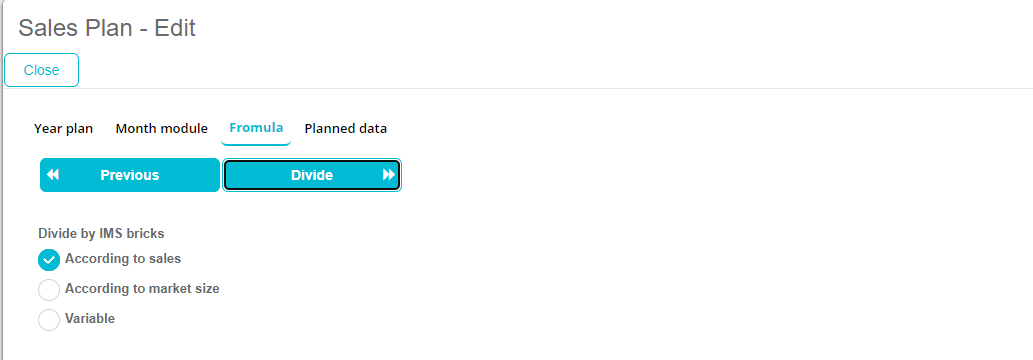
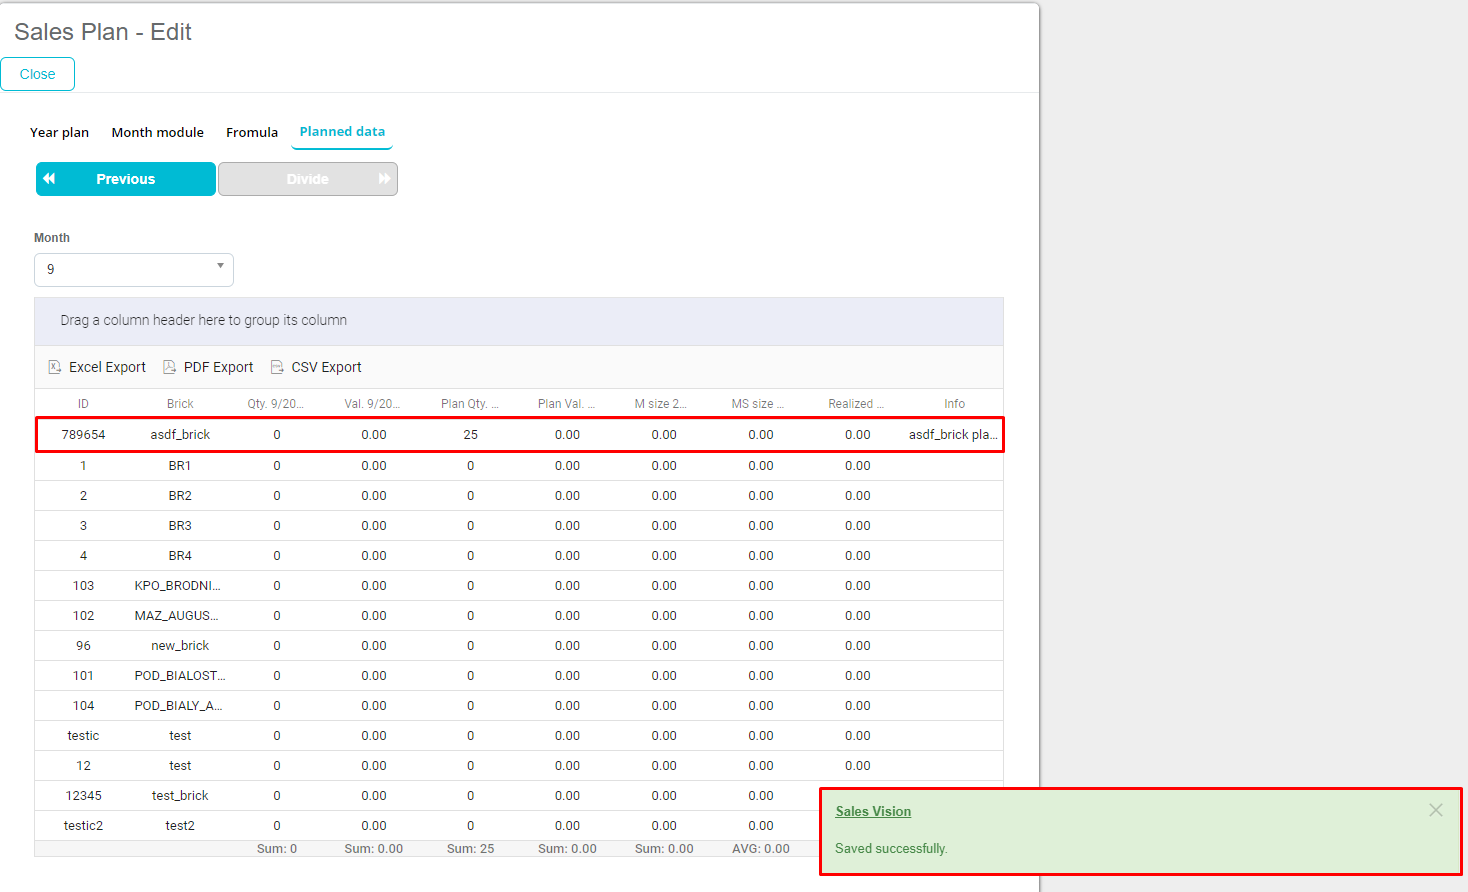
After clicking on “Divide”, system will let us know in the bottom right corner that it has saved our sales plan.
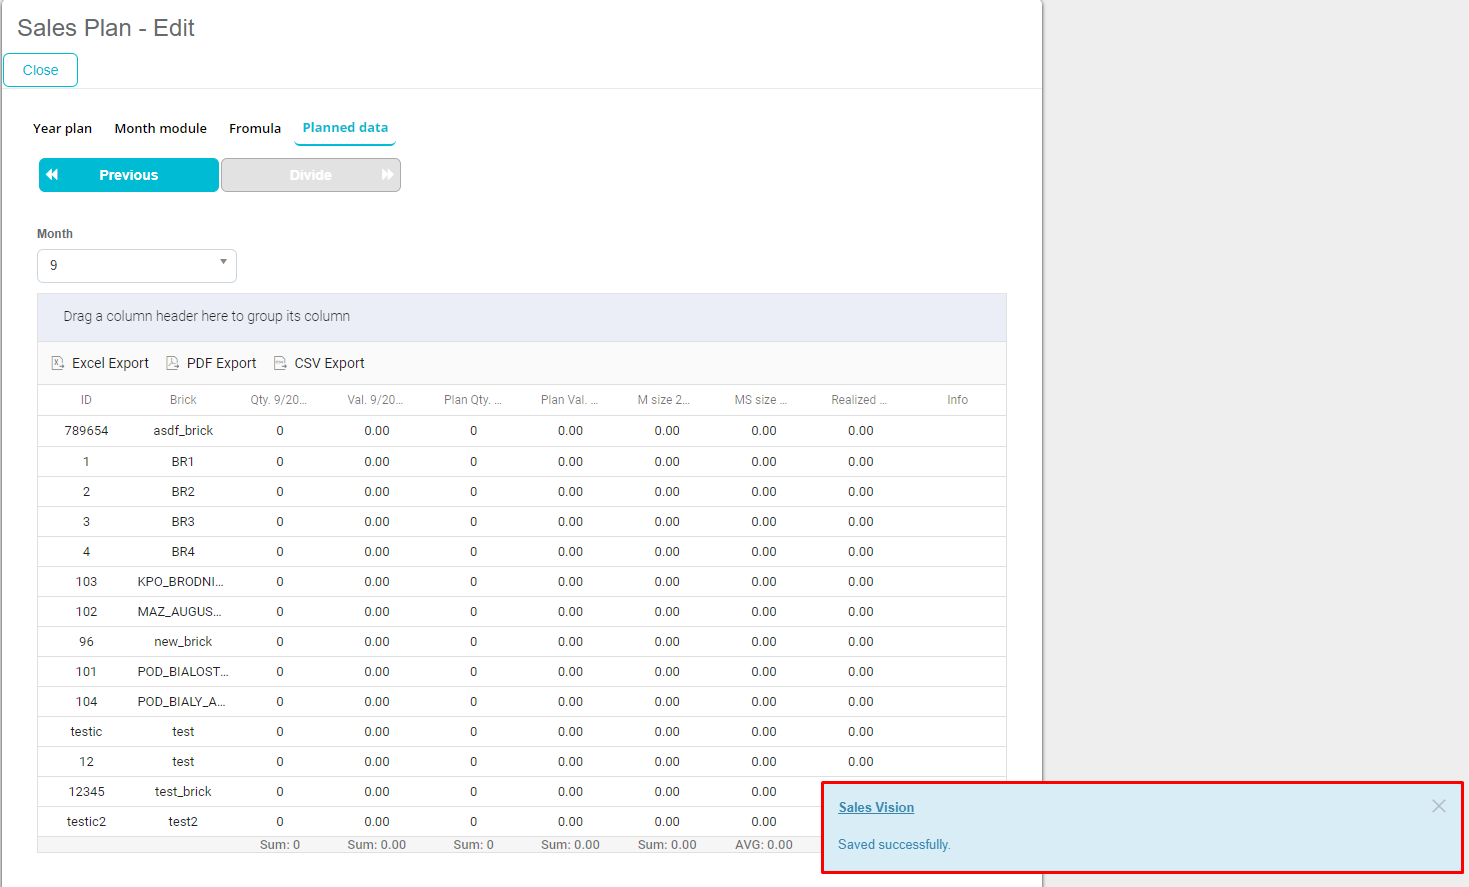
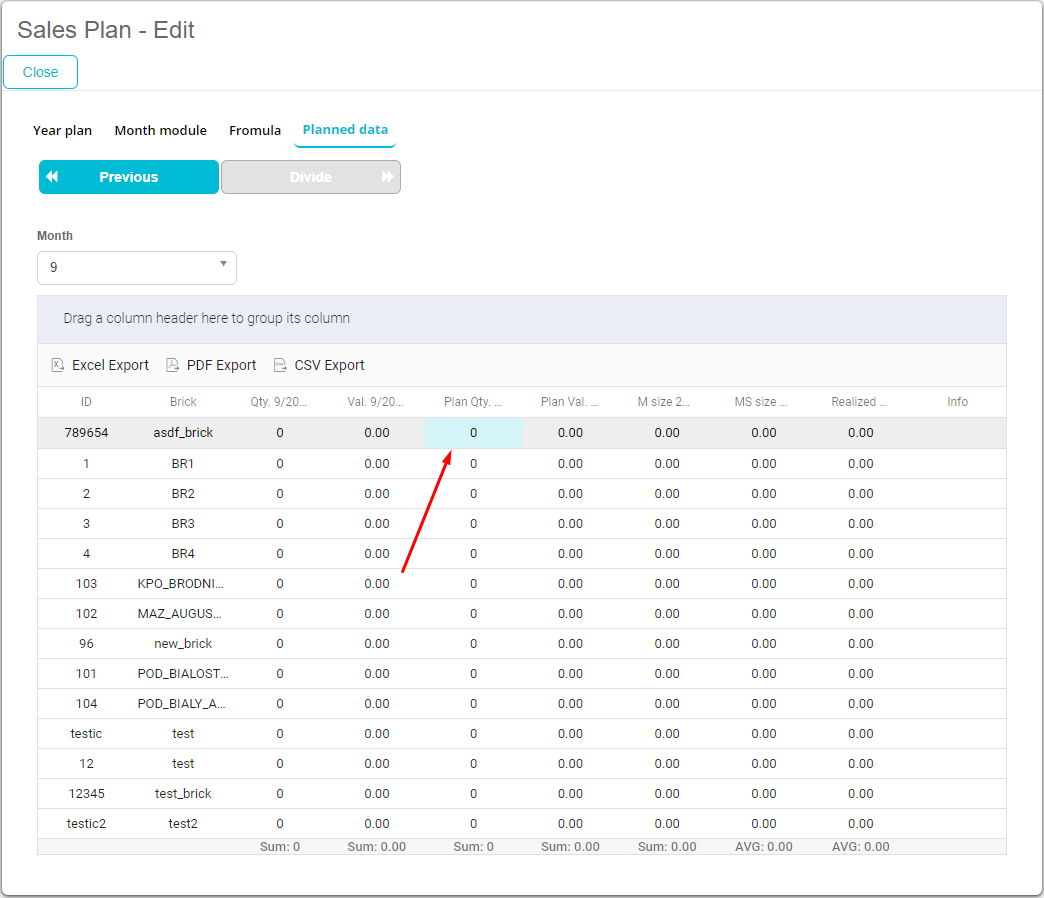
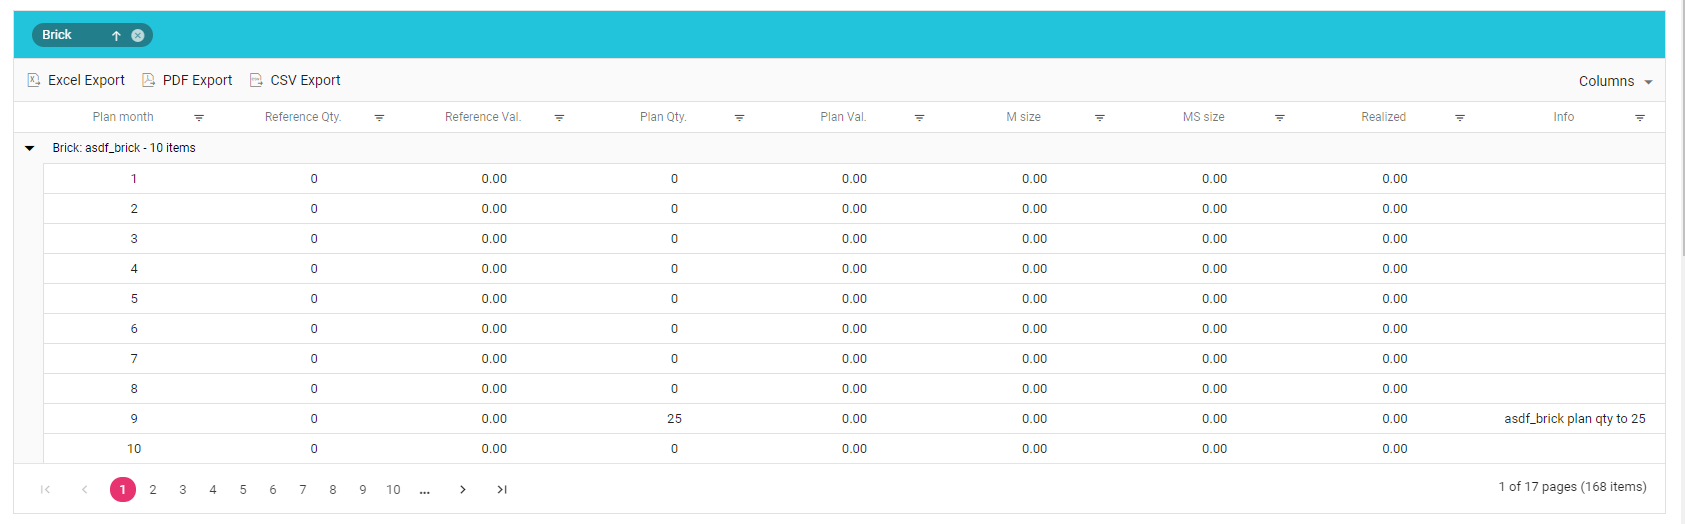
On Planned data tab, we can edit plan qty. for each brick, editable columns change color and mouse cursor is different.
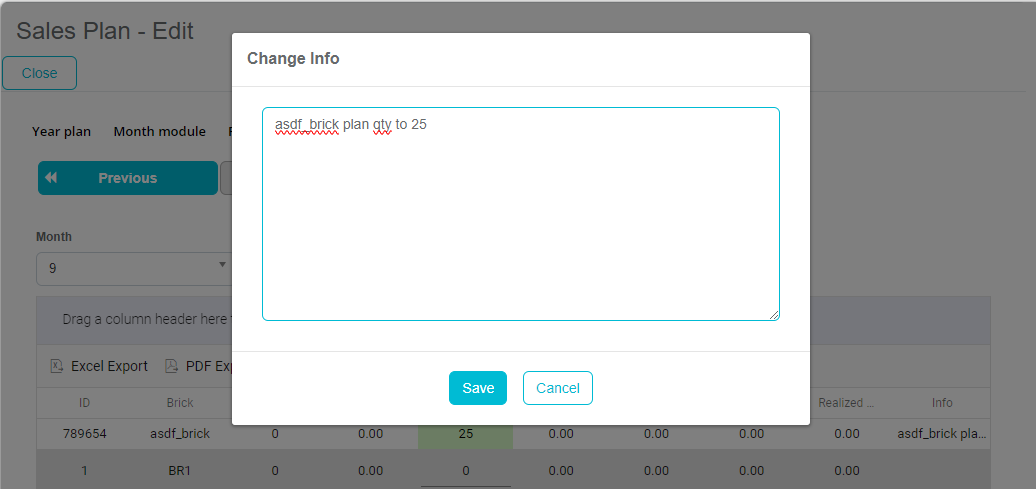
After editing plan qty., we are presented with the change info window where we can insert info text.
Now we can click on “Close” to go back to the Sales Plan module.
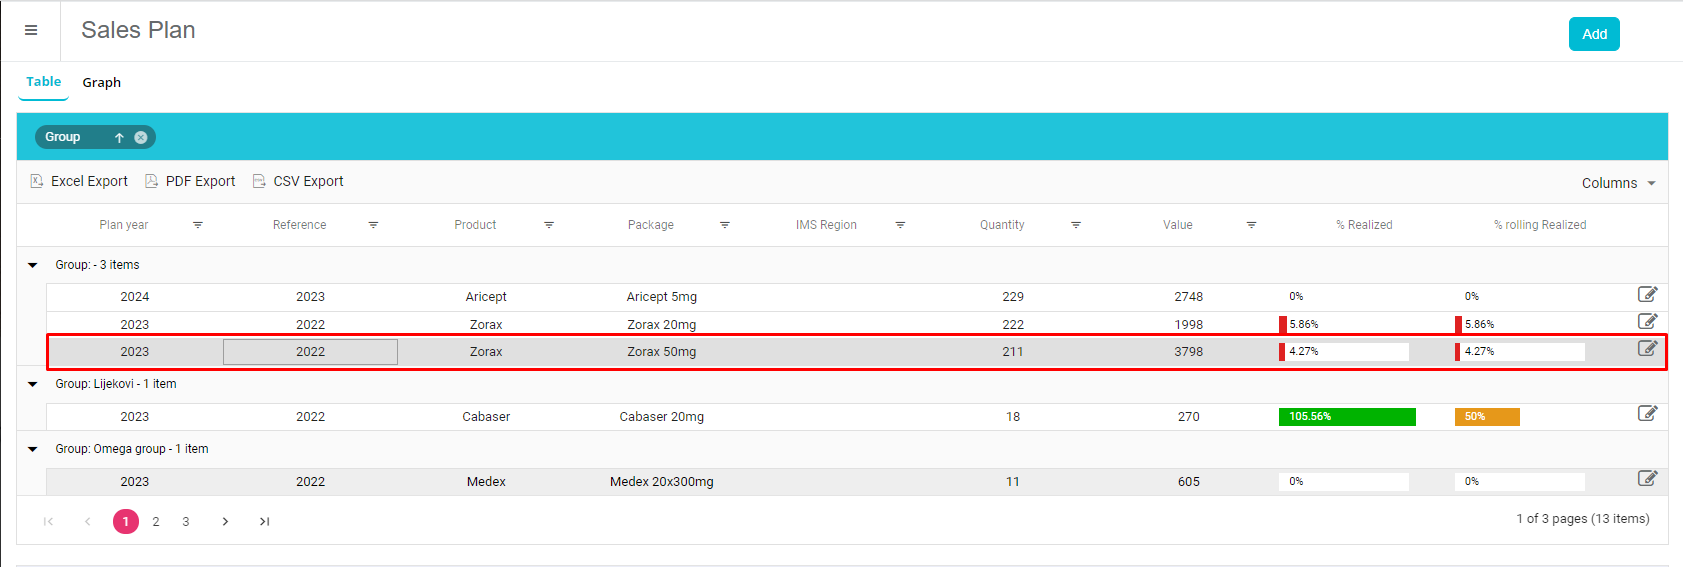

Editing a sales plan
To edit an existing sales plan, we can click on the edit icon in the far right corner of selected sales plan.
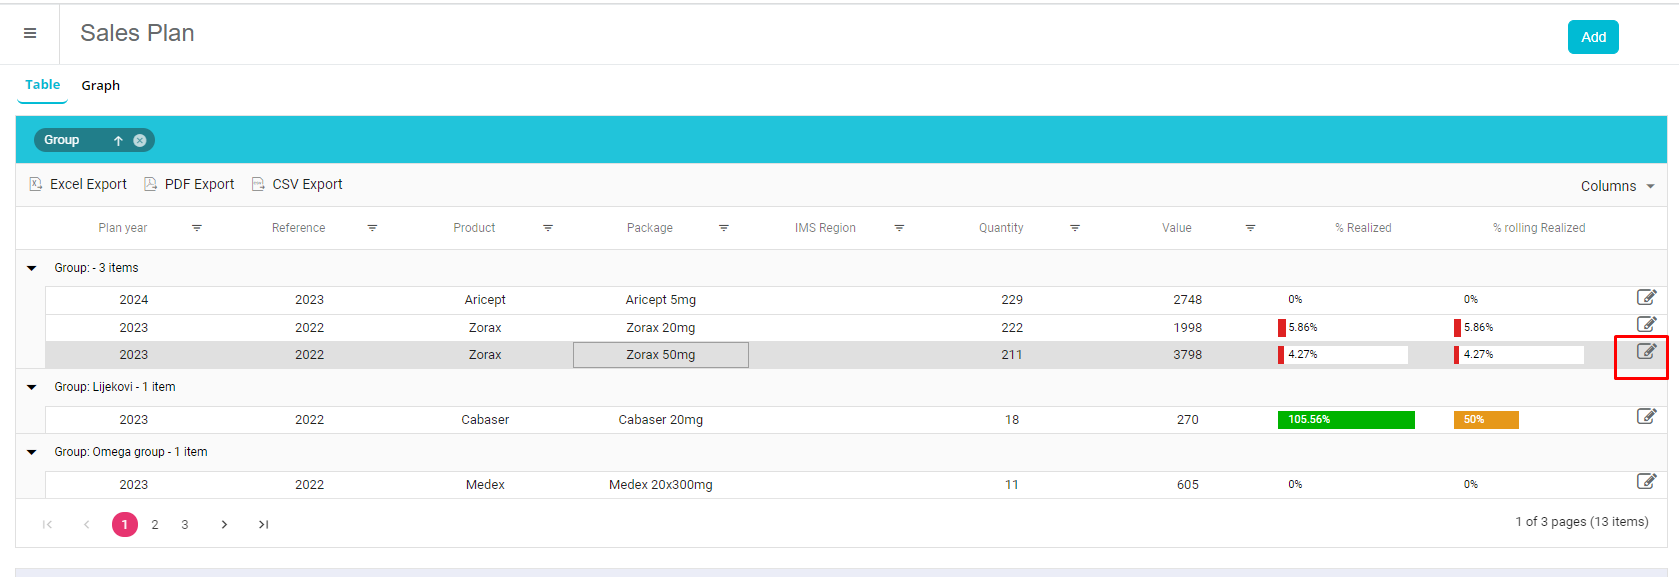
When we enter a sales plan, we can also see “Delete” button. If we want to edit any of the data for current sales plan, we can click on the desired field and edit it, and to save the changes, we have to click “Next” until “Planned data” tab where system will tell us that changes were saved successfully.
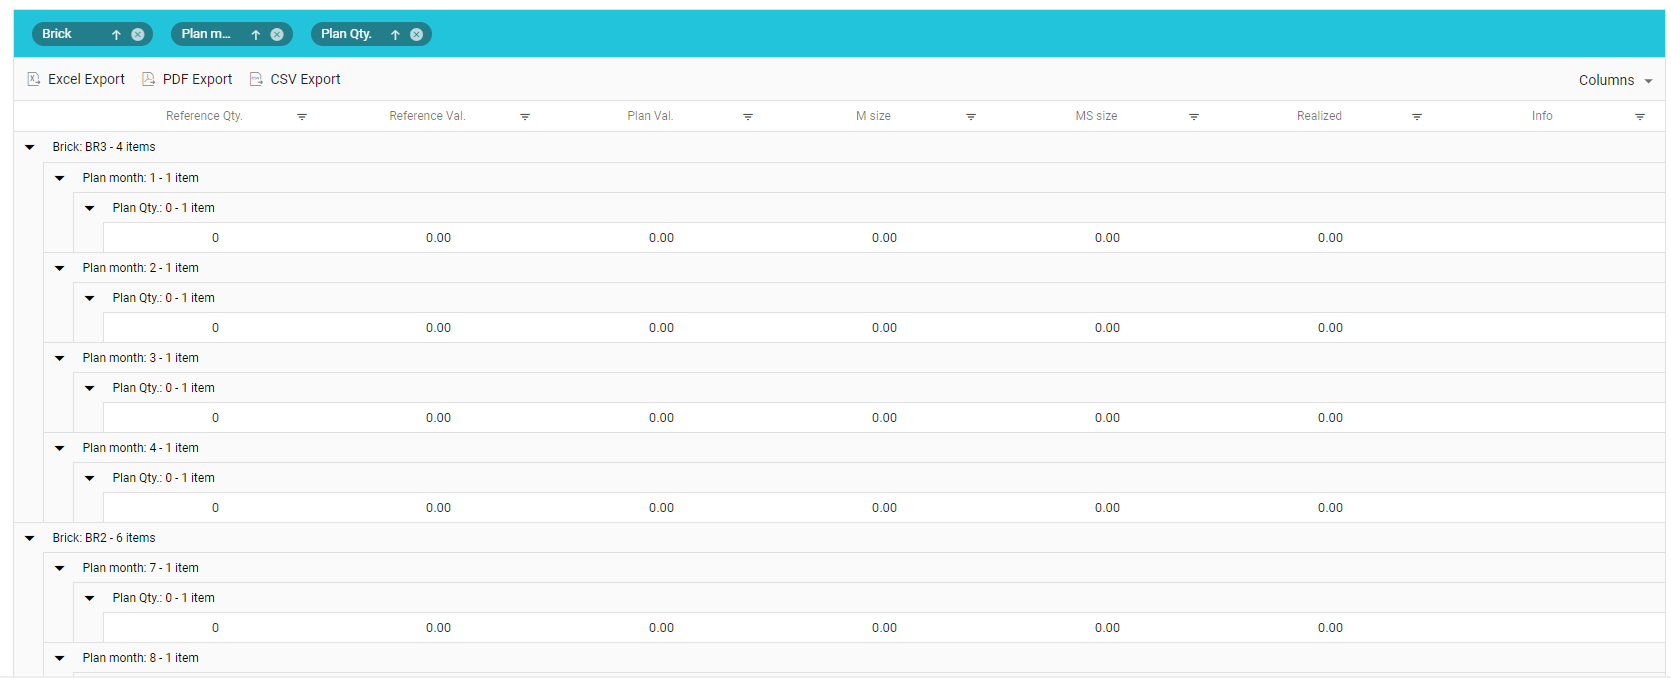
Grouping data
We can group our data by column by dragging a column header to the marked space.
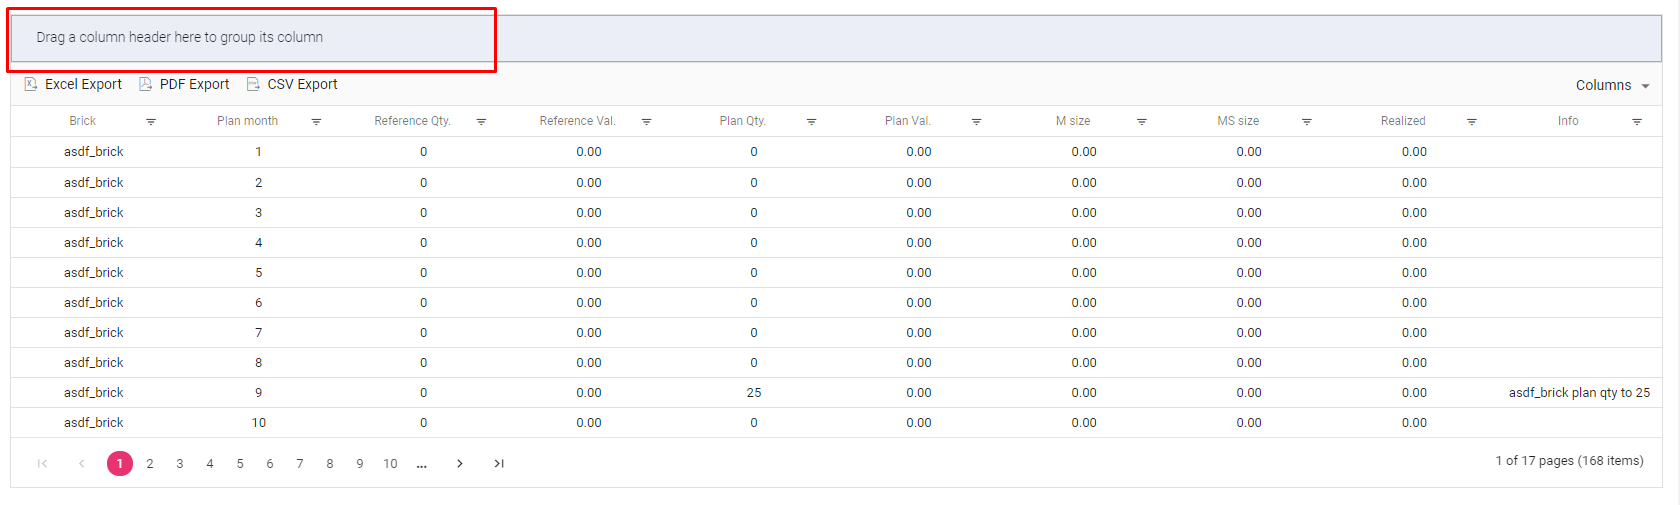
For example, we have decided to drag column header “Brick” and now data is immediately grouped by bricks.
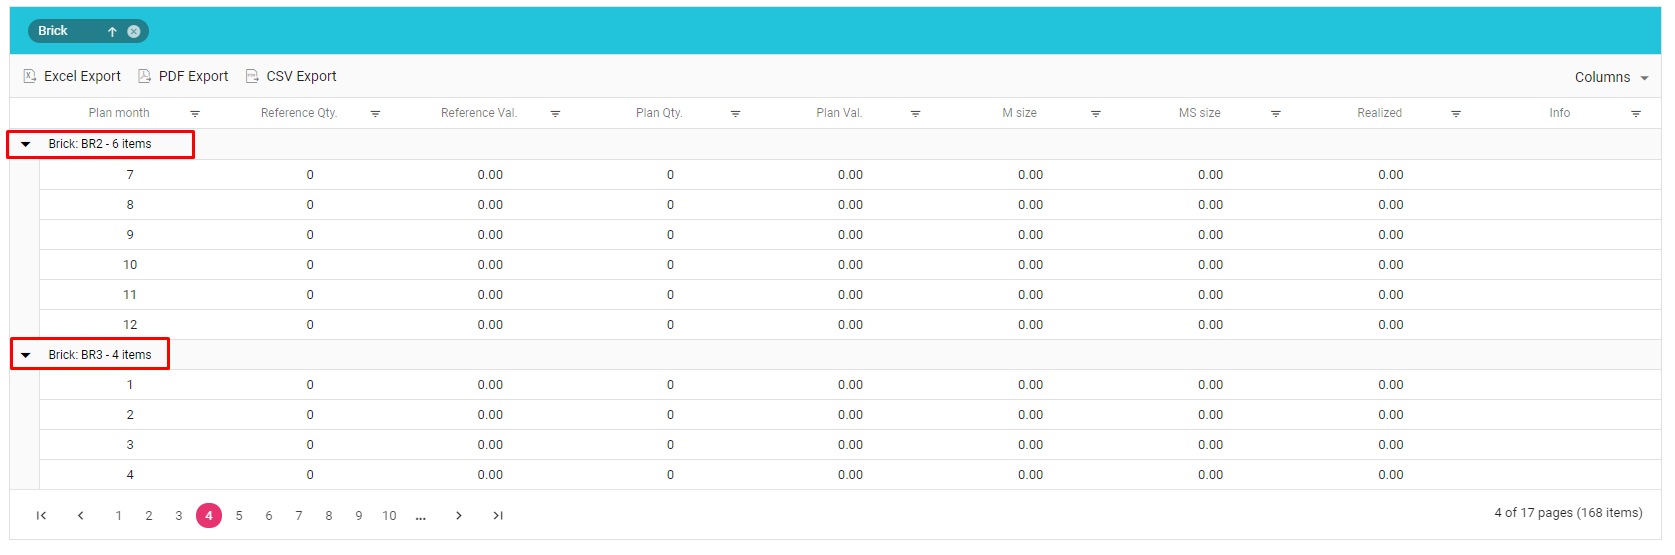
It’s also possible to group by multiple column headers.
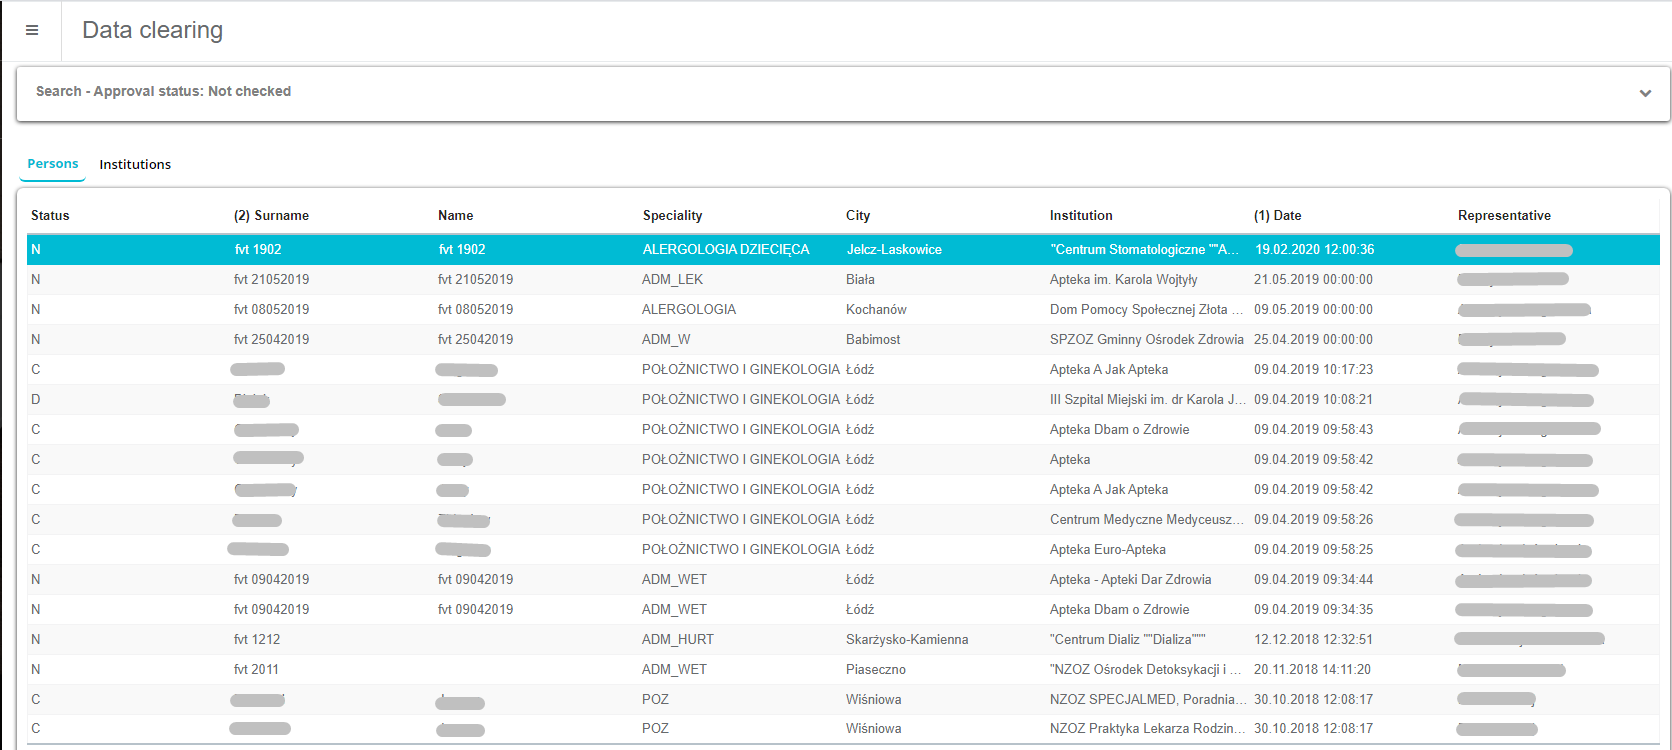
k. Data clearing
If data clearing is enabled (it is visible only for administrators), sales representative can not add/edit a person or institution (depending on options). On the next picture there is an example of persons waiting for approval.
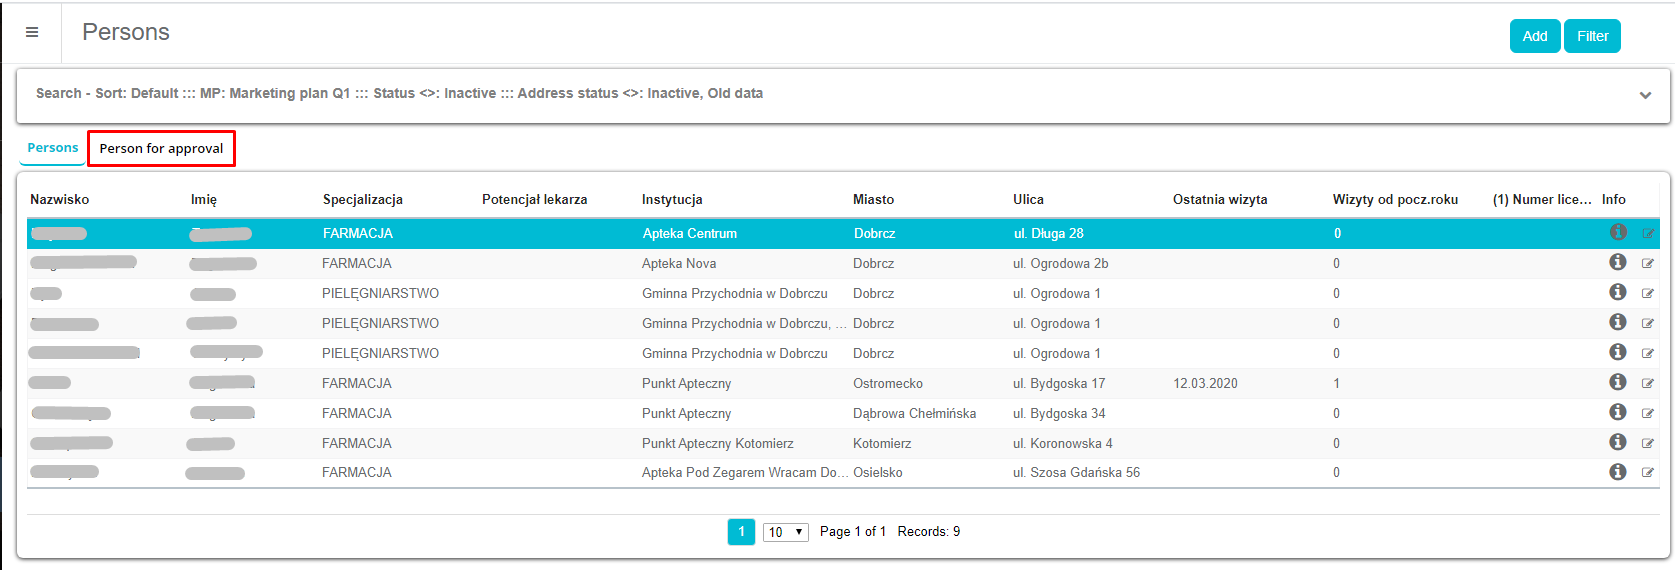
In order to make new person appear in the list of persons, administrator approval is required.
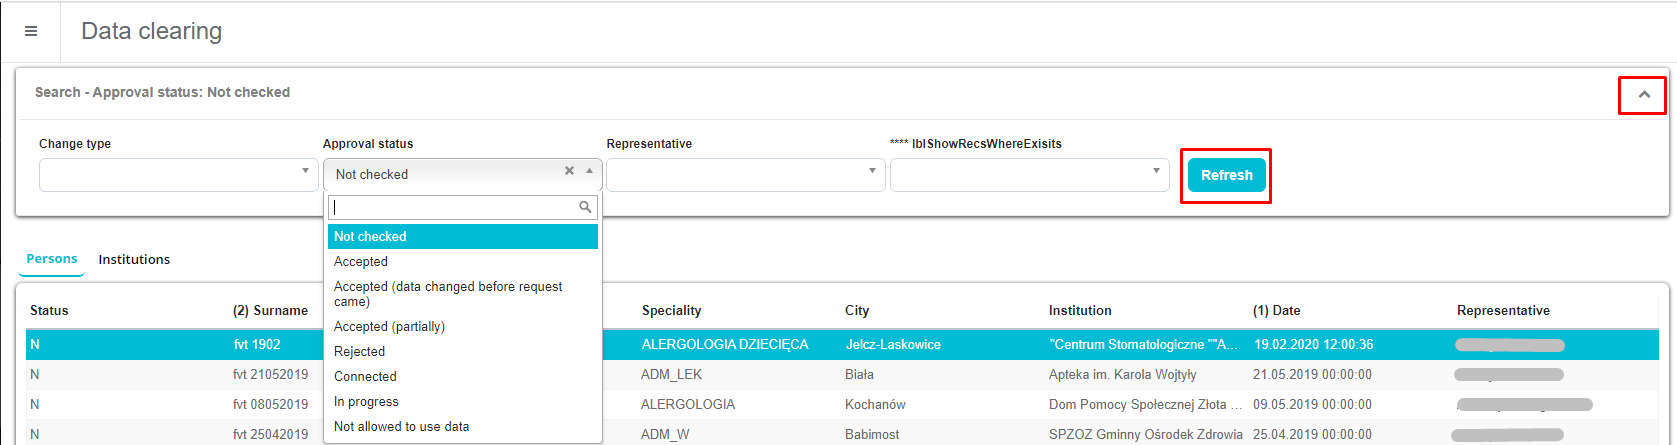
- Administrator opens Extras menu and after that Data clearing.
- A new window that contains persons for approval will appear.
- In order to filter approval list according to certain parameters, there is a fast search function right above the list of persons. Here it is possible to choose desired search parameters (approval status etc.). To display search results you need to press on Refresh button.
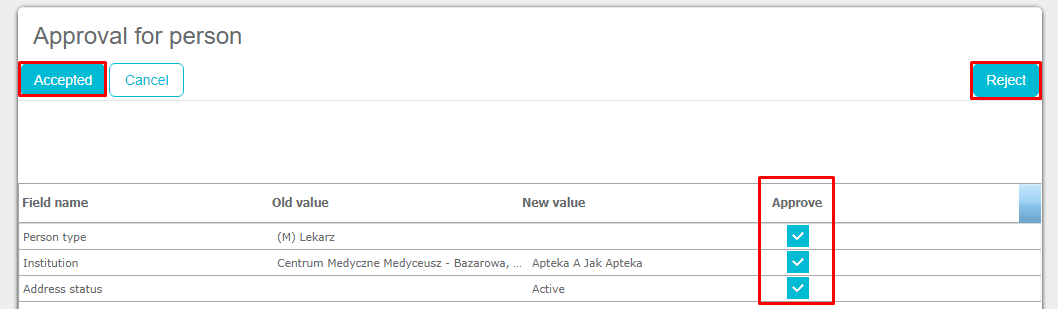
- Next to every field there is an old value and a new value. All changes are approved individually via checkboxes (Approve). Two basic functions are Accepted [1] and Reject [2].
Approved changes can be seen at sales representative after that. So, for example, newly created person can be seen in the list of persons. Data clearing has one letter under status for each record, and those letters have meaning: N – new record (a new person or institution has been created and has to get approved) C – change of an existing record (any kind of change that has to get approved, such as changing the surname of the person) D – delete of an existing record (this is not necessarily wrong to do, but it’s recommended to put persons or institutions on inactive status instead so their historic data doesn’t get deleted and can be looked at)
Orders
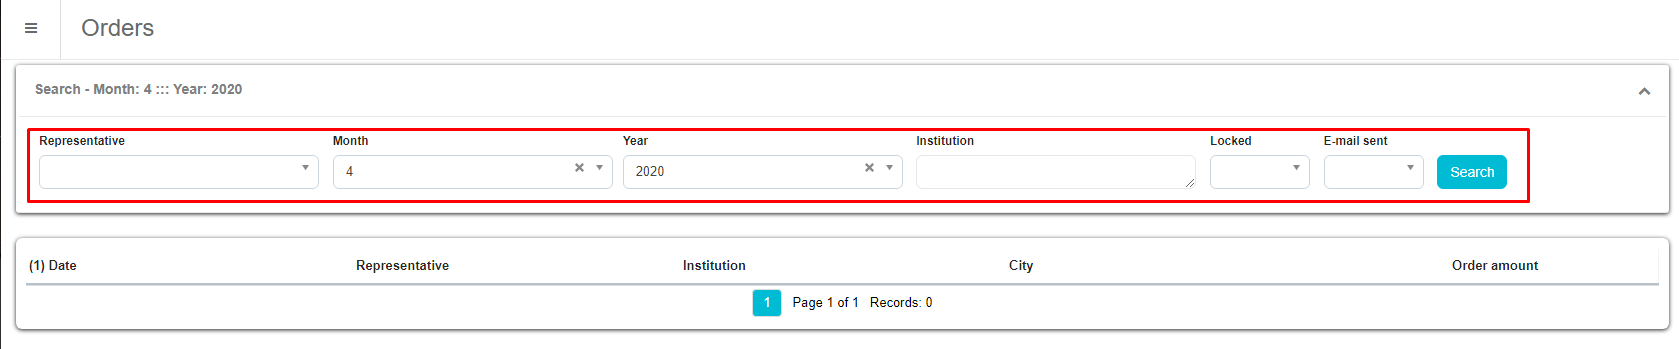
To access the Orders module, place the cursor on Extras and then click on Orders to open it.

In a new window there is a list of orders for current month if there were any (date, representative, institution, city, value). For other months you have to use search function (representative, month, year, institution, realized).

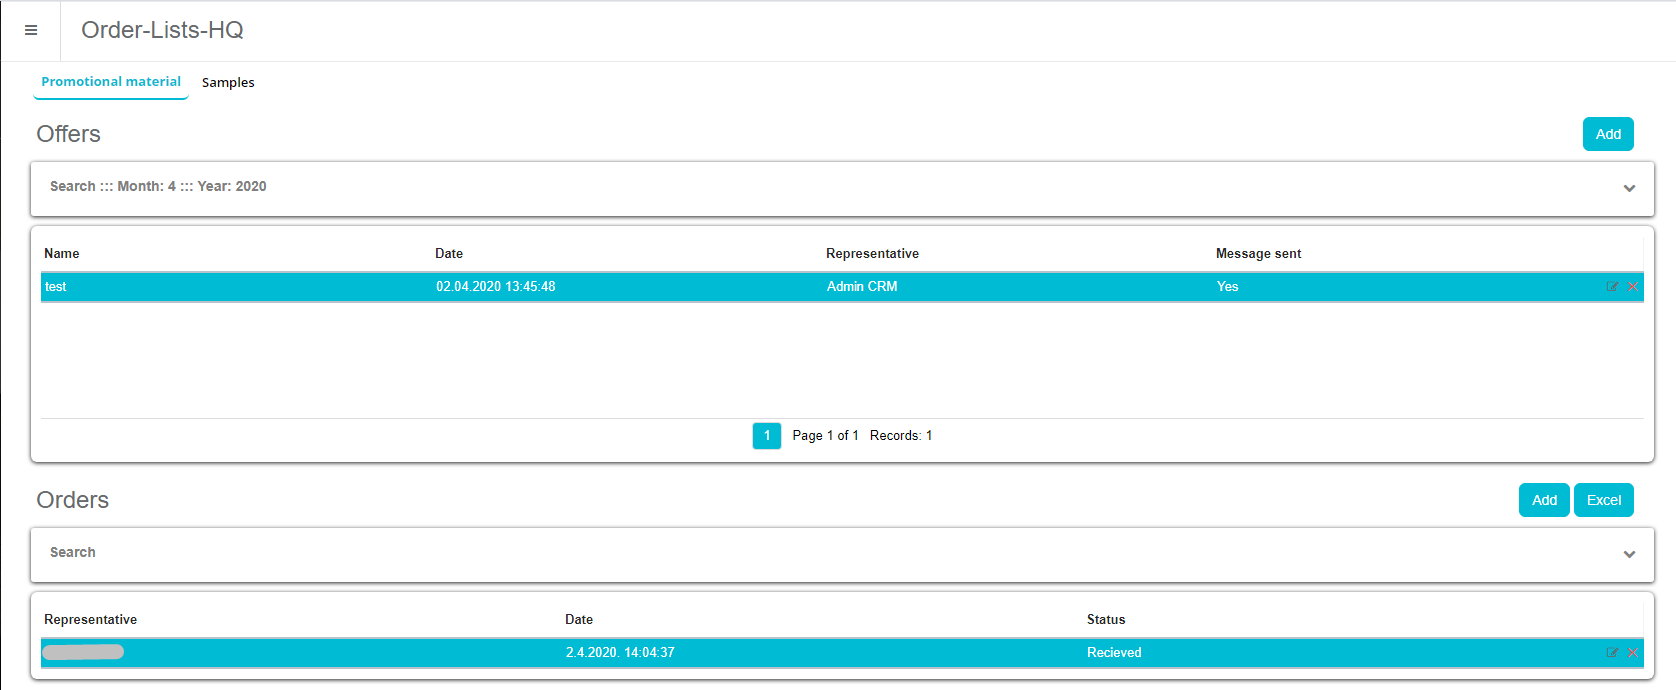
Order lists HQ
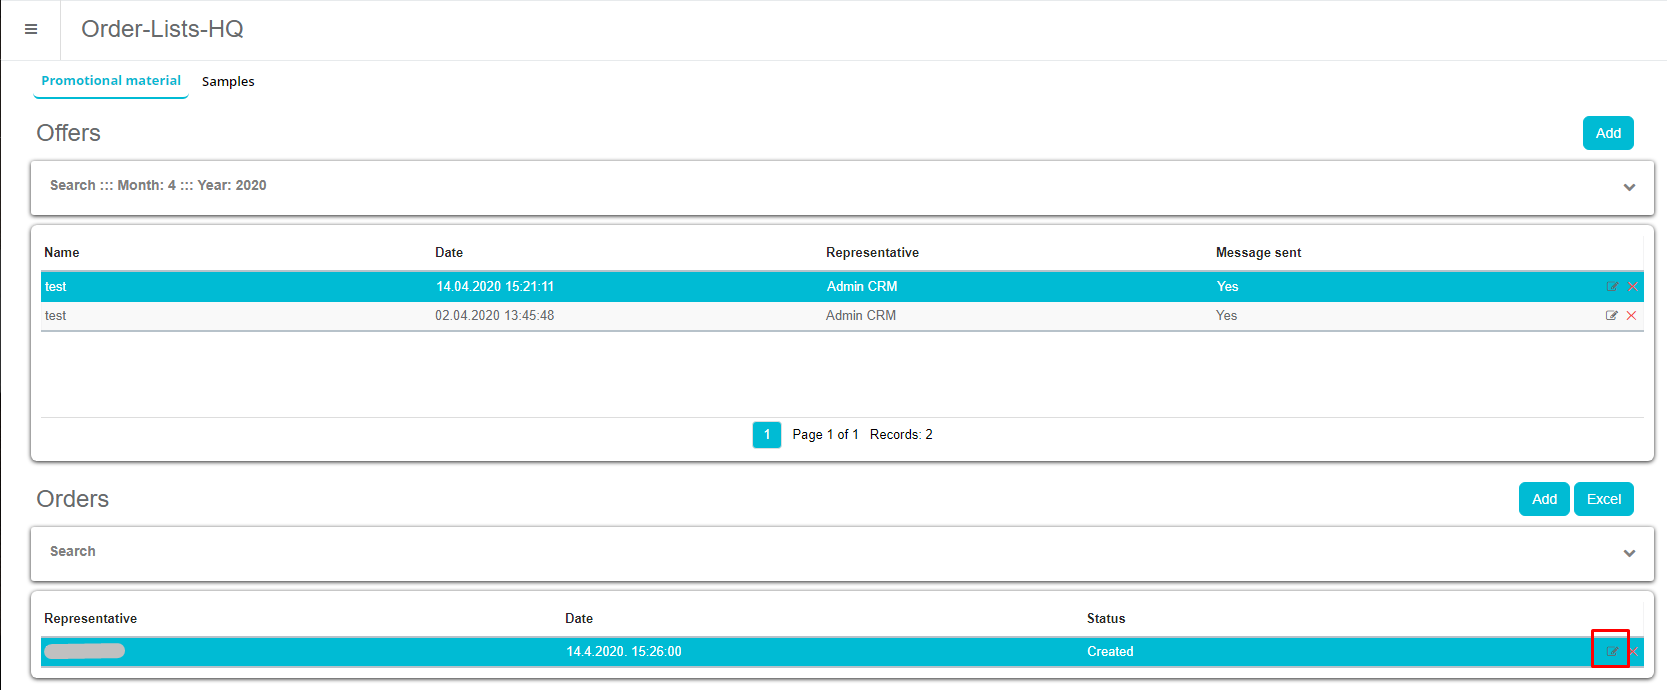
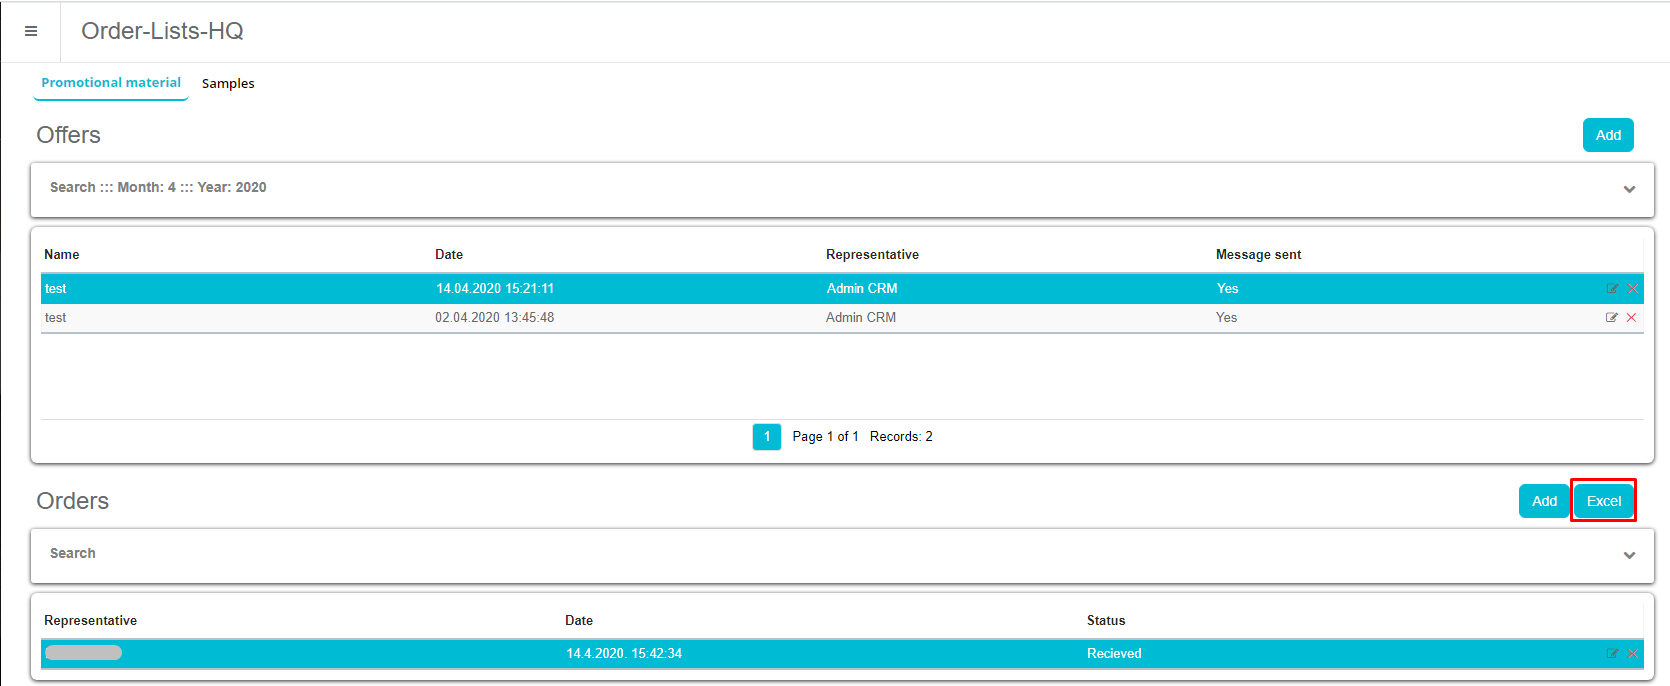
New module will appear on menu, tab Extras, Order Lists HQ. If acc rules are correctly set, this module is visible only to Admin and HQ users.

Promotional materials
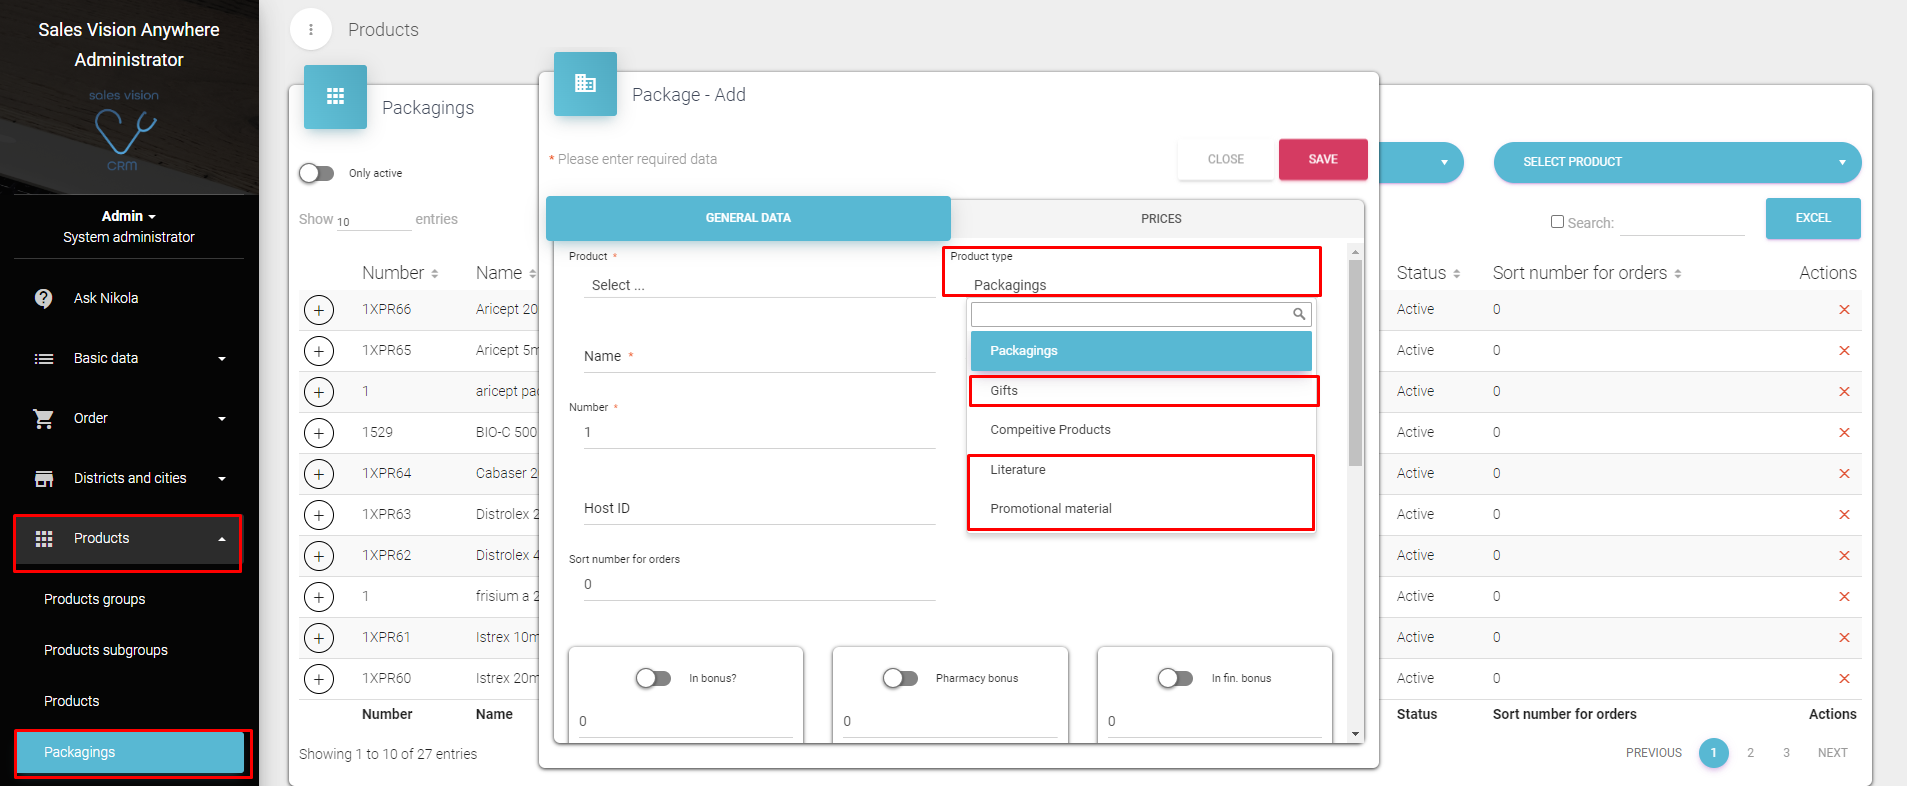
New module with possibility to add new offer by using Add button in the upper right corner. HQ user can enter a new offer for ordering promotional material: Promotional materials are defined in the Admin application under Products Packagings adding a new or editing existing package and changing product type to either “Gifts”, “Literature” or “Promotional material”.
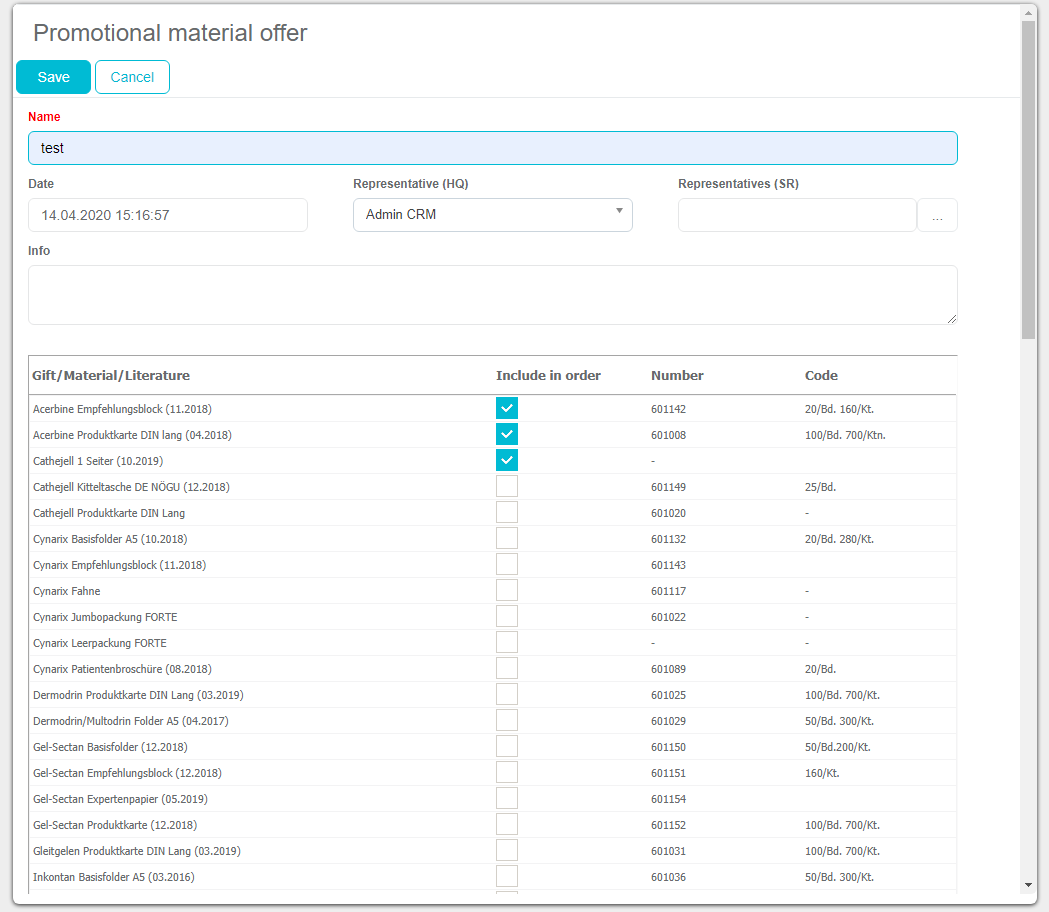
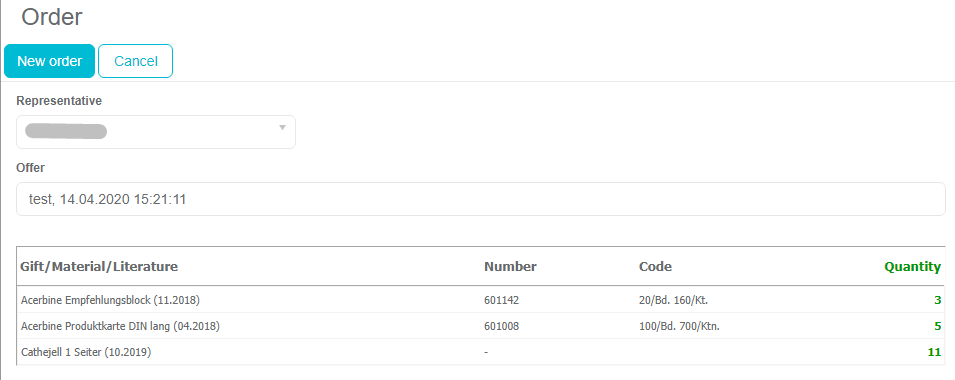
Window for adding order for active promotional materials.
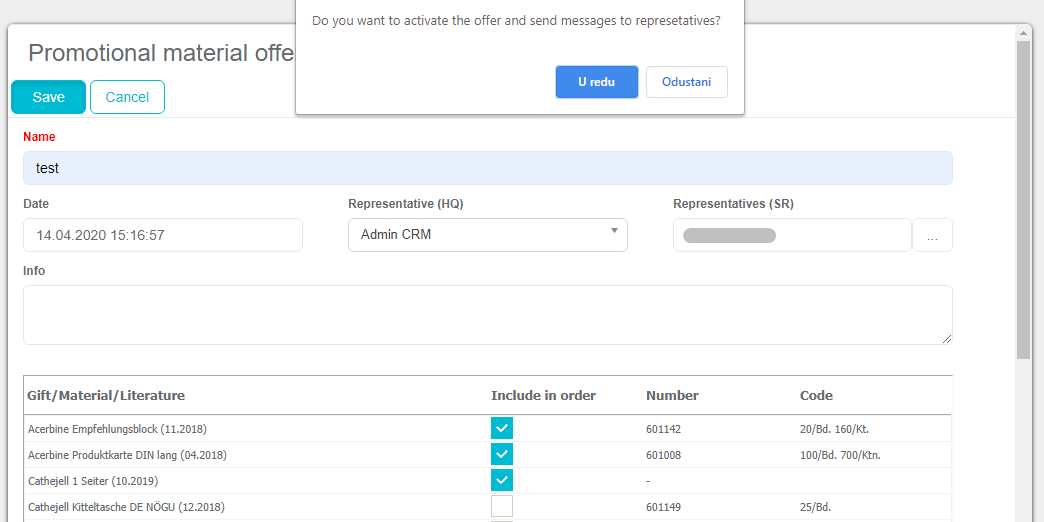
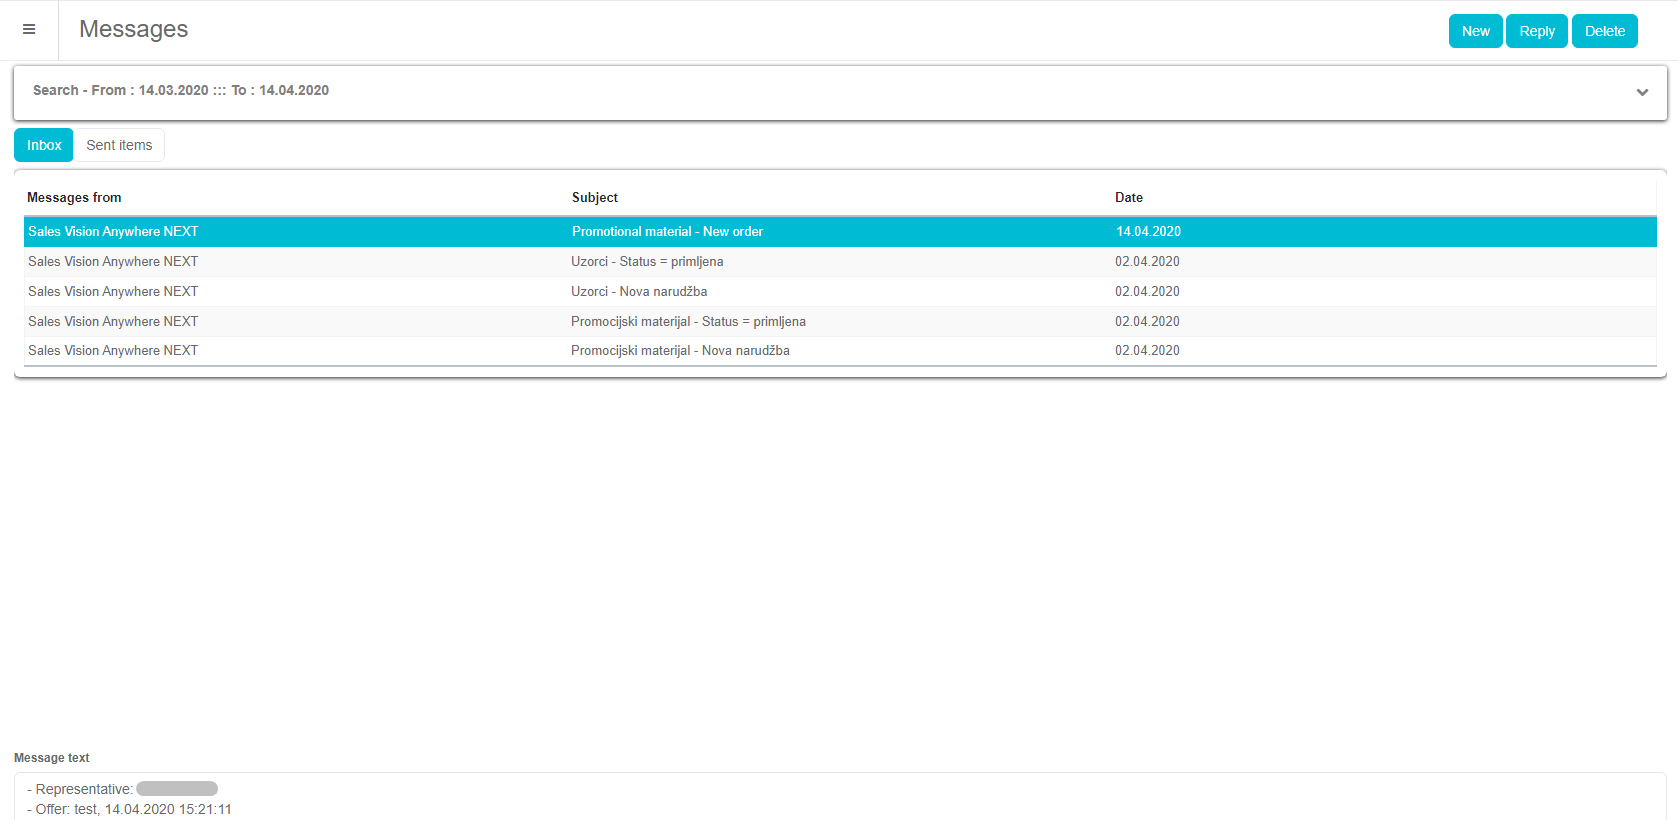
If user has been connected to an offer, you will get additional message if you wish for the offer to be send to SR:
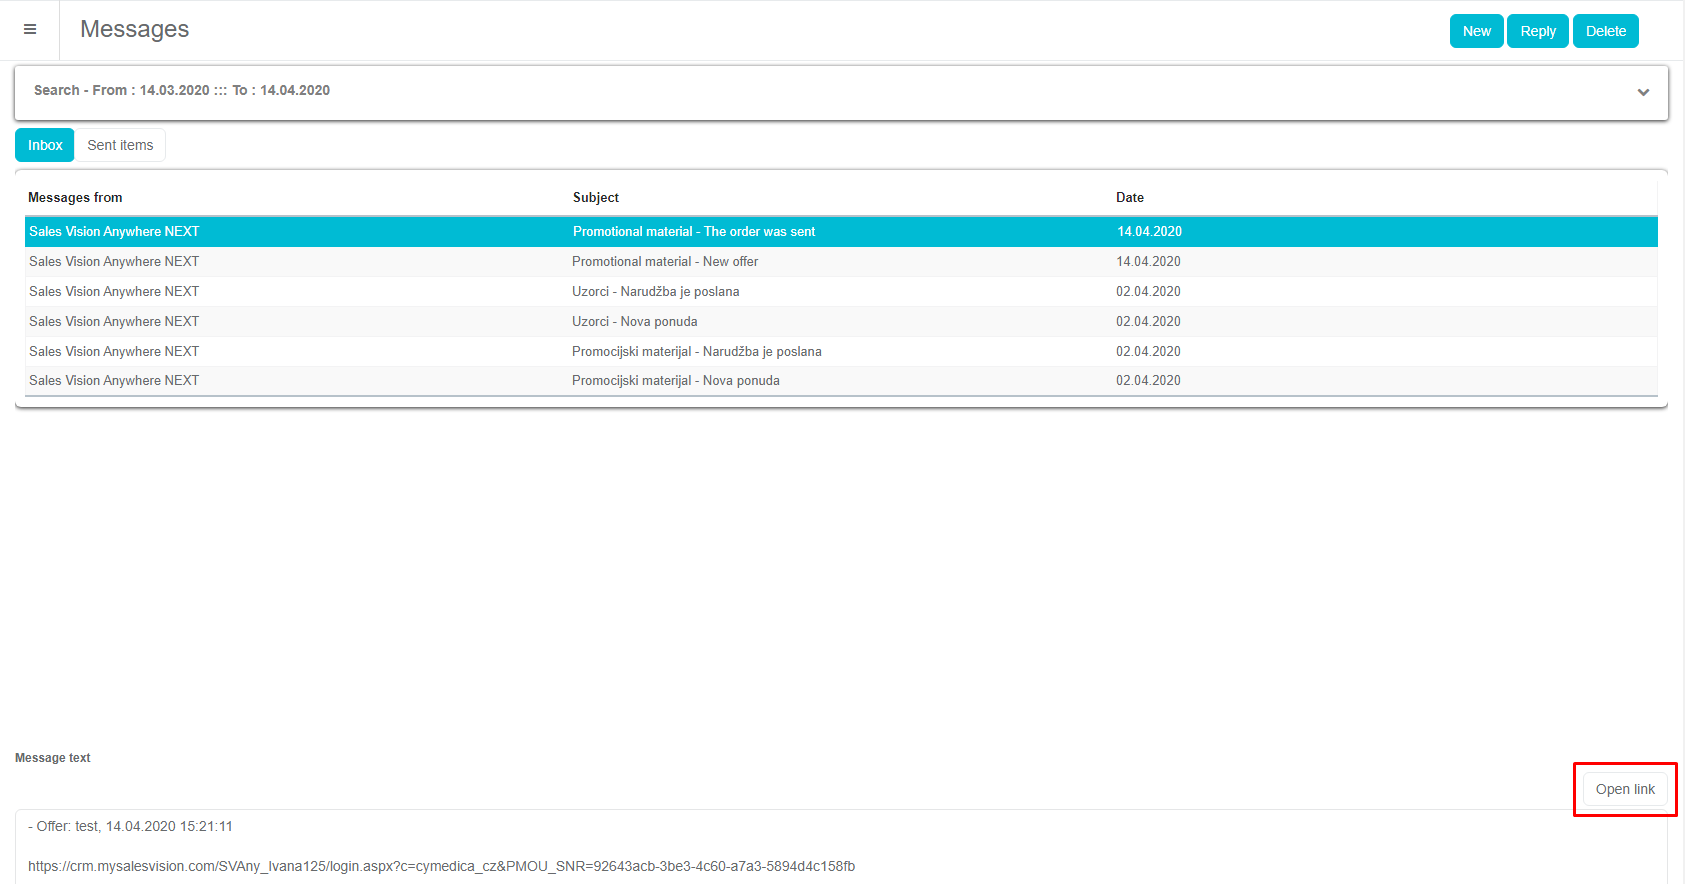
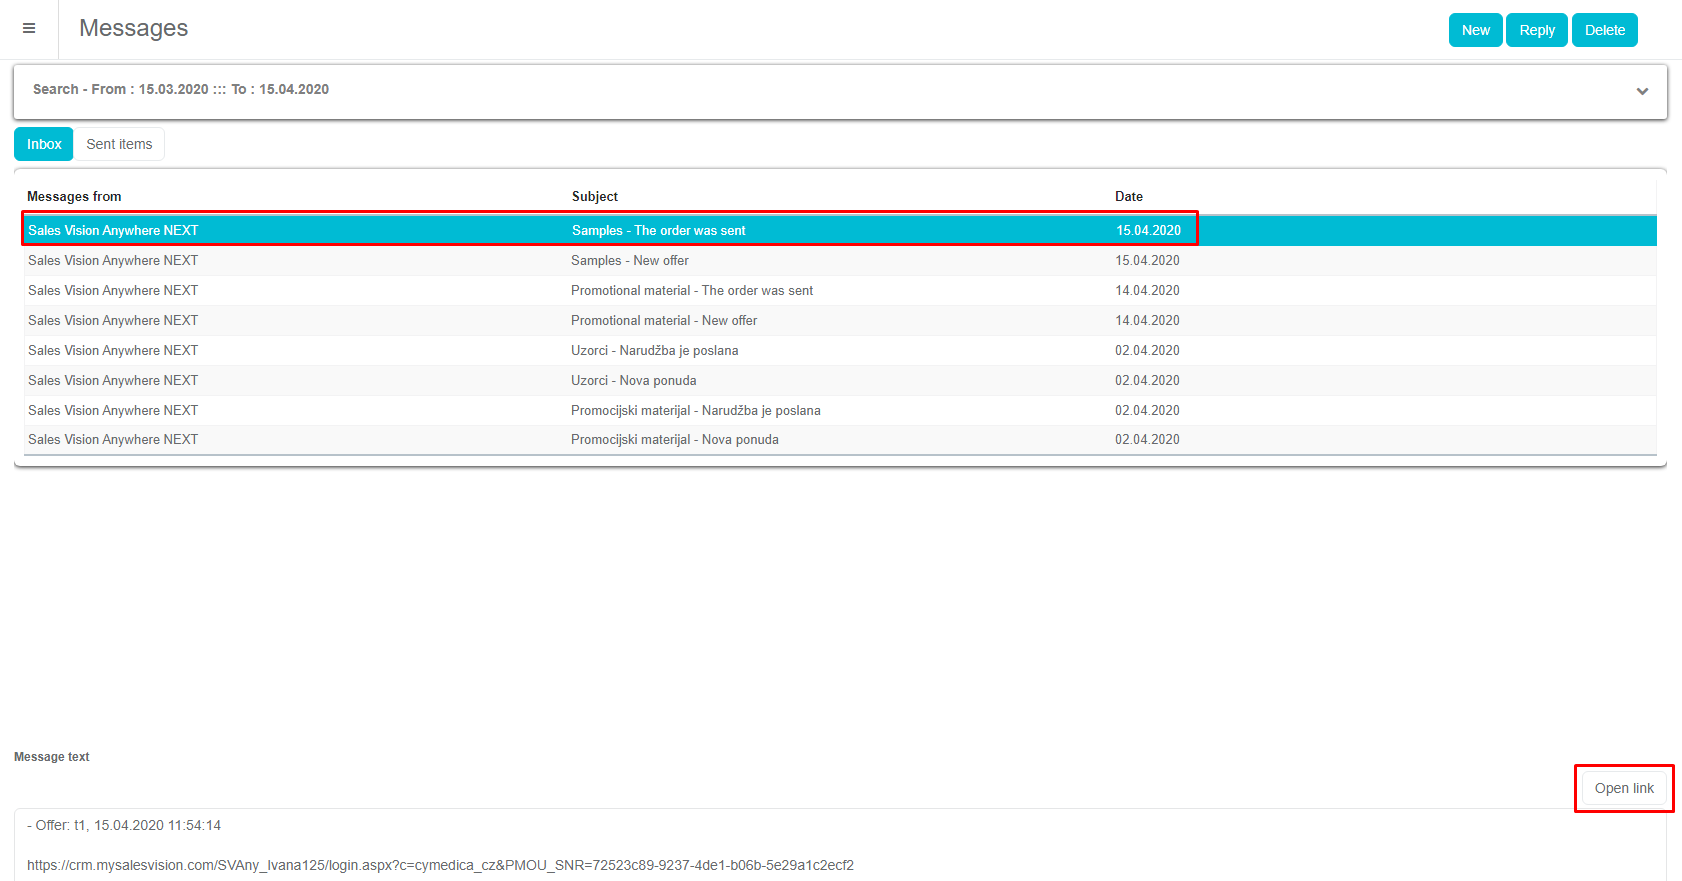
SR receives a message and by opening a link, window for adding order will be opened. This can be done by using Messages module in Anywhere and/or iPad version.

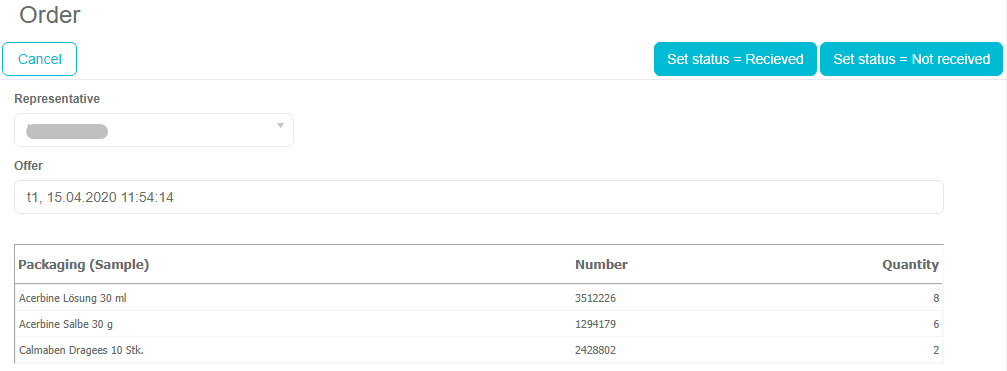
Here user can add quantity of promotional materials order.
Admin receives a message that new order has been created:
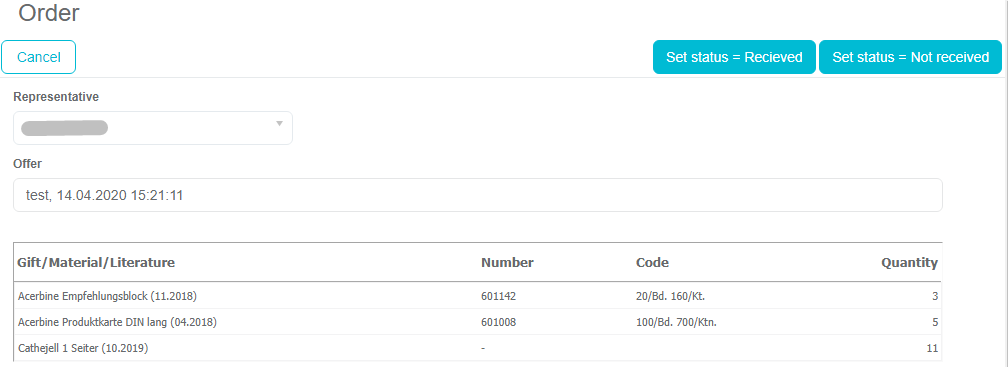
By opening an order, Admin can Send and/or edit an order.
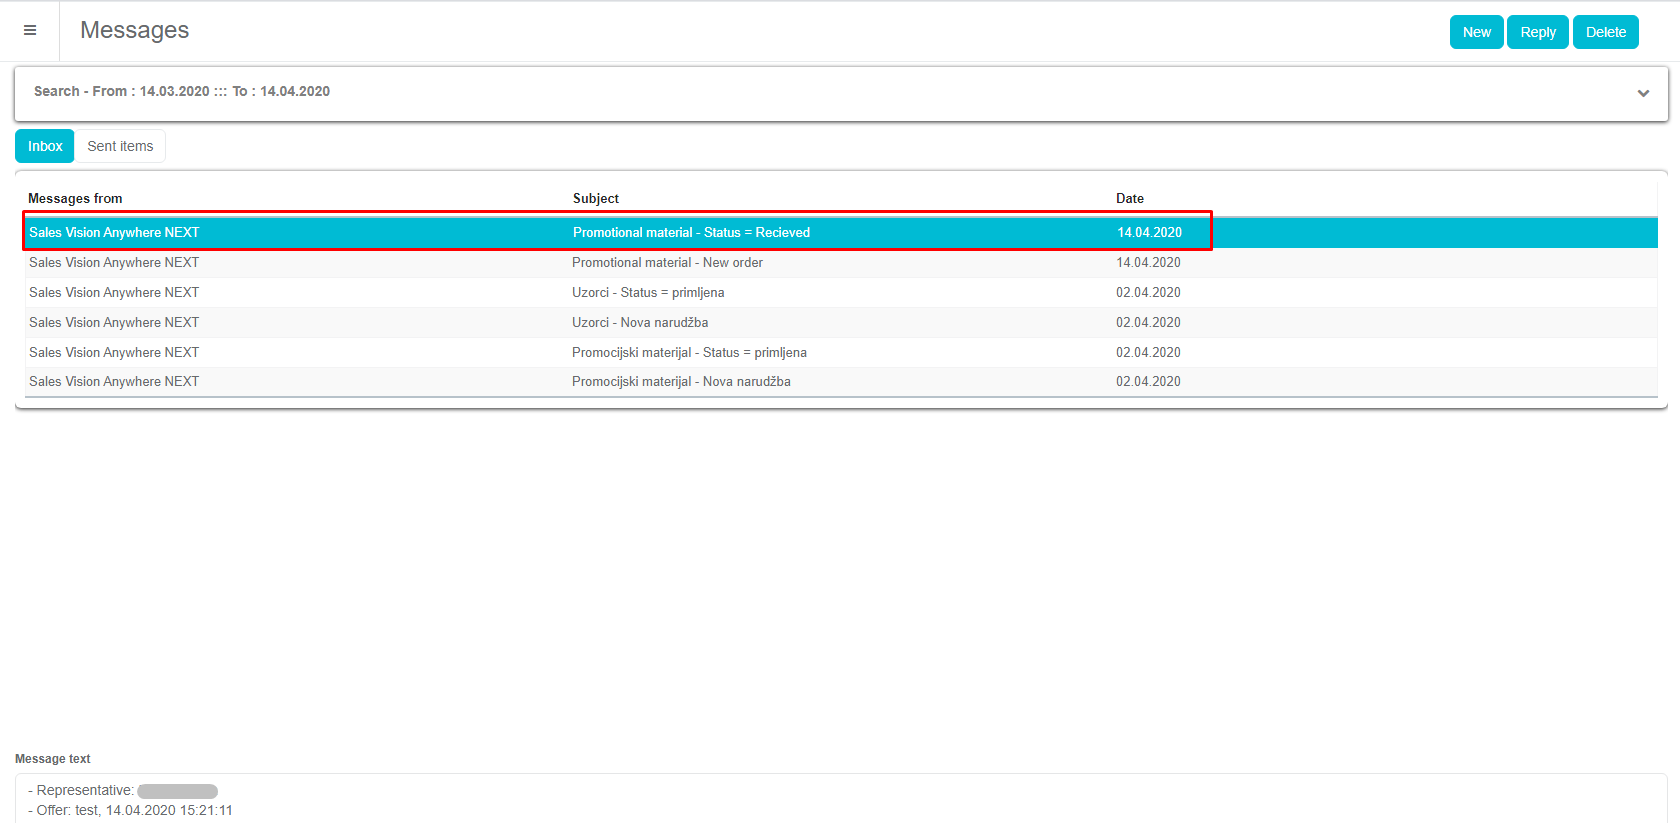
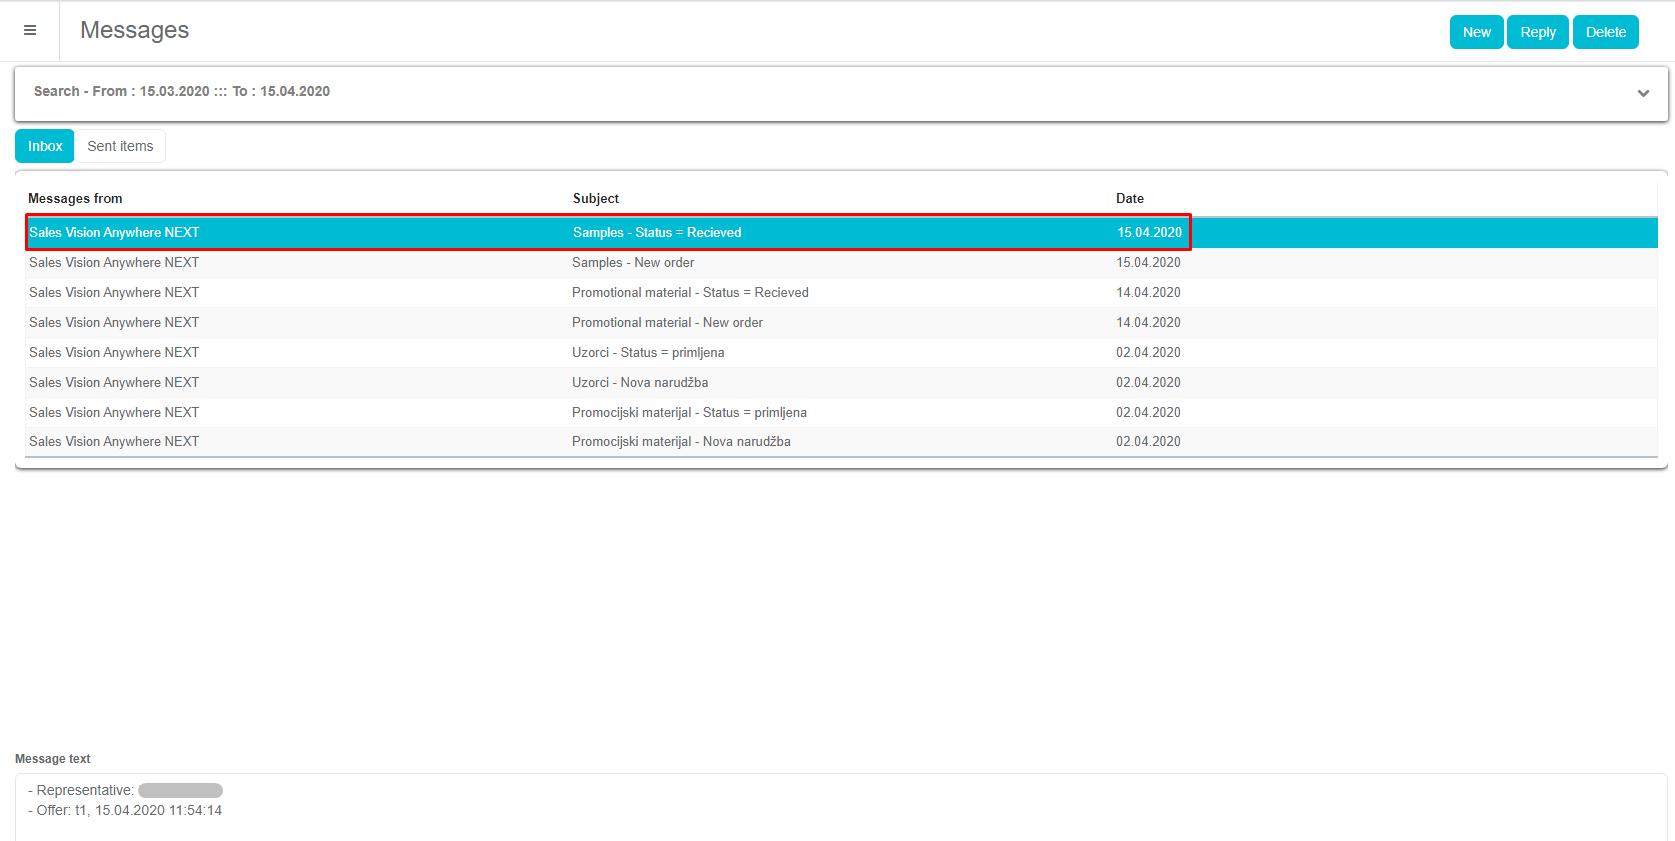
SR receives a message that the package has been send and can confirm that the package has been received or not:
Message for HQ when SR confirms the delivery:
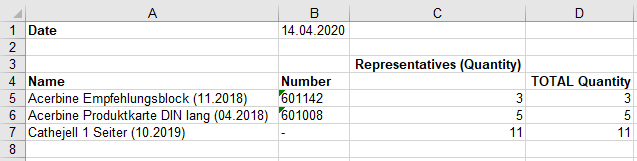
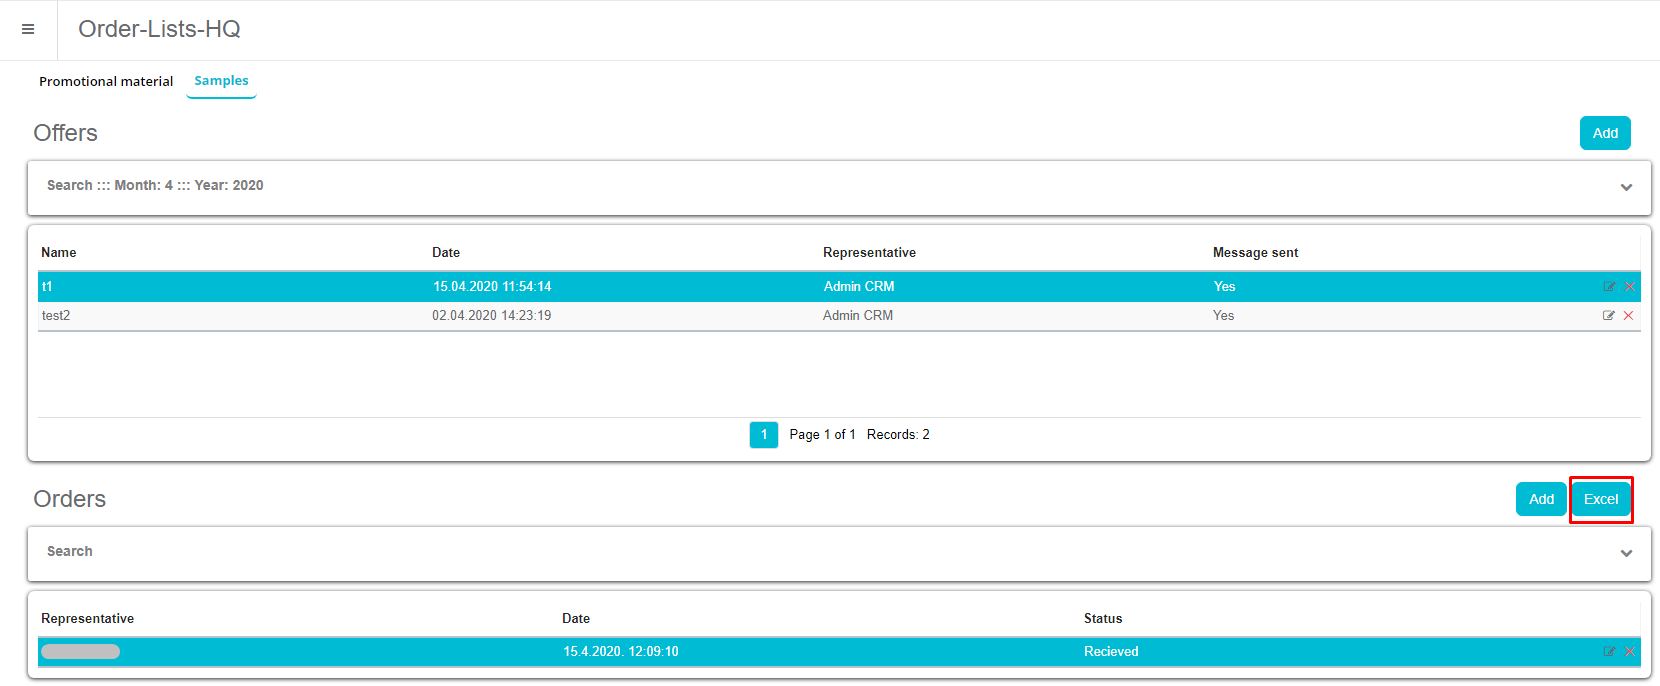
Export of orders to Excel:
Samples
New module with possibility to add new offer by using Add button in the upper right corner. HQ user can enter a new offer for ordering samples:
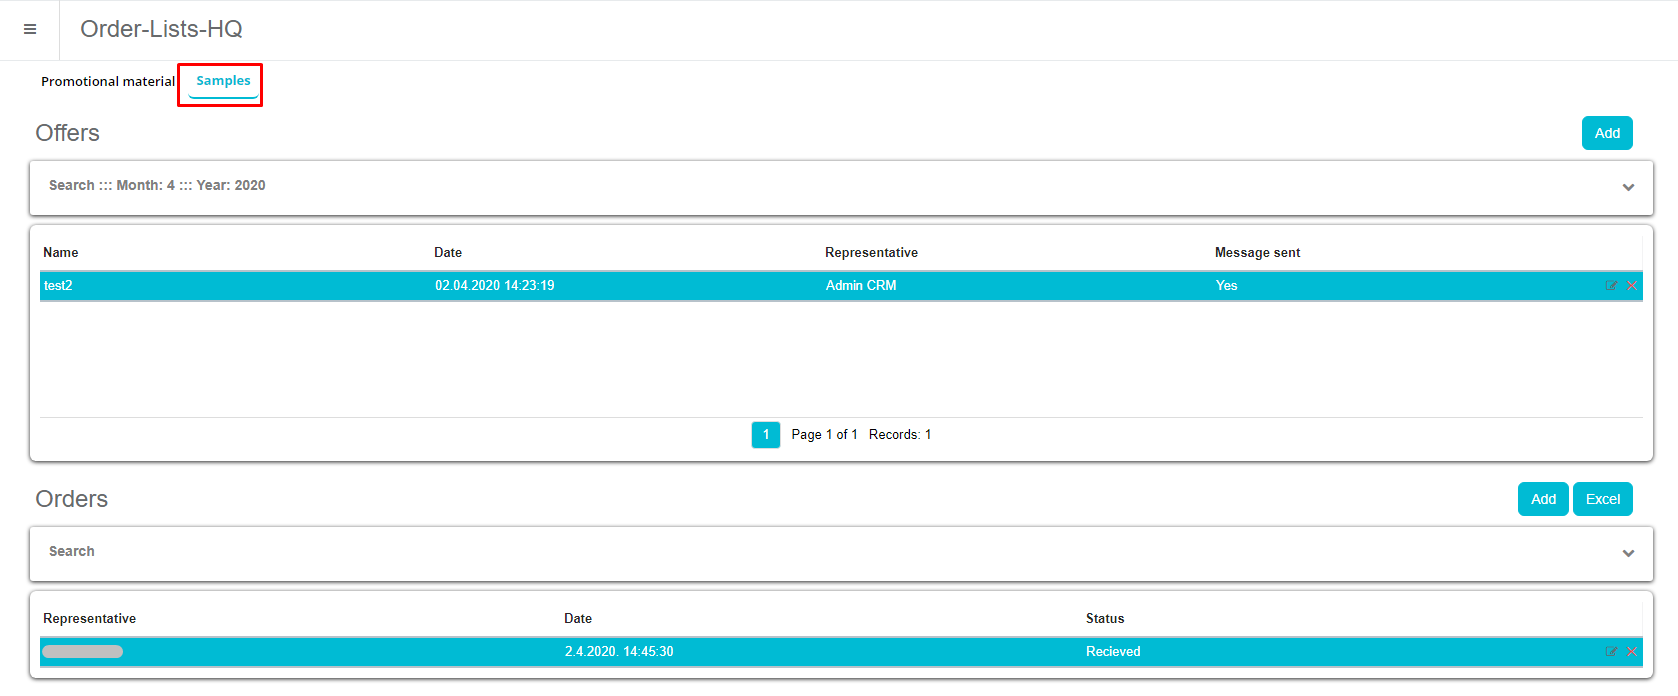
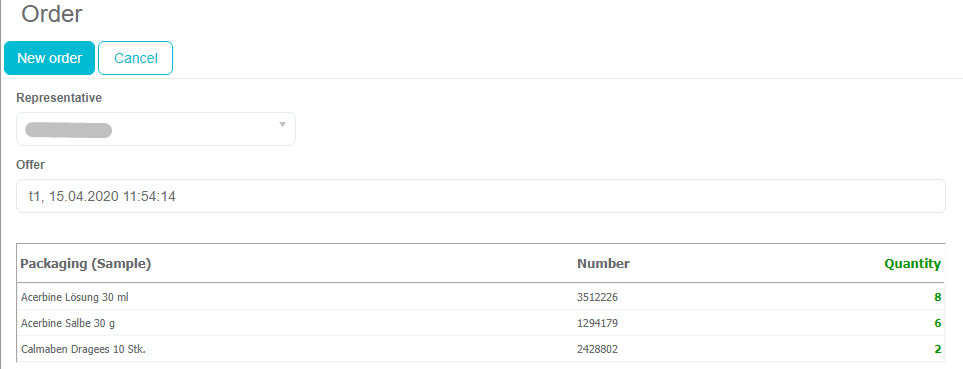
Window for adding an order for active samples.
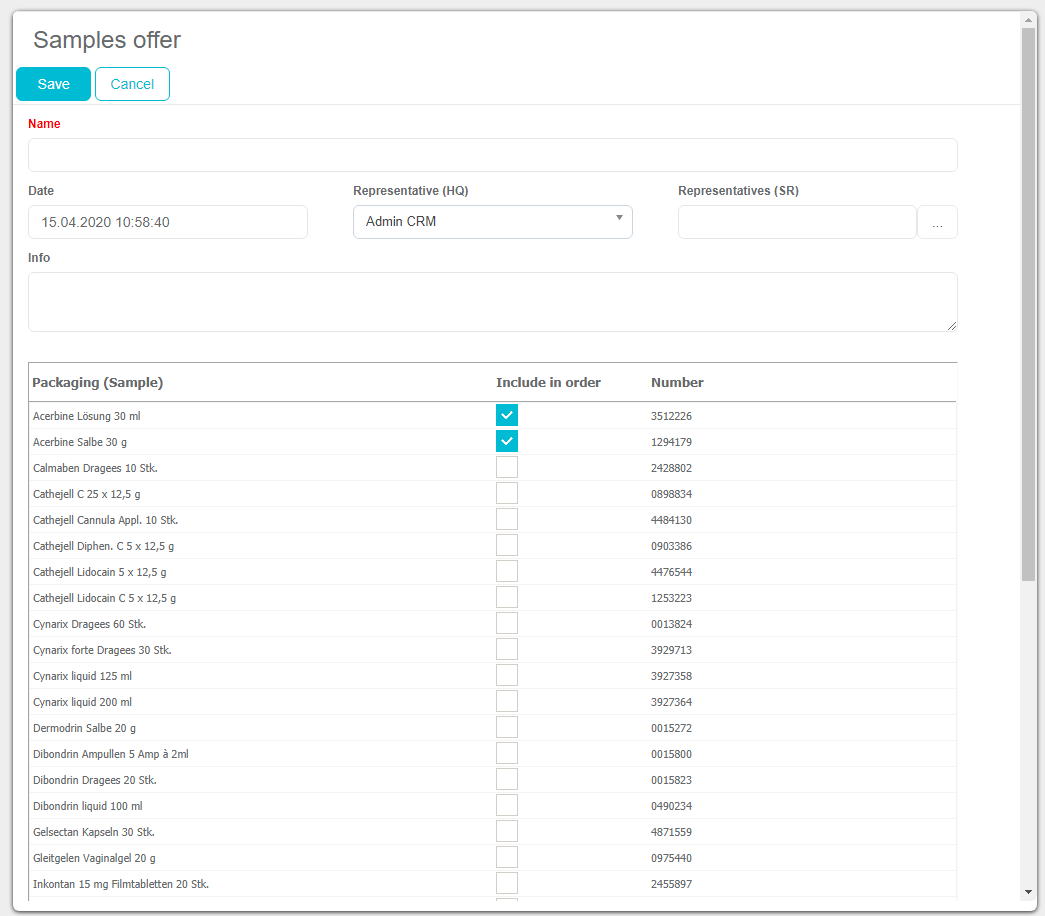
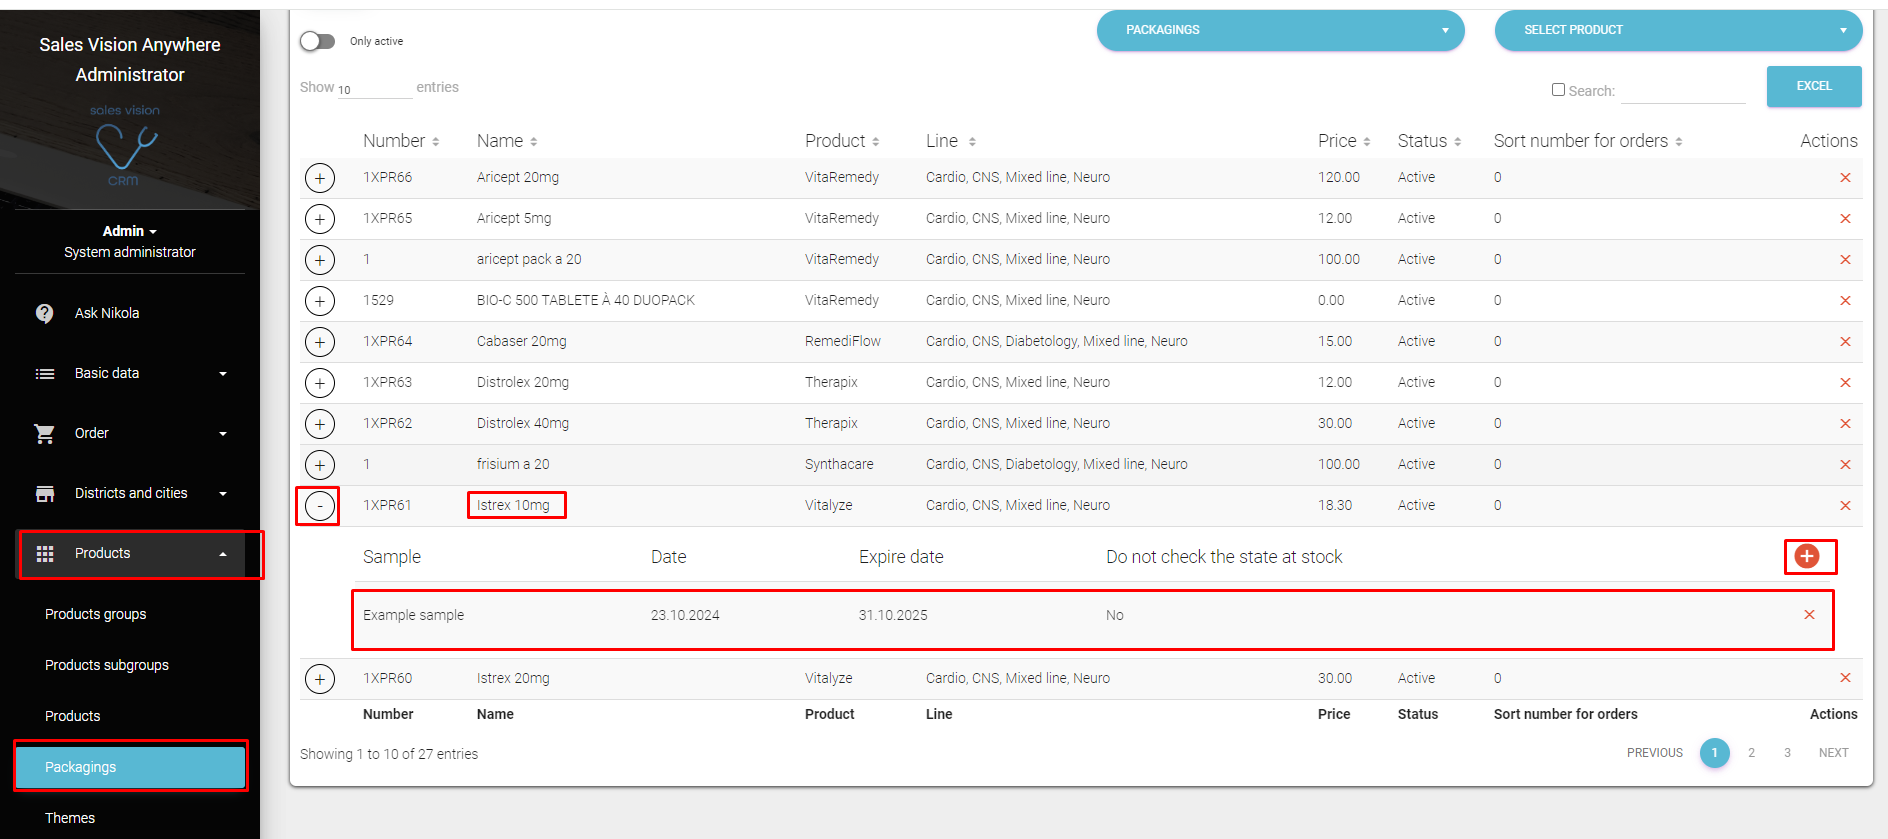
Samples can be defined in the admin application by going to Products Packagings for existing product types “Packagings” click on the “+” on the list and
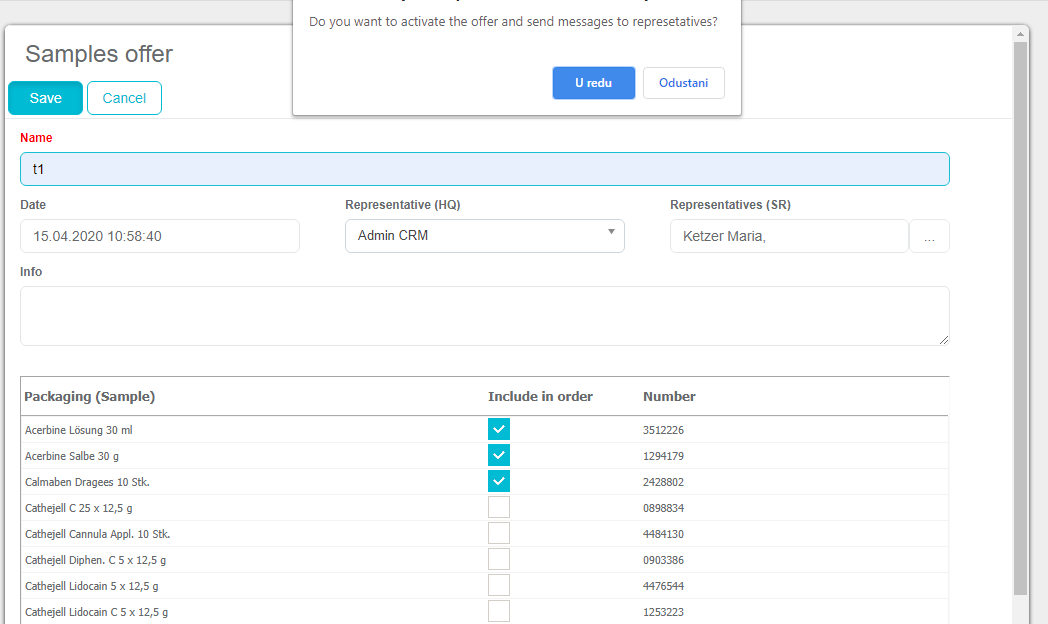
If user has been connected to an offer, you will get additional message if you wish for the offer to be send to SR:
SR receives a message:
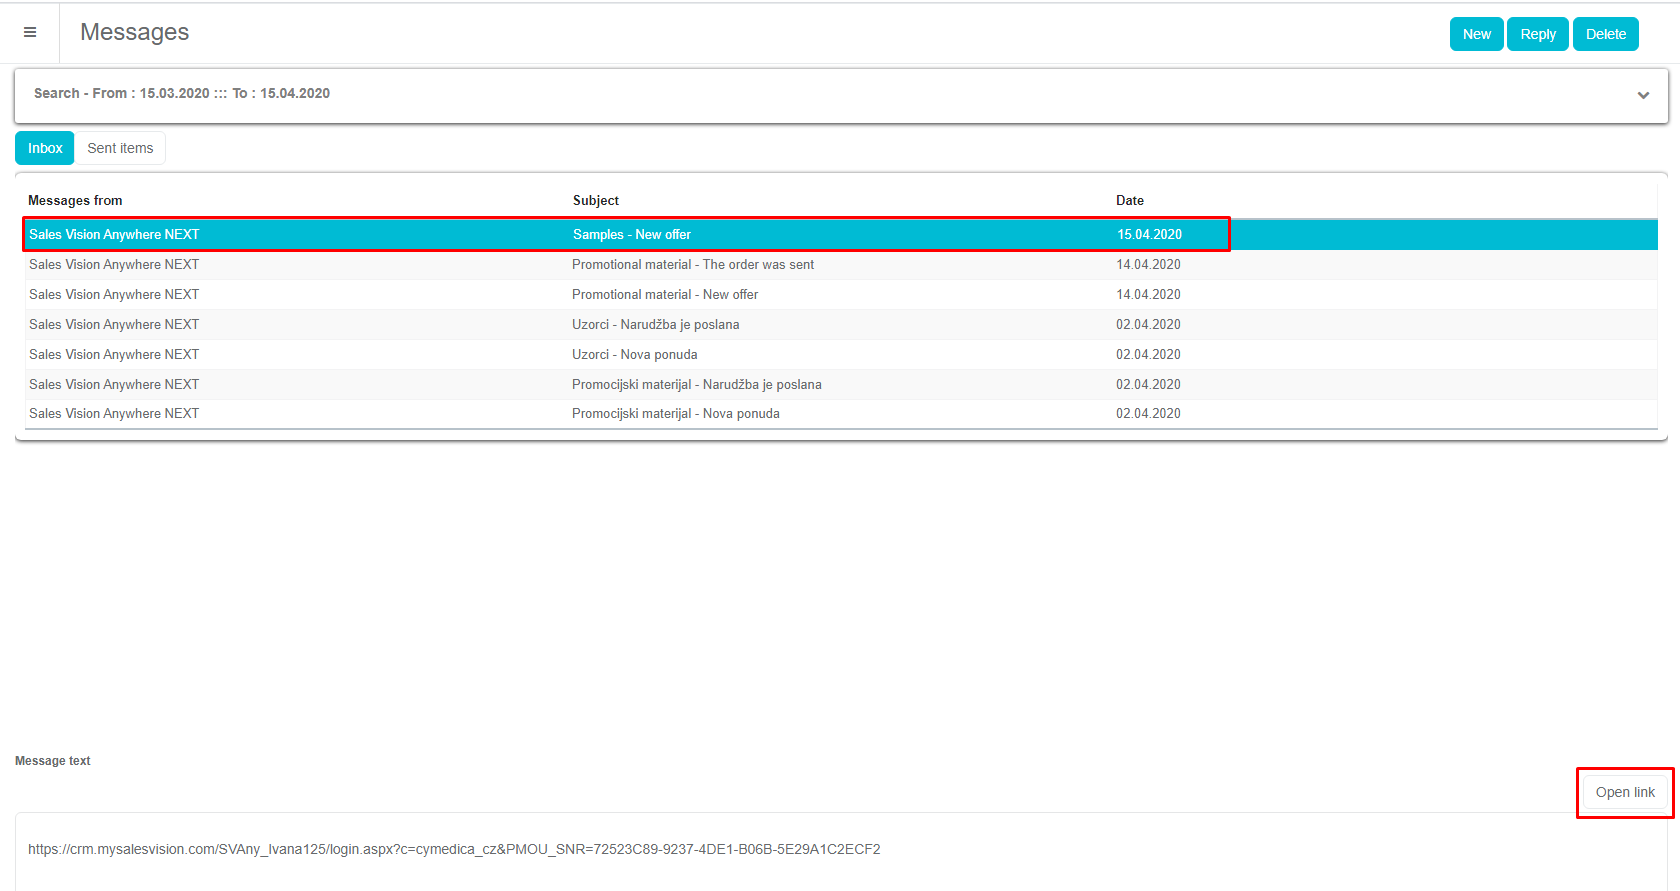
By opening a link, a window for adding an order will open. This can be done by using Messages module in Anywhere and/or iPad version.
Here can the user add quantity of samples order.
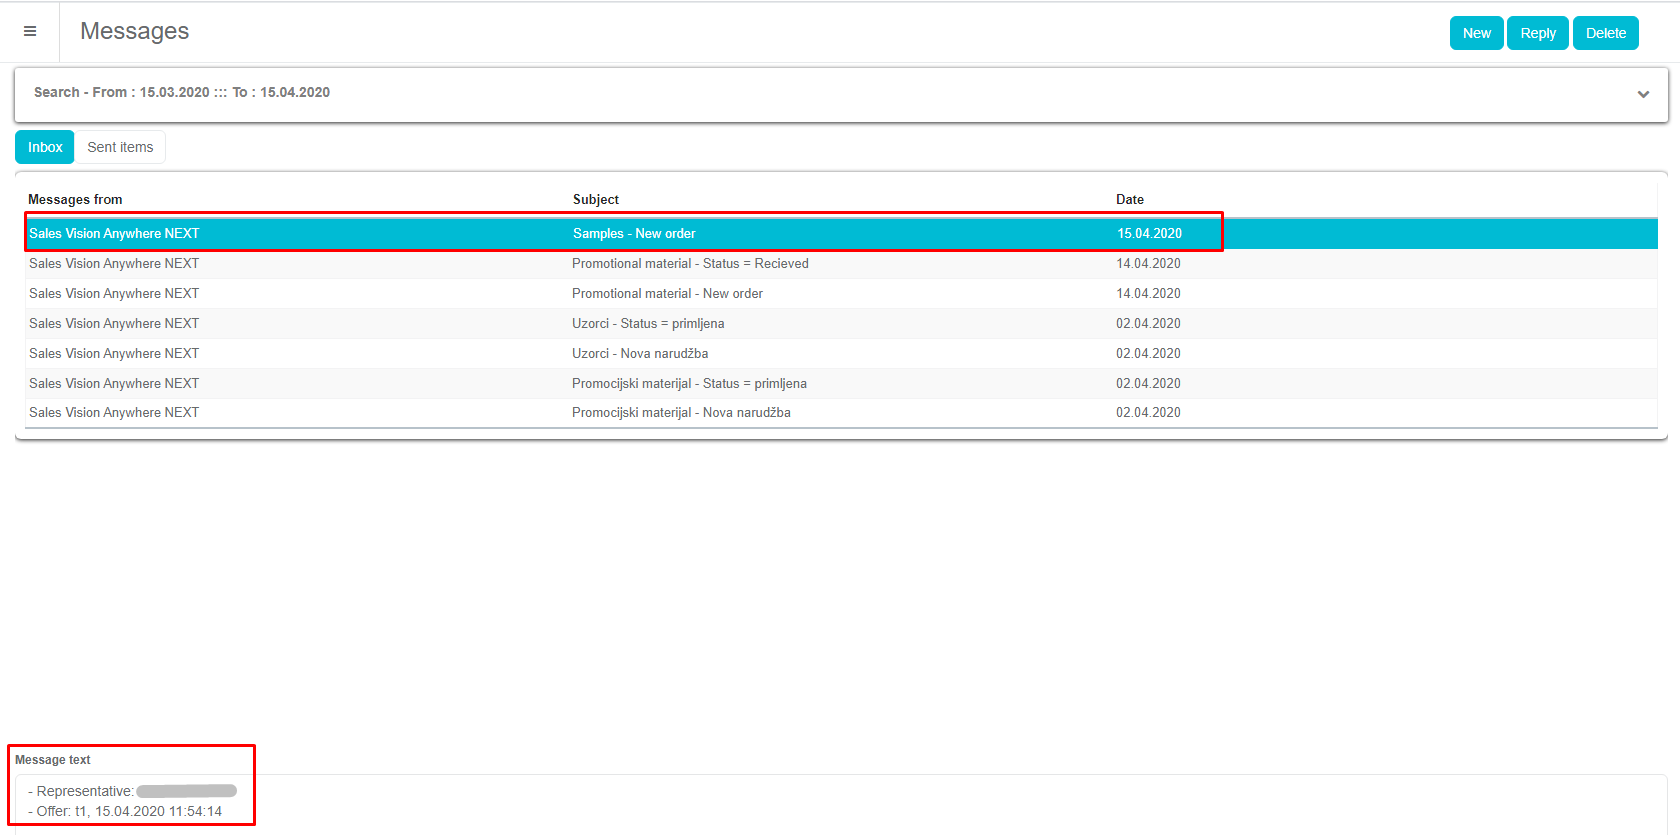
Admin receives a message that new order has been created:
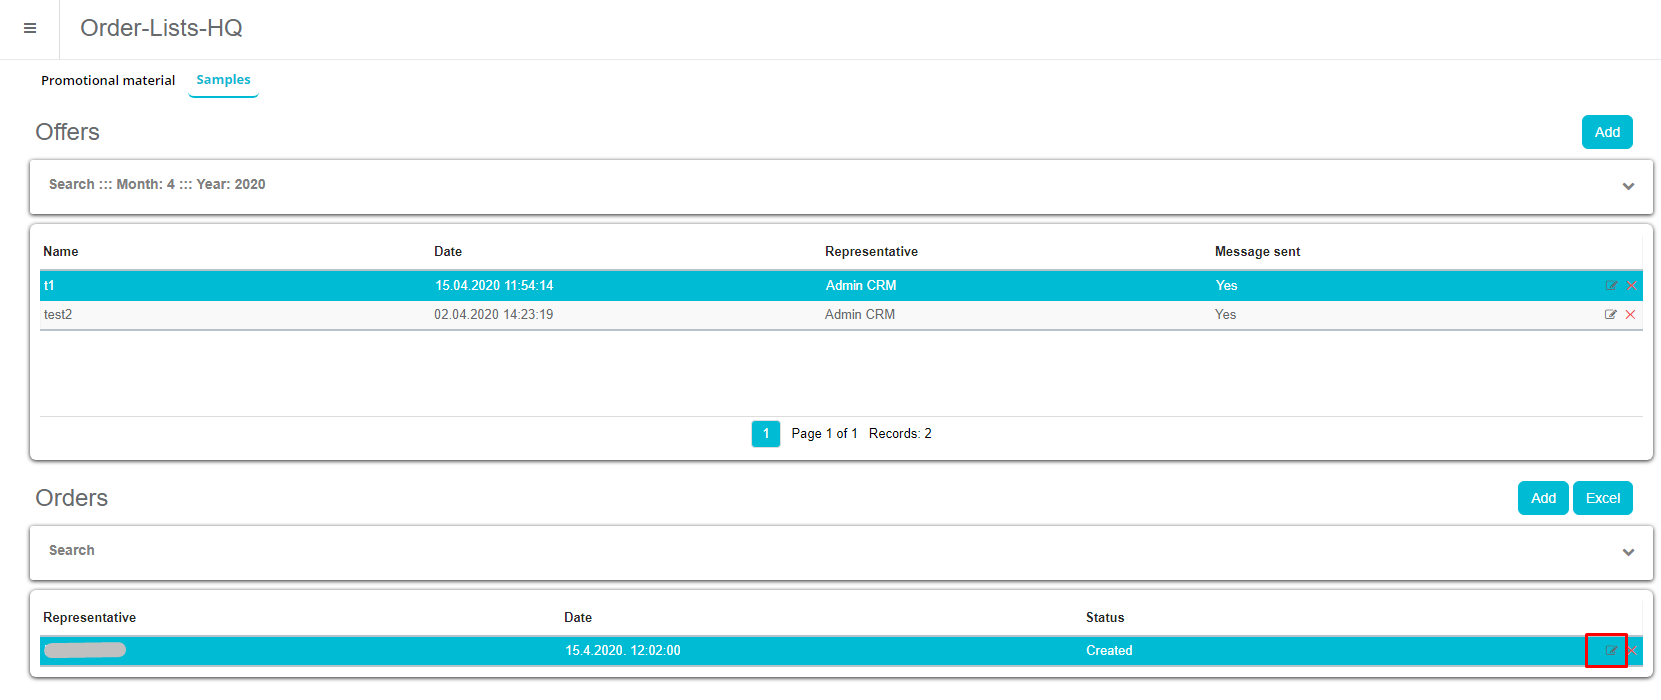
By opening an order, Admin can Send and/or edit an order.
SR receives a message that the package has been send and can confirm that the package has been delivered or not:
Message for HQ when SR confirms the delivery:
Export of orders to Excel:

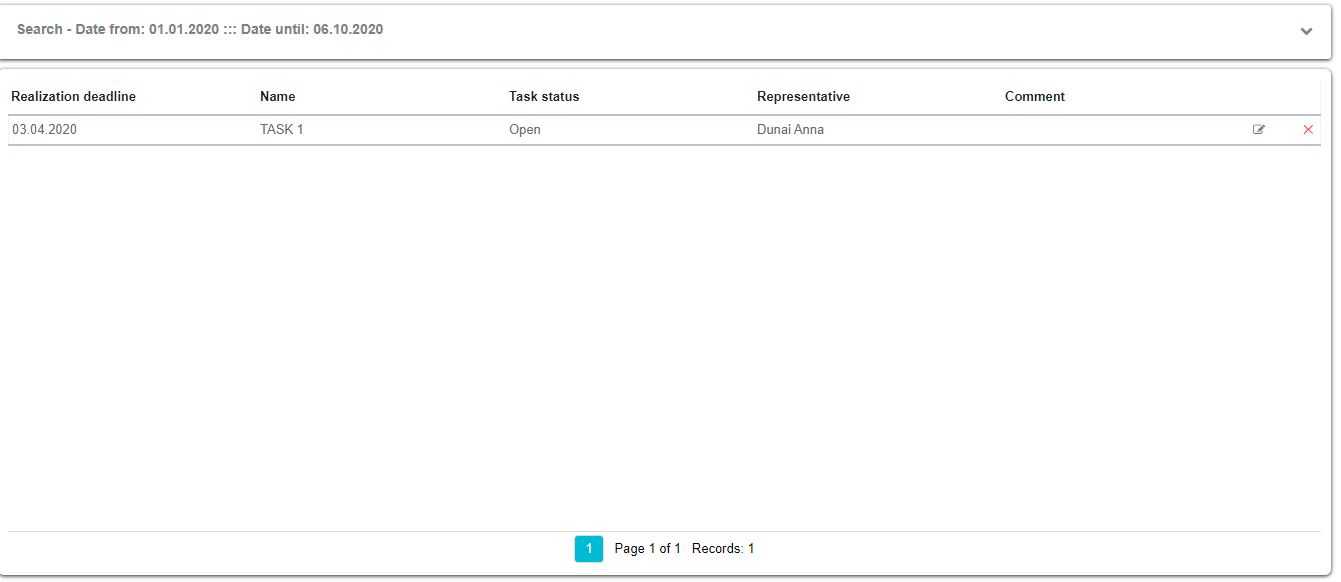
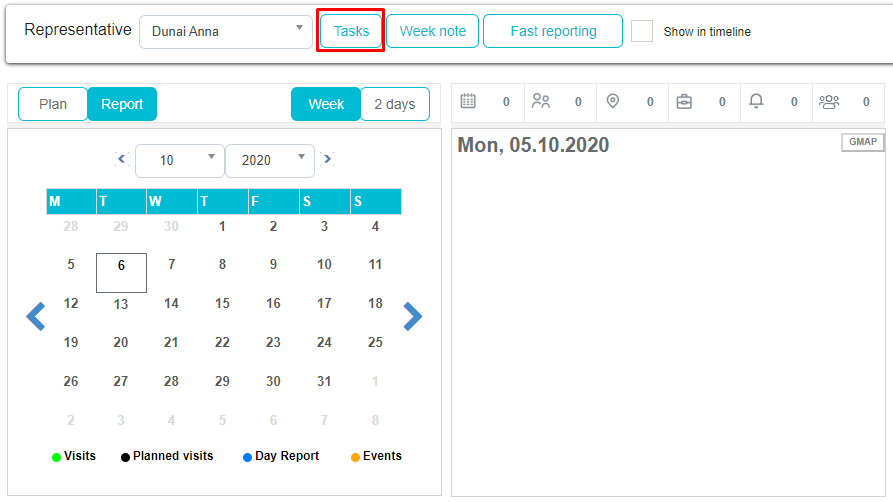
Tasks
Module allows superiors to create tasks for their SRs, and to track their progress. To activate this module, option “Tasks” in SV AnyAdmin needs to be enabled.

It allows you to add tasks for SR that they need to finish by certain date. This tasks can be created by certain type of users: Administrator Product manager HQ users RM Tasks preview shows basic data related to the task:
When you click on the button Add new form will appear where you set following data: Task name - text field Task description - text field Realization date- date filed by which the task should be completed Representative - a drop-down menu for assigning a task to a representative Institutions - multiple select control which enables to connect task to the one or more institutions Persons - multiple select control which enables to connect task to the one or more persons Task status - drop-down list - you need to create a new code list User comment - text field
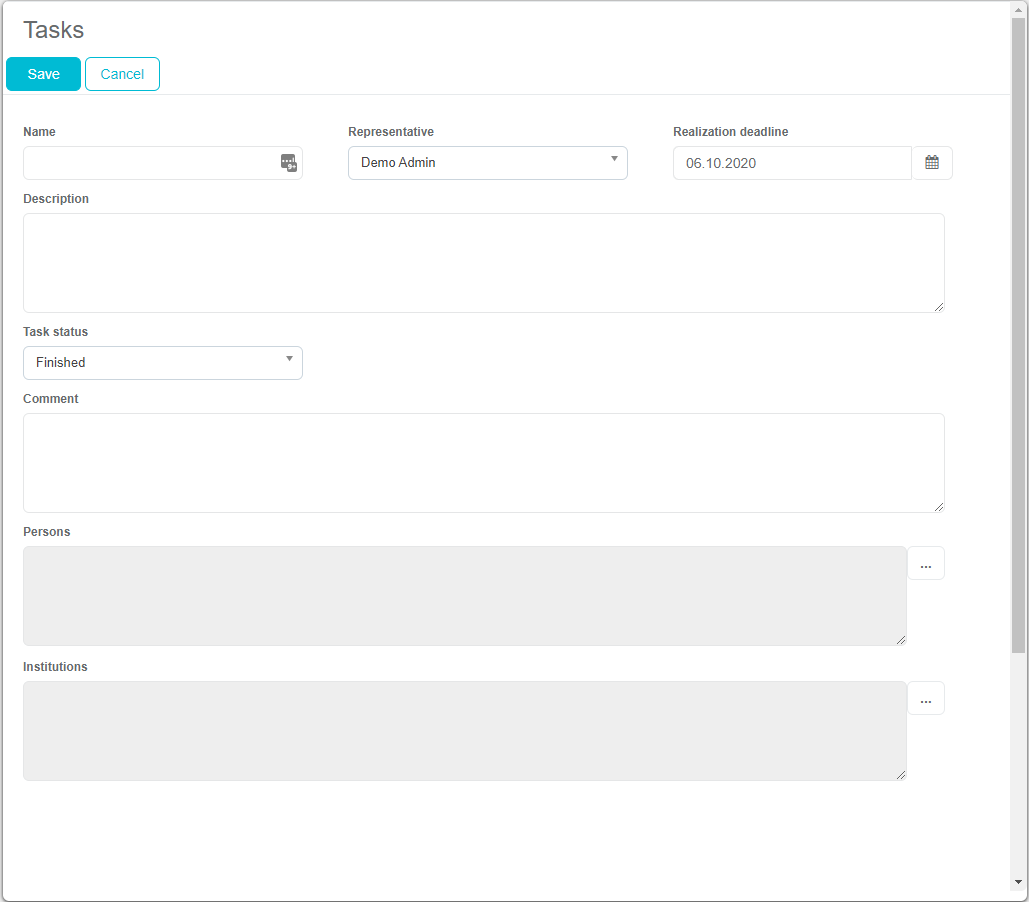
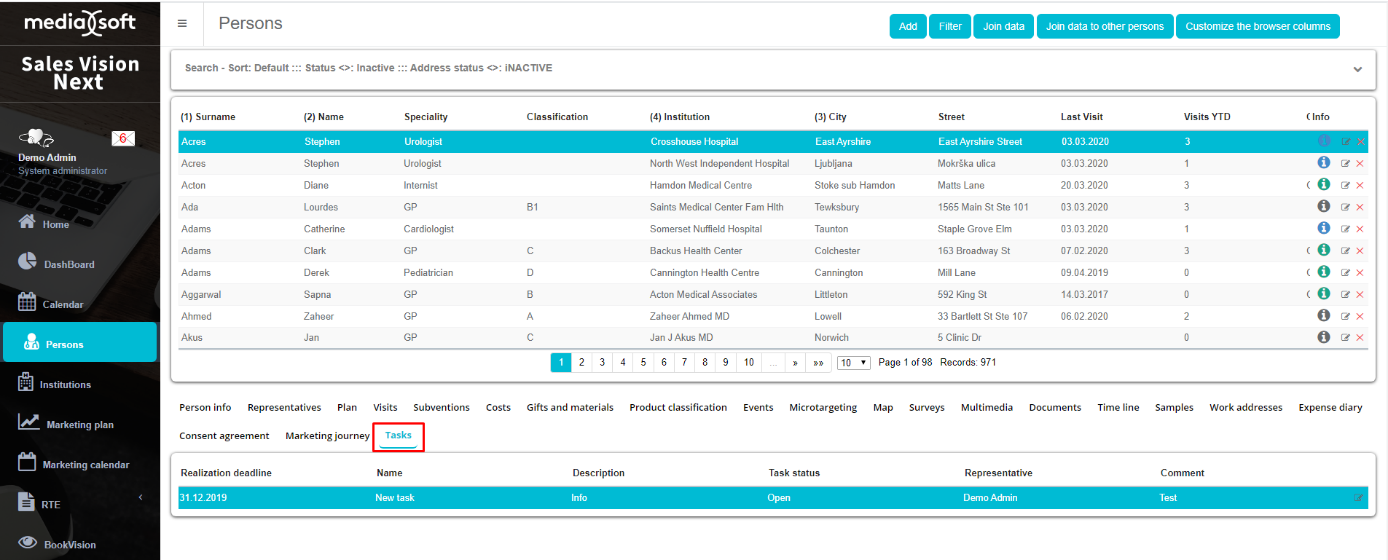
When creating a task, the user must enter the name of the task, the description of the task, the deadline for the task, the representative to whom the task is assigned, and the status, which is automatically filled with the status "Open". Optionally, the administrator may assign a specific task to one or more persons and / or institutions. If the task is linked to an institution / person, then that task will be visible on the new "Tasks" tab, with the person / institution details.
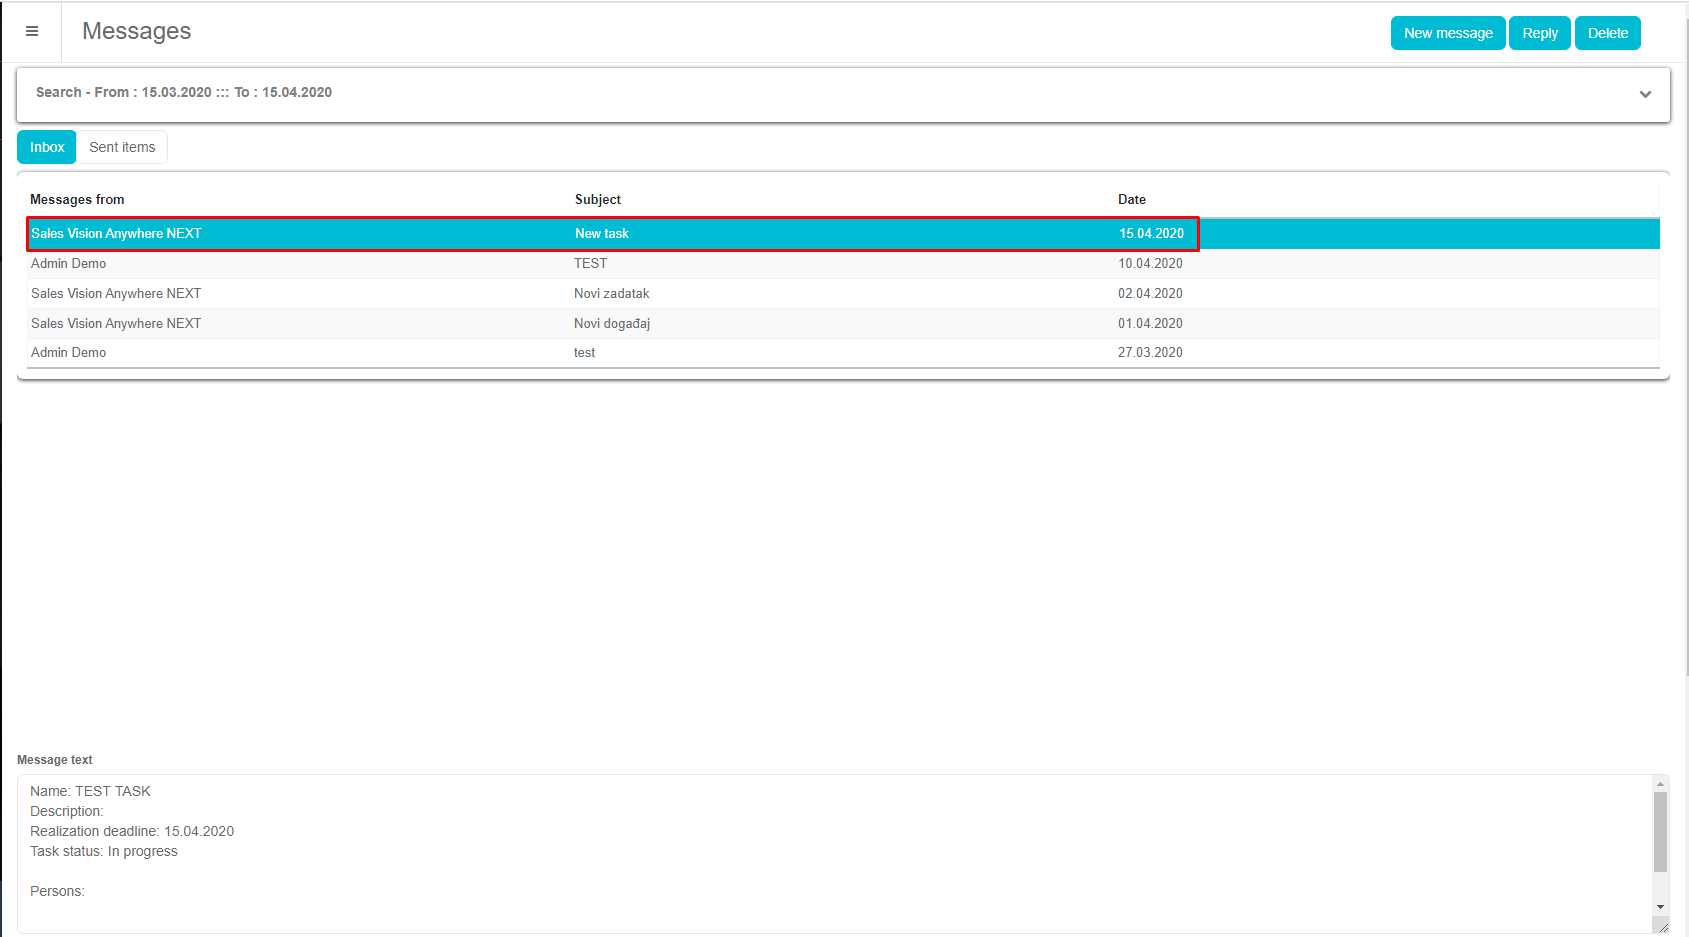
Once the task is created by Admin or any other person that has rights to create it, SR that is included in the task, will get a message in module Messages.
You can set rules in SV AnyAdmin for SRs, if they can add or delete tasks.

If the user doesn’t have a permission to add a new or delete the task, then he can only write a comment and change the status of the task that he was included in. Task will be visible in the module Calendar if the date of option Needs to be realized until hasn’t passed.

Once you pass this date, task won’t be visible on Calendar but it will be visible in the Task module. The SR who has a defined Task, can change the status of the task and add comments to it.