Consent agreement
Consent agreement template
Database Administrators and HQ users are given possibility to upload one or more consent agreement templates which users in the field can use for collecting persons signature for using their data into different purpose. Example, database consent agreement for adding plan and visits, email consent agreement for marketing purpose etc. Module Consent agreement on the list of modules in SV Anywhere used for uploading templates is not visible for remote users. Remote users are only given predefined templates without possibility to edit them.
How can Administrator upload a consent agreement template? After Administrator enters web application, a new icon on the list of modules called Consent agreement will be visible. Click on in to enter the module.
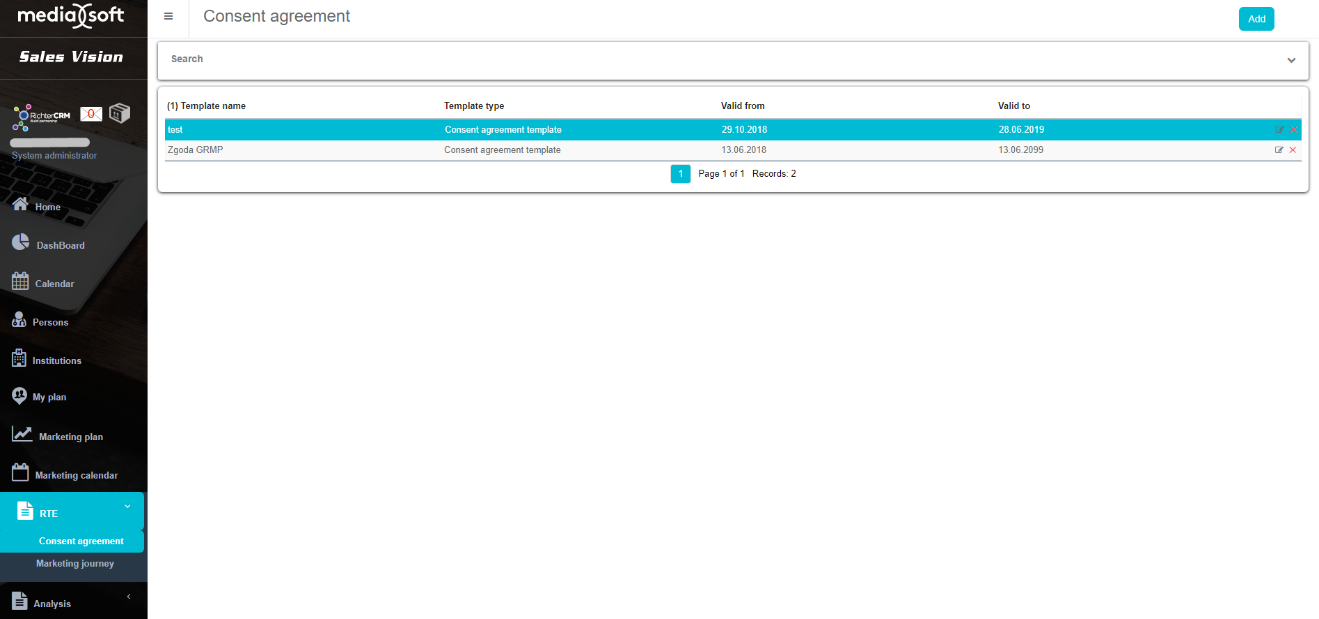
A list of all uploaded templates will be visible. In the upper part of the screen you are given a possibility to filter templates by its name and by time validity (Valid from and Valid to) as shown on the picture below.
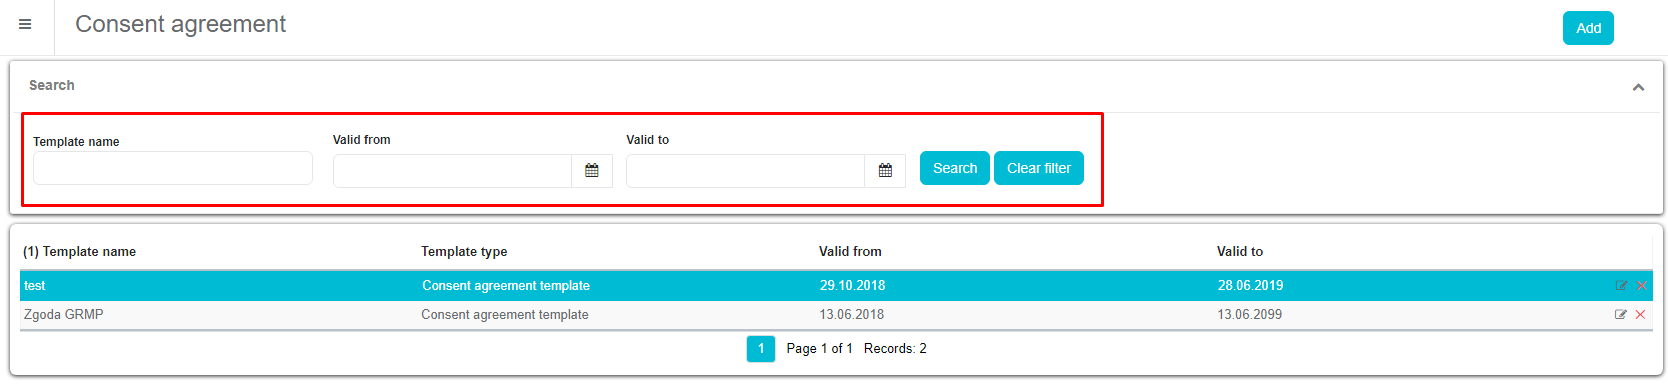
To upload new consent agreement template click on the Add button in the upper right corner. New window will open.
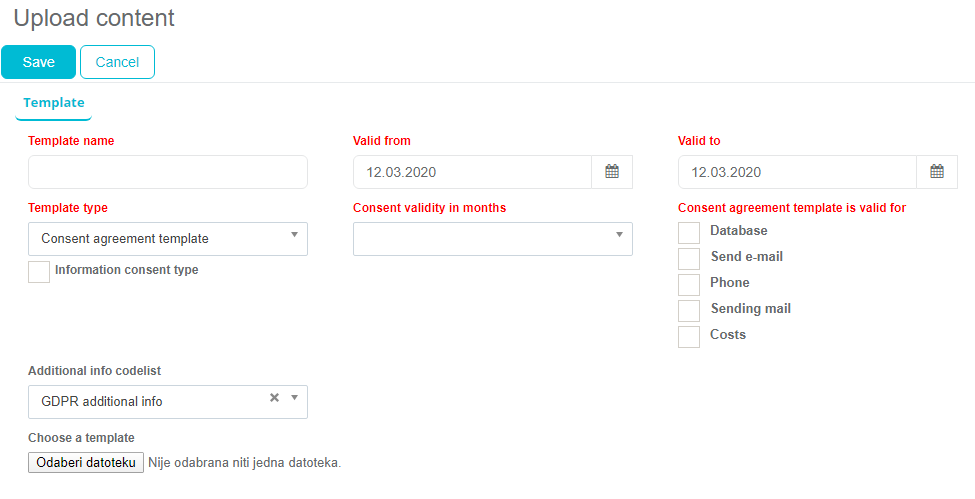
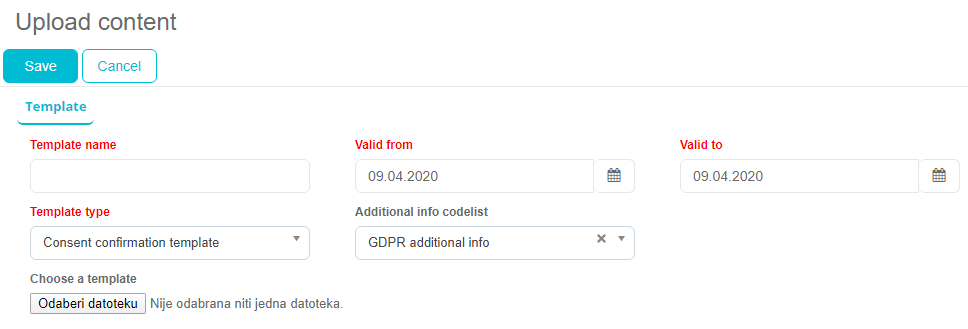
Add template name and define time period for which template will be valid. Users will only get list of valid templates. If you are uploading consent agreement template, under Template type choose Consent agreement template. Consent confirmation template type will be described later on. It is used for sending a „thank you email“ to a person if selected person has agreed to email type of consent agreement. Field Consent validity in months is used to define duration of persons consent. For instance, if Consent validity in months for selected template is twelve months, persons signature will no longer be valid one year after he/she has signed the agreement. Consent agreement template is valid for part is very important part of uploading consent template. Here you can define types of consent for your template. We have defined five different consent types: Database – person agrees that her/his data will be used for adding visits, plans, surveys, etc. in your database Email - person agrees to receive emails such as marketing brochures etc. by emails Phone - person agrees to be contacted by phone, GSM and fax Mail - person agrees to receive letters by post Costs – person agrees on publication of personal data containing information involving value transfers Although field is implemented as a multi select checkbox, we recommend uploading separate template for each consent type. Imagine an example: person can agree on database consent to have his/hers personal data in your database but does not wish to receive marketing emails. Problem if uploading one template for both database and email type is that there is not a possibility to handle this kind of situation. In this case, person will decline to agree to sign the consent. But if you upload two separate consent templates, person can easily sign the database type and disagree to sign email template.

Finally, the last field Choose a template is used to upload ZIP file, HTML with consent text. We advise to consult your legal department regarding the content of your consent text. Click Save to save the template you have uploaded. Consent agreement template will appear on the list of uploaded templates. We recently added new option in option Template type. It is called „Landing page for consent confirmation“. Option will activate only if options 564 and 616 in SV AnyAdmin are acitvated.
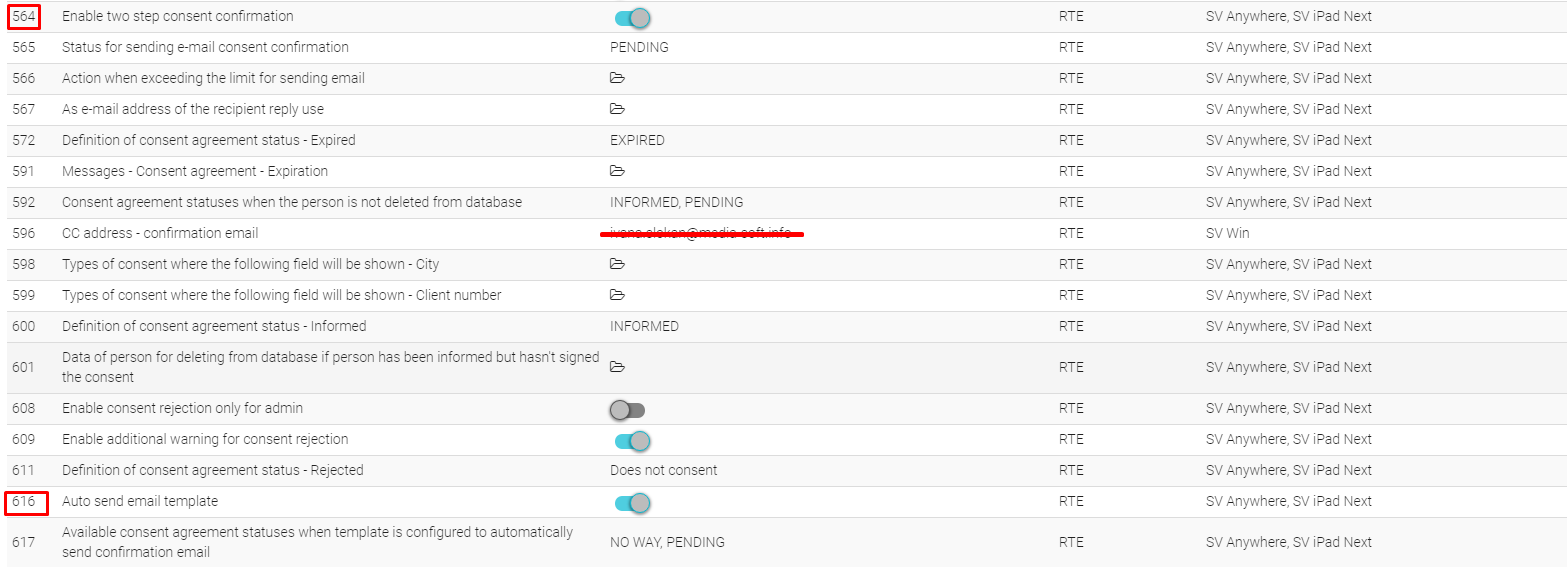
When those two options are activated in SV AnyAdmin, you will have extra option when you choose Template type. Landing page for consent confirmation is an option that allows you to choose template from your computer that you will use for consent.

Furthermore, when you choose Consent agreement template from Template type, extra two fields will be shown.
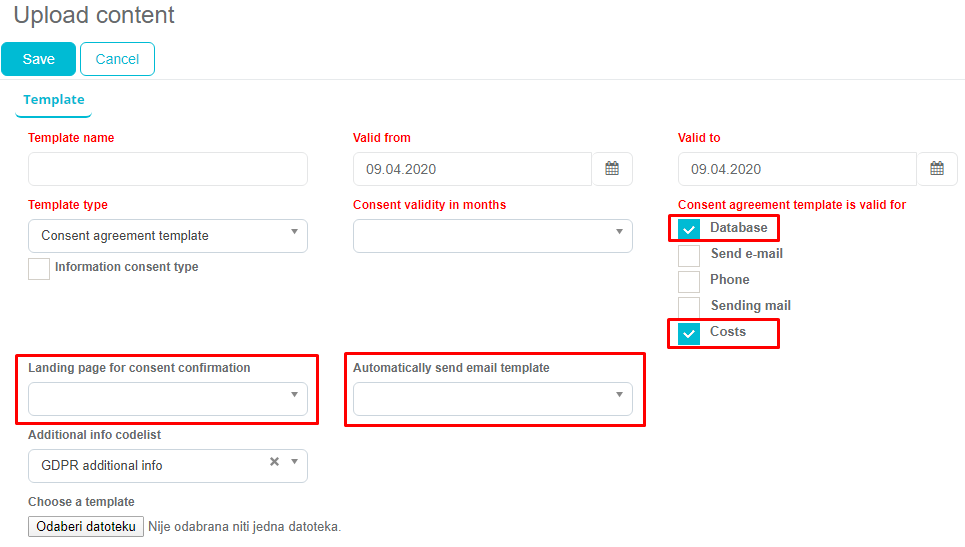
First field is „Landing page for consent information“ and it shows landing page that will open when you open consent. Second field is „Automatically send email template“ and that is a filed where you choose template that will be sent automatically to a person's e-mail.
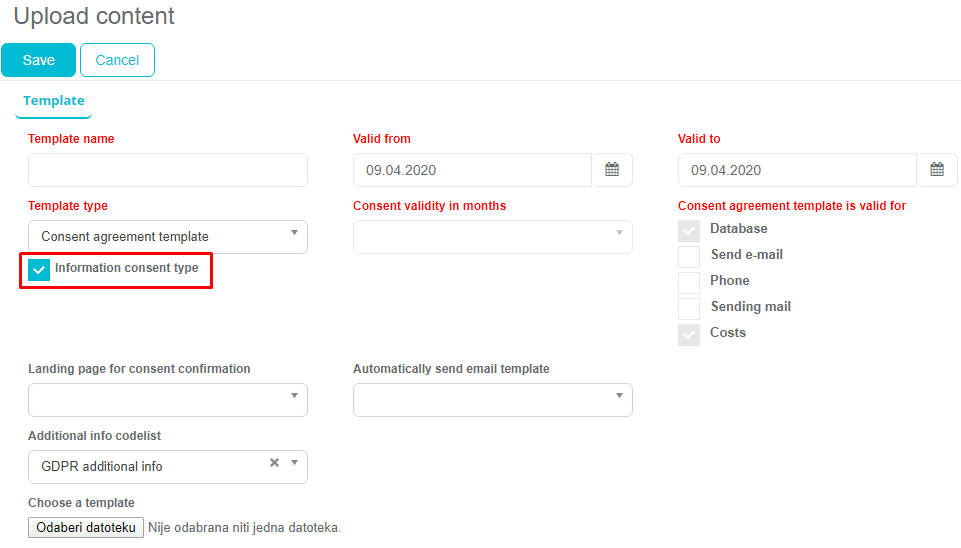
One thing that needs to be highlighted is that when you activate option „Information consent type“, by default, Database and Costs will be marked. It means that we have your data in our Database (person agrees that her/his data will be used for adding visits, plans, surveys, etc. In your database) and we can see your costs (person agrees on publication of personal data containing information involving value transfers), but we can't send you an e-mail or mail and use your phone number (picture bellow).
We added another new option when saving Consent. To make this option available you need to activate options 564 and 616 in SV AnyAdmin. When you want to add consent to new person, you go to module Persons and you choose person from list you want to add a consent.
Form will open and you choose template and Status. List in Status is defined in SV AnyAdmin under option 617.
If you choose Pending, next form will open where you have to write your e-mail address (RTE E-mail box).
After you click Save, you will recive email on your email address with link. Before, you click on that link in you email, status of consent in SV Anywhere will be “Pending”.

Once, you click on that link in email, status of consent in SV Anywhere will become “Obtained”.

How to upload a Consent confirmation template? The window for uploading Consent confirmation template is the same as for uploading consent agreement but under Template type select Consent confirmation template and certain fields used for Agreement template will disappear.
To differentiate type of template we have added additional column on the list of templates.

Consent agreement

Process of adding consent agreement status to a person in web application is as described below for option used in settings:
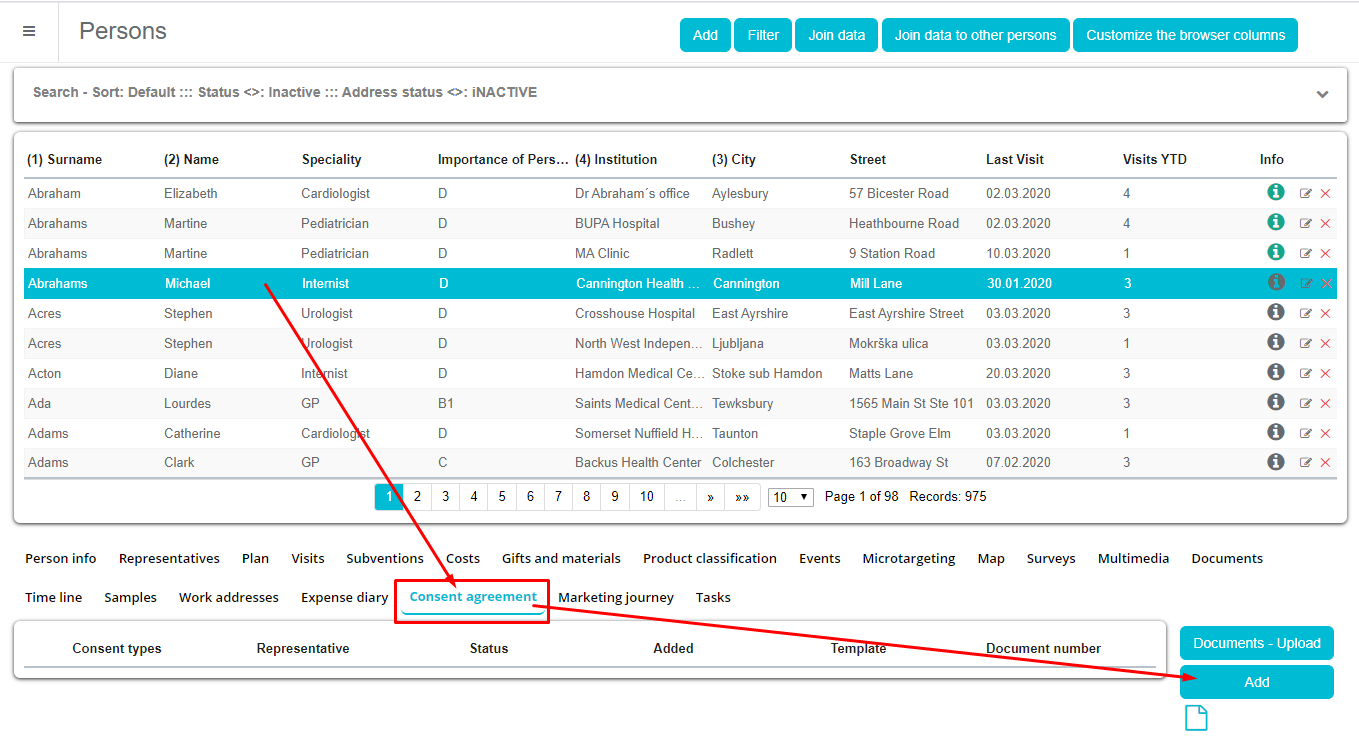
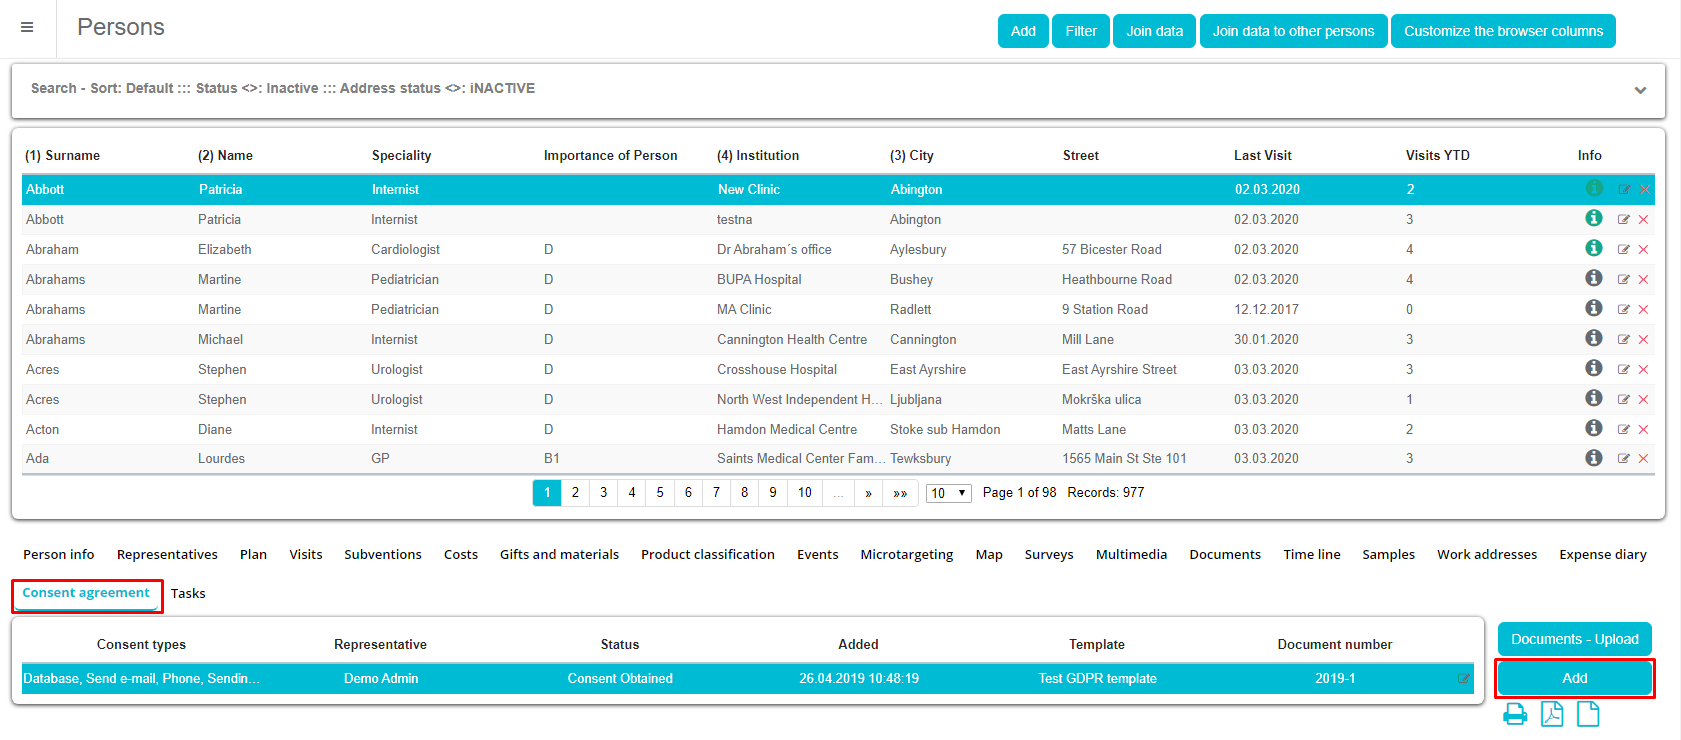
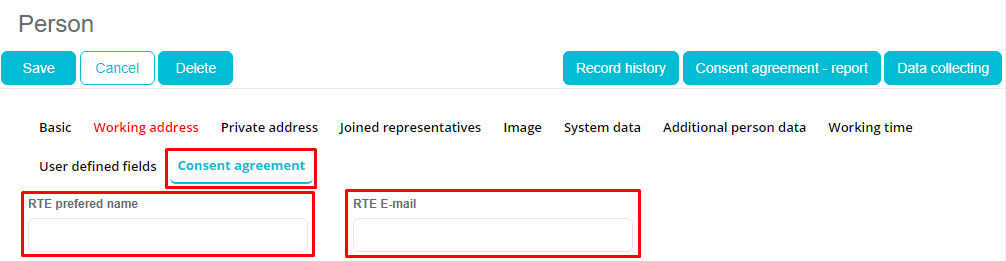
Find and select a person you whish to add status of a consent. Click on Consent agreement tab and than click on Add button.
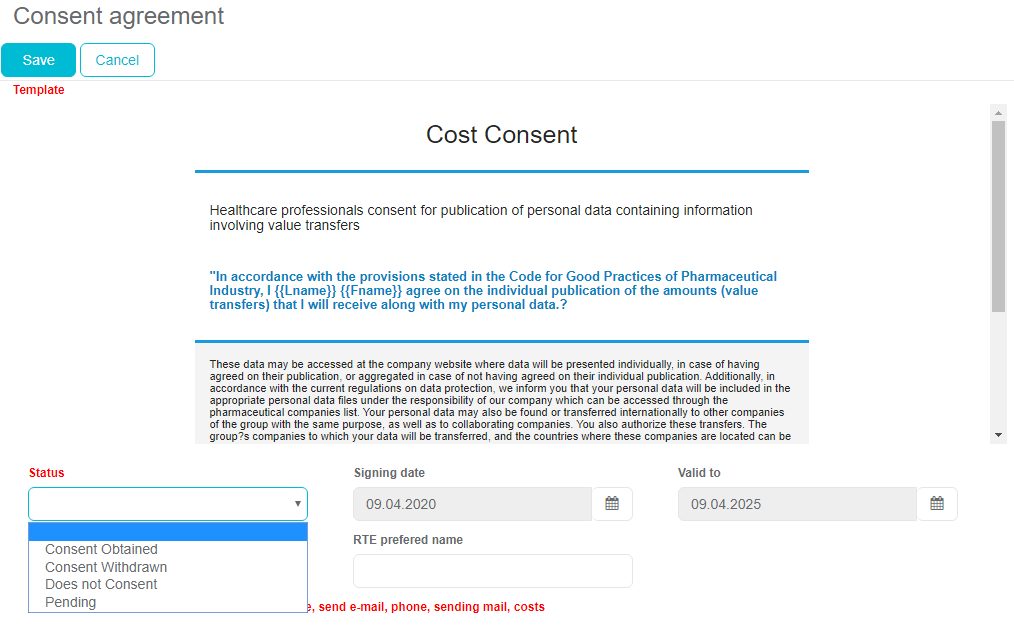
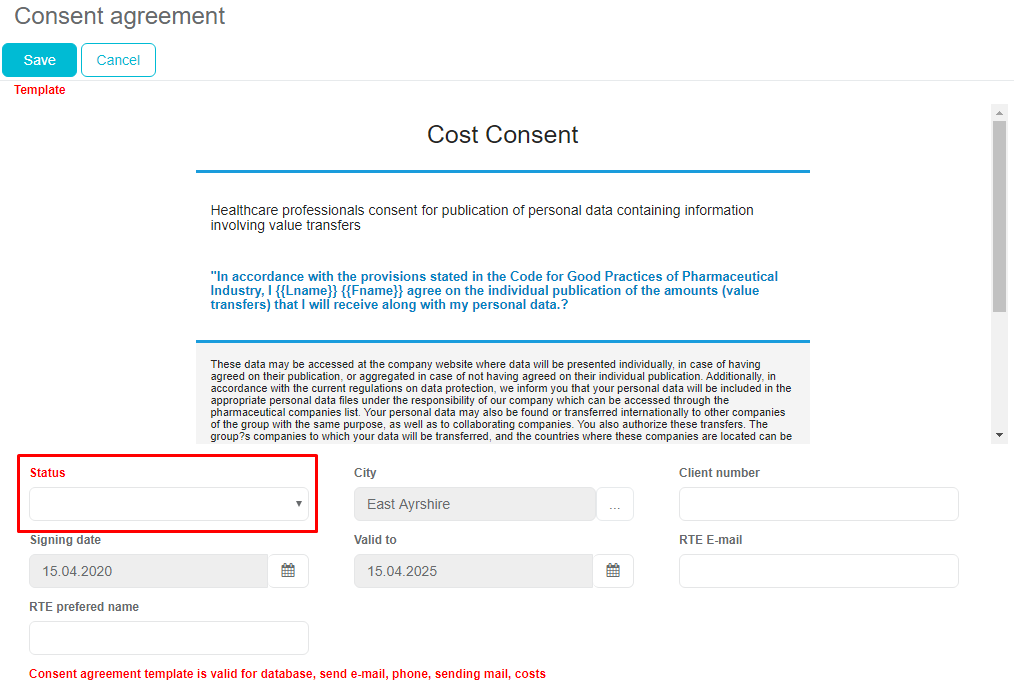
Select consent template you want to use and add person's status. In the lower part of the window you can find information for which type of consent signature is given. Click Save to save your entry. Field City is replacing defined city anchor in the template. When anchor is defined by administrator, city is automatically inserted into consent. We have also possibility to select another city if neccessary. The same works for Client number field. Difference is that client number can only be entered manually.
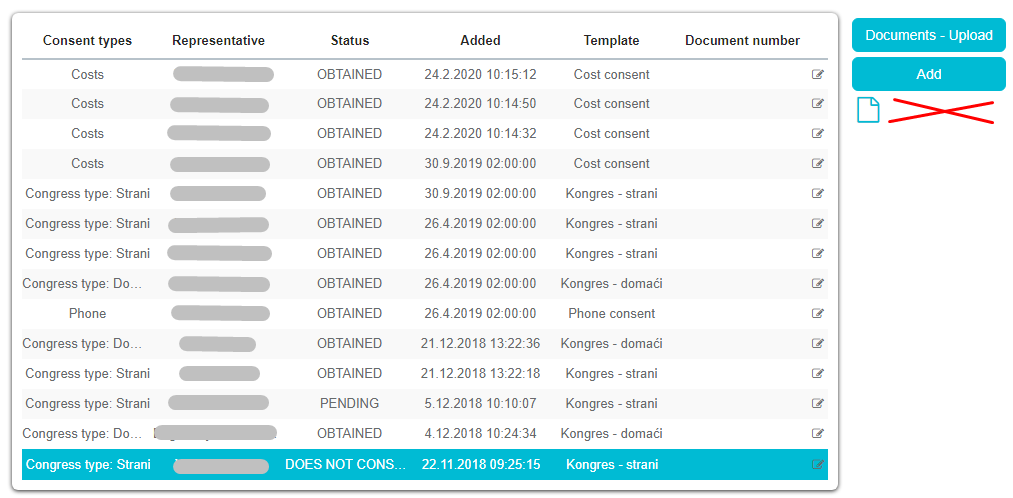
As an example, we have saved two consent agreements with status obtained. One for database agreement and second one for email type of consent. This can be seen on the pictures below. After adding status, for selected row, you are given possibility to upload signed consent under Documents upload:

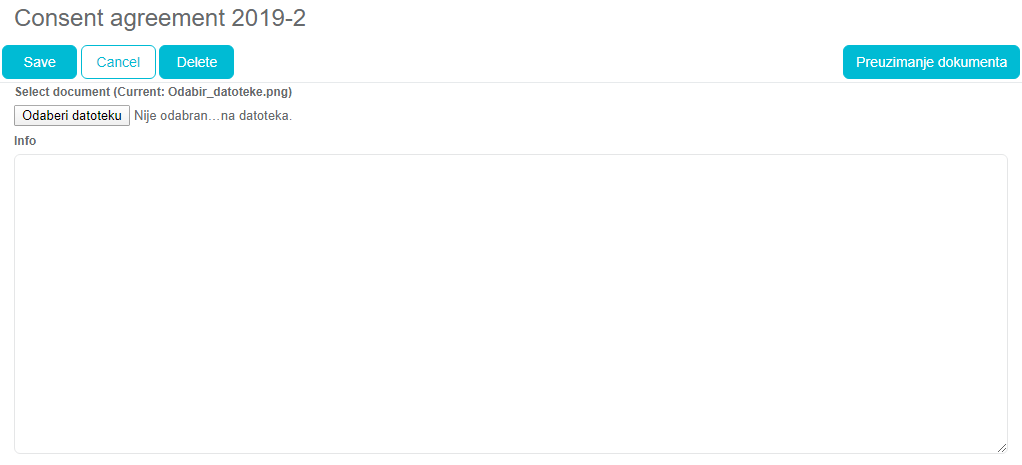
Once you upload document and save your entry, uploaded document will be visible under Documents tab with its relation Document type (type + number):

When option in Admin settings for Paper or Electronic signature is used, each document will be given a unique number.

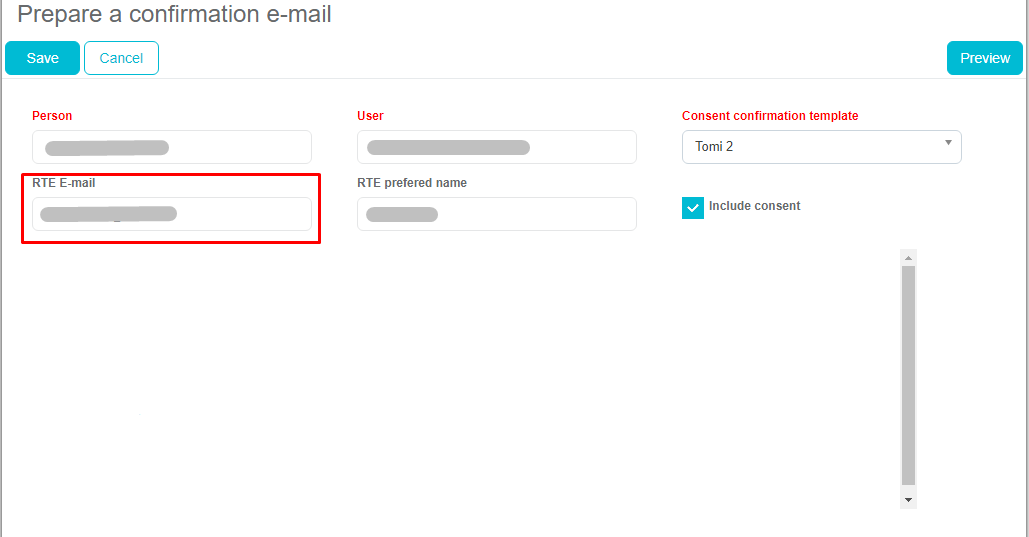
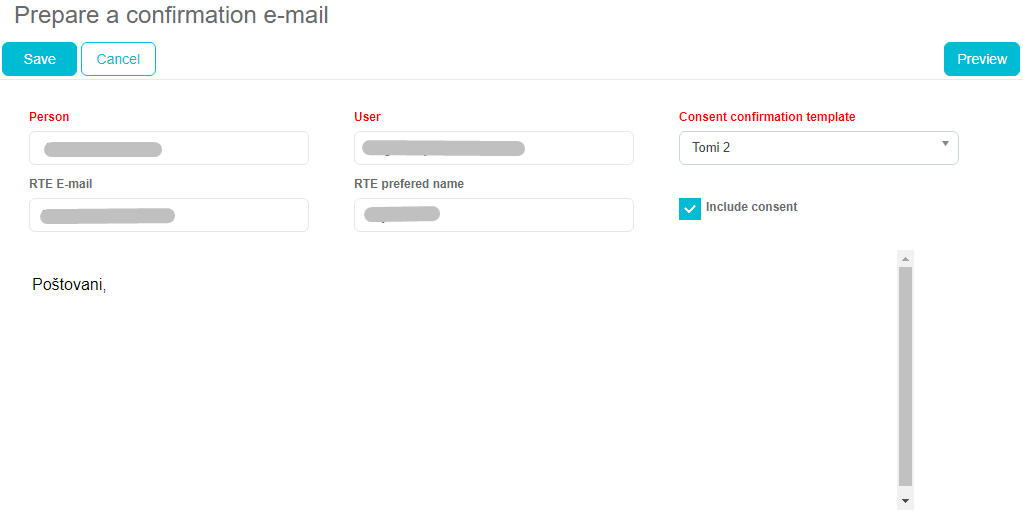
If consent status for selected person is obtained, user can print and/export consent document by using Print and Export buttons (icons). Only when a person has Status obtained for Email consent template type, Representative is given possibility to send a confirmation template (as a thank you email for signing the document or similar). Click on the button Prepare a confirmation e-mail to choose and prepare confirmation email for sending. New window will open where you can select which confirmation template you want to send, preview the prepared email and edit RTE email and RTE nickname of a person. Remember that Adminstrator can set anchors/keywords used in template.
You can use checkbox Include consent to send consent document as an attachment in confirmation email.
If you are editing a RTE e-mail and RTE preferred name this will be updated on person form, Consent agreement tab for future use:

If the status of an e-mail consent agreement is different than status set in Admin for status obtained, representative will not be able to send confirmation e-mail.
![]()
Button Prepare a confirmation e-mail is also not visible if option in SV Admin called Representatives can not send e-mail with the confirmation of consent to persons is turned on.
If a way of collecting signature is Electronic signature on device, for web version procedure is the same as described above.
What happens when a person does not give his/hers consent
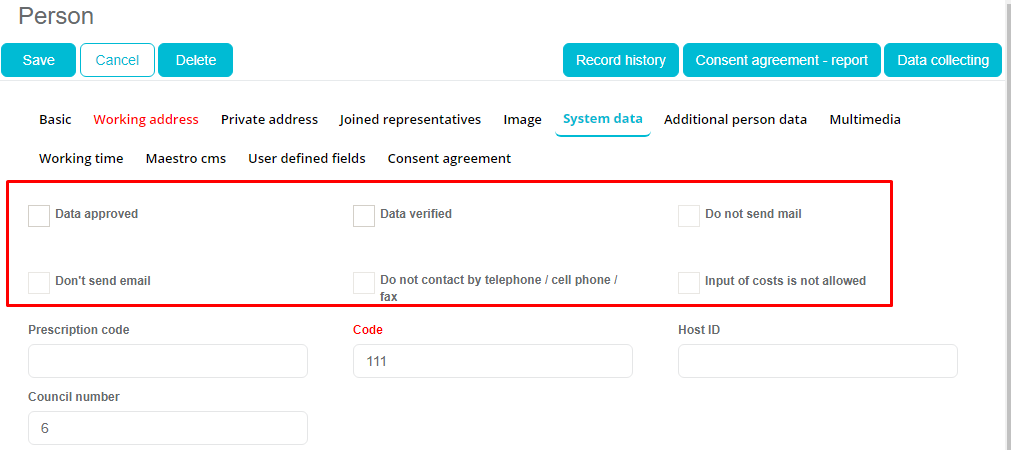
As earlier described, Sales Vision differentiates five types of consent: Database Email Phone Mail Costs If a person does not consent to one or more types of consent or an existing consent has expired, automatically this person will have a flag on person edit form, System data for each consent type. These five checkboxes are disabled if Consent module is turned on and show user if this person has agreed to be contacted by phone, mail, email etc.
SV Anywhere, person edit form, System data tab:
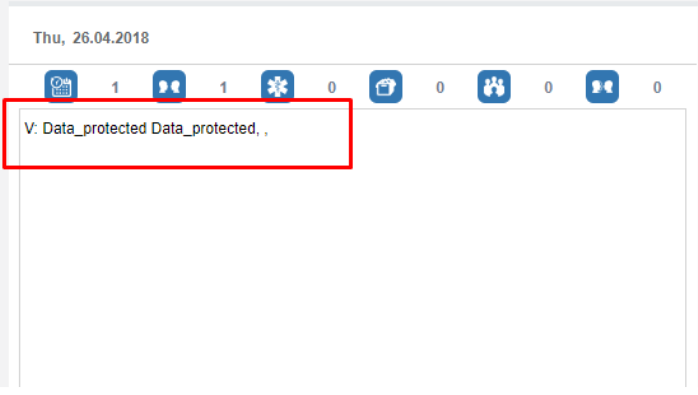
All these five types of consent are related to the rest of Sales Vision application. If a person does not give consent for e-mail, sales representative will not be able to send an e-mail from Samples module (from visits), send an e-mail from Storypad module or by using Direct mailing. If a person does not give consent for cost consent, sales representative will not be able to add direct costs for this person on event, subventions and other additional modules on request (Event & budgets and Expense diaries). Special type of consent is database type of consent. If a person’s withdraws database type of consent, system will automatically delete this person form database including all plans, visits, samples given to this person, MT, survey etc. In case a person wants to give a database consent, sales representative will have to re-enroll this person as a new one to database. Old visits and plans will be shown on calendar with „DATA PROTECTED“ or „D_P“ on Anywhere platform. Deleting all data if database consent agreement is not present is not valid for status defined in option status of a person when a person is not deleted from database.
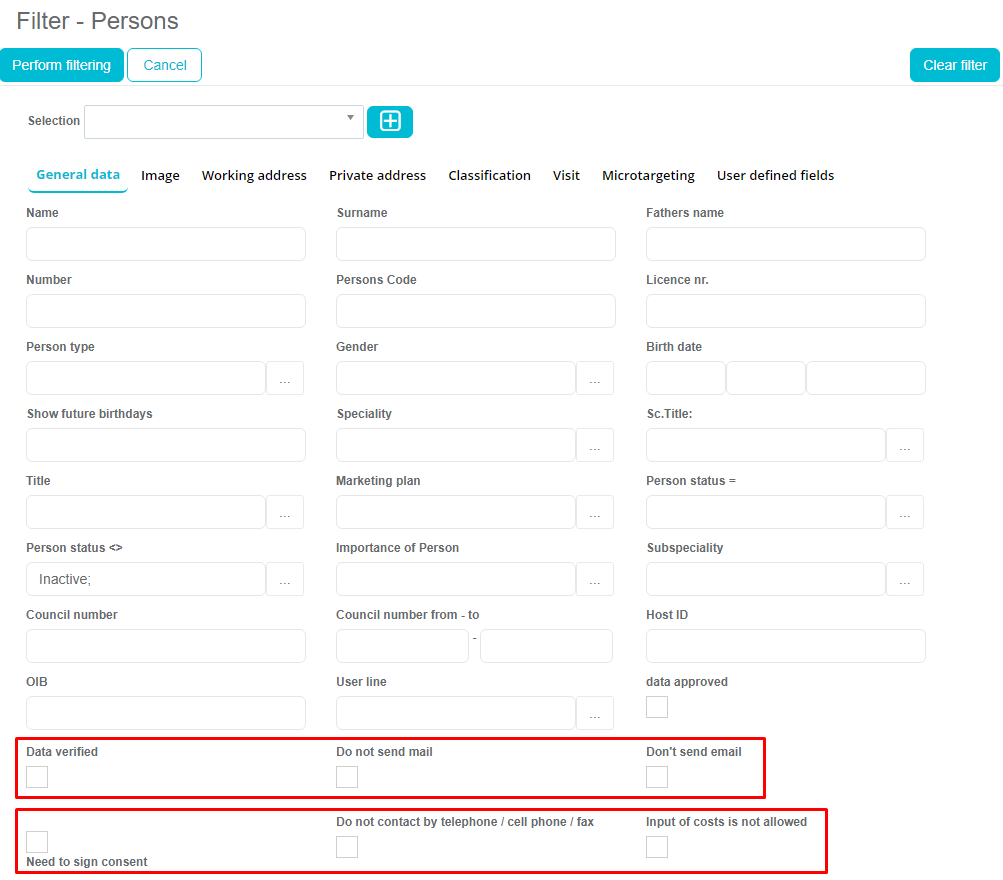
Filter regarding GDPR status consent has been added in Persons module to filter the list of person with or without consent. SV Anywhere, Person filter, General data tab:
Sending Marketing journey mail
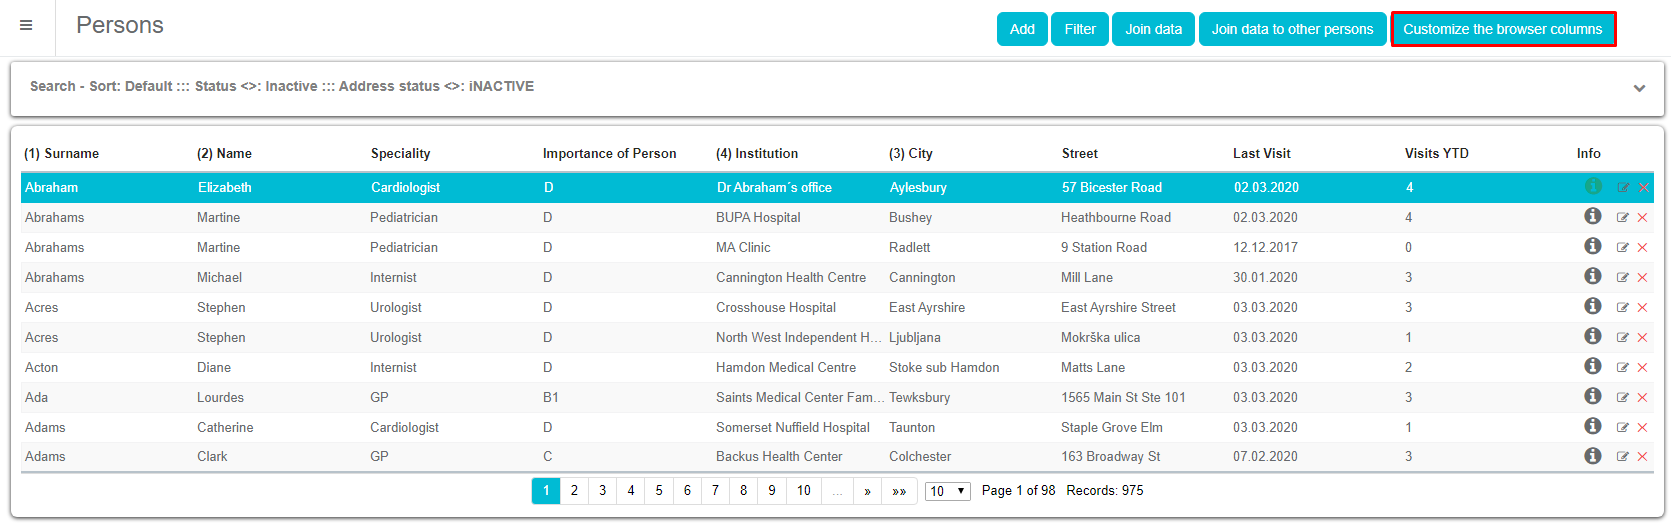
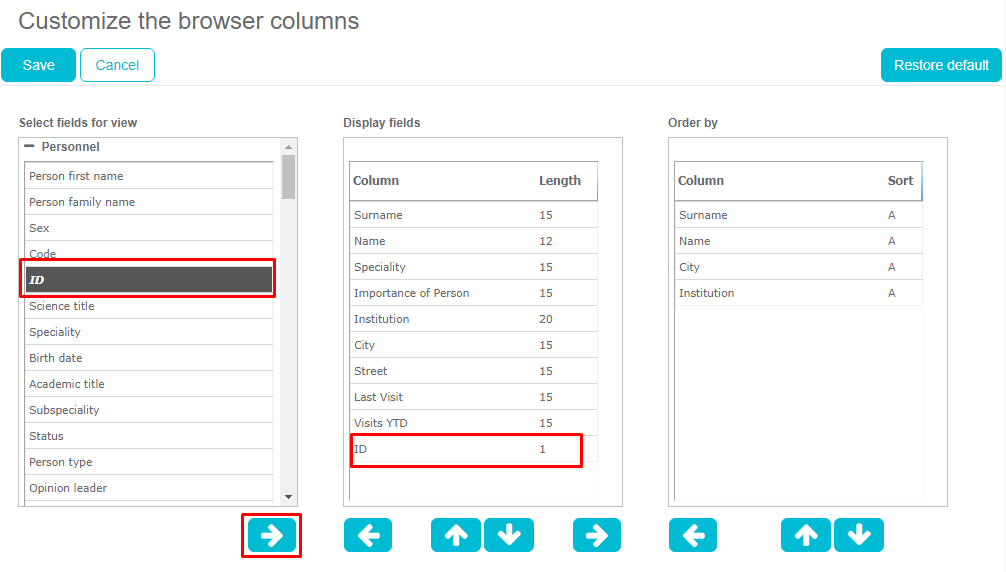
Sending emails from Marketing journey is possible only to the person with status for e-mail type of consent Status obtained. Additionaly, Administrator can define customize browser and add column e-mail consent status on the persons list in Anywhere:

There are three possibilities in sending marketing journey emails from SV Anywhere.
Through Persons module
In Persons module, under tab Marketing journey you can prepare e-mails for sending by clicking on Prepare template for sending and new window will open.
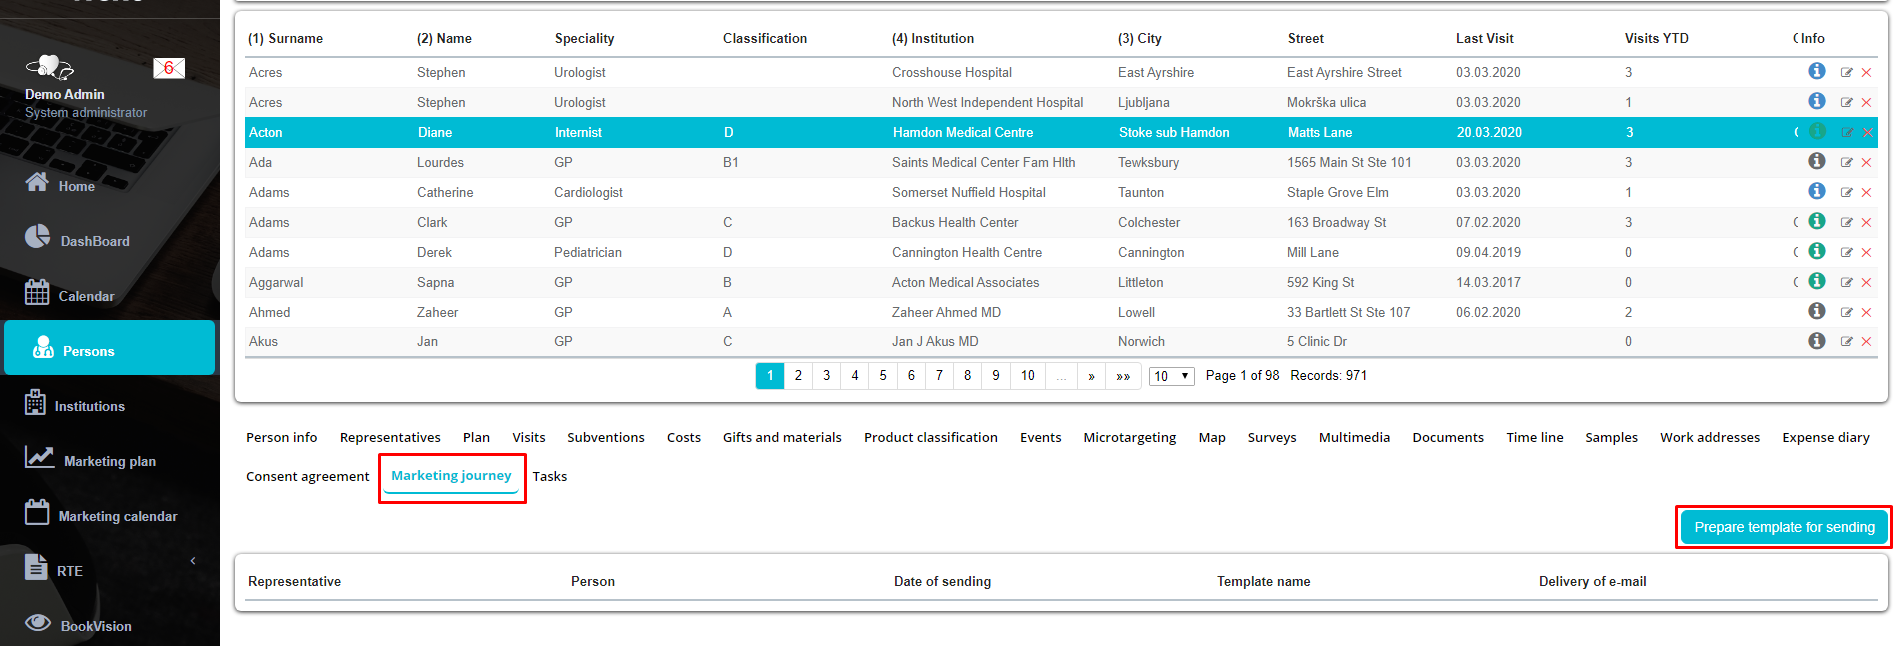
Button Prepare template for sending is visible only if e-mail consent status for this person is Status obtained.
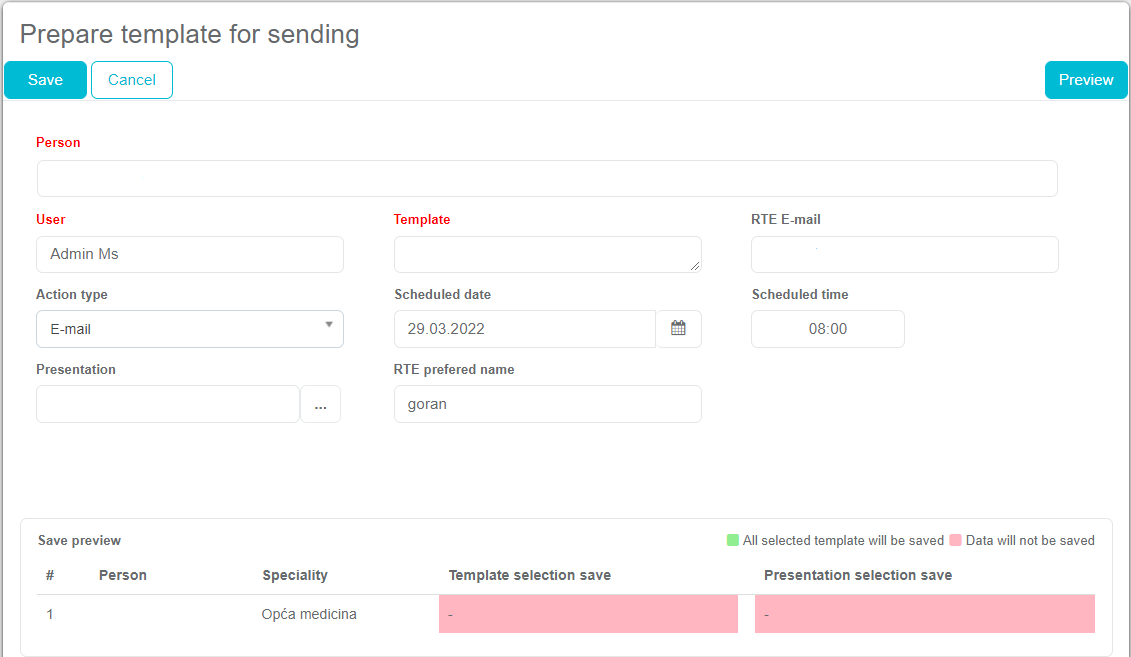
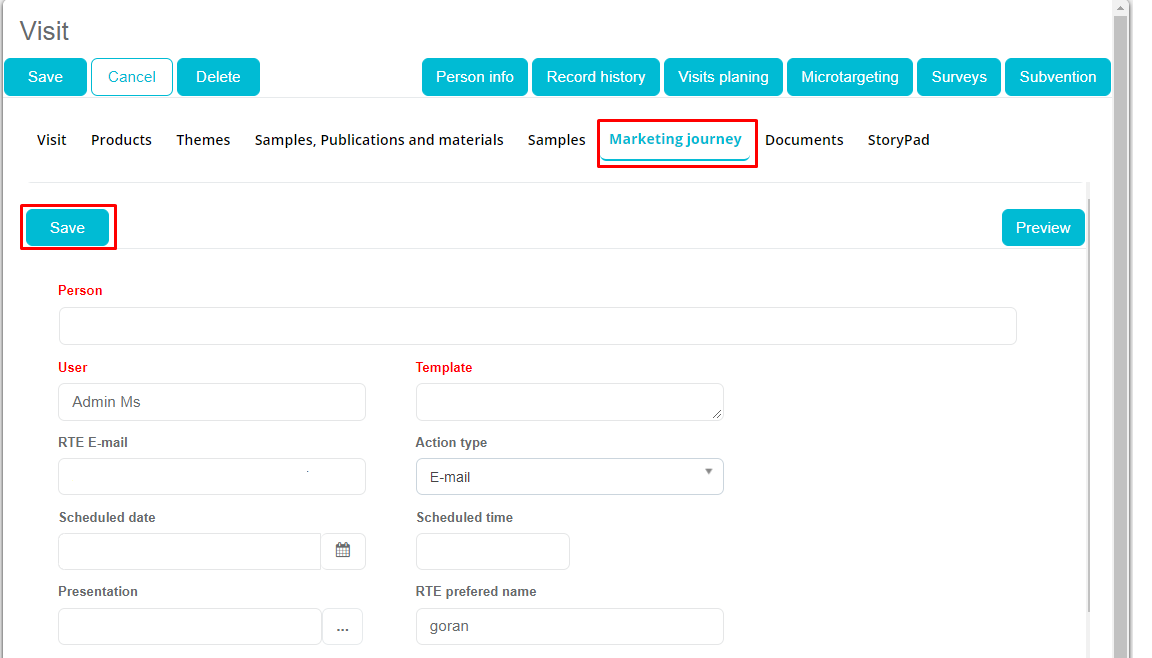
New window will open where you can select which marketing journey template you want to send, preview the prepared e-mail and edit RTE e-mail and RTE preferred name of a person. If you are editing a RTE e-mail and RTE prefered name this will be updated on the person form, Consent agreement tab for future use. Remember that Adminstrator can set anchors/keywords used in the template. Also you can select under the Action type the sending method for the RTE mail (E-mail, SMS, WahtsApp, Viber), scheduled data and time when the e-mail should be sent. There is also a small preview of the saved template.
Through Visits
Second possibility is to schedule Marketing journey template via Visit form Marketing journey tab. To schedule e-mail for sending, select template, preview scheduled e-mail and click Save button.
Marketing journey menu
Third possibility is to schedule Marketing journey by using Marketing journey menu Marketing journey tab. Procedure is the same as in preparing e-mails directly via Visits or form Person module, but here campaign is mandatory and you have to select a person and then choose template etc.
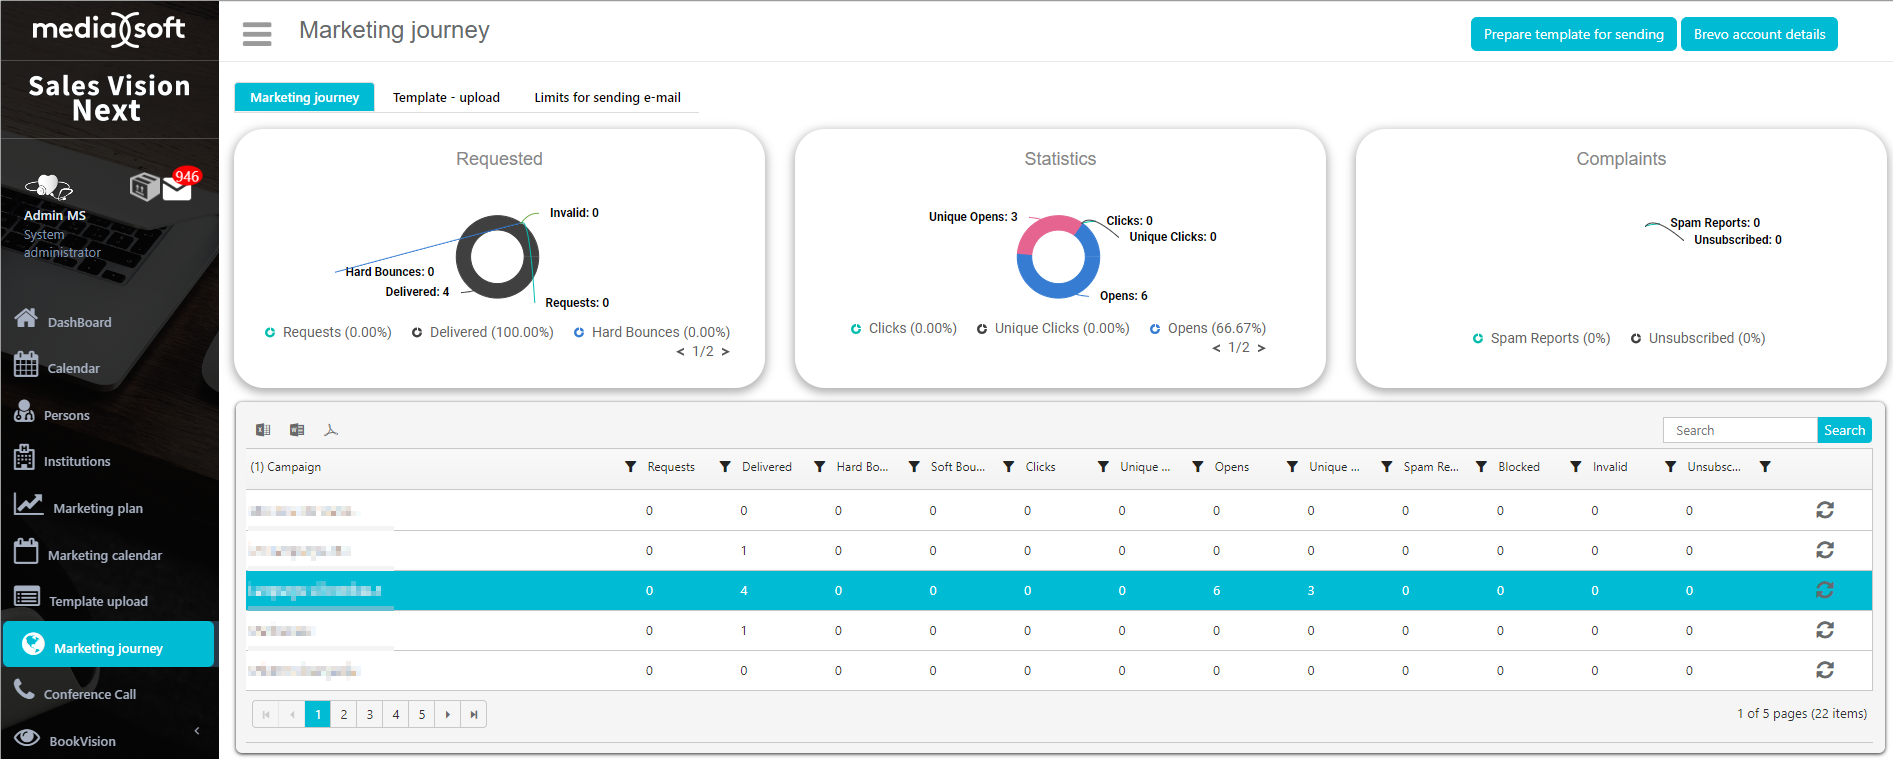

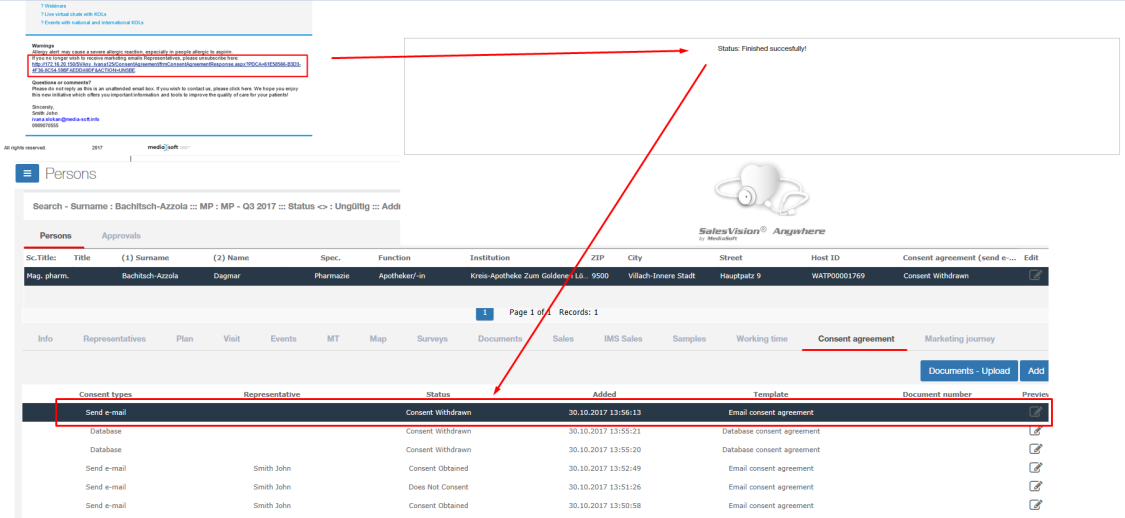
If unsubcribe option is used, template will contain unsubscribe email and by clicking on, HCP will be transferred to unsubcribe page. Status for this type of consent will be the same as set in options (in our example: Consent Withdrawn). This will be updated in Consent agreement tab on Persons module.
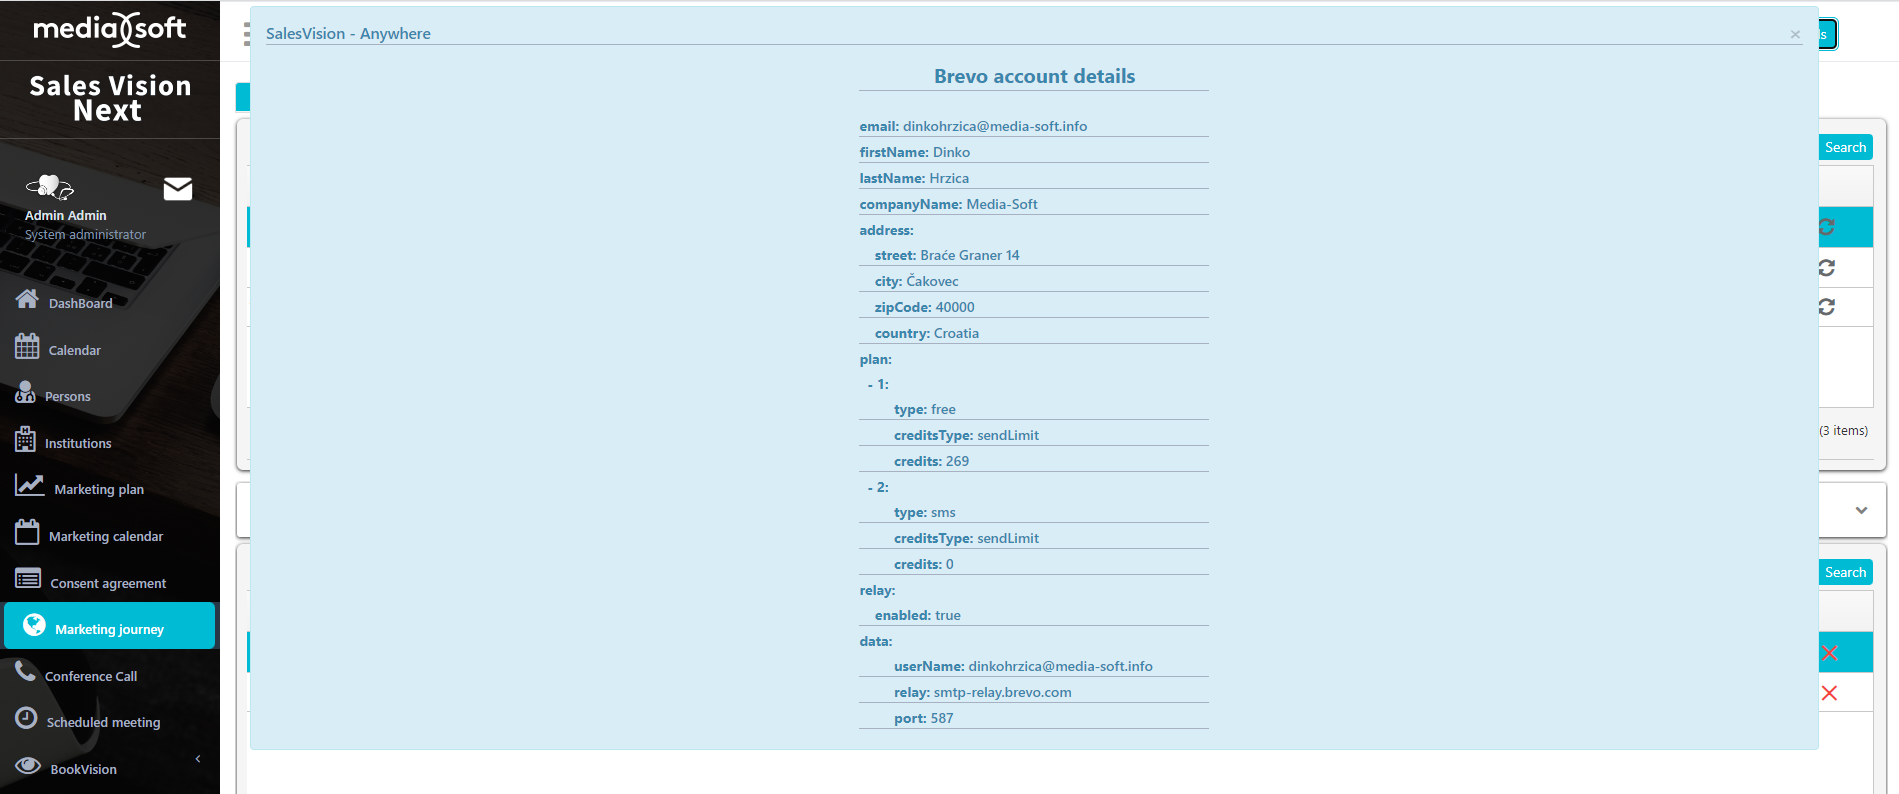
Brevo account details
By clicking on „Brevo account details“ we can see what kind of a plan we have, for example type: free, a free account enables us to send up to 300 emails per day.
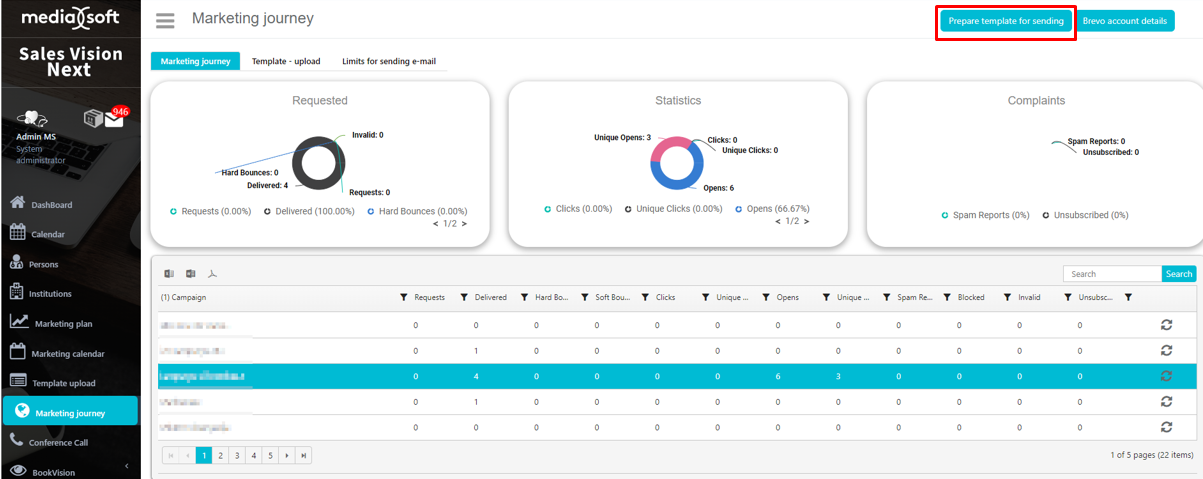
Creating a campaign
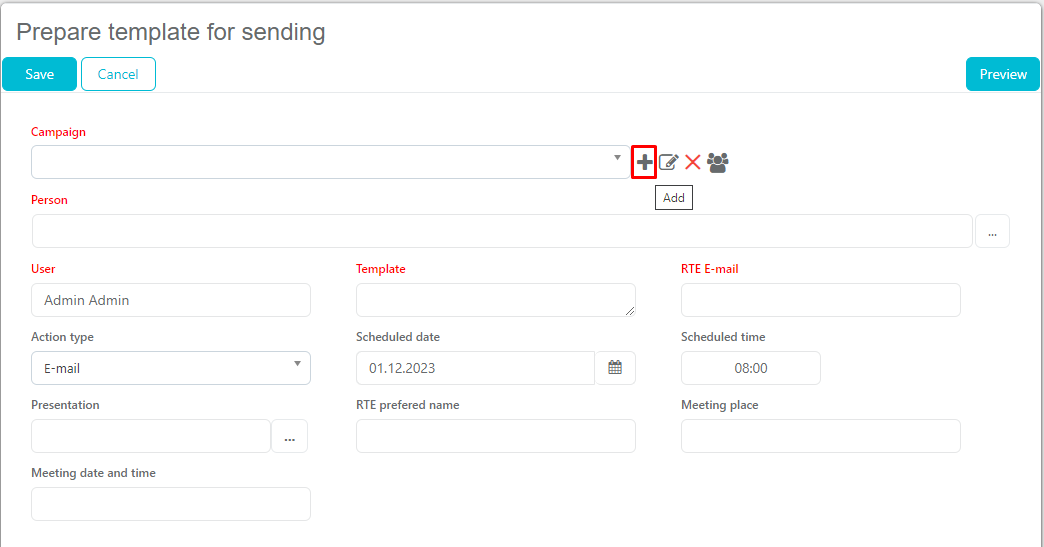
The first step is to click on „Prepare template for sending“
Click on the „+“ button to start creating a new campaign.
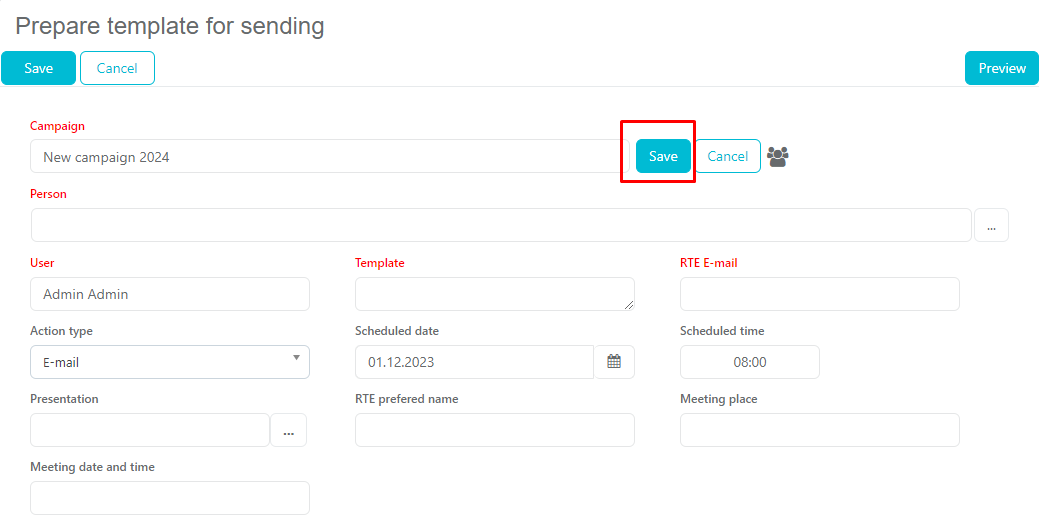
Write a name of a campaign and press save.
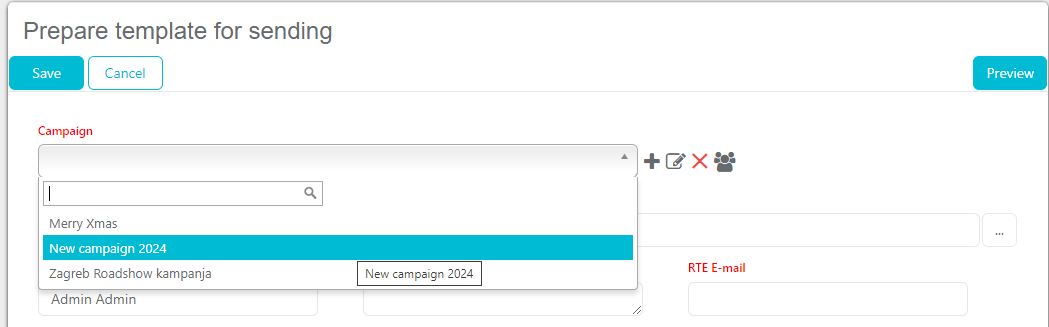
A new campaign will be available for selection.
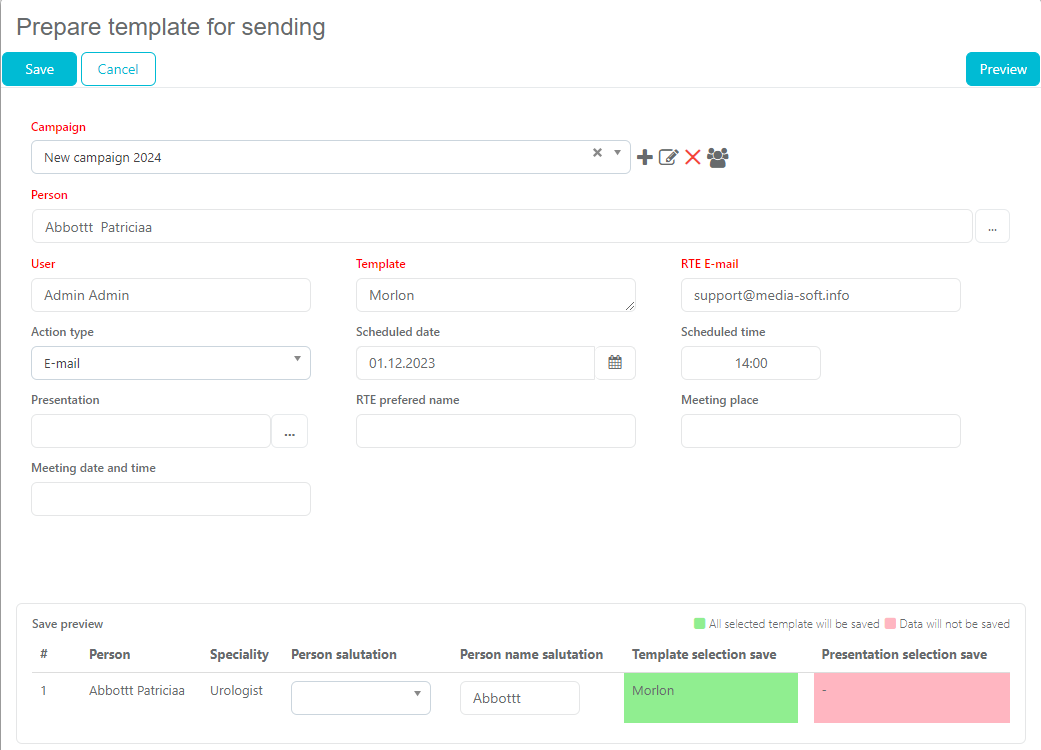
Prepare template for sending
The red fields are mandatory, including campaign, which is necessary for statistics. It is possible to select multiple persons that we are sending the email to.
If you were familiar with Marketing journey before, the only difference now is campaigns, which are used for statistics that will help you with determining the success of sent emails.
Dynamic content
The administrator can define within the marketing journey template free text fields and dropdown list where user can add free text and/or choose drop down fields. Let's explain it in our example how this functions. How to define Dynamic content fields? In SV Admin, under Codelist Persons codelist nr. 793. Administrator can add different categories as shown on the picture and for each of them the adminstrator can add drop down list.
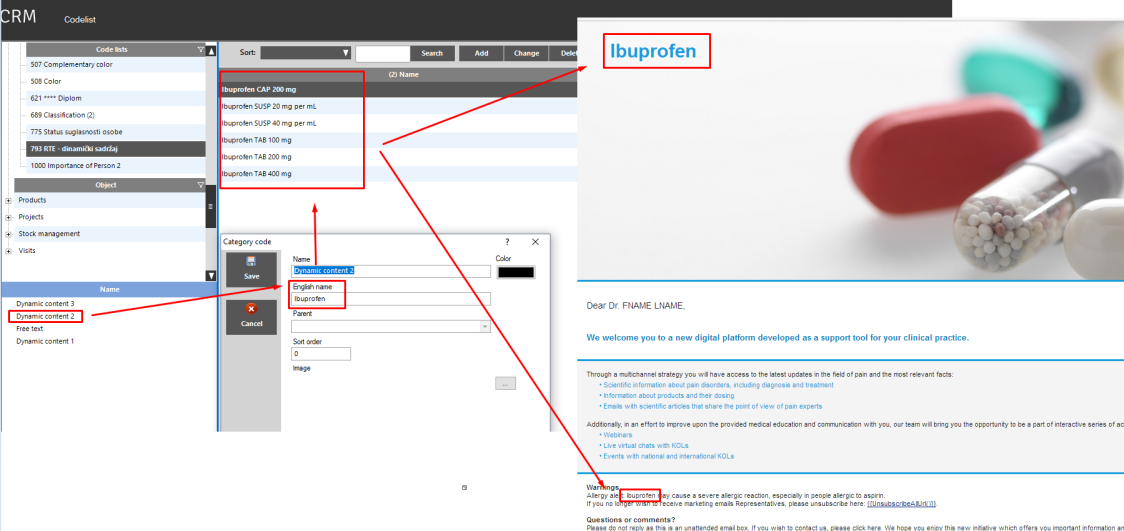
Under the English name for category is the Dynamic content 2 defined as Ibuprofen. As a replaceble word are added six dropdown lists.
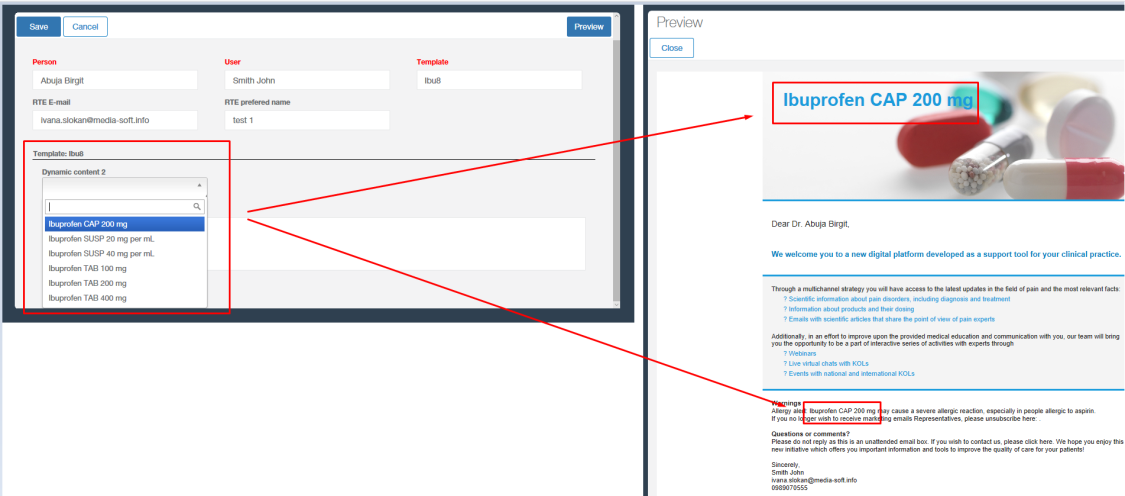
When preparing a template, user can choose which dropdown field will be used.
If you want to use Free text field under English name use FREE_TEXT_FIELD_ and word you want to replace as a keyword:
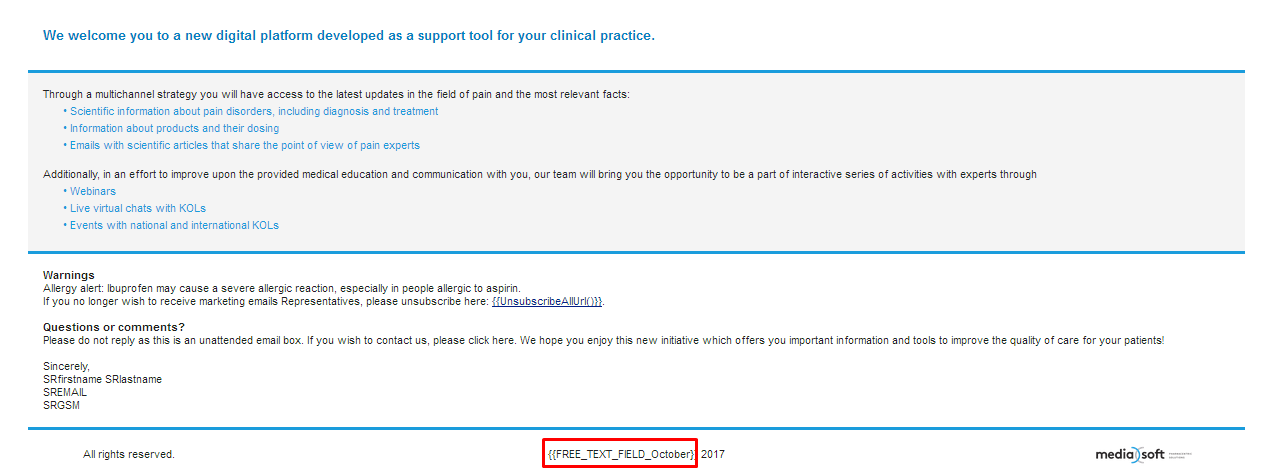
Original HTML:
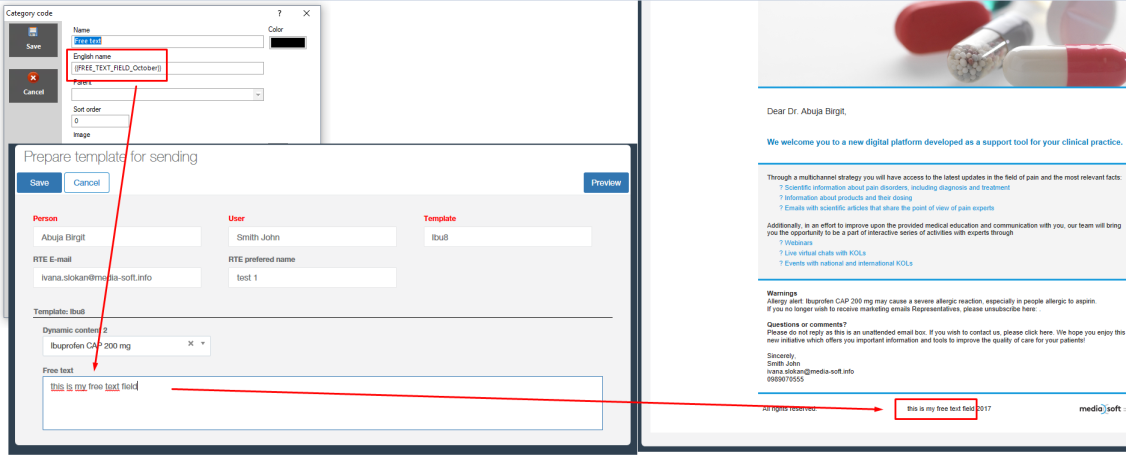
Options set in Admin and preview on Anywhere: