Remote call
ZOOM
To use a remote call functionality, user needs to create an account for Zoom aplication. There is no need to install Zoom application on users device. Login name and password need to be saved in Settings menu on SV Next. Settings menu can be found on home screen, menu list, „Receive and send data“ – „Login to Zoom“.
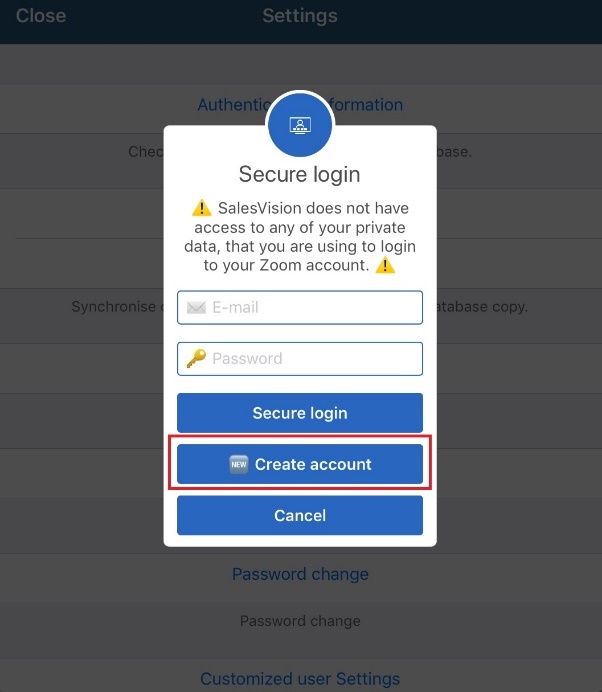
Important to note is that Sales Vision does not store your login name and password for Zoom account to its database, it only forwards this data to Zoom API.
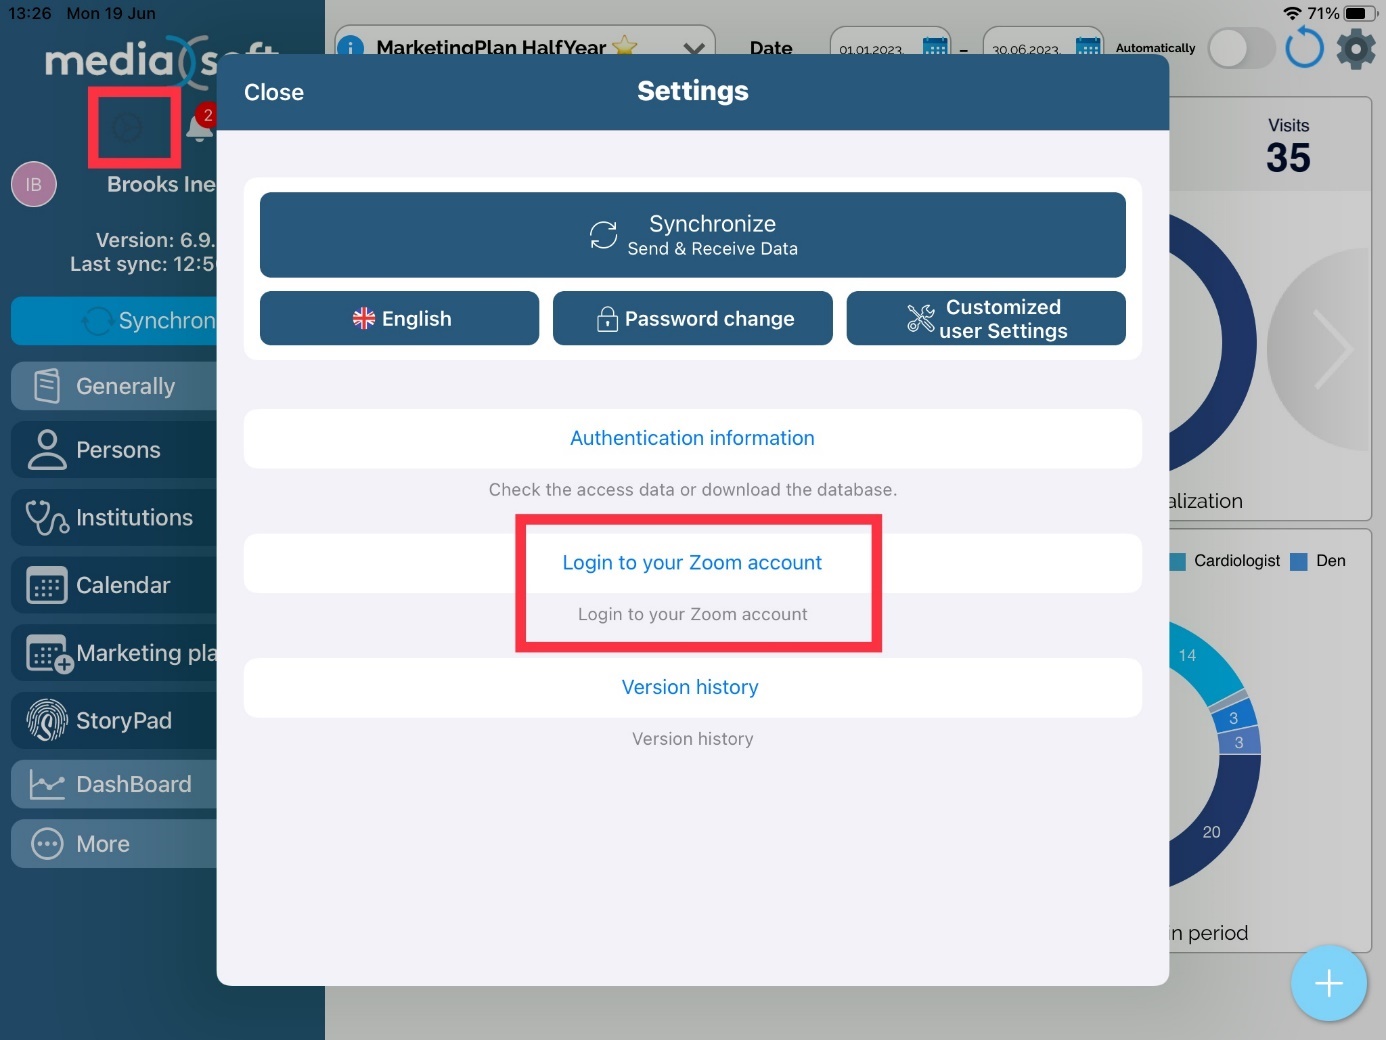
If you do not have a valid Zoom account, use Login to Zoom button and you will be transferred to website where you can register.
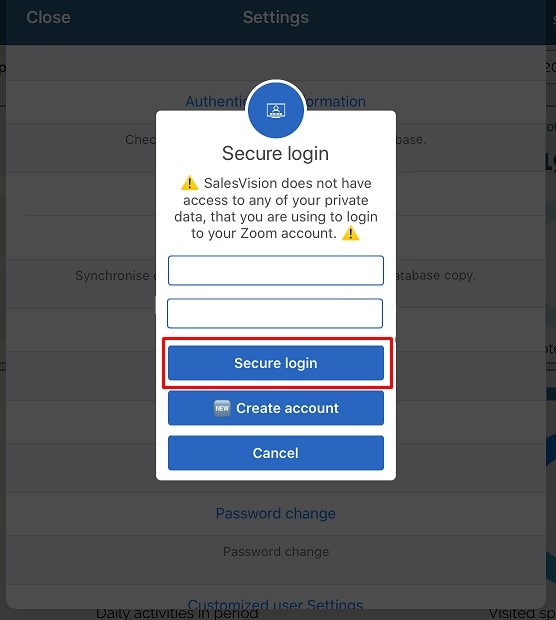
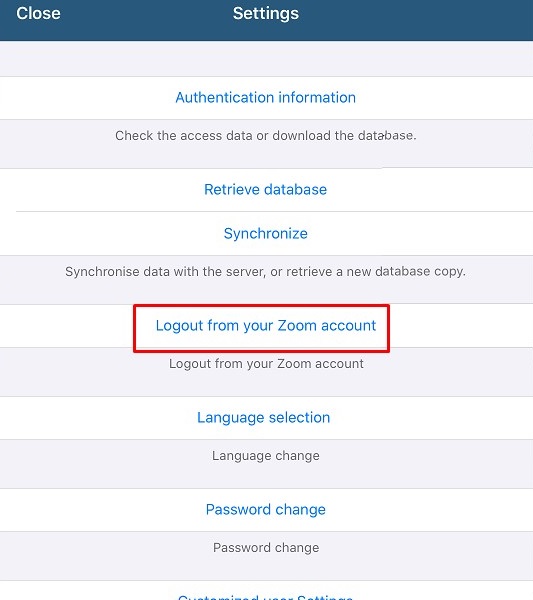
After a sucessful registration, add login name and password to SV Next. Clik on Secure login to save your entry.
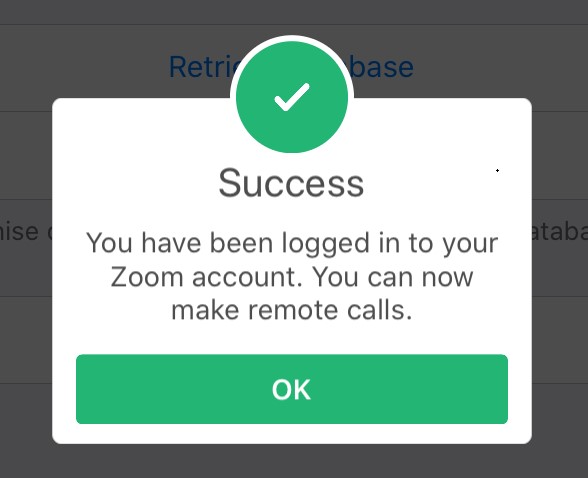
Without login to Zoom account, you will not be able to start a remote call. As for other participant in meeting (doctor), Zoom account is not needed. Zoom application is not needed if the access the meeting link from Chrome browser for desktop computer, but is needed if the access the meeting from other browser or mobile phone.
You can logout from your account at any time using Logout button in Settings menu.
How to schedule and start remote call?
There are several ways to use Remote call functionality on SV iPad Next. Each of them will be described below:
From Calendar module
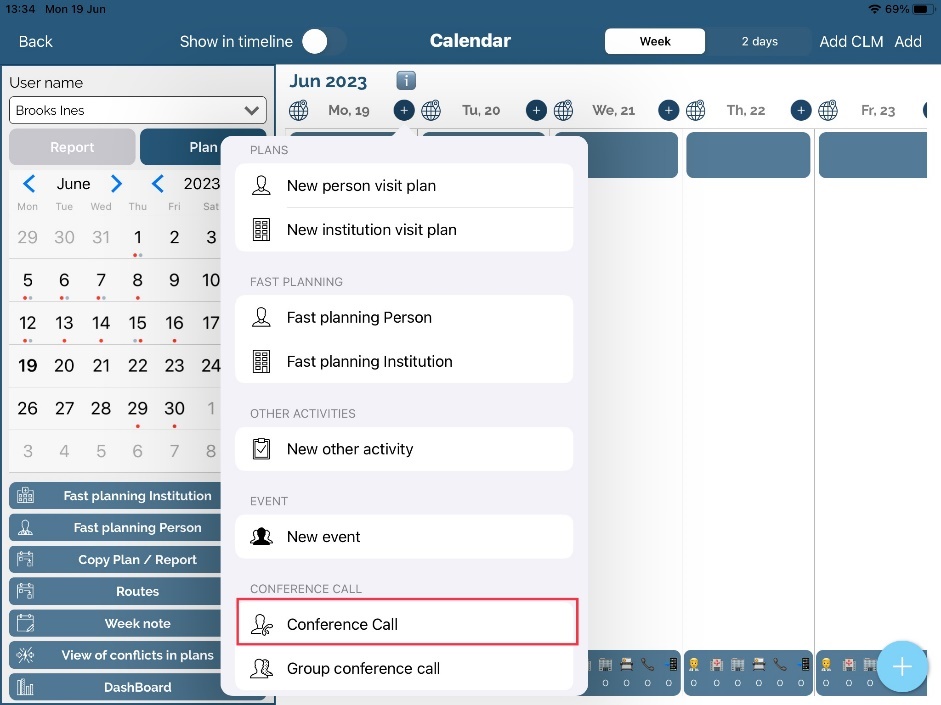
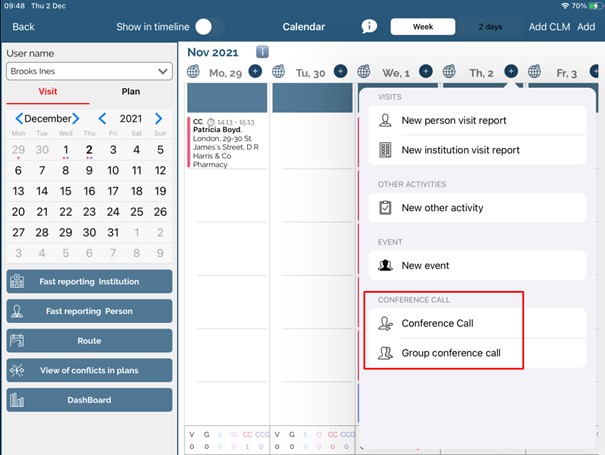
In calendar module there are two ways to start remote call from Calendar: from plan and from report. Process is similar: to start remote call use „+“ or Add button the get the list of wanted action.
From Plan:
From Report:
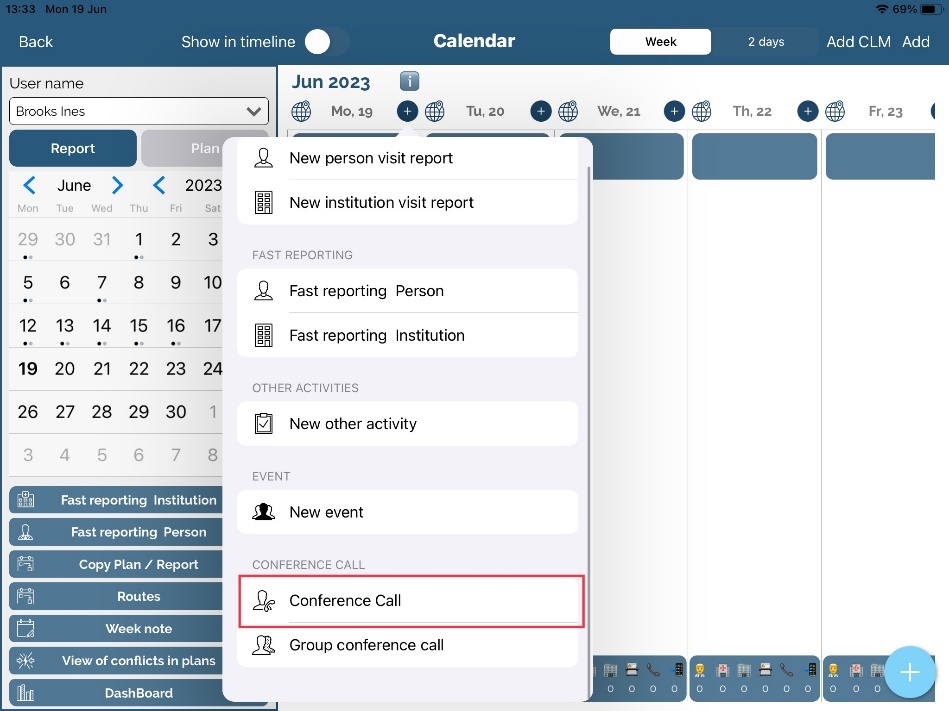
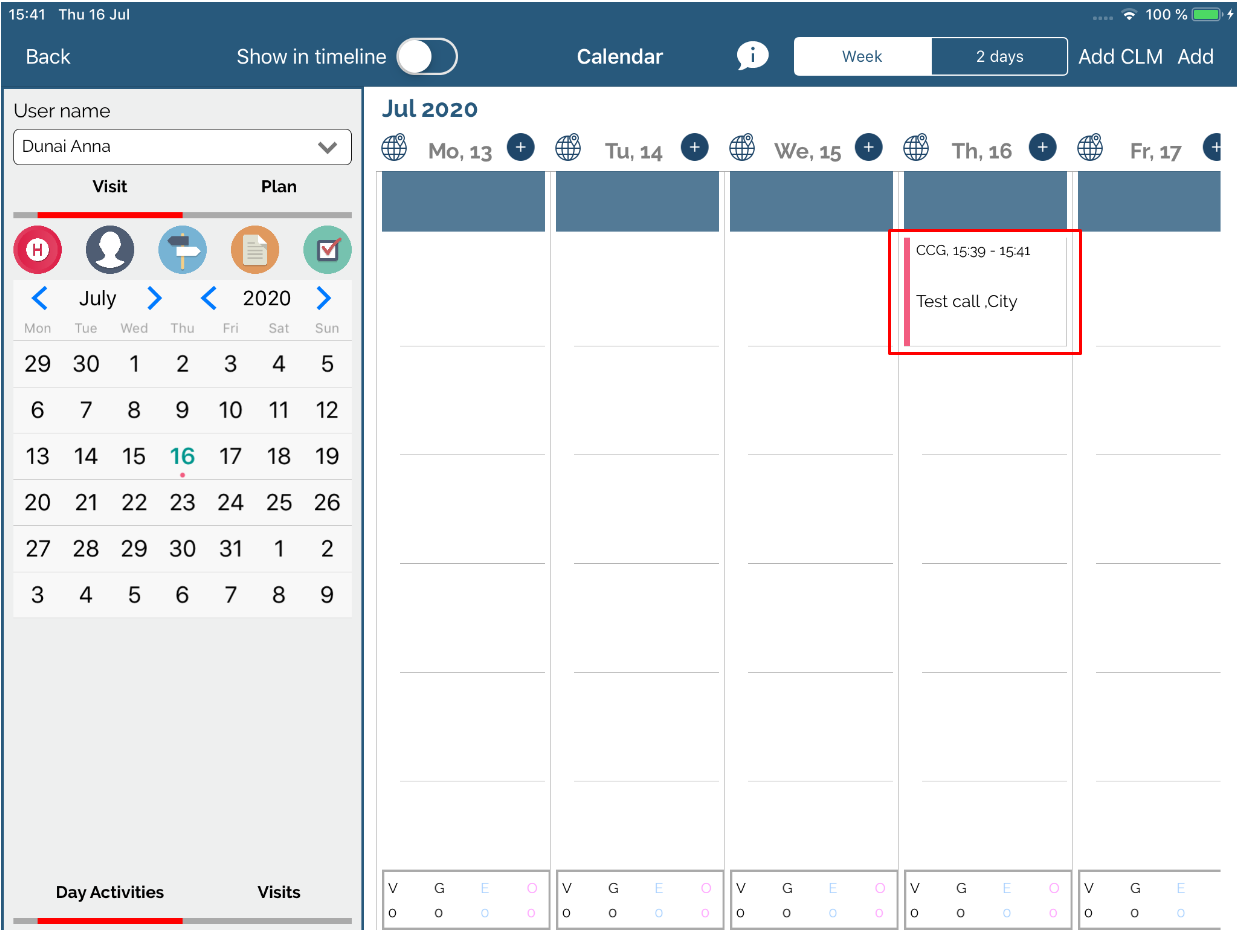
On the end of the list you will find option „Remote call New person plan“ or „Remote call New person visit“ (depending on which tab you are currently located). Difference is that when creating new remote call plan, user is sending an invitation to a doctor with info on date and time of scheduled remote call, without sending a link to join a remote call. When creating a remote call from Visit tab, user is sending an invitation to a doctor in real time, with information on access link to remote call.
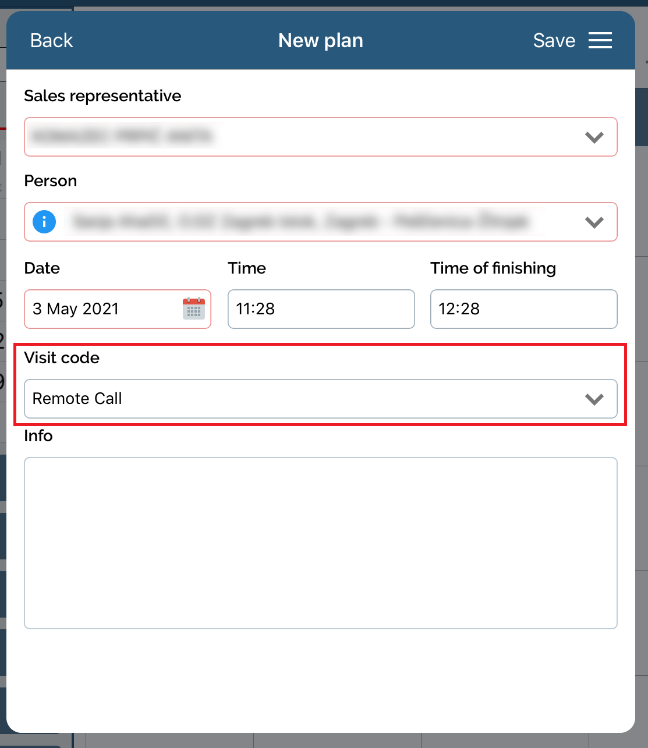
Visit code for plan and report from remote call is codelist defined in system options for remote call.
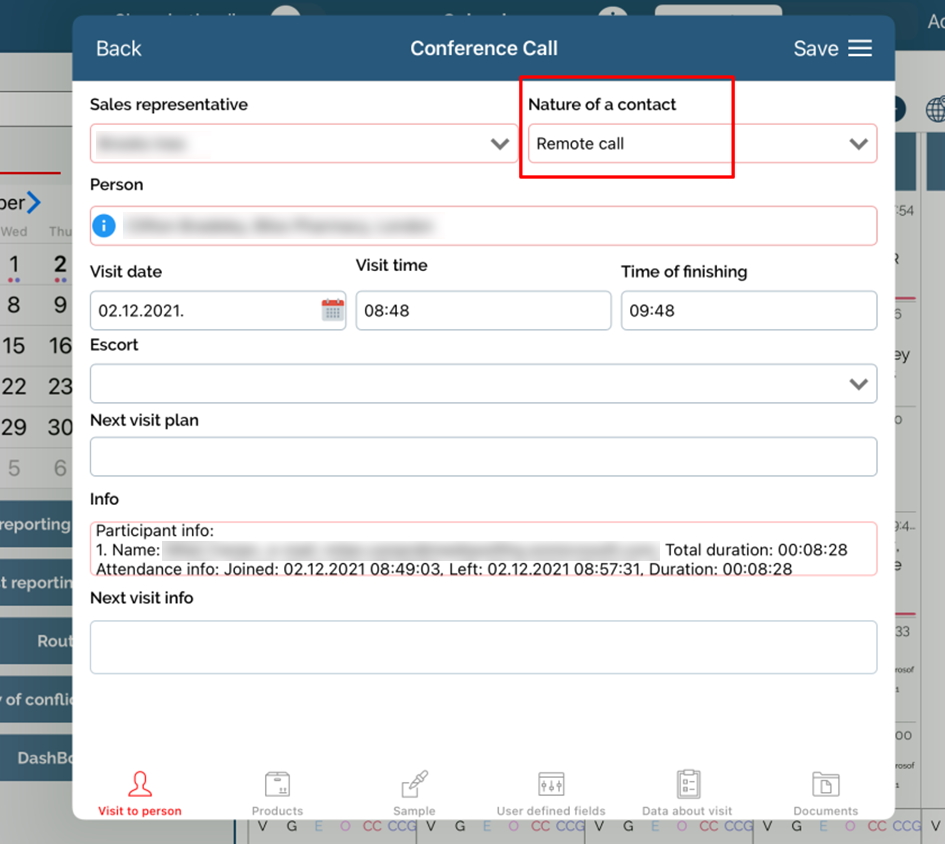
Add a new plan for remote call and save your entry.
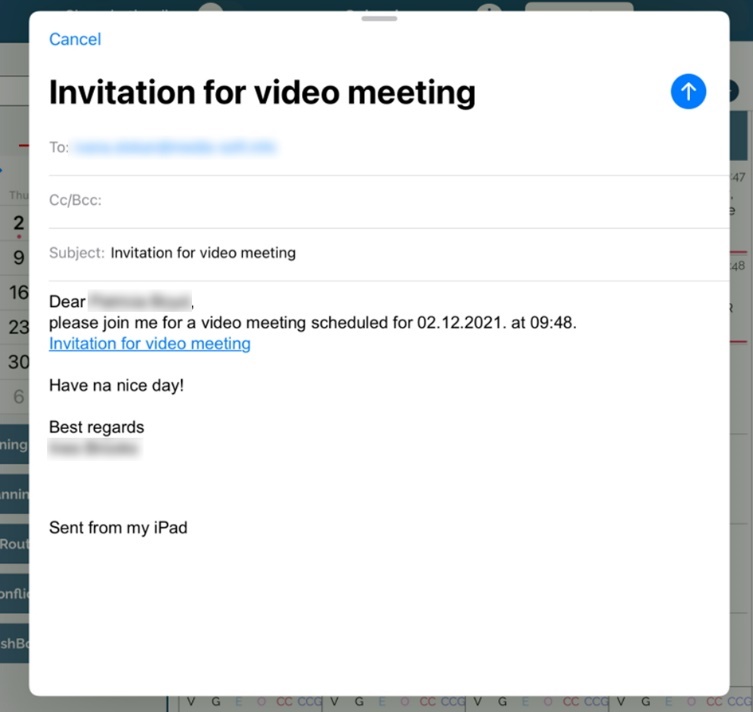
After saving your plan, new window for sending email invitation will be opened. Email field TO is automatically populated from person data. Use Send button to send an email to doctor, a reminder for schedule meeting with information on time and date of meeting.

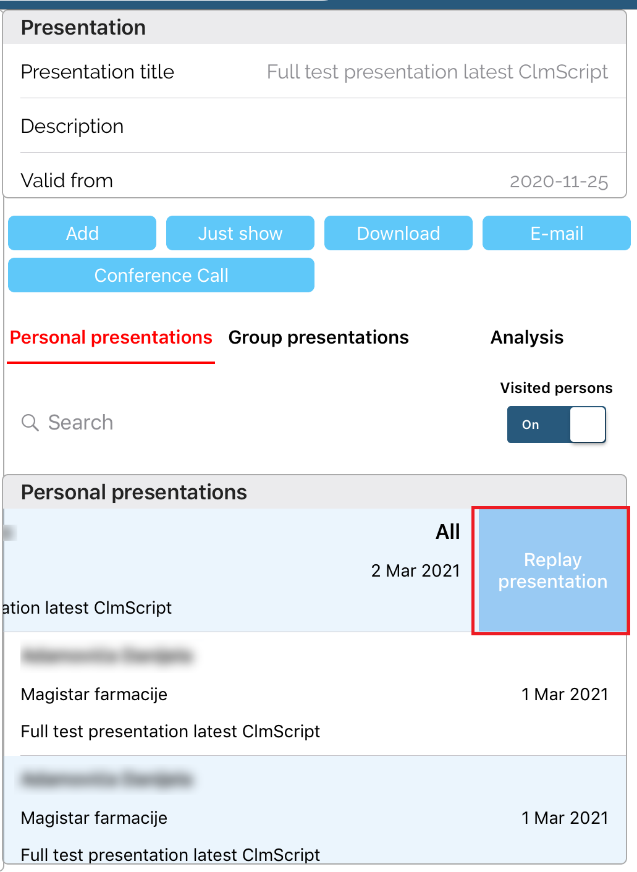
On the day of your meeting open your plan and use Present button.
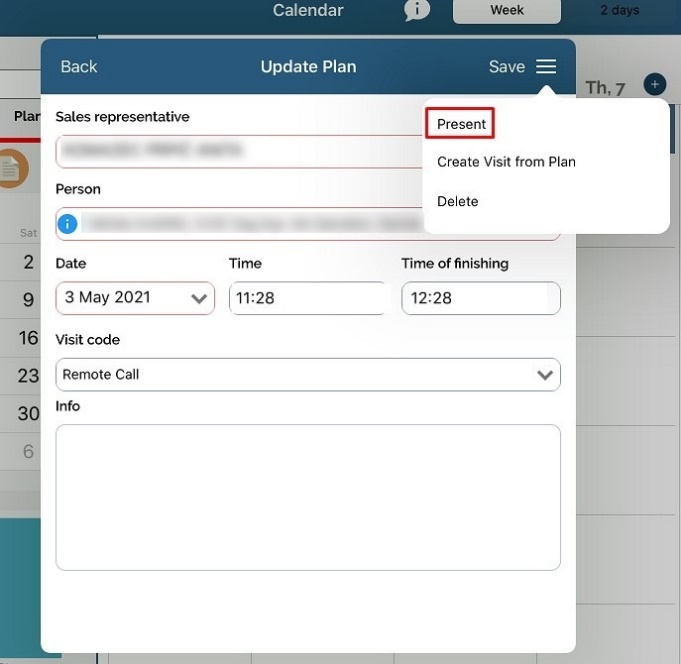
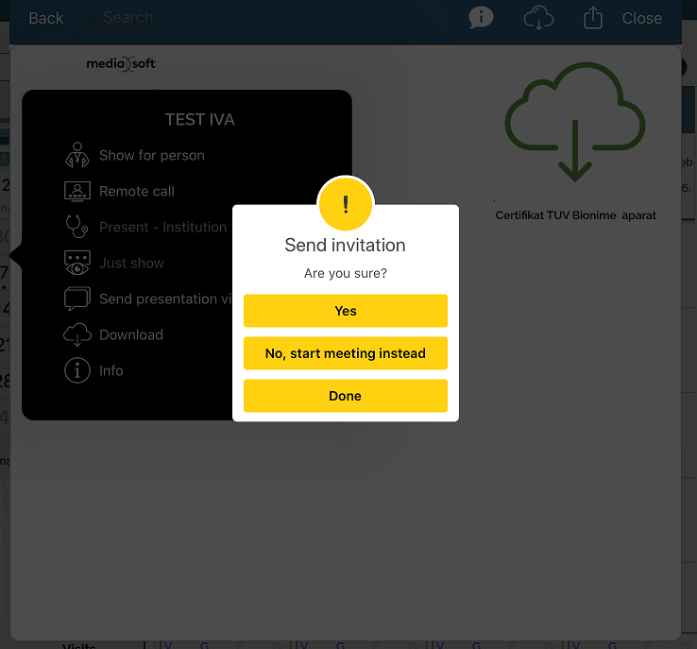
Select Remote call button on CLM presentation you want to present and you will be asked to send an invitation to doctor with access link to your scheduled meeting.
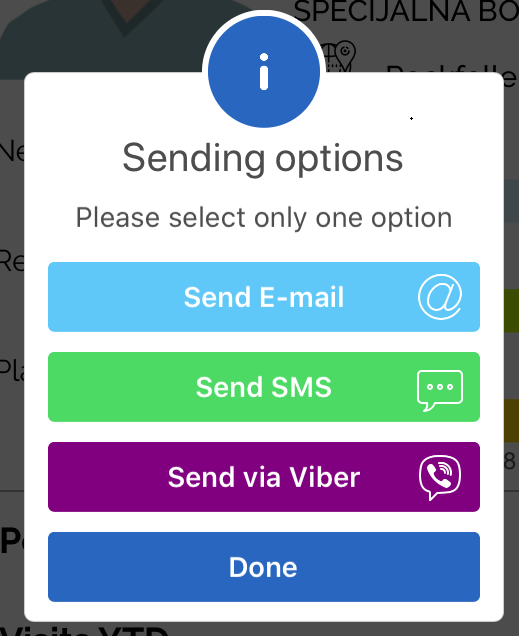
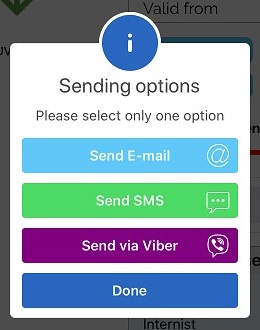
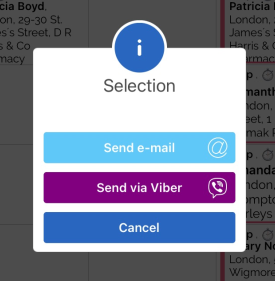
There are several ways to send a remote call invitation to doctor: by email, SMS or using Viber application installed on your iPad device. Email used for sending emails is the one from RTE module (if Consent agreement is turned on your database, if not than the email field for working address is used). Unless system option 659: „Use private e-mail and phone for remote call and Maestro“ is turned on, in such case for sending emails - private email address is used.
After you have selected the type of invitation you want to send, a new window will be opened where you have to manually send an invitation, for an example by using Email module. Simply click on Send button to send an invitation.
After sending an invitation to doctor, remote call can start in real time.
If Consent agreement module is turned on on your database, you will not be able to send an invitation without a valid (status obtained) email and phone consent for selected person.
from StoryPad module* option on demand, depends if it is turned on in your licence
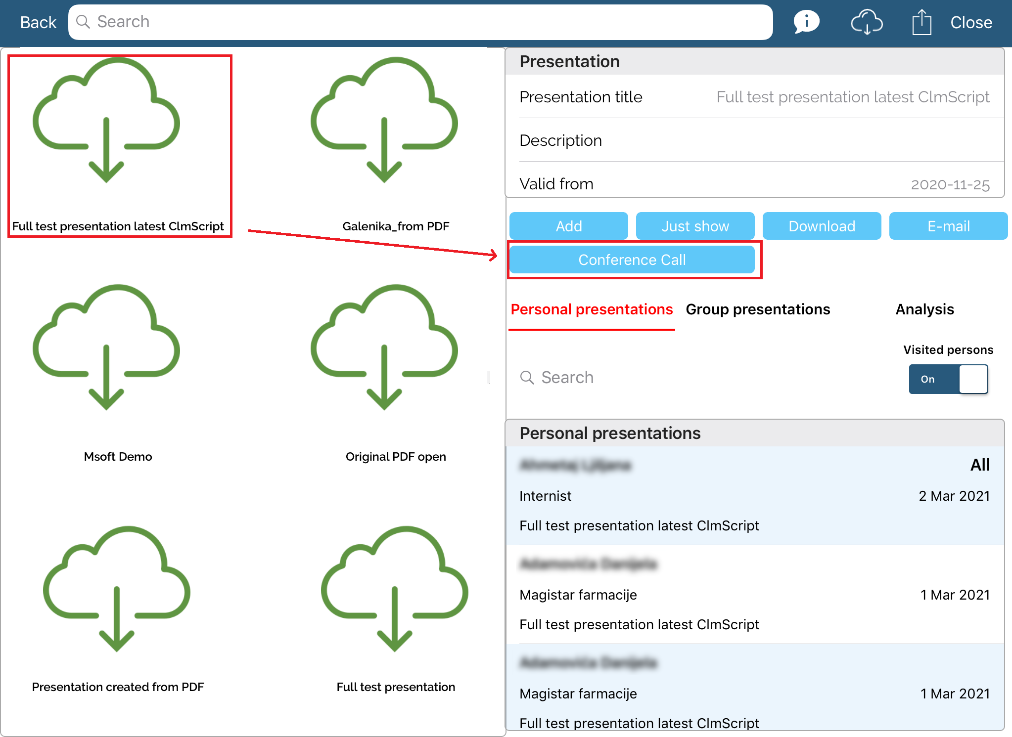
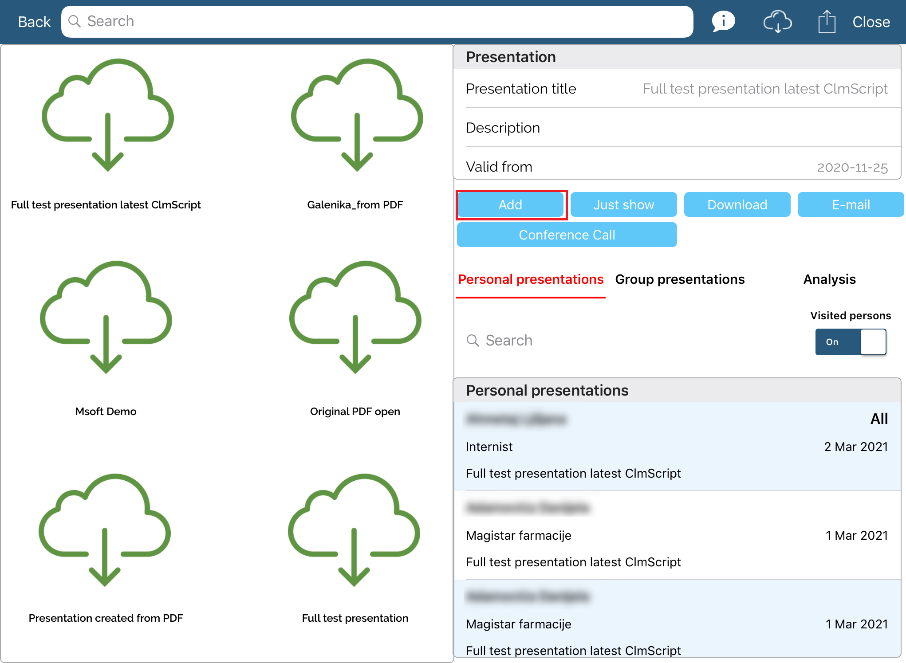
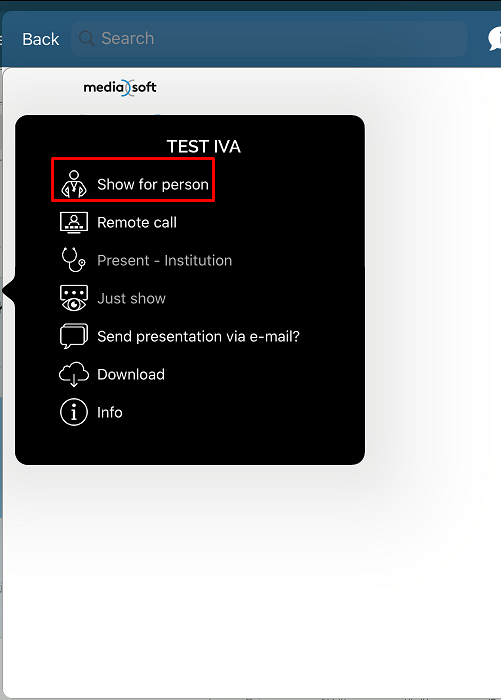
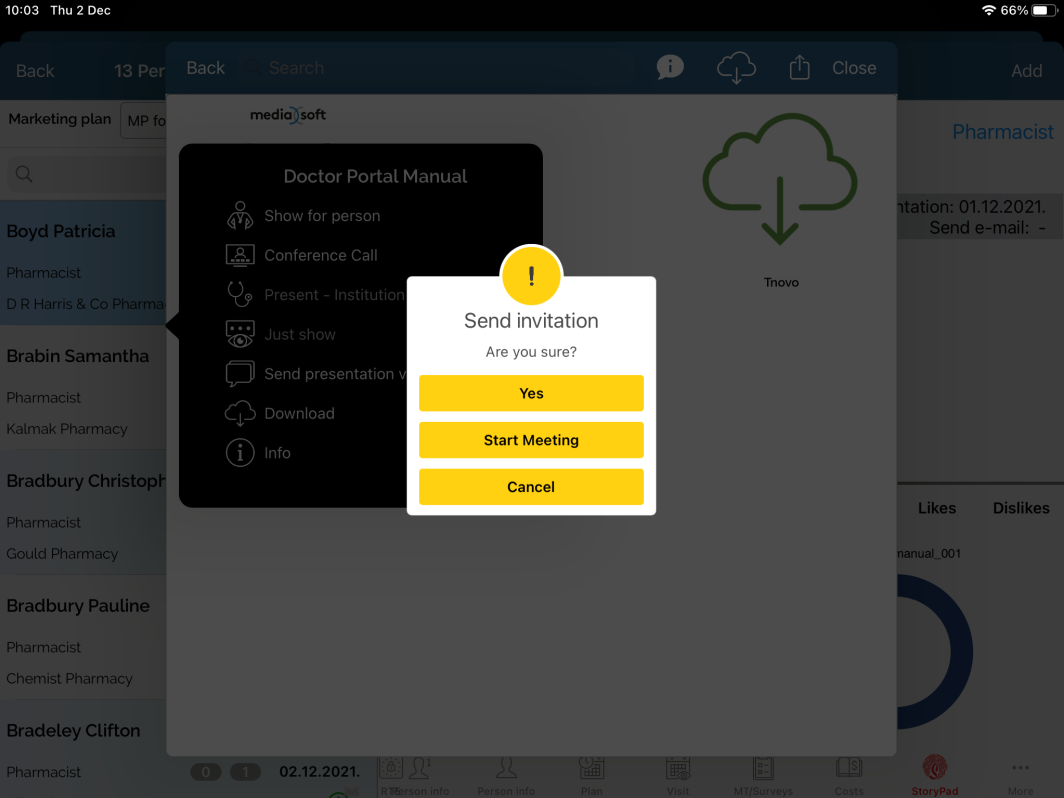
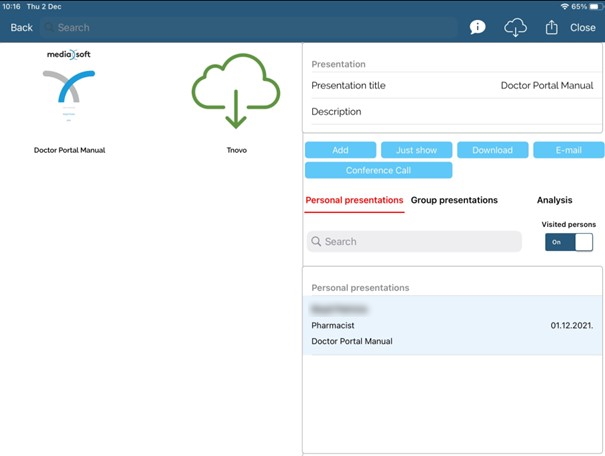
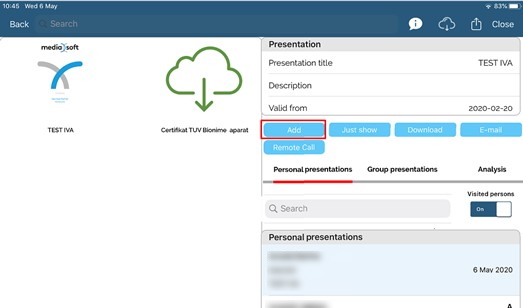
To start a remote call from StoryPad module, use Conference call button as shown on the picture below.
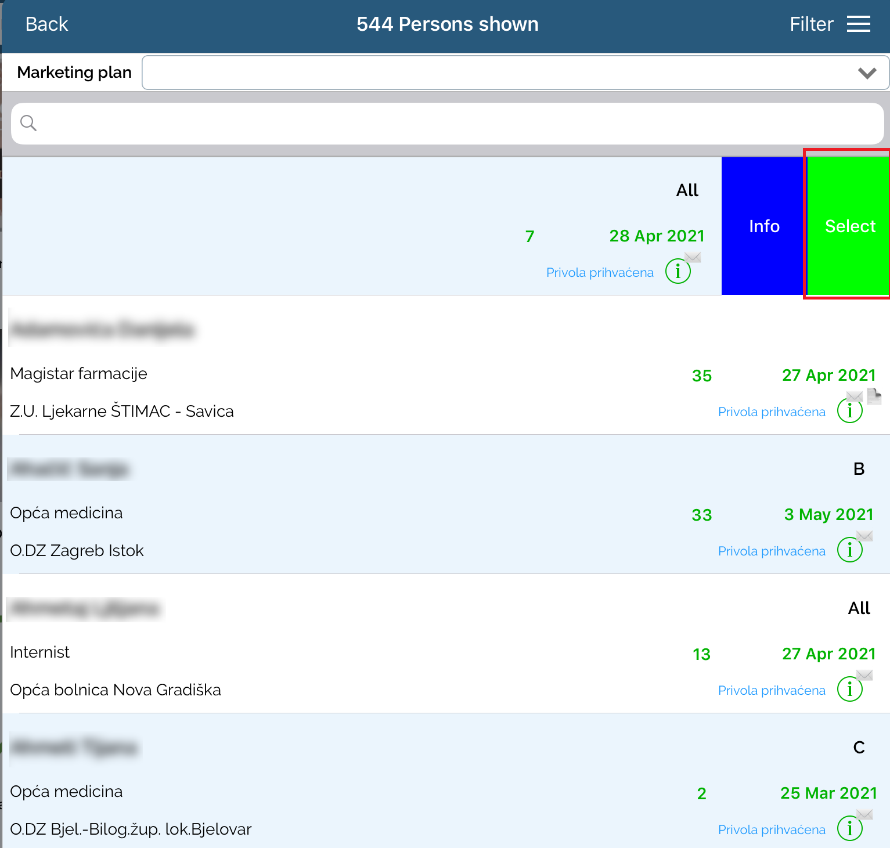
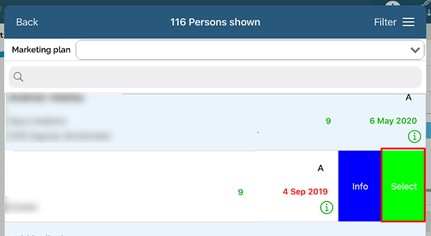
Select a person you wish to start remote call.
You will be asked to send an invitation with access link.

Choose type of invitation you want to send: using email, SMS or Viber application.
After sending an invitation to doctor, remote call can start in real time.
Once again, select the person you want to show your CLM presentation. Click Add button and select person from the list.
Use blue icon with plus sign in the lower part of the window to open Zoom application to start your meeting.
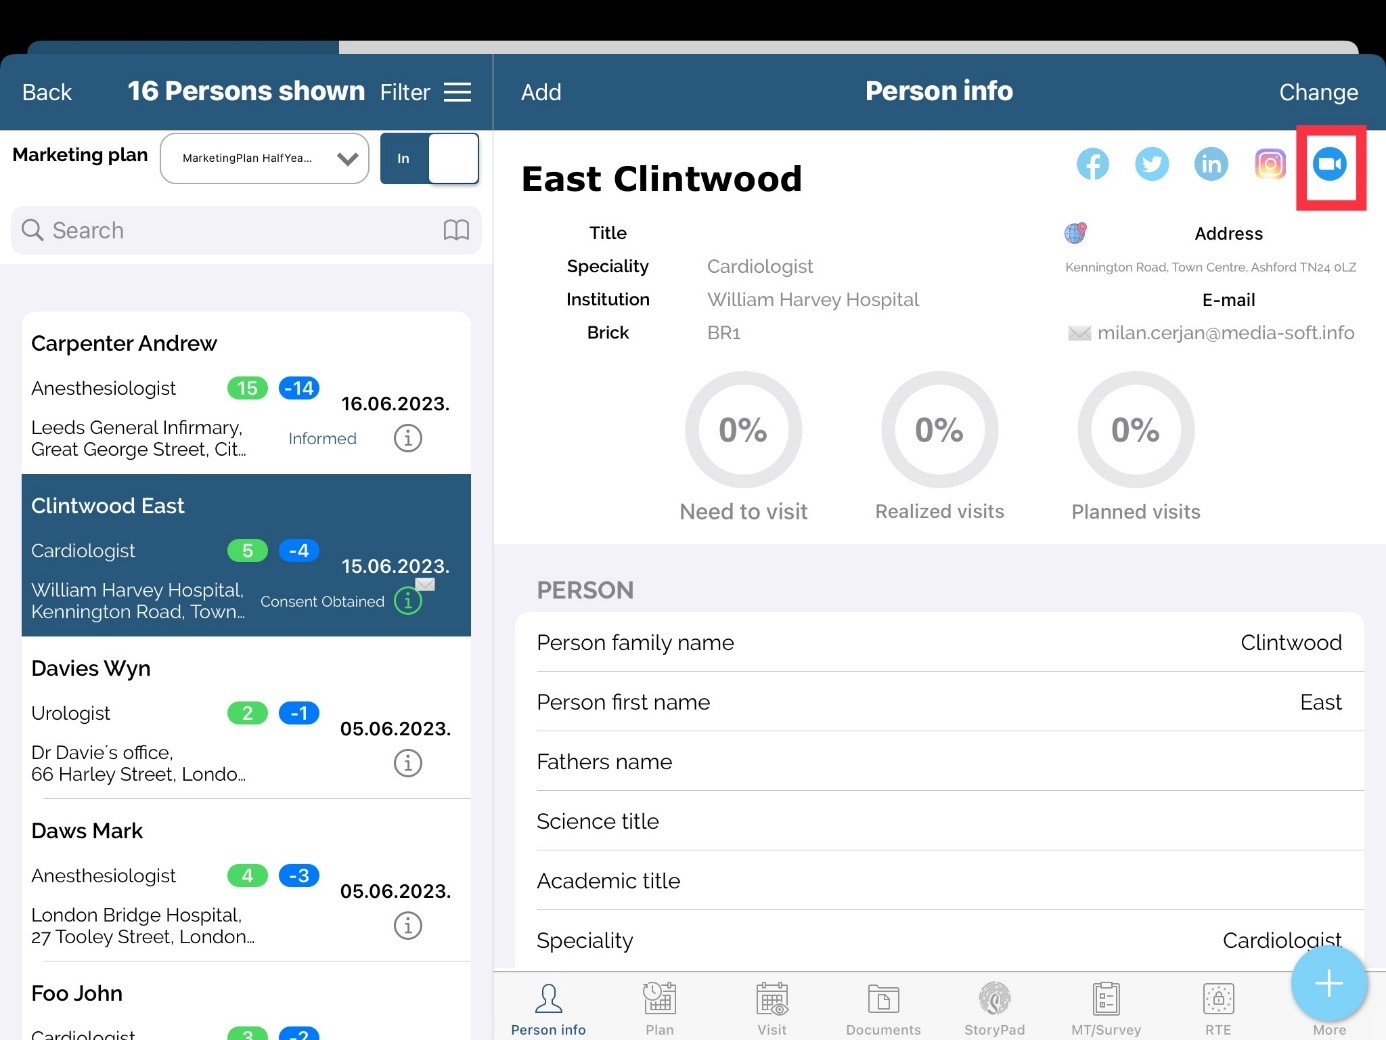
from Person module
To start a remote call from Person module, use green Remote call button/icon located in the right corner of Person info tab.
You will be asked to send an invitation with access link. After sending an invitiation to doctor, remote call can start in real time by using StoryPad tab, Show for person button. Again, you can send a new invitation by using Remote call button, if needed.
How to work in Zoom application from SV Next?
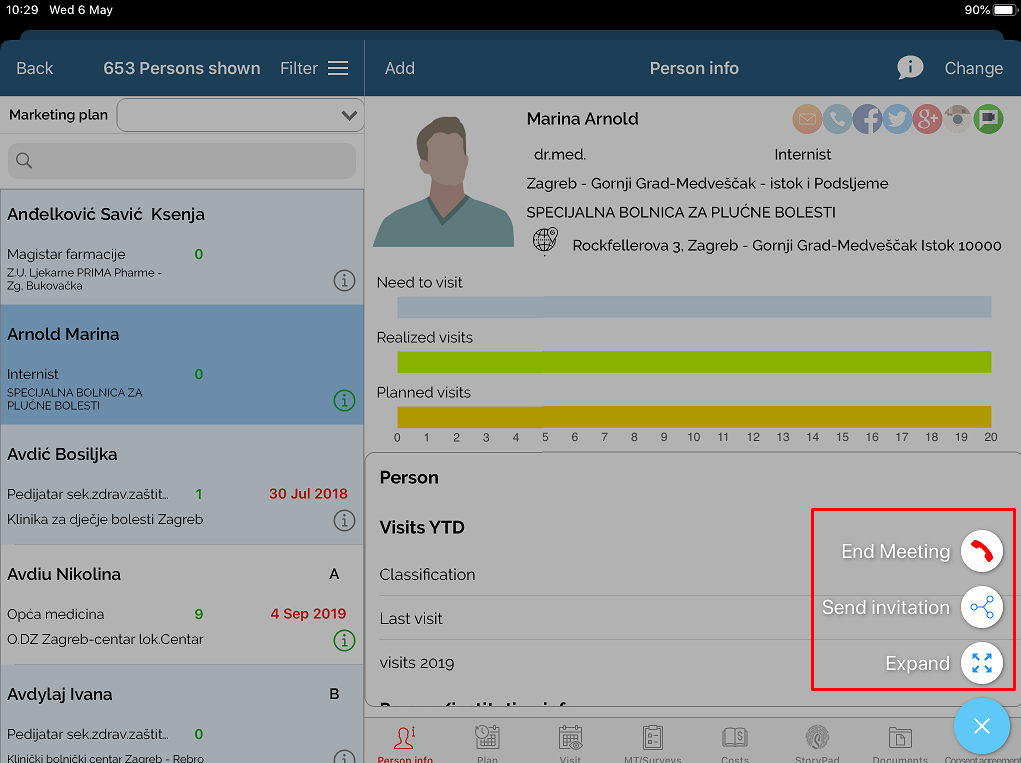
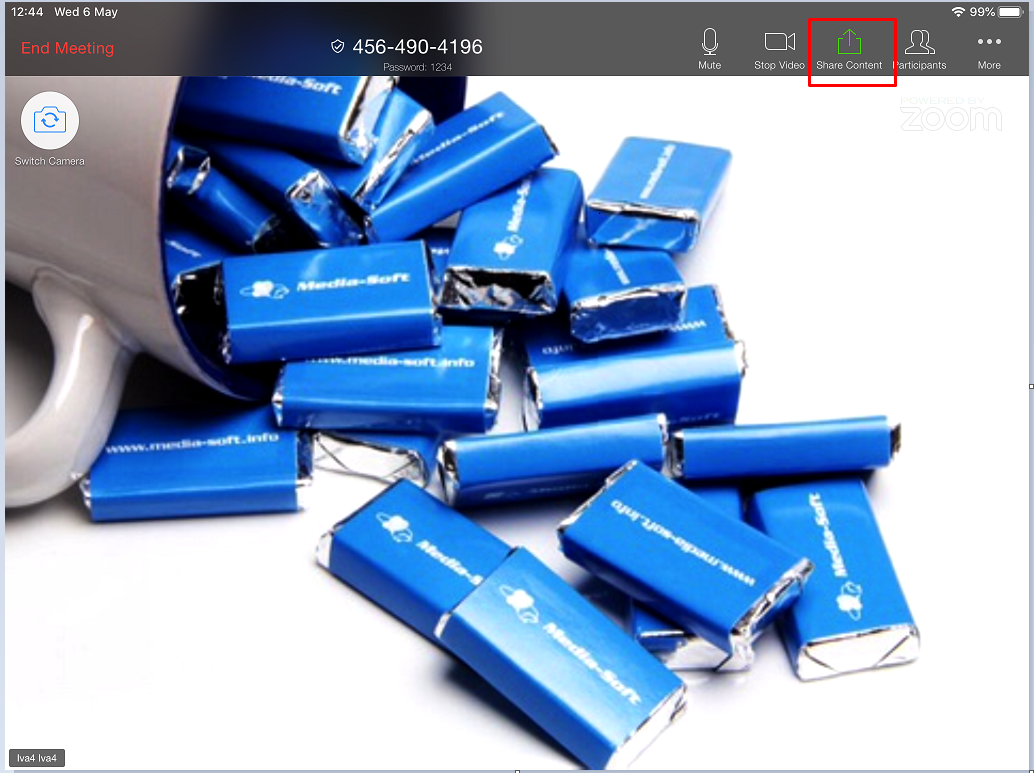
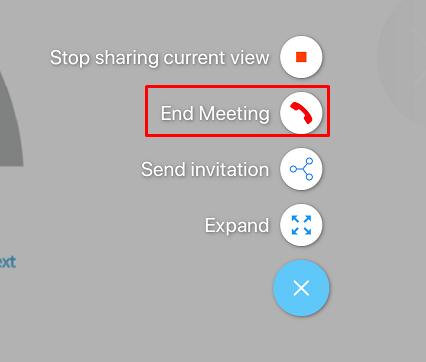
After your meeting has started, you will notice a blue icon with with plus sign in the lower part of the window. Click on it and the menus will appear:
End meeting: button used to finish your meeting
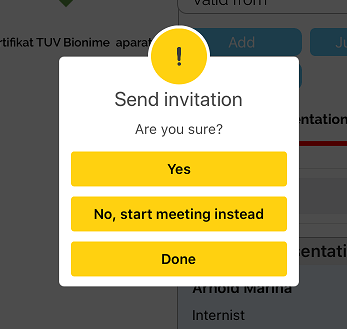
Send invitation: sending an invitation once again (in case if doctor has not received one)
Show meeting / Expand: button used to access Zoom application.
If this button is disturbing your presentation, you can move it across the screen at any time by using drag&drop functionality.
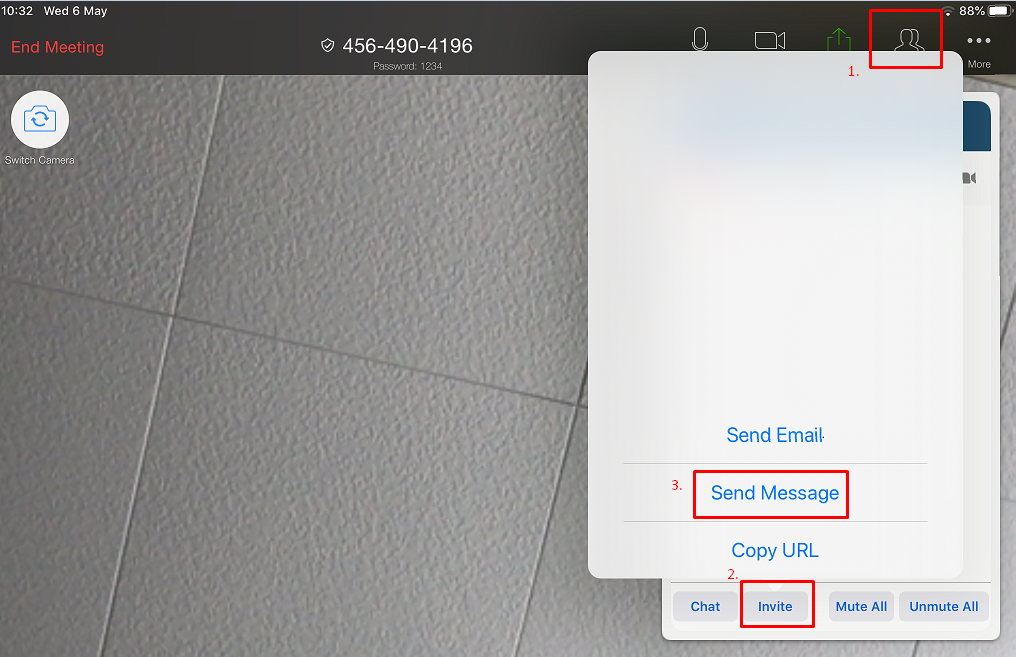
Using Show meeting button, Zoom application will be opened. After participant has joined your meeting, use Admit button to let him/her join your meeting.
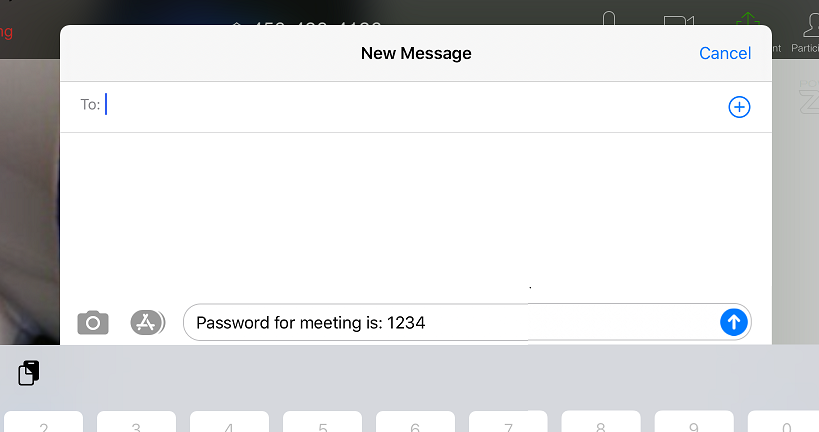
Hint: If settings of your Zoom account have set that participant requires a password to access this meeting, use Sending messages button to generate message for a participant with password for selected meeting.
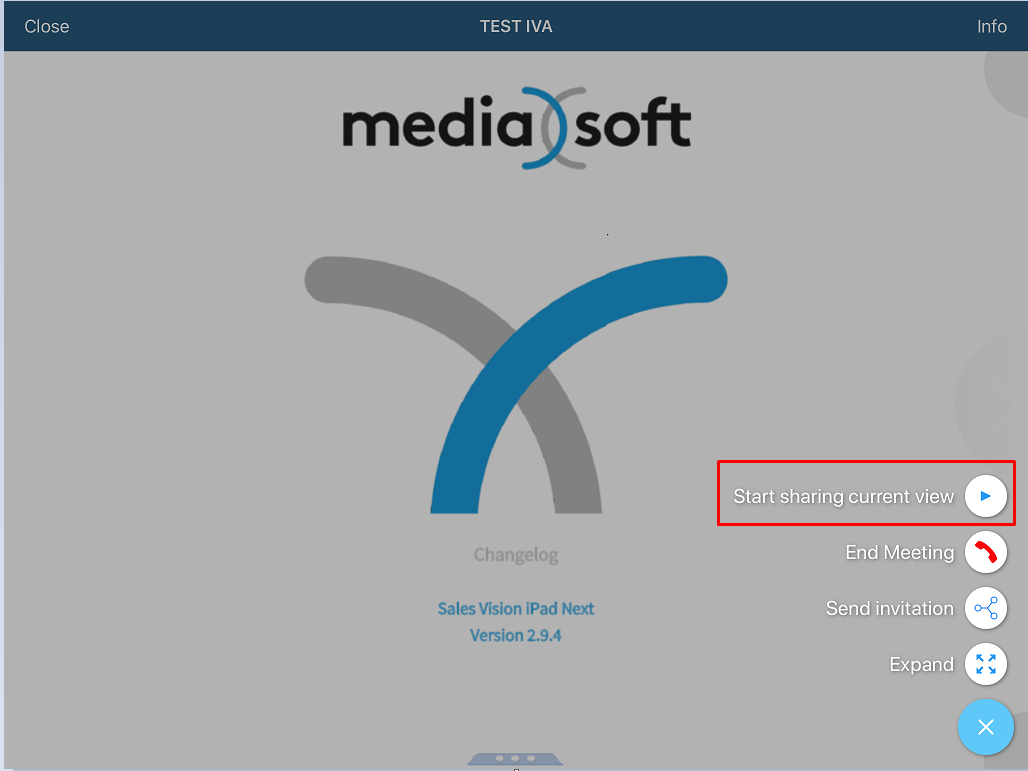
To share your screen form SV iPad Next aplication, use Share screen functionality first from Zoom.
And after that, using Start sharing current view. Screen sharing from Sales Vision has been added so Sales Representative is sure that he/she is prepared to share CLM presentation. If saving visits in SV require entry of fields that are mandatory before saving the visit, you will be asked to add them before CLM presentation has started.
Screen sharing from Next is enabled only when you are located on StoryPad module, only CLM presentation can be screenshared!
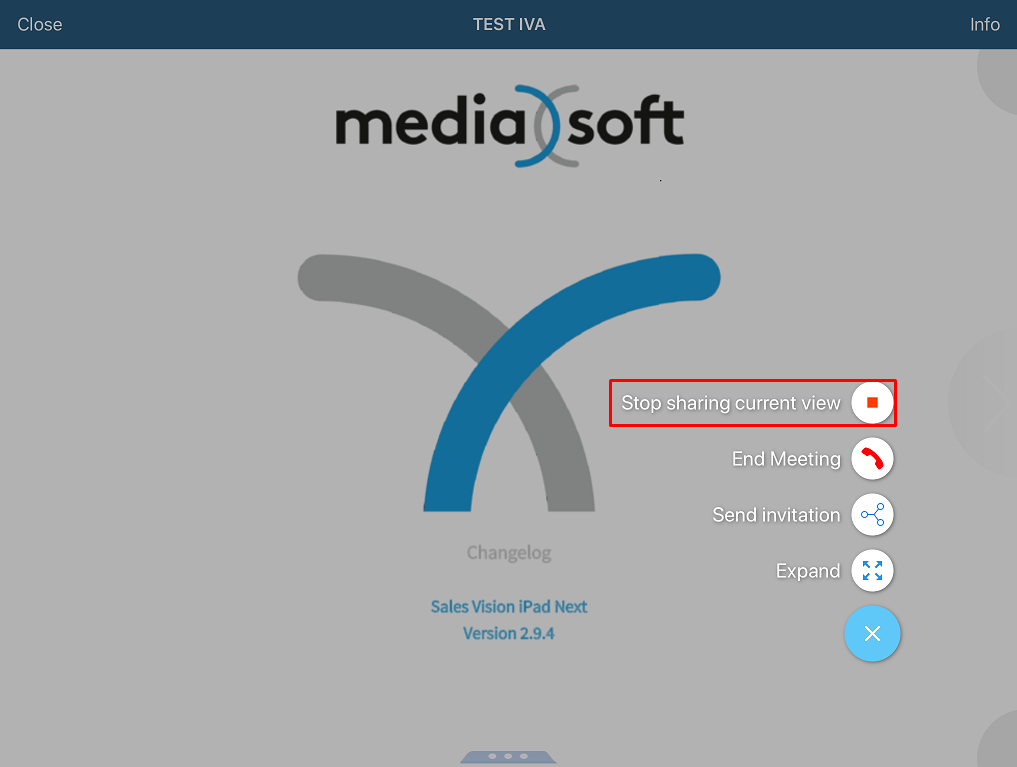
To stop sharing your screen use Stop sharing current view button.
After you are finished with remote call, use End meeting button (either from Next or from Zoom).
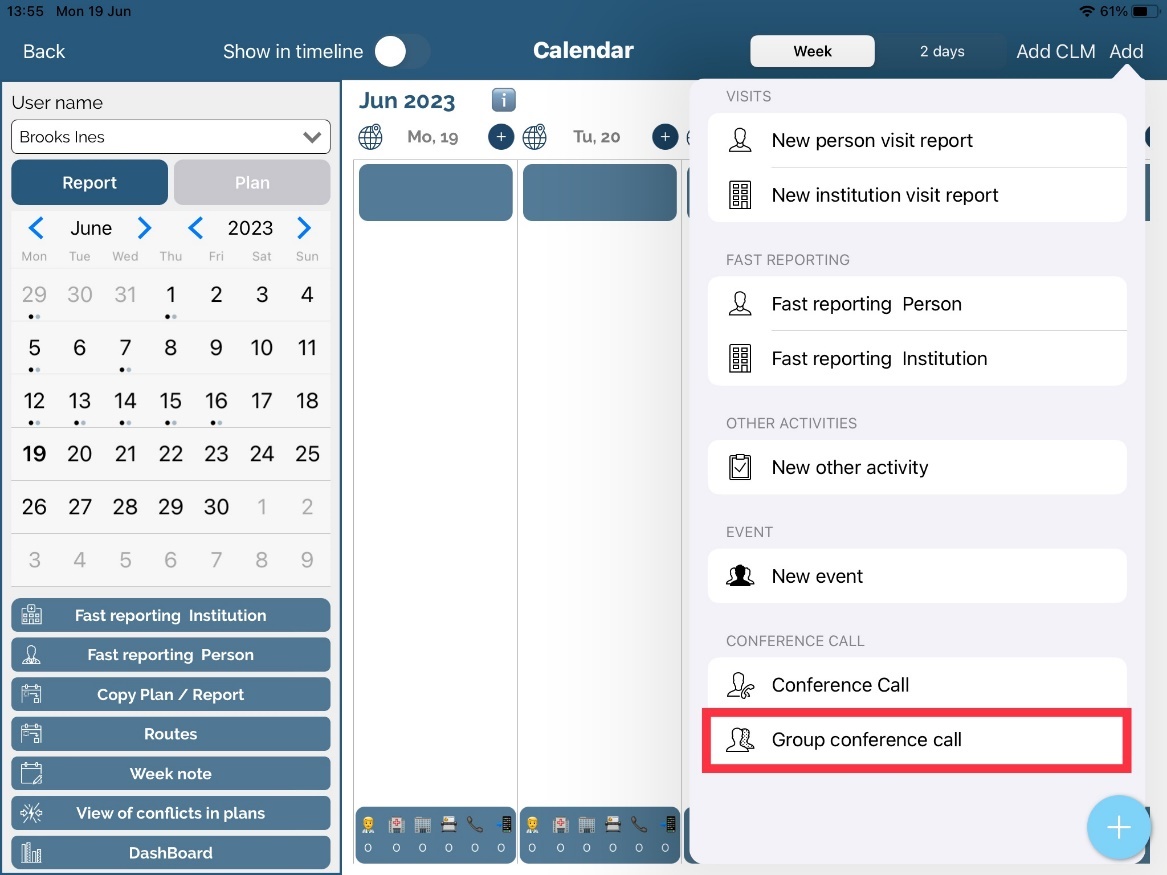
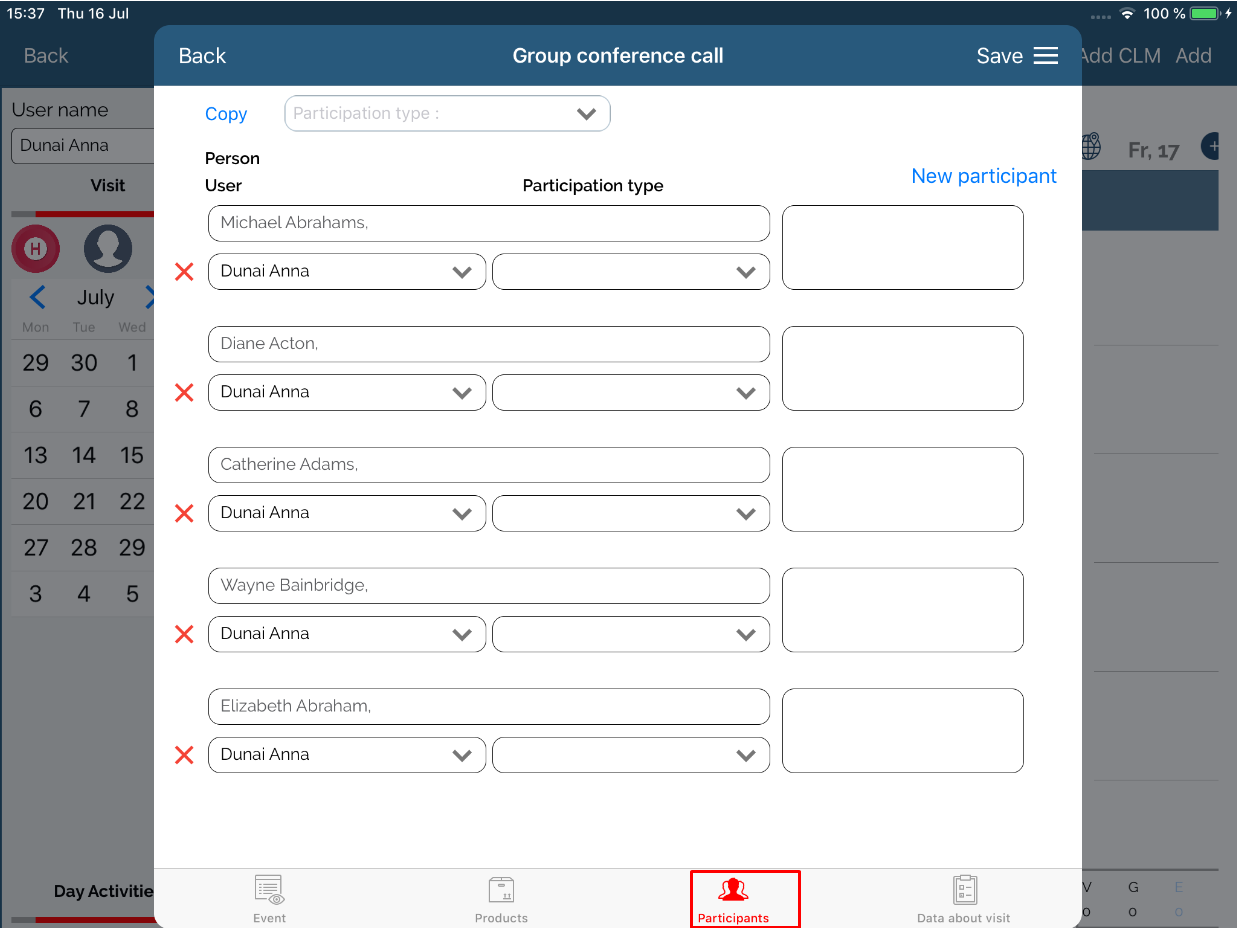
Group Remote Call
To start Group conference call please select:
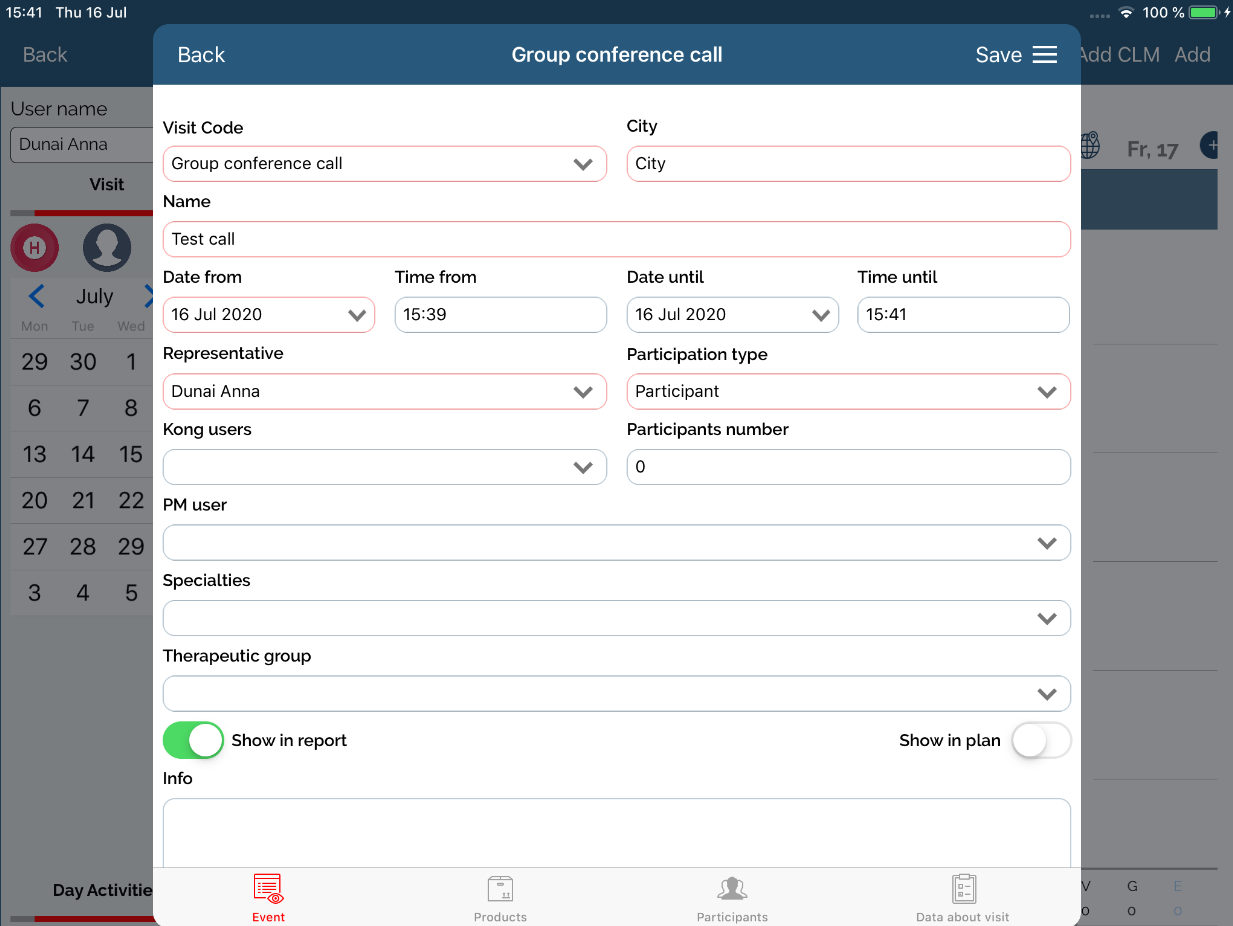
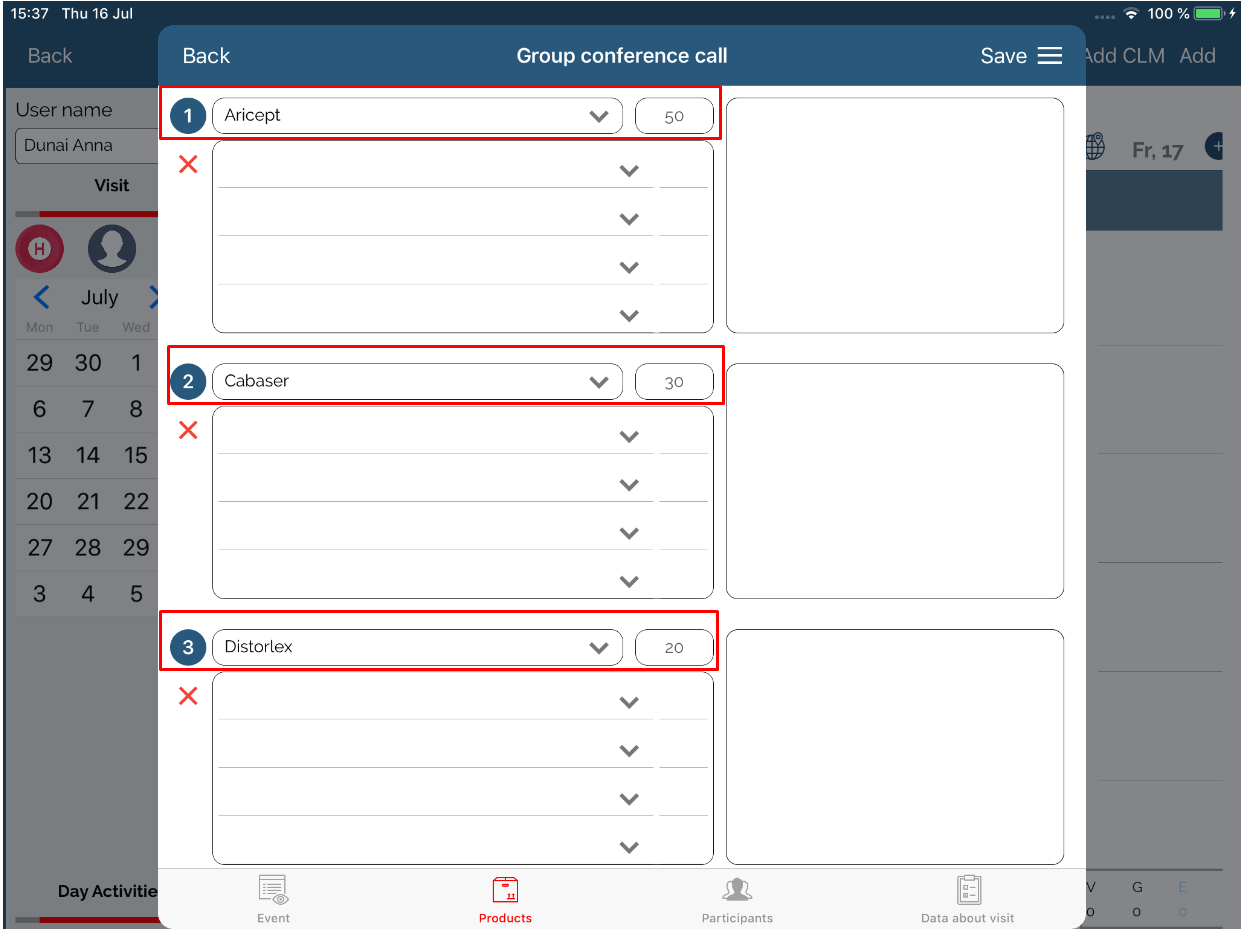
It is possible to add products which were promoted during the conference call
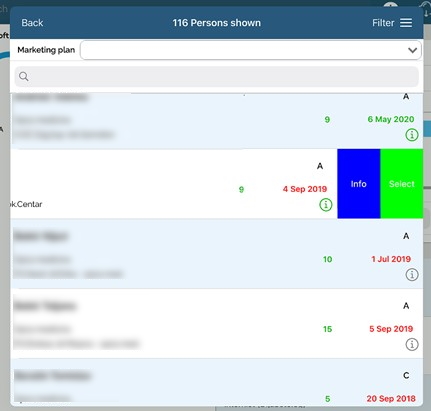
You can select more participants (see the following figure):
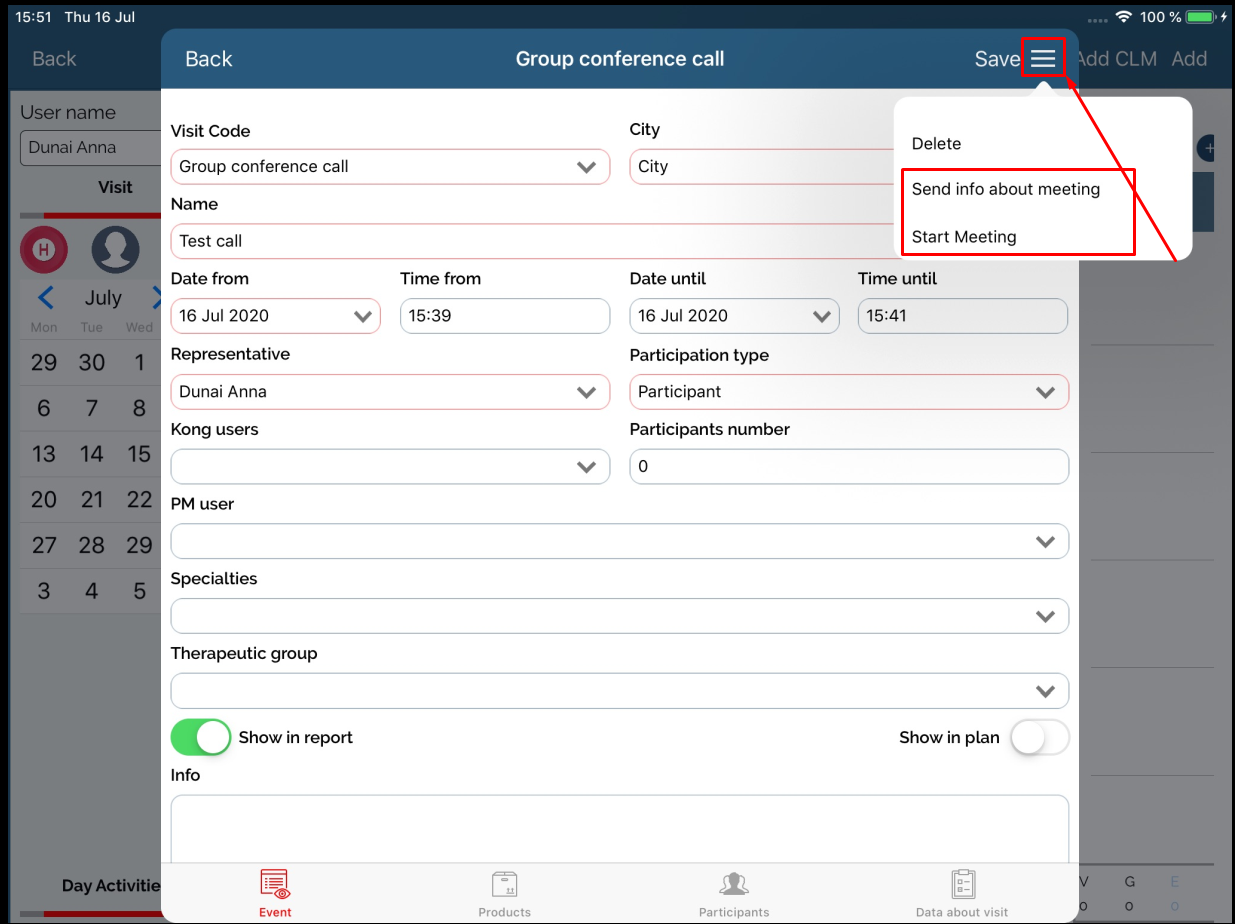
To start meeting or send info about meeting click o n following menu:
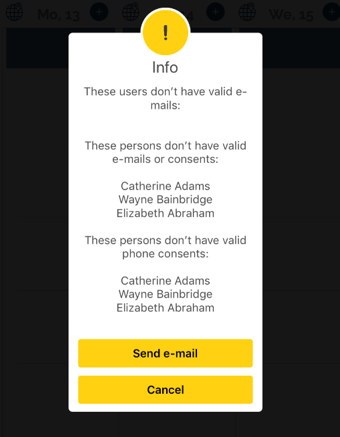
When sending invitation for meeting info about missing e-mails or consents is shown. It is possible to send this info email as reminder.
Last tab enables preview of presented Storyboard presentations
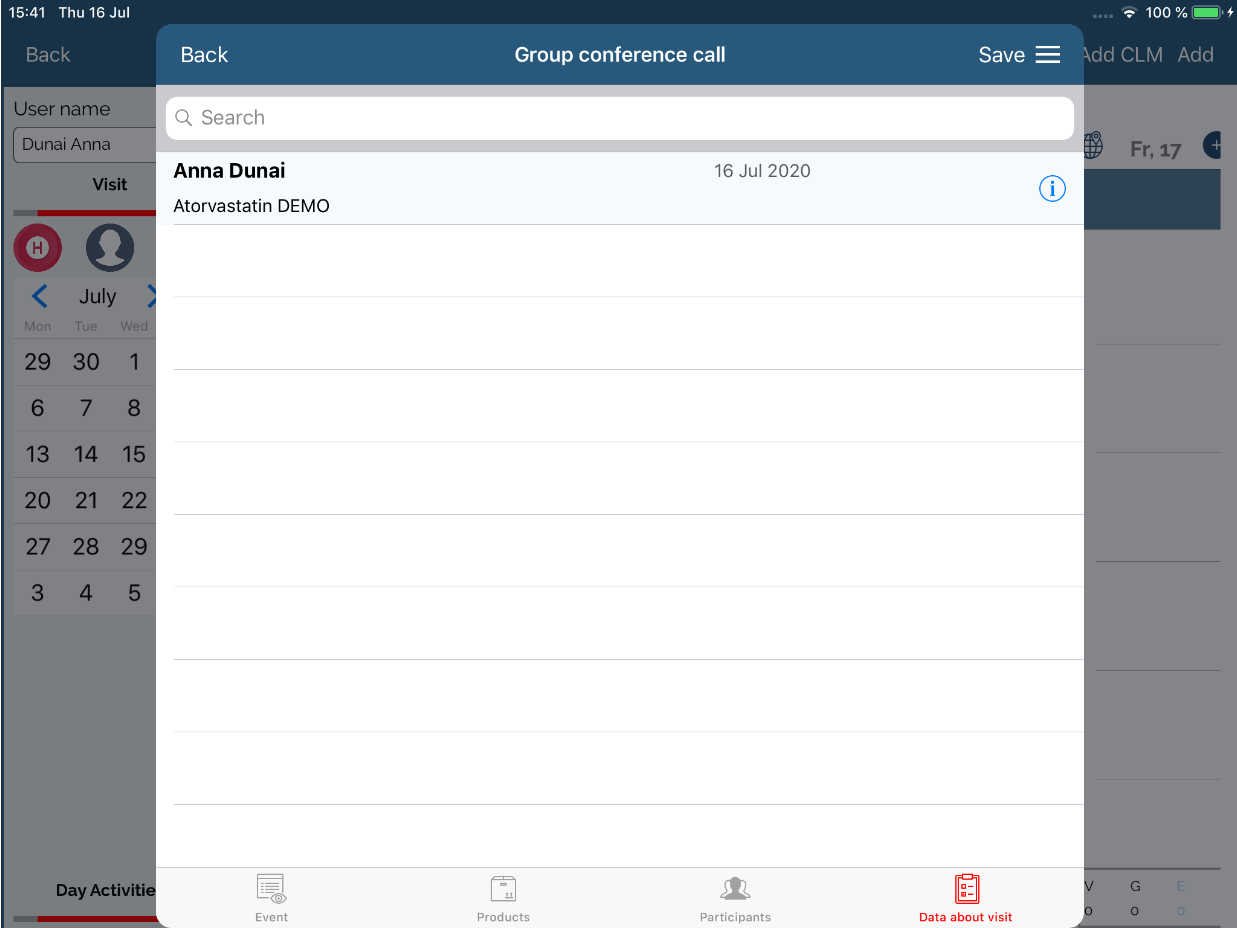
Preview in Calendar:
MICROSOFT TEAMS
How to create a new remote call on SV Next?
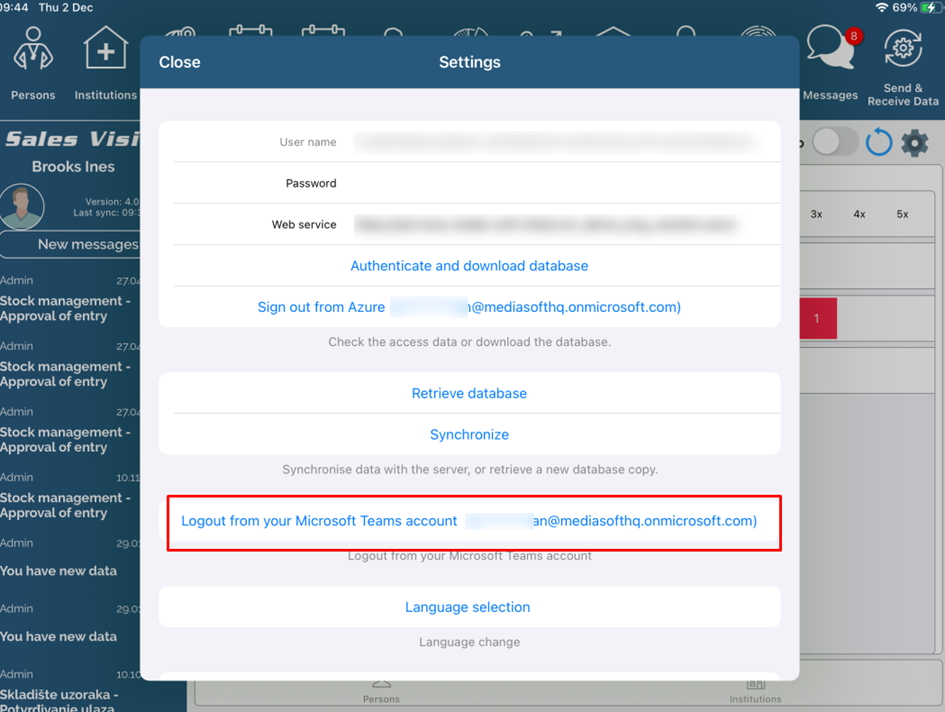
To use a remote call functionality, user needs to create an account for Teams aplication. Login name and password need to be saved in Settings menu on SV Next. Settings menu can be found on home screen, menu list, „Receive and send data“ – „Login to Microsoft Teams account“.
Important to note is that you have be logged in to Teams application on your iPad device.
Without login to Teams account, you will not be able to start a remote call. As for other participant in meeting (doctor), Teams account is not needed.
You can logout from your account at any time using Logout button in Settings menu.
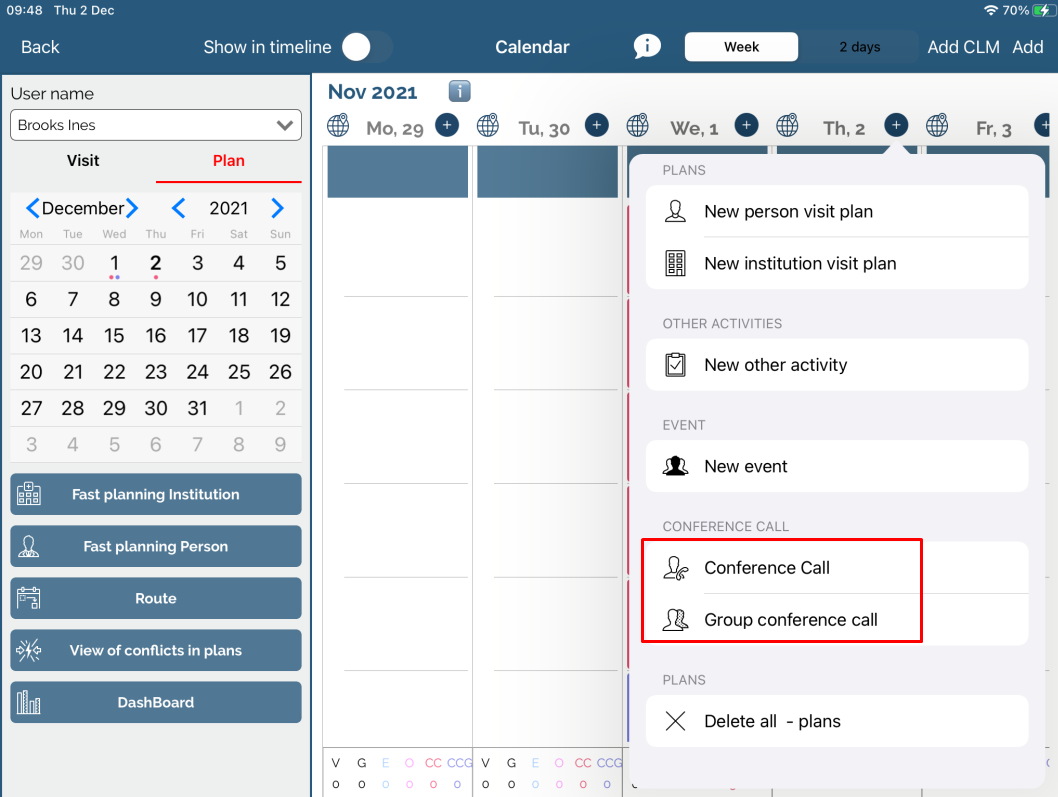
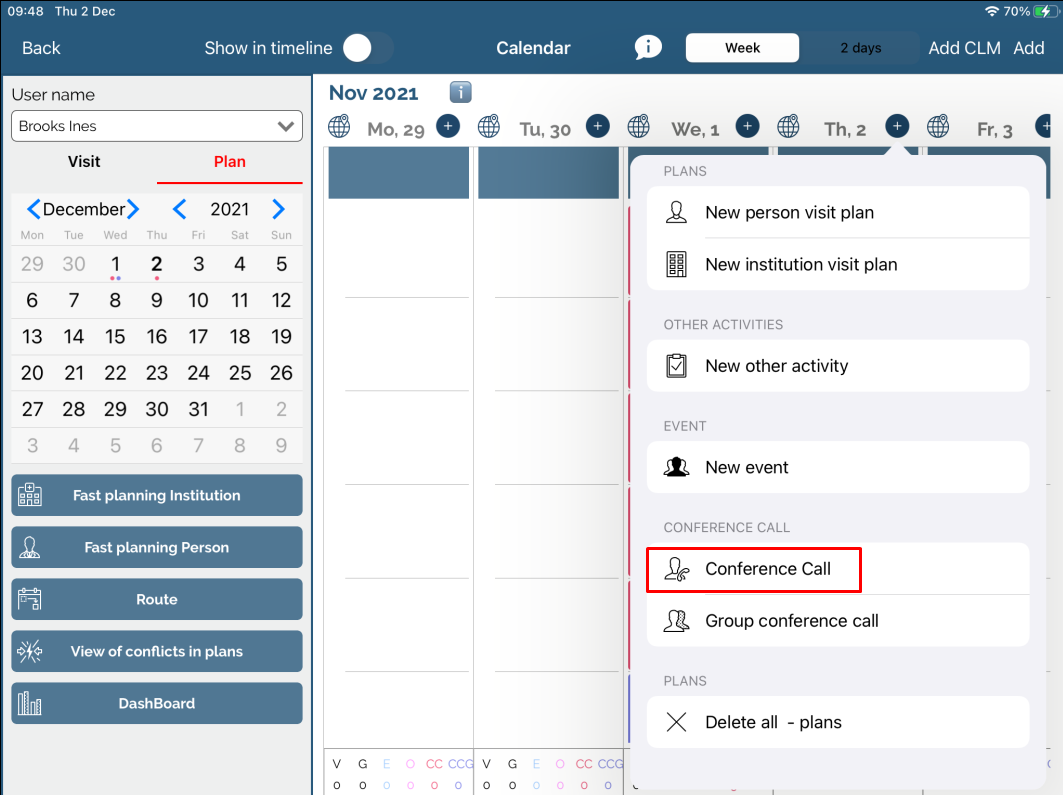
How to schedule and start remote call / groupe remote call?
There are several ways to use Remote call functionality on SV iPad Next. Each of them will be described below:
A) -> from Calendar module.
In calendar module there are two ways to start remote call from Calendar: from plan and from report. Process is similar: to start remote call use „+“ or Add button the get the list of wanted action.
From plan:
From report:
Difference between conference call plan and conference call report is that when creating new remote call plan, user is sending an invitation to a doctor with info on date and time of scheduled remote call, without sending a link to join a remote call. When creating a remote call from Visit tab, user is sending an invitation to a doctor in real time, with information on access link to remote call.
Visit code for plan and report from remote call is codelist defined in system options for remote call.
Add a new plan for remote call and save your entry.
After saving your plan, new window for sending email invitation will be opened. Email field TO is automatically populated from person data. Use Send button to send an email to doctor, a reminder for schedule meeting with information on time and date of meeting.
On the day of your meeting open your plan and use Present button.
Select Remote call button on CLM presentation you want to present and you will be asked to send an invitation to doctor with access link to your scheduled meeting.
There are several ways to send a remote call invitation to doctor: by email or using Viber application installed on your iPad device. Email used for sending emails is the one from RTE module (if Consent agreement is turned on your database, if not than the email field for working address is used). Unless system option 659: „Use private e-mail and phone for remote call and Maestro“ is turned on, in such case for sending emails - private email address is used.
After you have selected the type of invitation you want to send, a new window will be opened where you have to manually send an invitation, for an example by using Email module. Simply click on Send button to send an invitation.
After sending an invitation to doctor, remote call can start in real time.
If Consent agreement module is turned on on your database, you will not be able to send an invitation without a valid (status obtained) email and phone consent for selected person.
B) ->from StoryPad module* option on demand, depends if it is turned on in your licence
To start a remote call from StoryPad module, use Remote call button as shown on the picture below.
Select a person you wish to start remote call.
You will be asked to send an invitation with access link.
To start a remote call from Person module, use green Remote call button/icon located in the right corner of Person info tab.
Choose type of invitation you want to send: using email or Viber application.
After sending an invitation to doctor, remote call can start in real time.
Once again, select the person you want to show your CLM presentation. Click Add button and select person from the list.
Use blue icon with plus sign in the lower part of the window to open Teams application to start your meeting.
->from Person module
To start a remote call from Person module, use green Remote call button/icon located in the right corner of Person info tab.
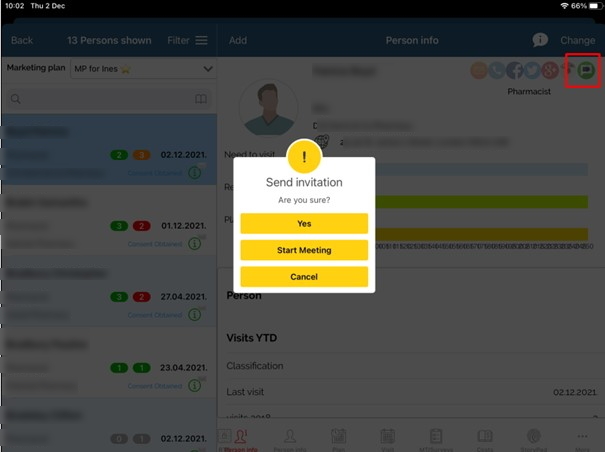
You will be asked to send an invitation with access link. After sending an invitiation to doctor, remote call can start in real time by using StoryPad tab, Show for person button. Again, you can send a new invitation by using Remote call button, if needed.
