Persons
Person module gives you the overview of all the persons in your database. To enter it, press on the Persons icon on the main menu. Here you can add or change persons and informations about them.
You can see the list of persons in your database.
a. Search filter
To narrow down your search, you can use two options. The quickest one is to use a Search toolbar on top left part of screen to search by parameters that can be customized by the user. Search will automatically show all persons that contains entered letters no matter where they appears in name.
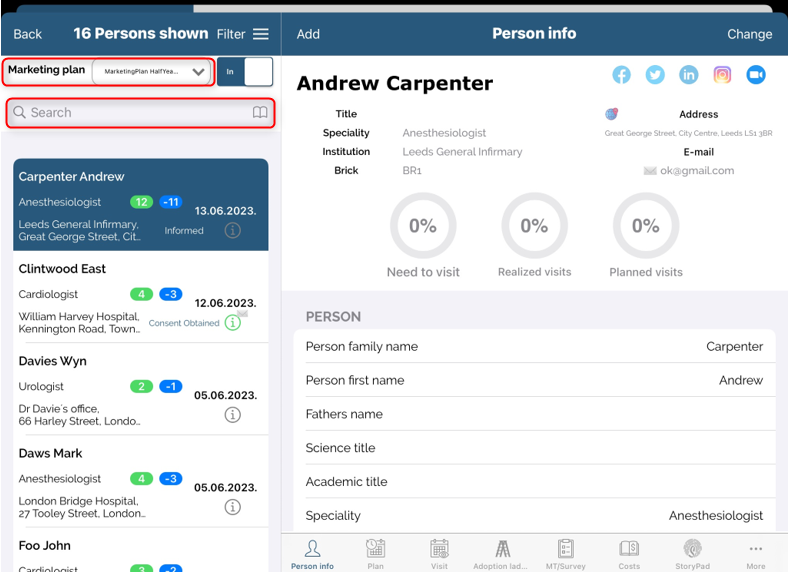
When using quick search filter, you can also user filter on Marketing plan. By clicking on Marketing plan filter, list of all persons in marketing plan for logged user will be shown.
Users can define if they want to see person In/Out of Marketing plan by selection, too.
Quick search criteries
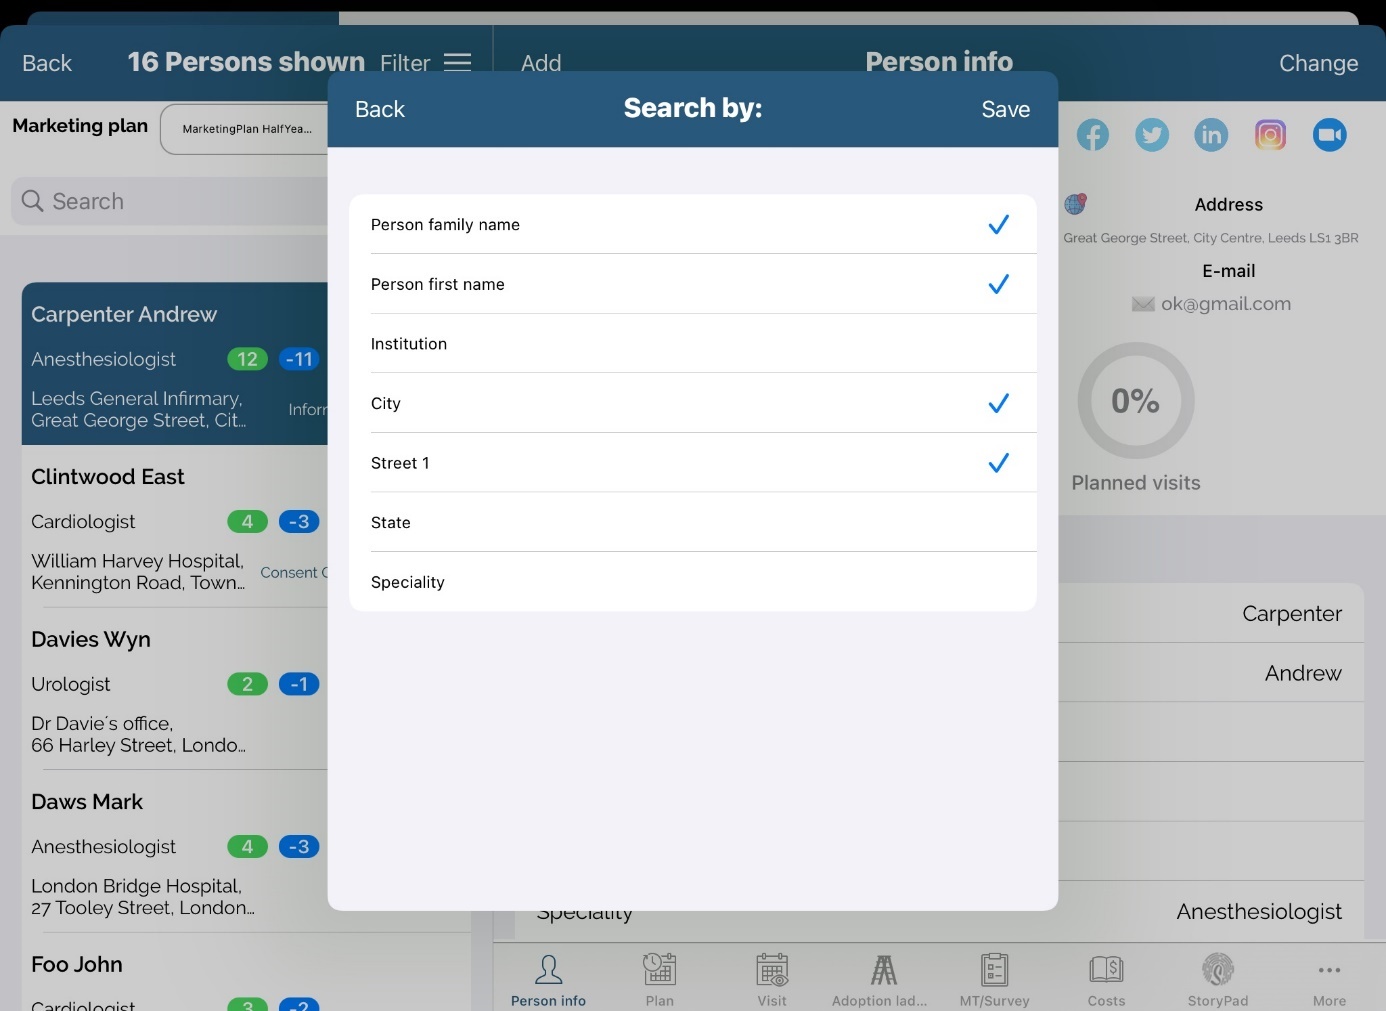
There is an option in quick search in modules “Persons” and “Institutions” to select criterias by which search will be made. Every user can modify by which criterias he wants to make search. How he select criterias, filters are set to default.
For more complex search, you can use Filter. Press on the Filter button on top left part of screen and window like the one on picture below will appear.
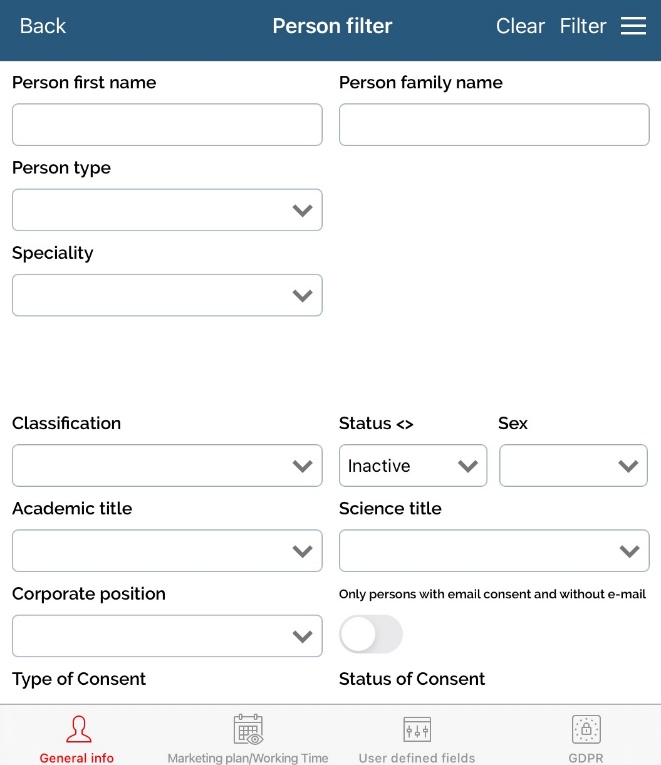
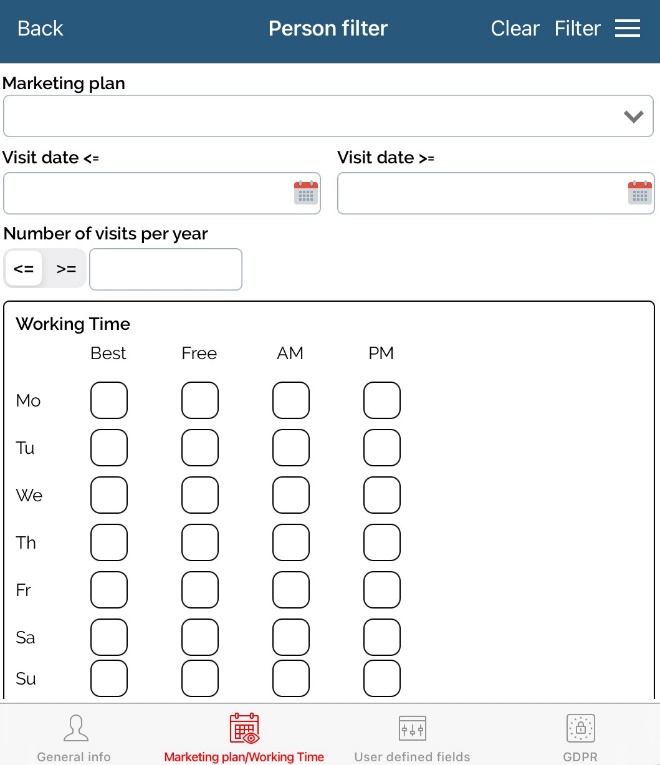
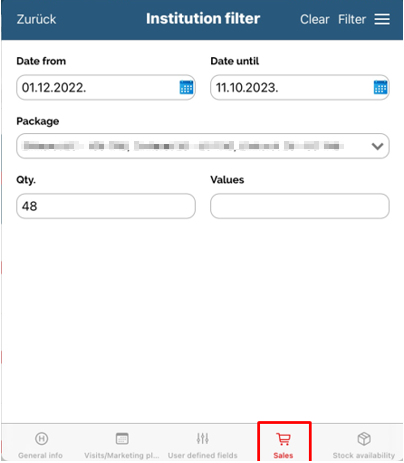
Filter helps you search person's list by the different criteria. When filtering we can save entered filter for future use by clicking on „≡“ button and choosing Save. Also, we can choose existing filters and delete them.
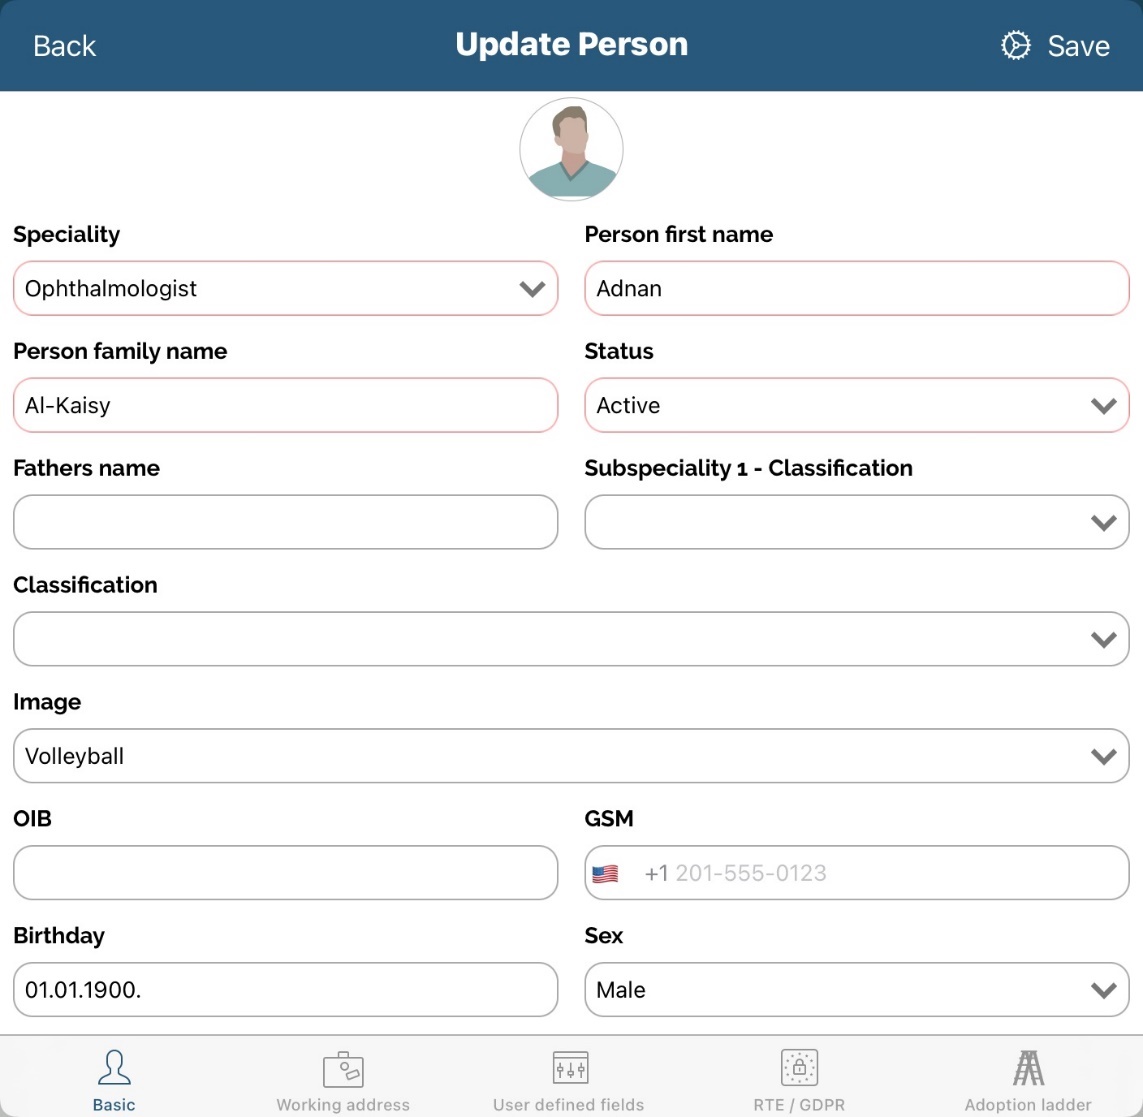
b. Adding a new person
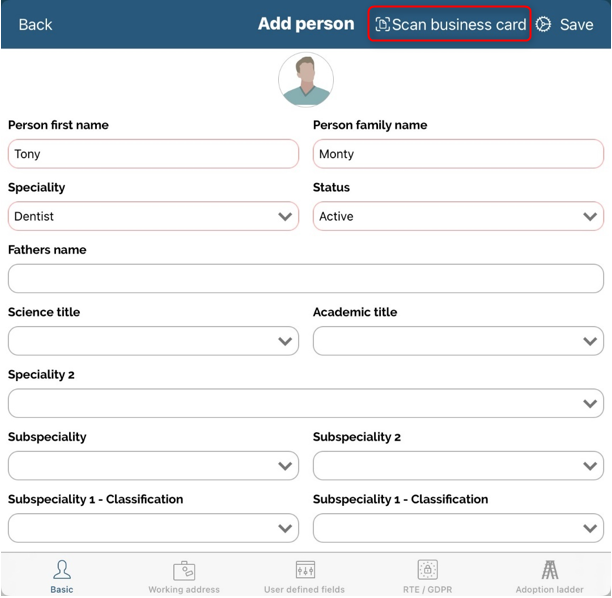
Press button Add in the person's module to add new person. New window will appear.
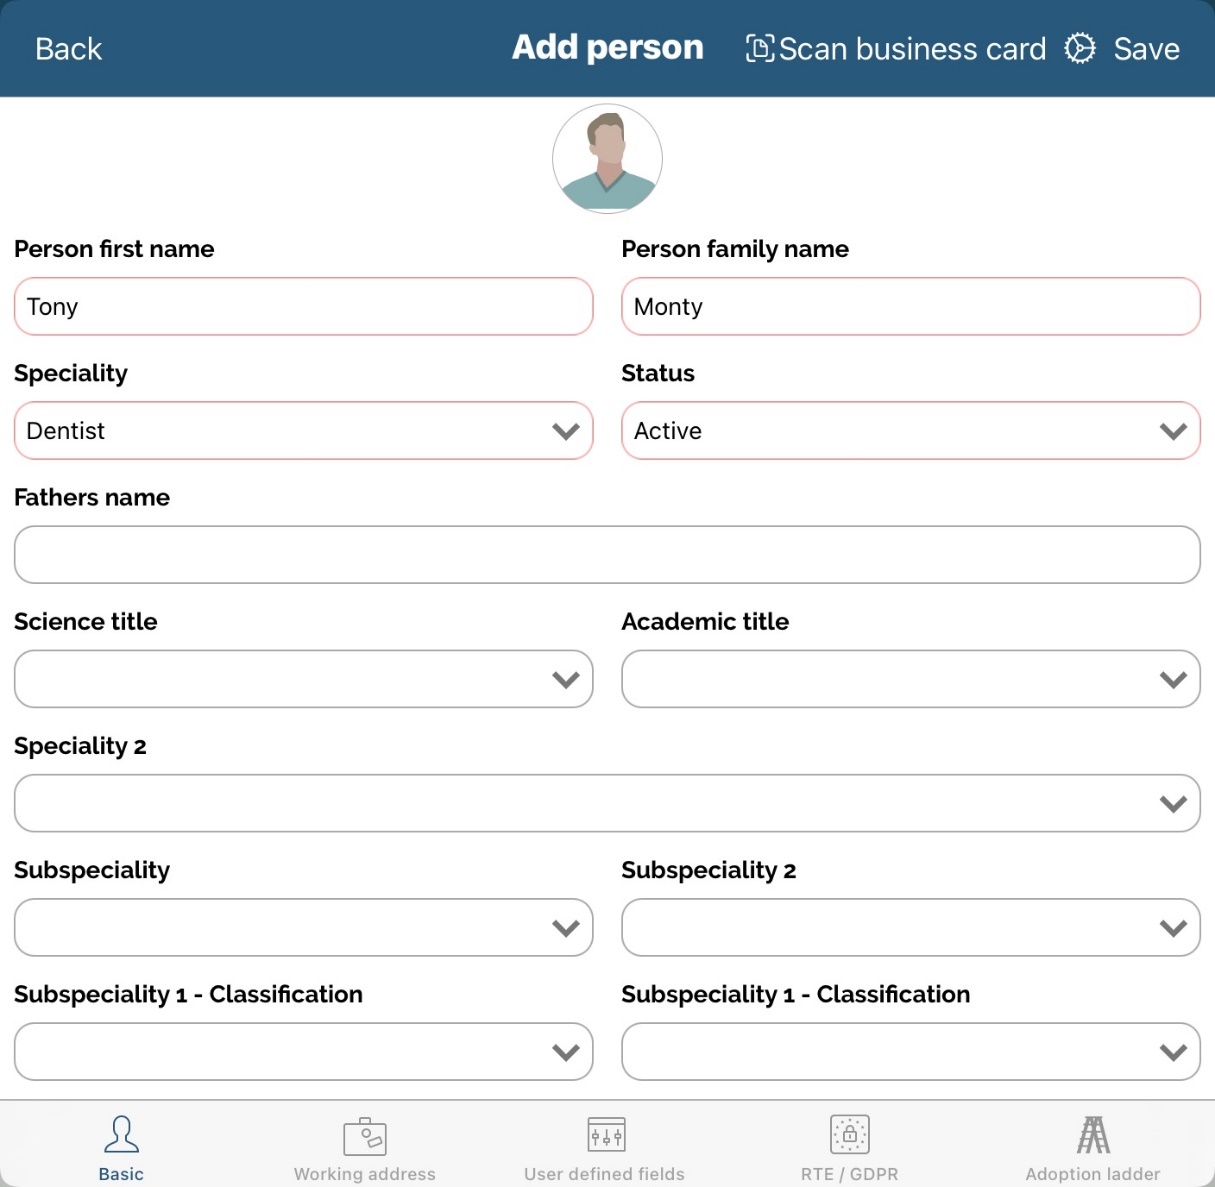
On the bottom of screen there are three basic options/tabs – Person, Person/Institution and Custom fields. Custom fields will be explained later on.
By pressing each button, new screen will open where you can enter data about a person. Person screen is shown by default when adding a new person.
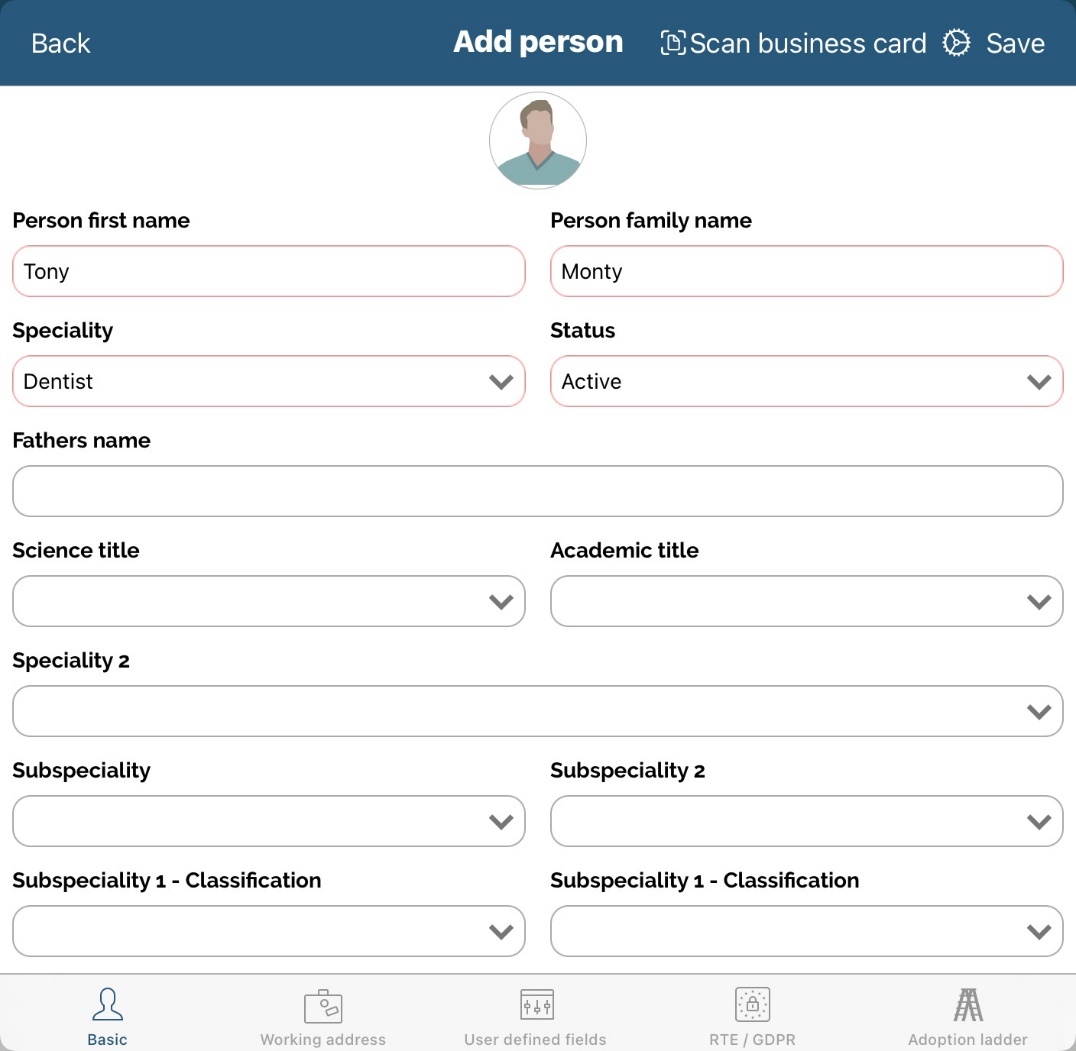
Scan business card
Clicking on button Scan business card, you can scan either visit card with camera or scan from the camera roll for it to be filled out in the person form.
Person view
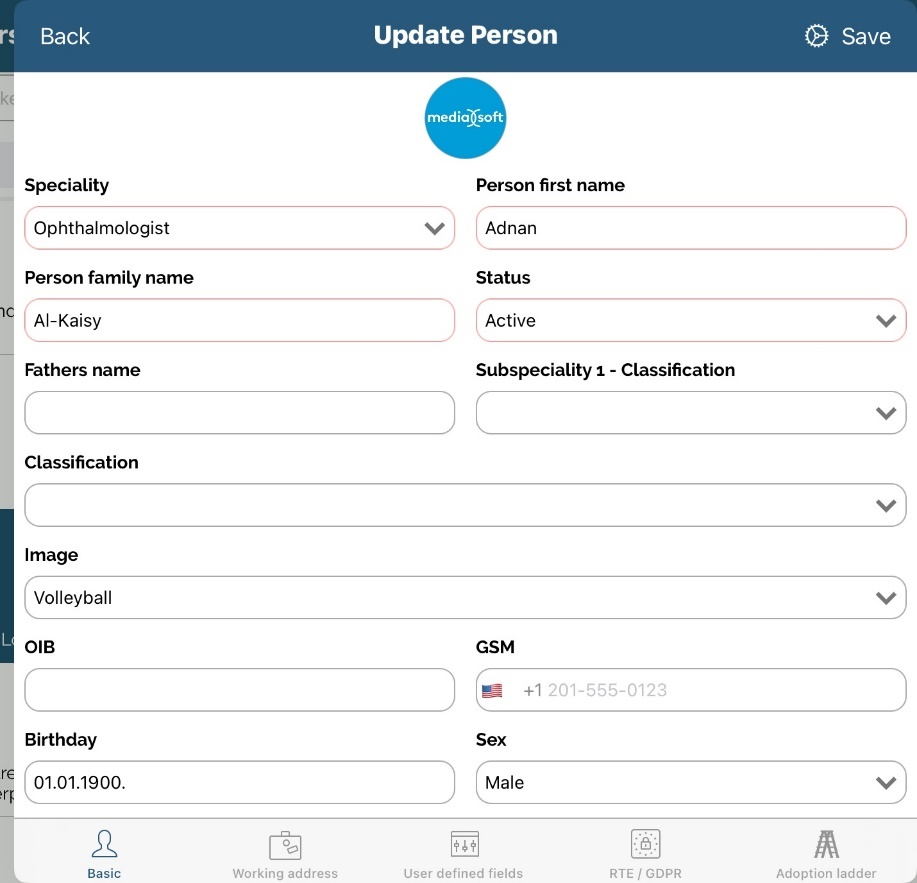
On Person view you can enter basic data about a person, like person name, speciality, birth date and so on by using your keyboard or choosing an option from drop-down list.
Fields Person family name, Status and Speciality in Person view are mandatory. If you do not enter data for one of those fields and press Save button you will get a warning message. Other data you want to enter is optional.
When selecting city, it is possible to see all cities that are in database no matter if you have joined territory for that city or not. This can be done by enabling Show all option.
c. Working address view
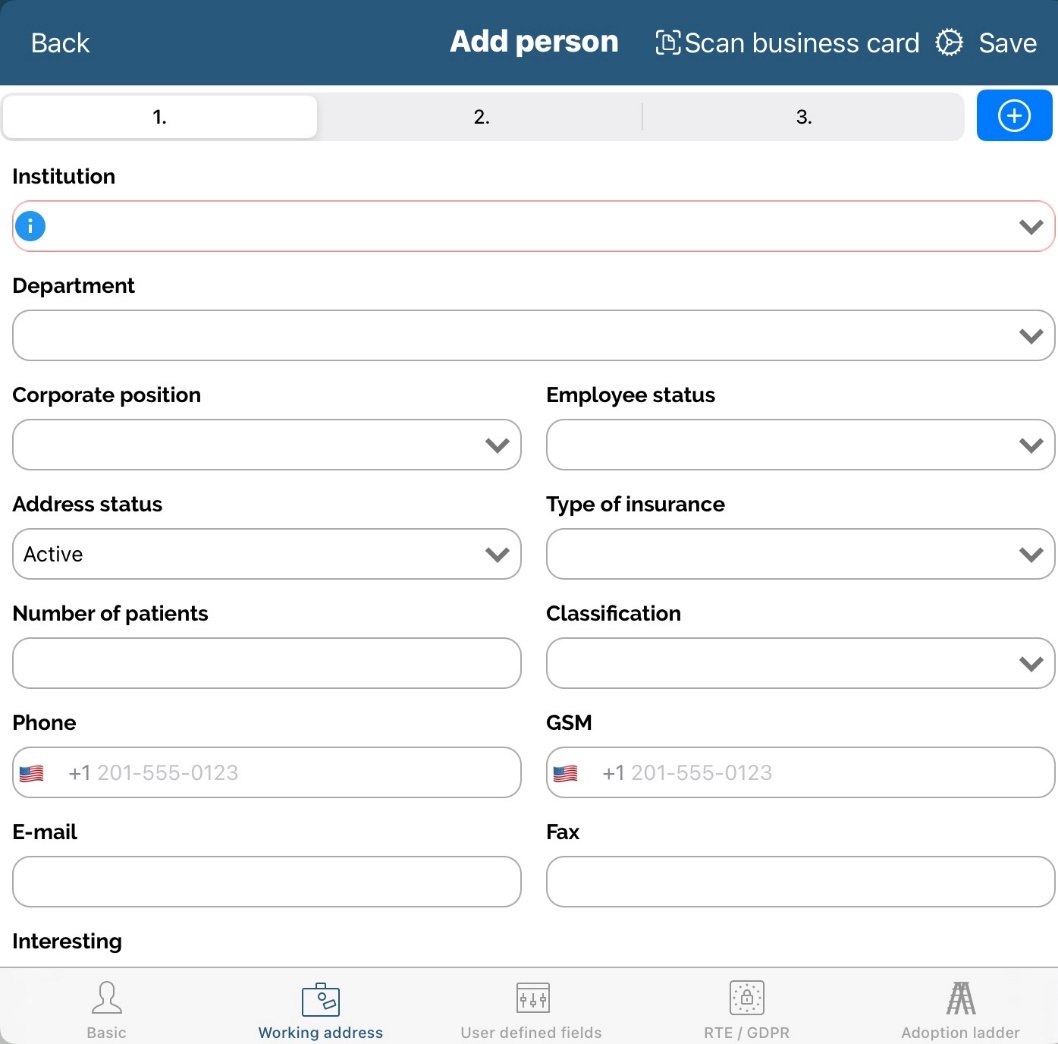
Besides the basic information, the second tab is the Person/Institution. There is also mandatory information that must be entered for each person. This data is closely linked with the information about the institutions. Pressing on Person/Institution icon following screen will be shown.
Here you can enter data for person's working address, like Institution where person is working, address status, city, phone and so on. You can add up to three working addresses at one time for that person by clicking button named by numbers (1, 2, 3) at top of screen.
Also, you can enter working time for chosen person in right bottom part of the window.
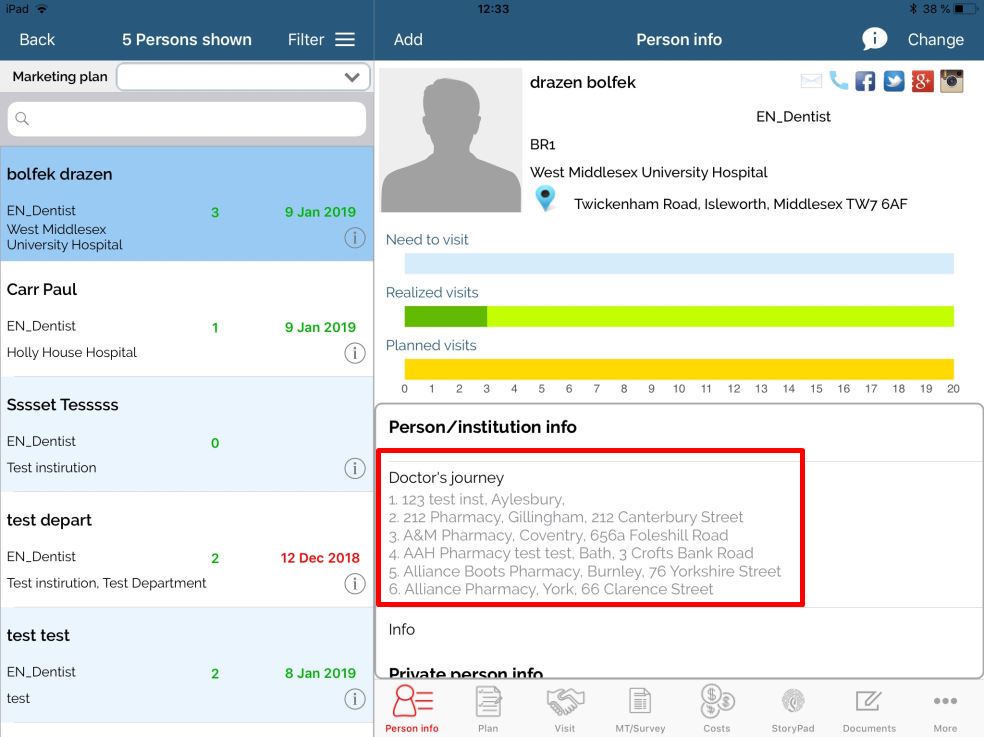
Doctor's journey
It is an option where you can define Institutions where doctor have influence. If doctor changes working address, to be precise, institution where he is working, connection in doctor’s journey will be deleted. In case you add doctor new working address, connections in doctor’s journey won’t be deleted. Furthermore, in case of new connections between doctor and institutions, Administrator will get message in module “Messages” about new connection.
This option is defined in the tab Working address, when you are editing existing person or when you are adding new person.
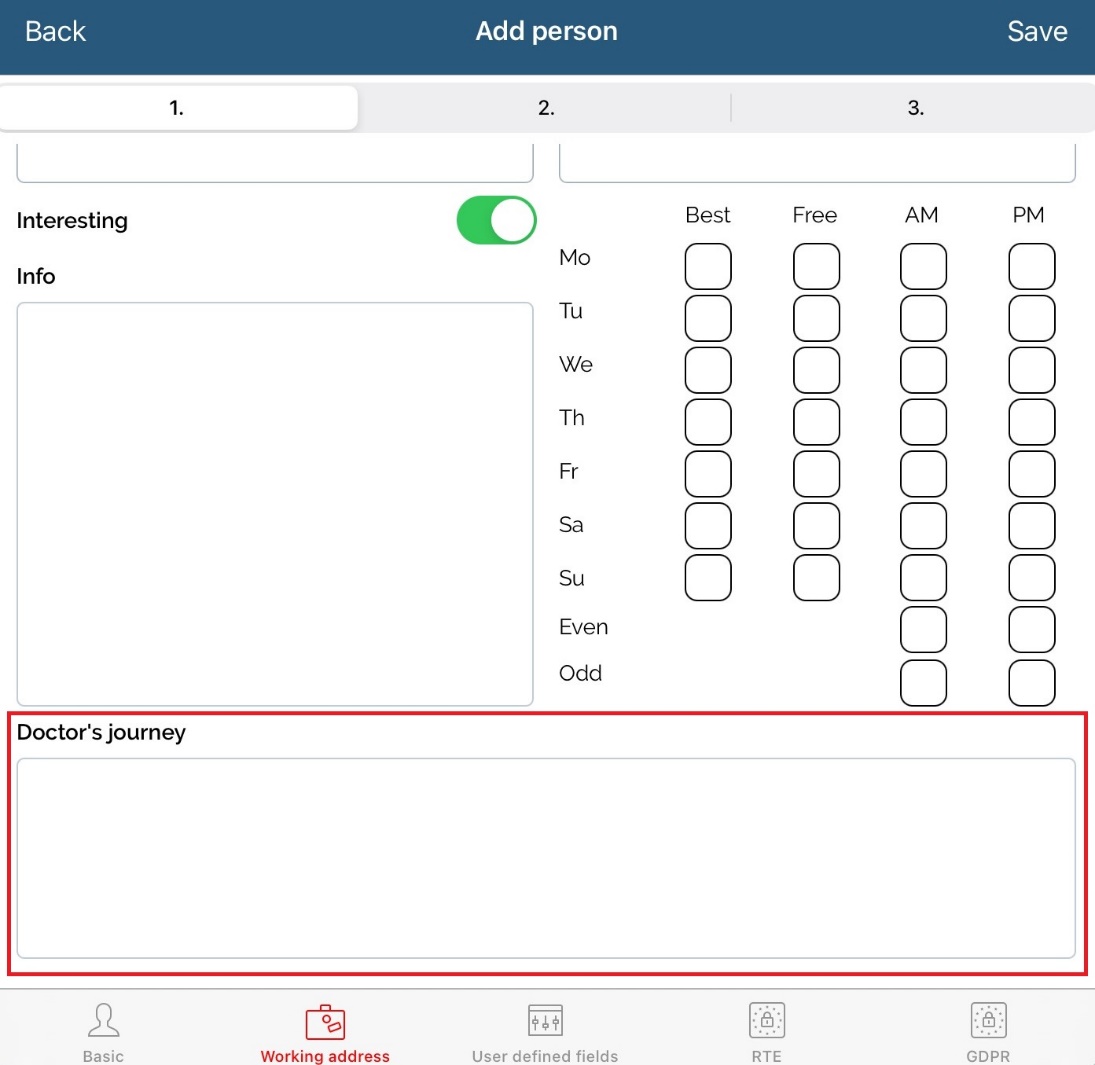
When you click on the empty field, list of all institutions will be shown. To choose which institutions you want in doctor’s journey, just tap on them and click button Save.

In the next step, you can see under tab person info information about Doctor’s journey. To be more precise you can see with which institution this person have connection.
d. Editing/changing a person
To change the data for a person, first it is necessary to select a person which you want to edit. When you find a person, simply click Change button. The same view as on adding a person will be shown. You can edit data here under tabs and press Save when finished.
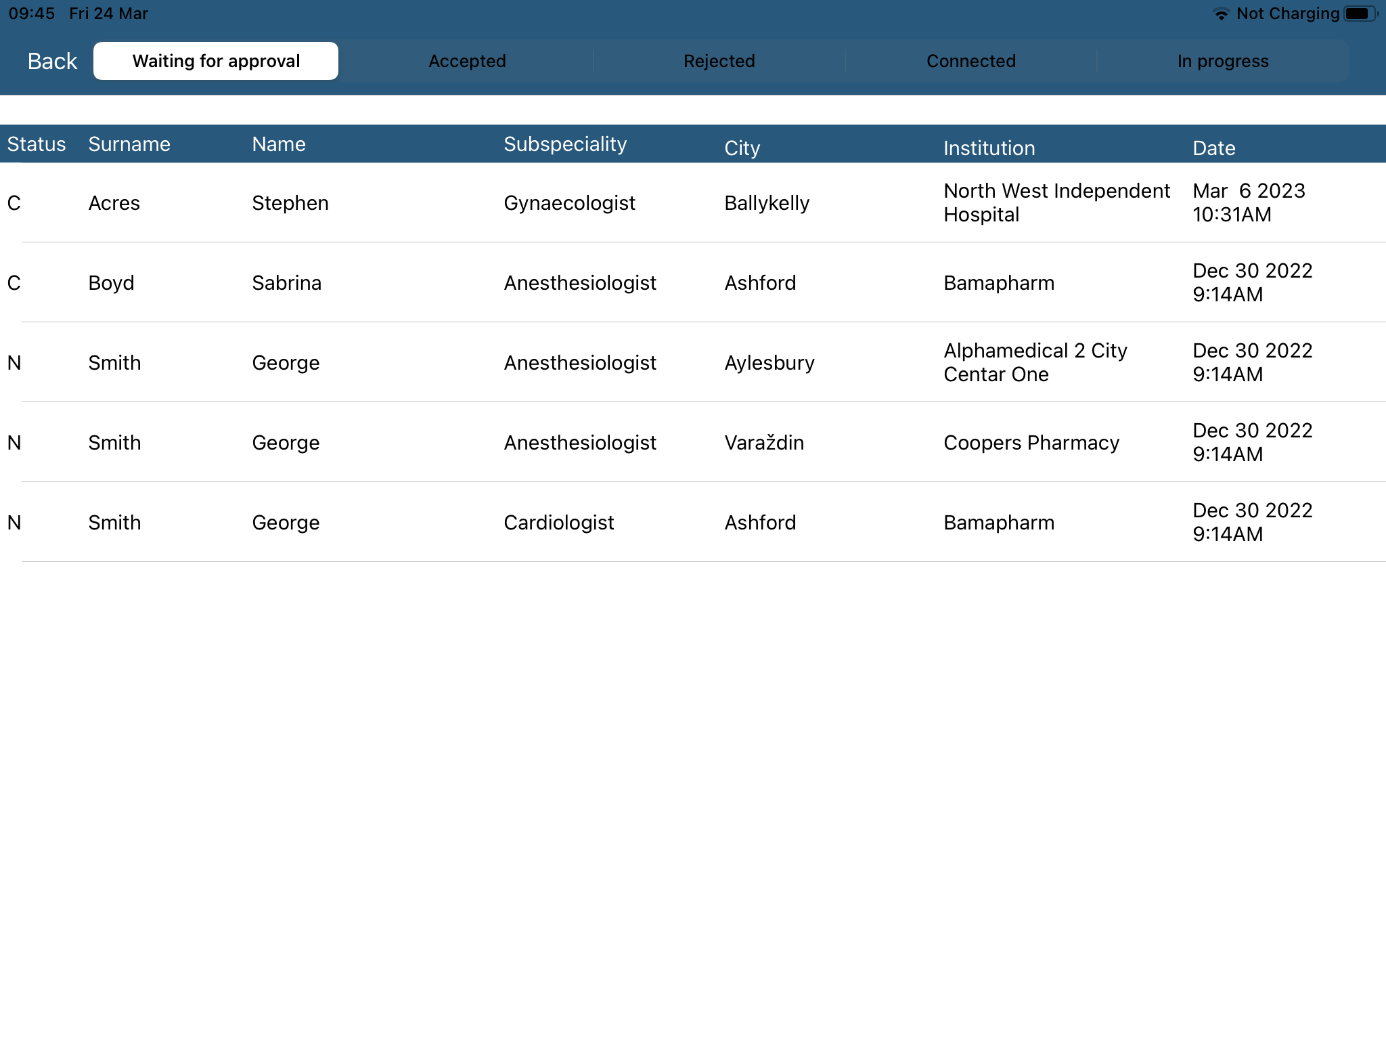
e. Approvals
If Person/Institution approval is enabled, users can see the status of all Changed, Accepted, Rejected, Connected, In progress or Waiting for approval records.
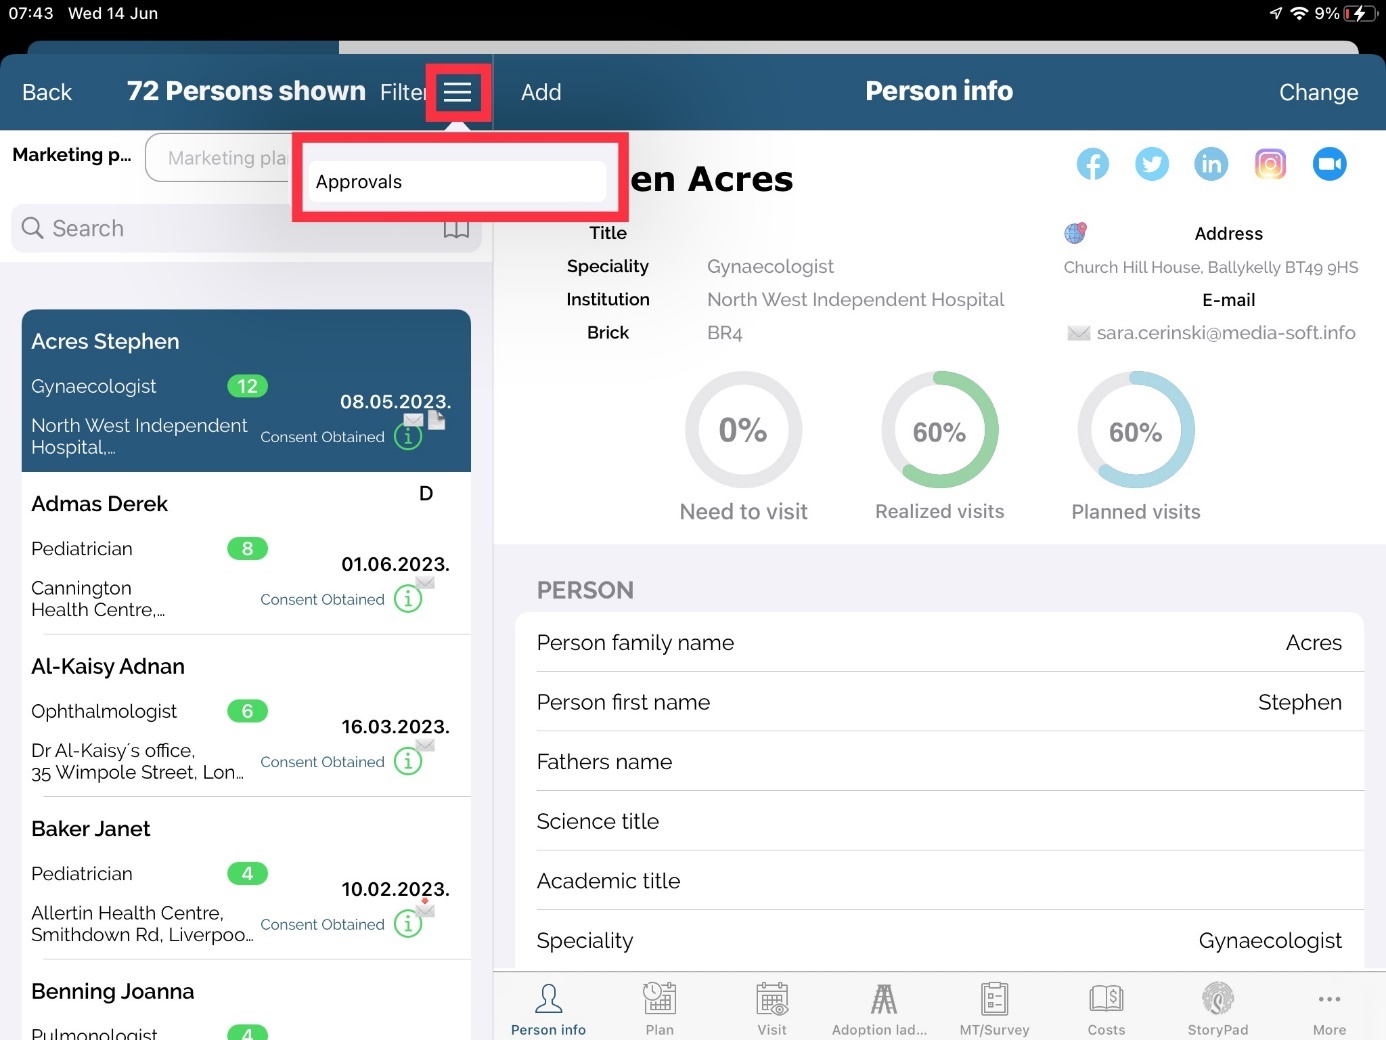
After clicking on Approvals, you will see the records here.
f. Person work time *
With this option enabled, you can click on the “clock” icon to see the work time for each individual doctor.

This is an option in licence. For more informations contact our Support team.
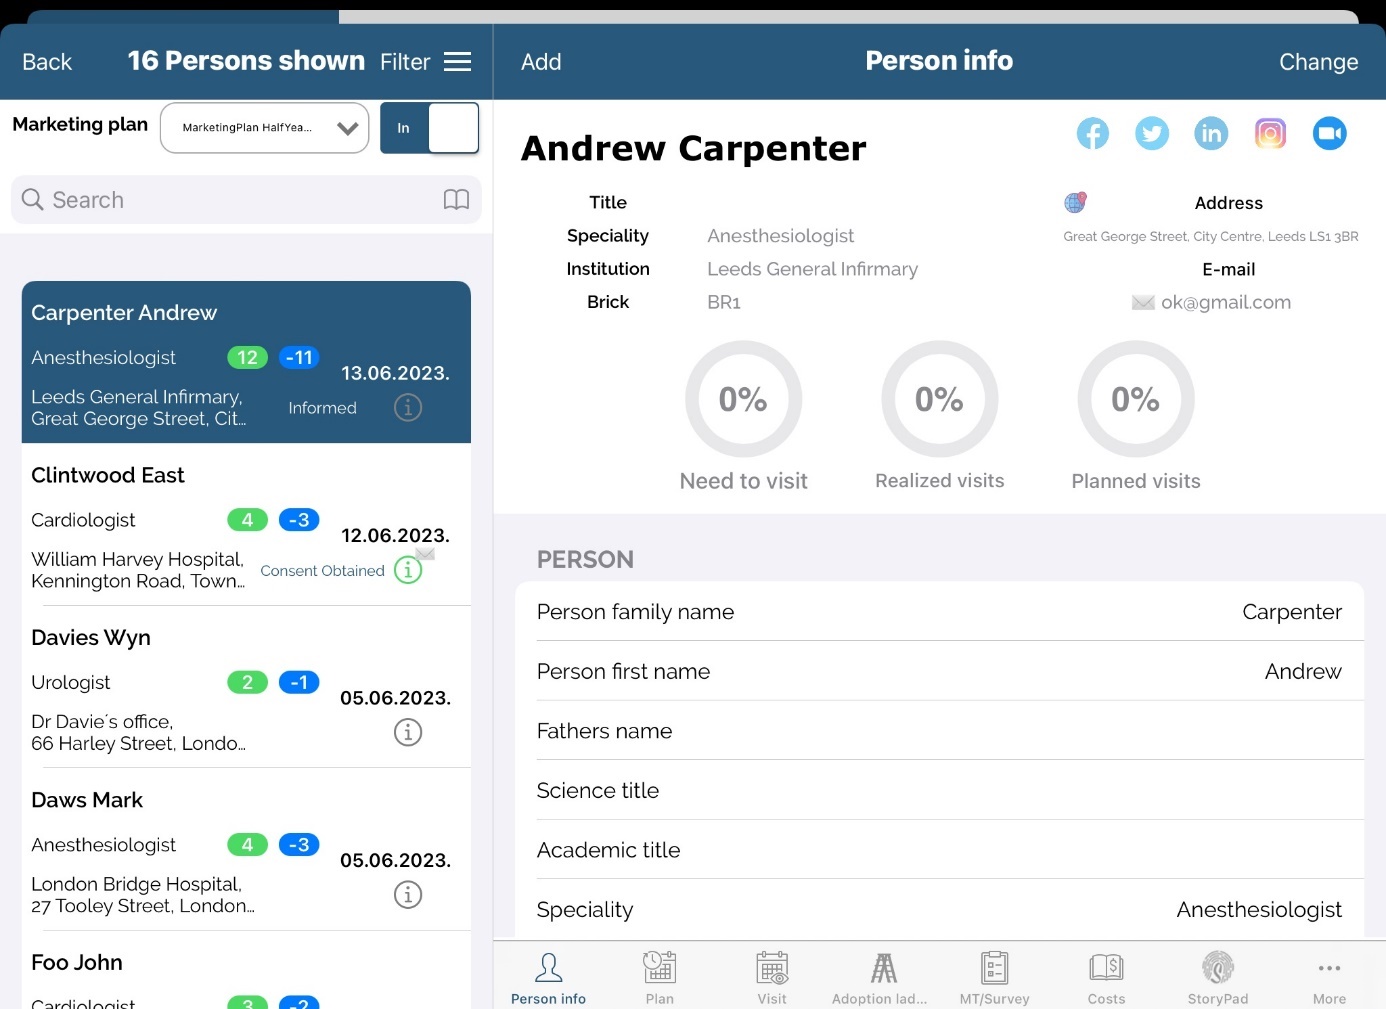
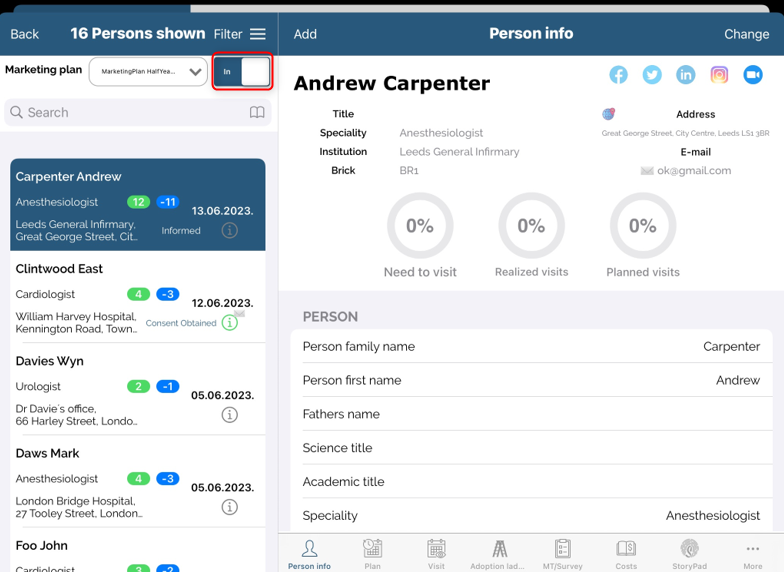
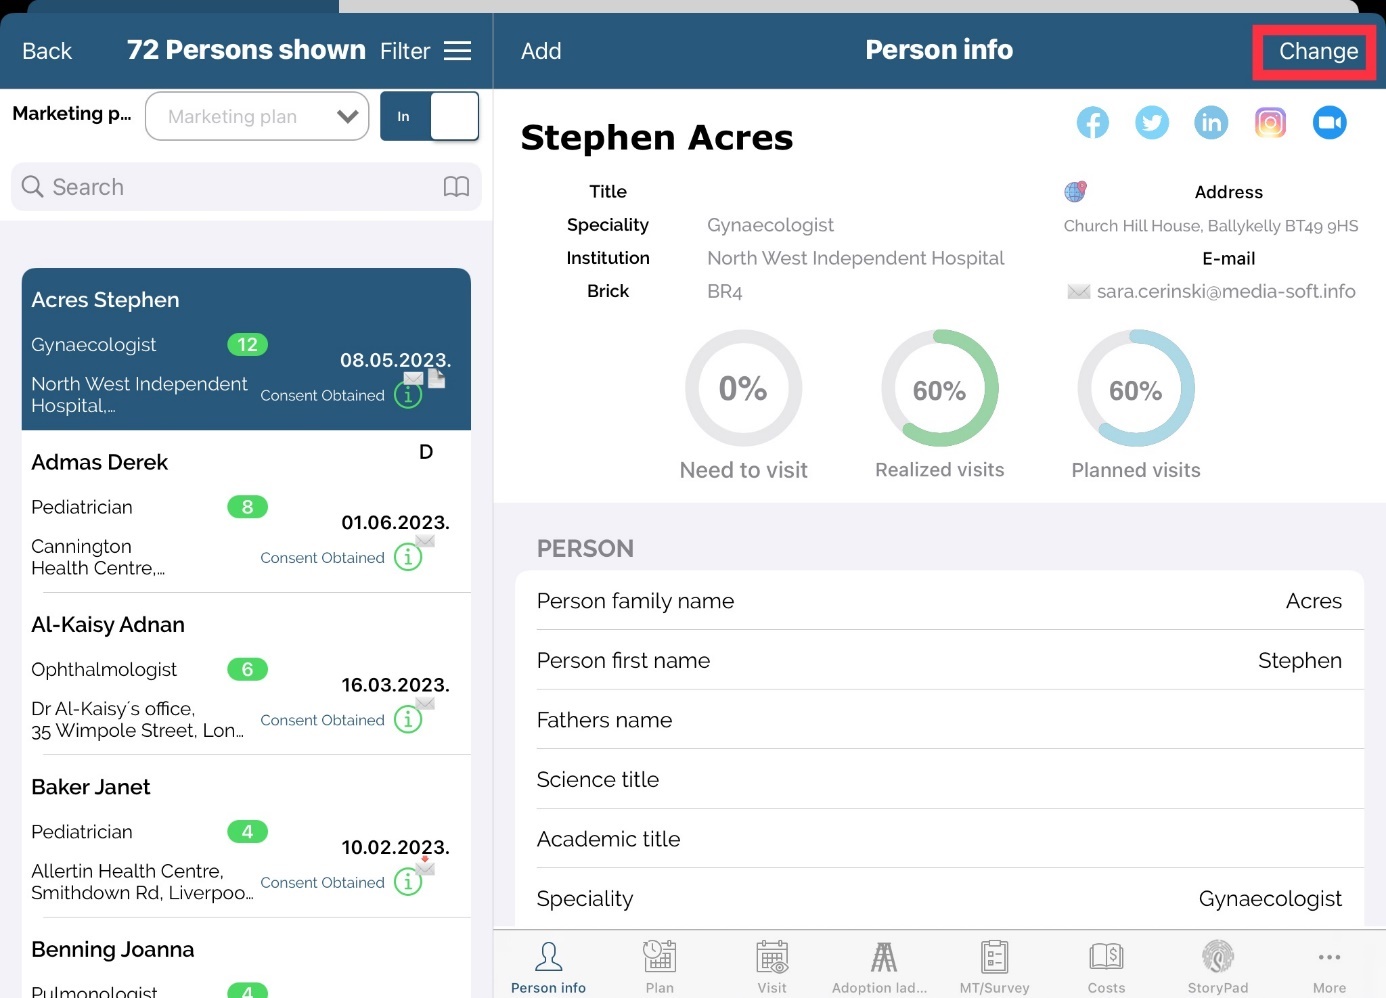
g. Person info
To view person's info, click on the name of that person and his/her data will appear on the right part of the screen. On Person info you can see name of person with Working address, under that there is a Classification, Last visit and Total visits for current year. Below that is shown person info with all the information of that person (for more information scroll down).
Also, some additional tabs are visible: Info, Plan, Visit, Adoption ladder,Survey, Costs and Storypad.
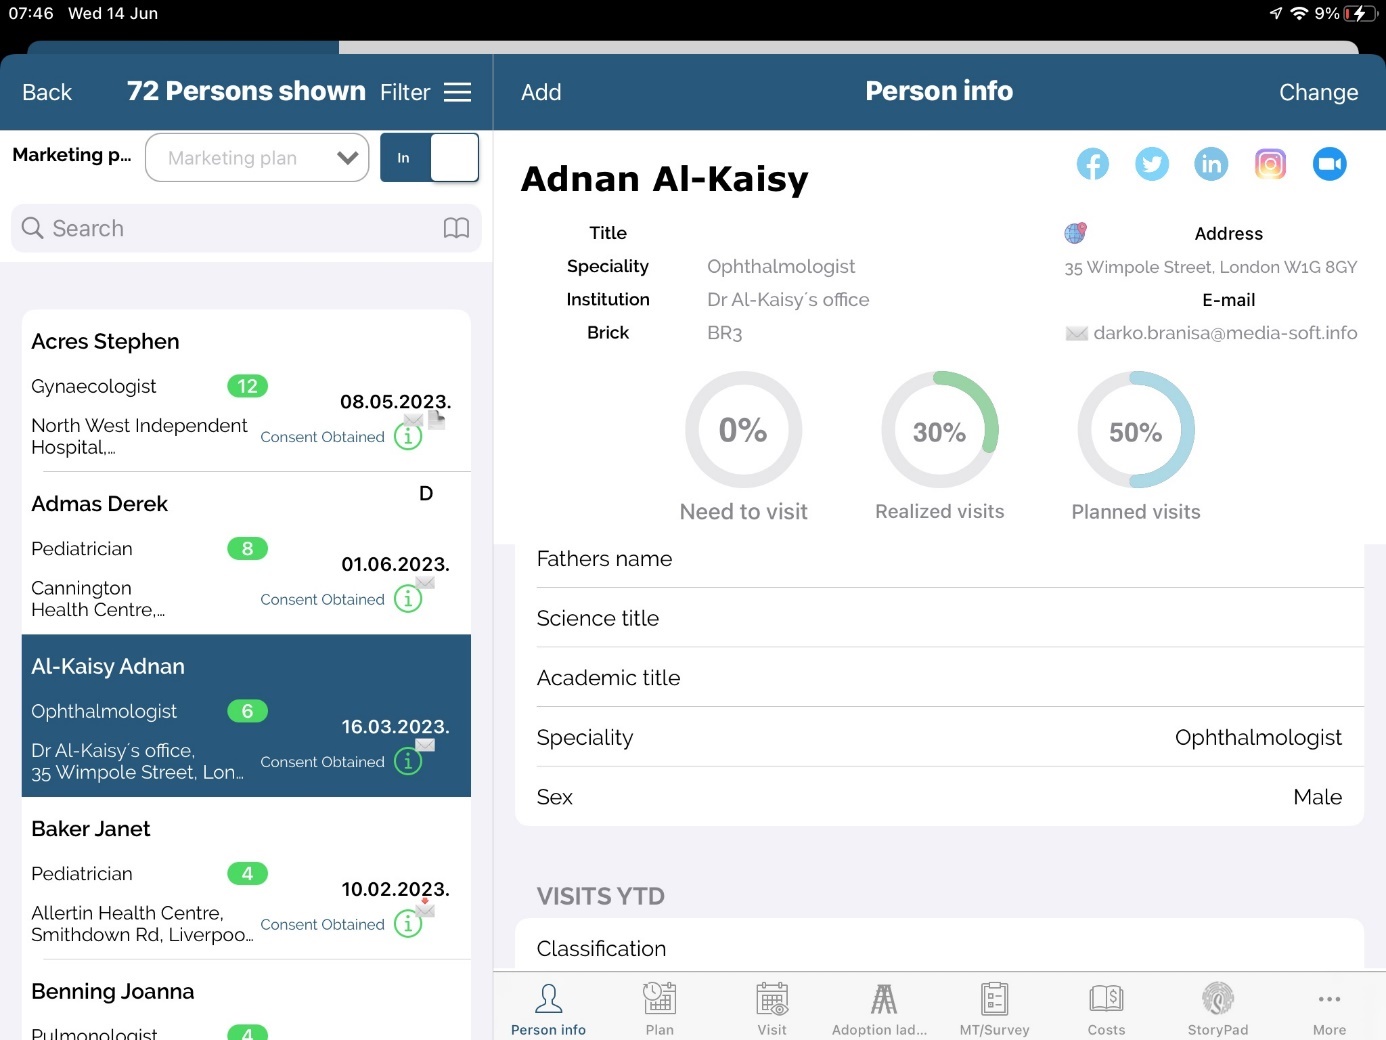
Except person informations, we can see simple graphs that are showing three values Need to visit, Realized visits and Planned visits.

Need to visit is set by Marketing plan values. If there is no Marketing plan this will be filled from number of visits from Admin application. If that is also not set, this value will be set by default to 0.
Realized visits will show visits that are entered for that person. If there is Marketing plan it will show values depends on entered data in it.
Planned visits will show plans that are entered for that person. If there is Marketing plan it will show values depends on entered data in it.
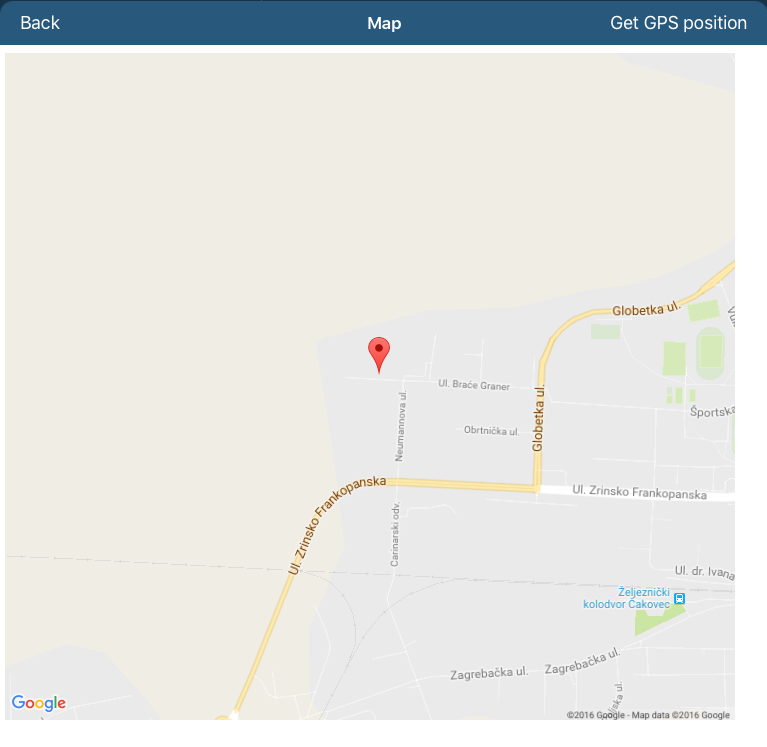
h. Map
Very useful tool in application is Map option. Map allows us to find and keep geographical location for a certain person. Once the location is remembered, a simple click on the Map button can easily locate a person which he/she has to visit, which makes a work in the field much easier.
How to use maps?
Lets imagine that we are in the field and visiting a person. We find that person in the person's module and press Map button on Info tab.
You can set coordinates of a person, by pressing Get GPS position. Application will automatically find location and then press Save.
Note that while entering GPS position, you have to be on the location entered as a working address. Otherwise, a wrong position will be saved.
i. Photo of a person
Application gives you an opportunity to upload photo of a person. This can be done when editing a person. Click on the Change button in the upper right corner. Window for editing person will open. Click on the Upload picture button to add photo of a person. You can choose among two possibilities: uploading photo from an album on you device or directly using camera. As a standard procedure, you will have to allow Sales Vision to access your album. Click Save button to save picture you have chosen to upload.
Picture will be visible on Update person of a person.
j. Plan and Visit tab
Contacts history allows us to view past contacts for each person and to add new visit report or plan for the chosen person.
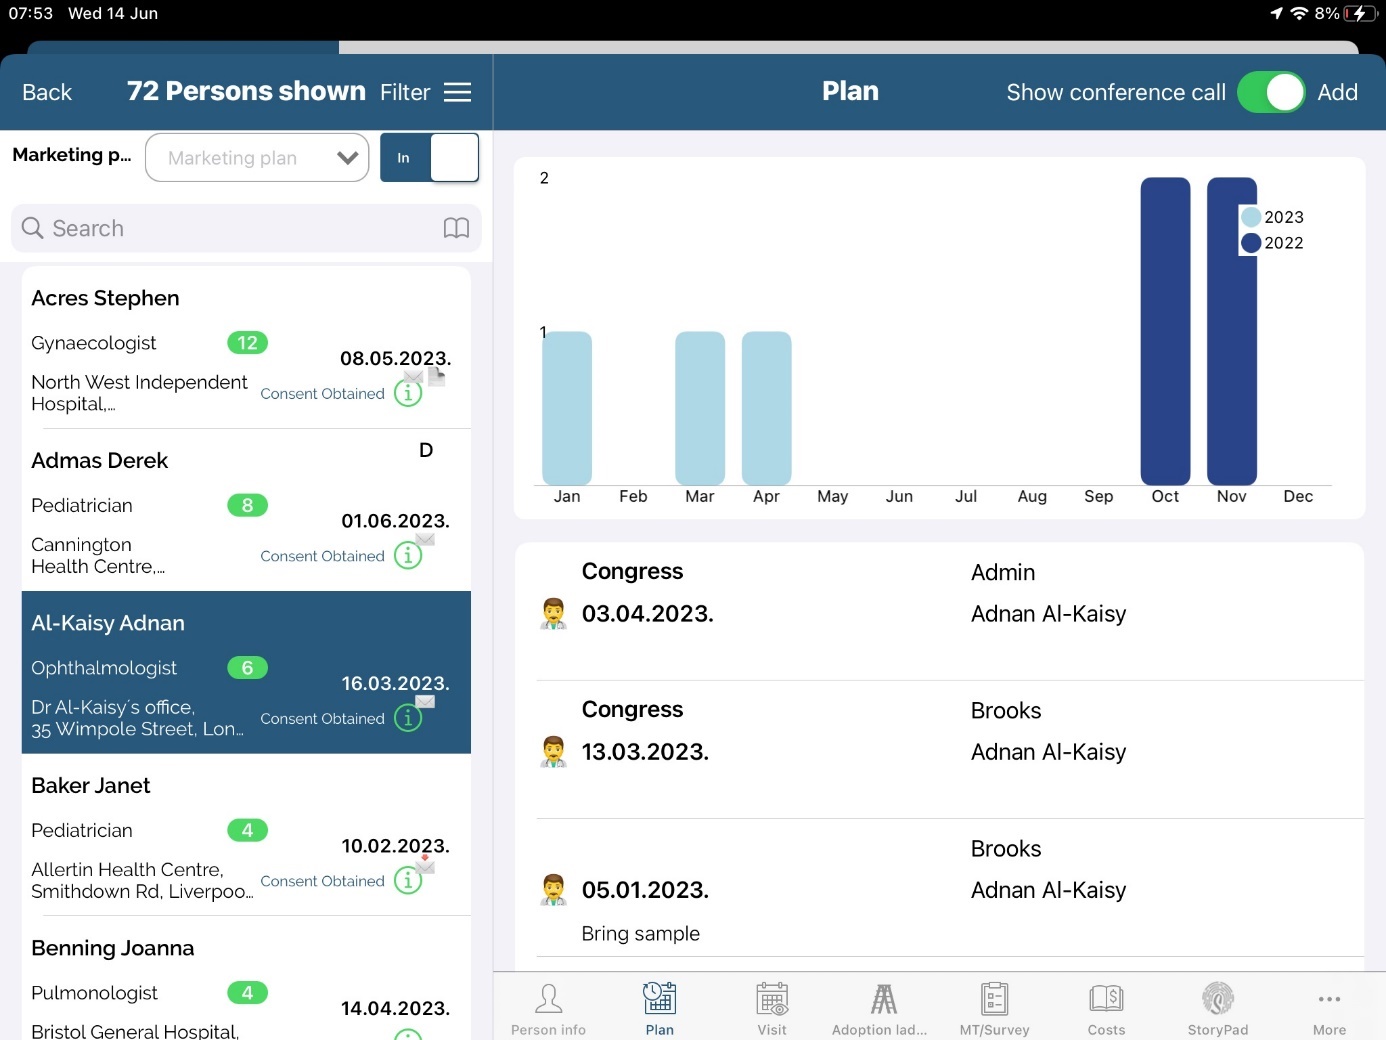
Two buttons are available on screen, Plan and Contacts. That means, by opening each of them we can check last planned and realized visits for a certain person. Along with the visit frequency by months for a certain year, a detailed description of visit is seen, when (Date) and who (Representative) has planned and realized that visit/plan. If there are not any visits or visit plans saved for this person, no data will be shown. Here you can add a new visit or plan by pressing Add button which is described in details in Calendar module.
Also, there is a graph with statistics of last year and current year and number of plans and contacts.
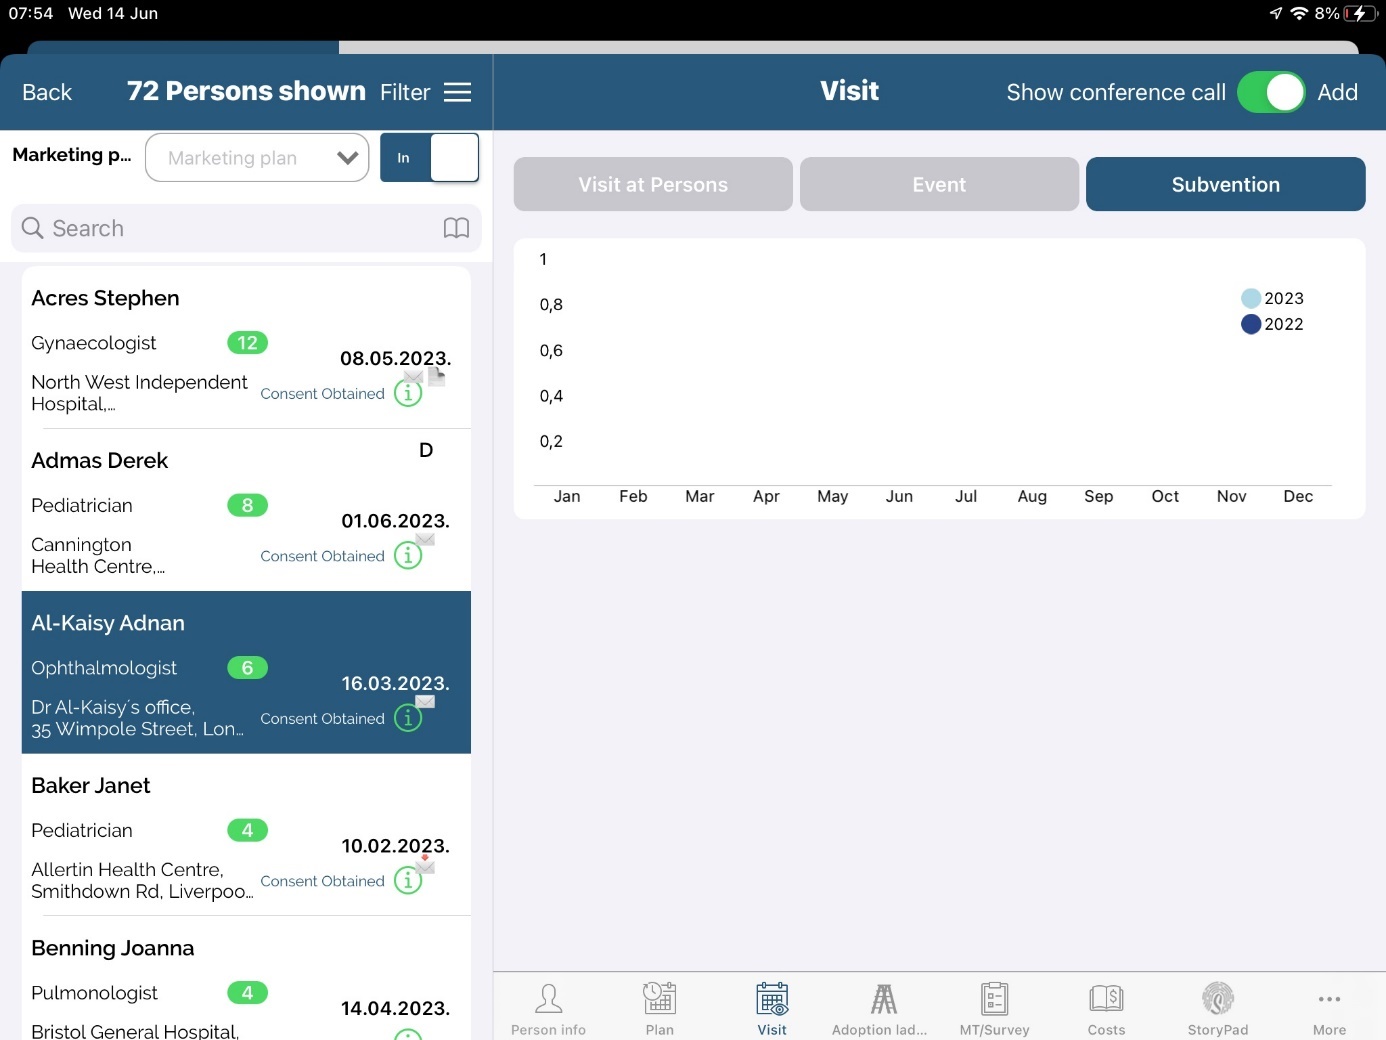
You can add a subvention to a selected person by using Visit tab - Subvention part as shown on the picture below.
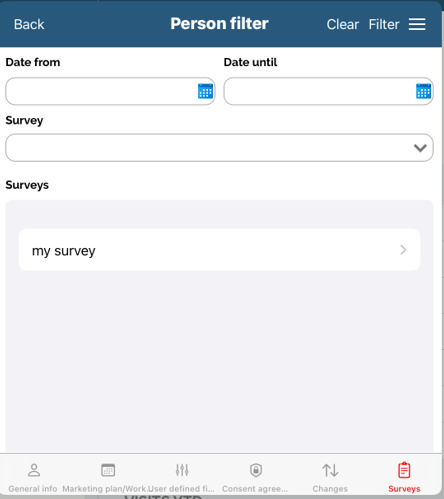
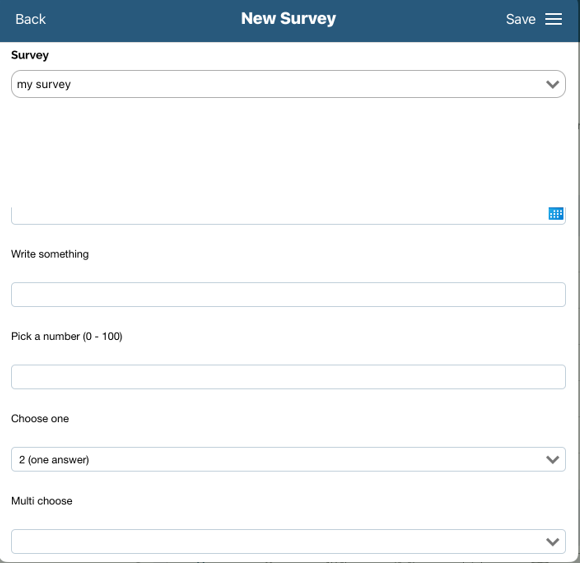
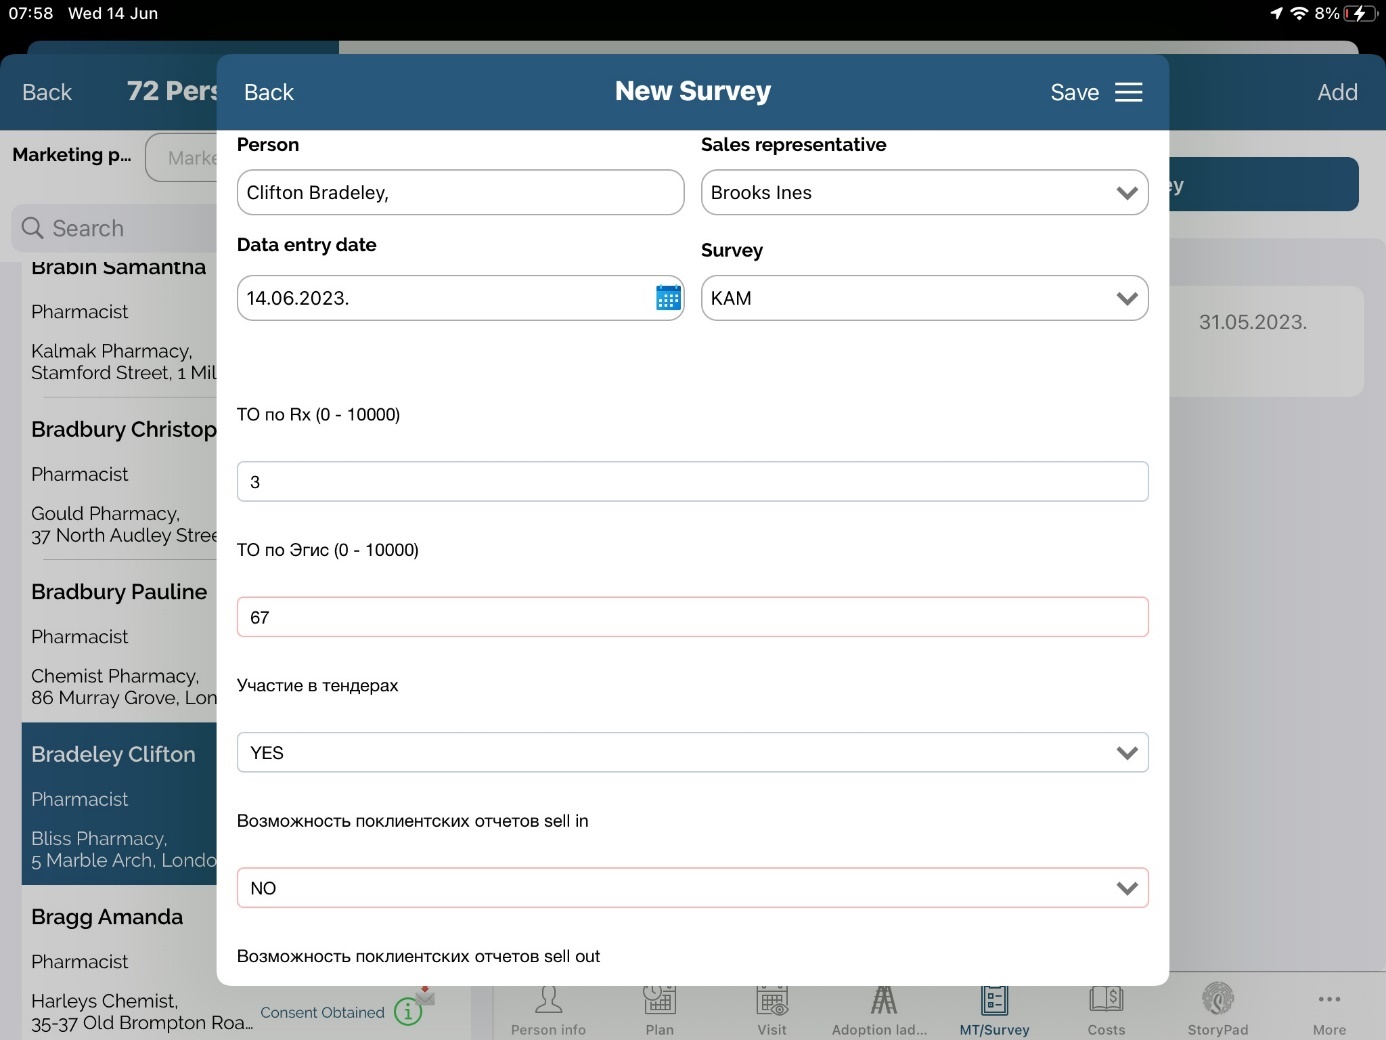
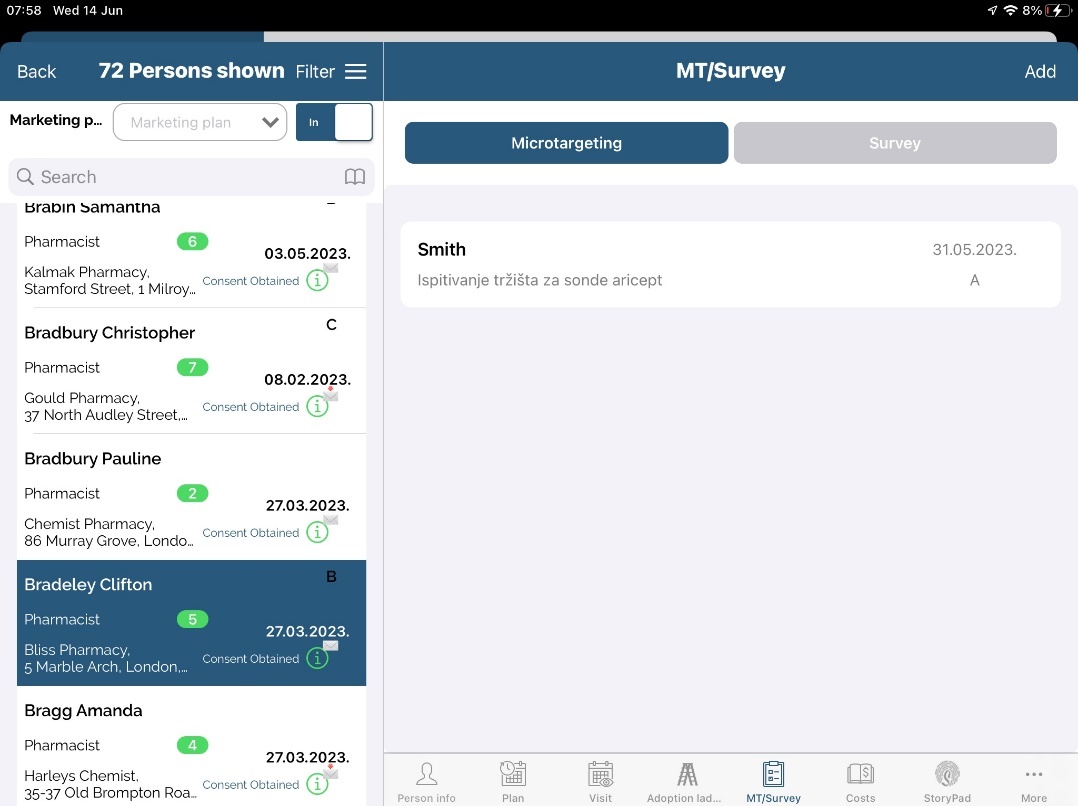
k. MT/Survey
Survey
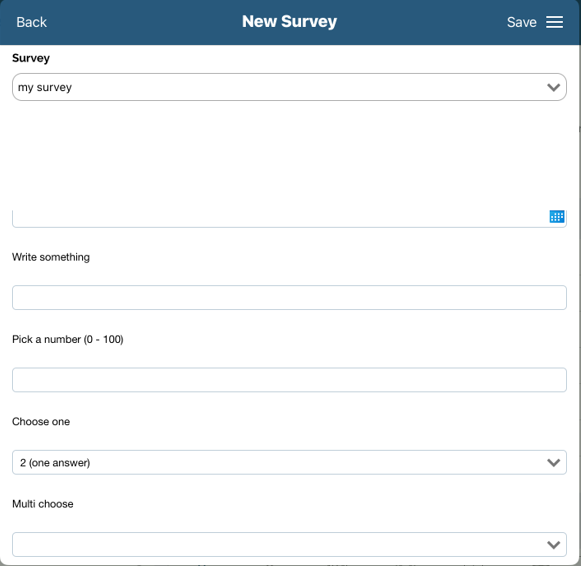
The questionnaire can be used in case you want to create surveys. To be able to use this option, questions and answers must be created by the Administrator. Survey can be added while adding a visit to a person or institution or as a single option under Survey tab in person's and institution's module.
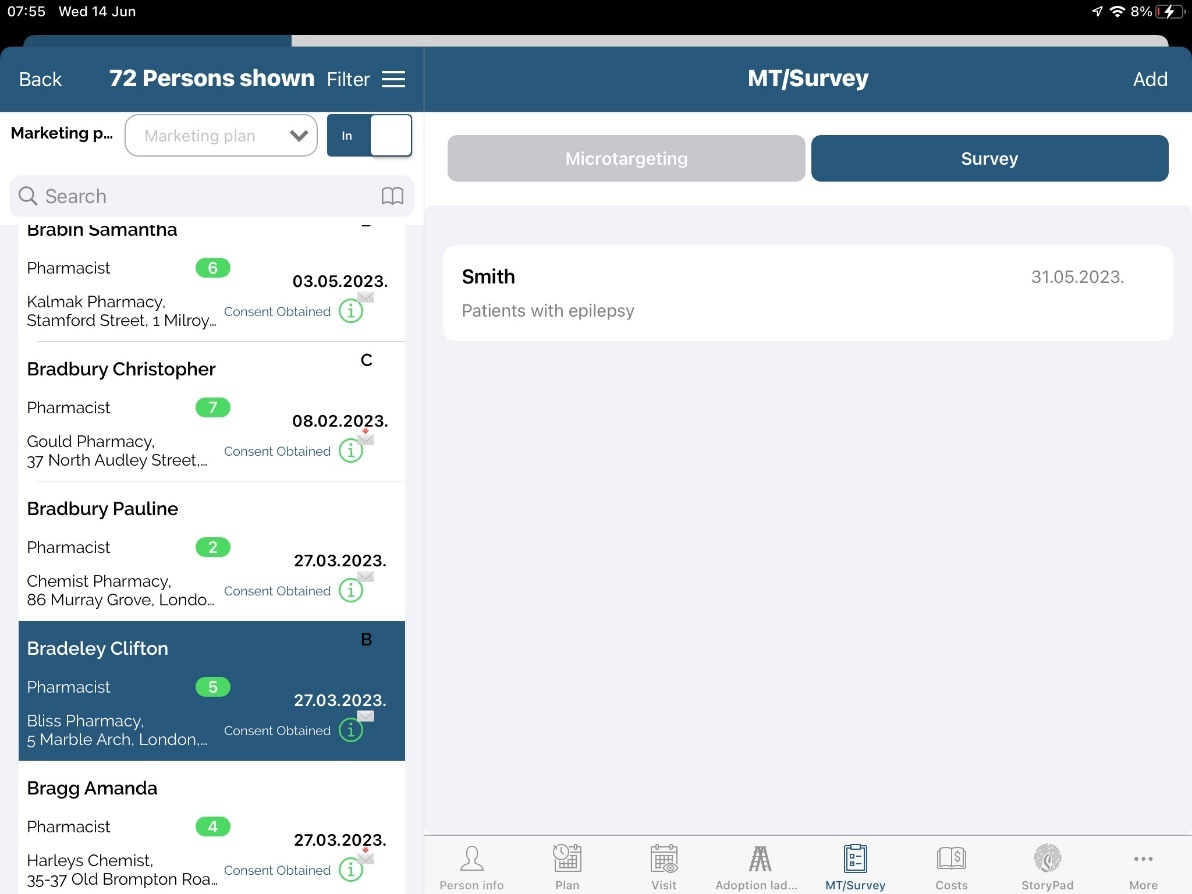
Click on the person you wish to add survey for and click on Survey tab. Press Add button and fill all the data. To save data press Save button.
There is possibility to select answers from dropdown list, to multiselect the answers from dropdown list, to enter numeric value in defined numberic range, free text field entry, date picker and slider value.
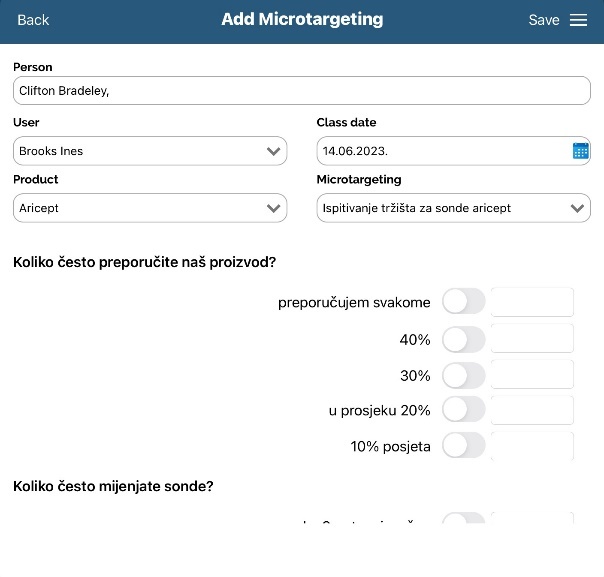
Microtargeting
Tab Microtargeting gives an overview of all microtargeting actions performed on this person. Clicking on the Add button opens a new window for adding new microtargeting. Different questions will appear, according to assigned speciality to microtargeting. For example, if Admin set MT for speciality Anesthesiolog, then MT can be added only to persons with that speciality.
After you populate question with answers classification will calculate. If you have some unanswered questions, you will get an info note that all questions have to be answered in order to save microtargeting. When you save, new record will appear with new classification.
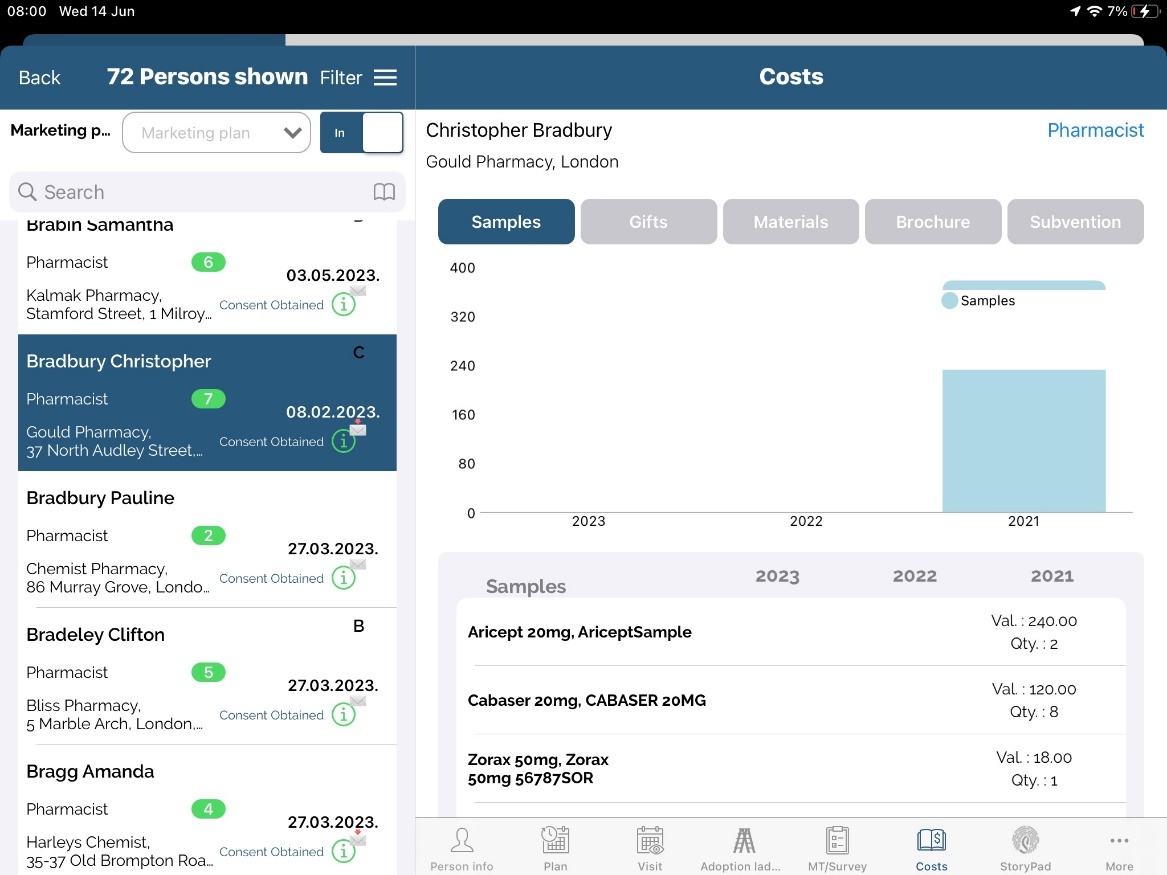
l. Costs
By using Costs tab you can view statistics on all cost related to this person: costs on samples, gifts, materials, subventions and other.
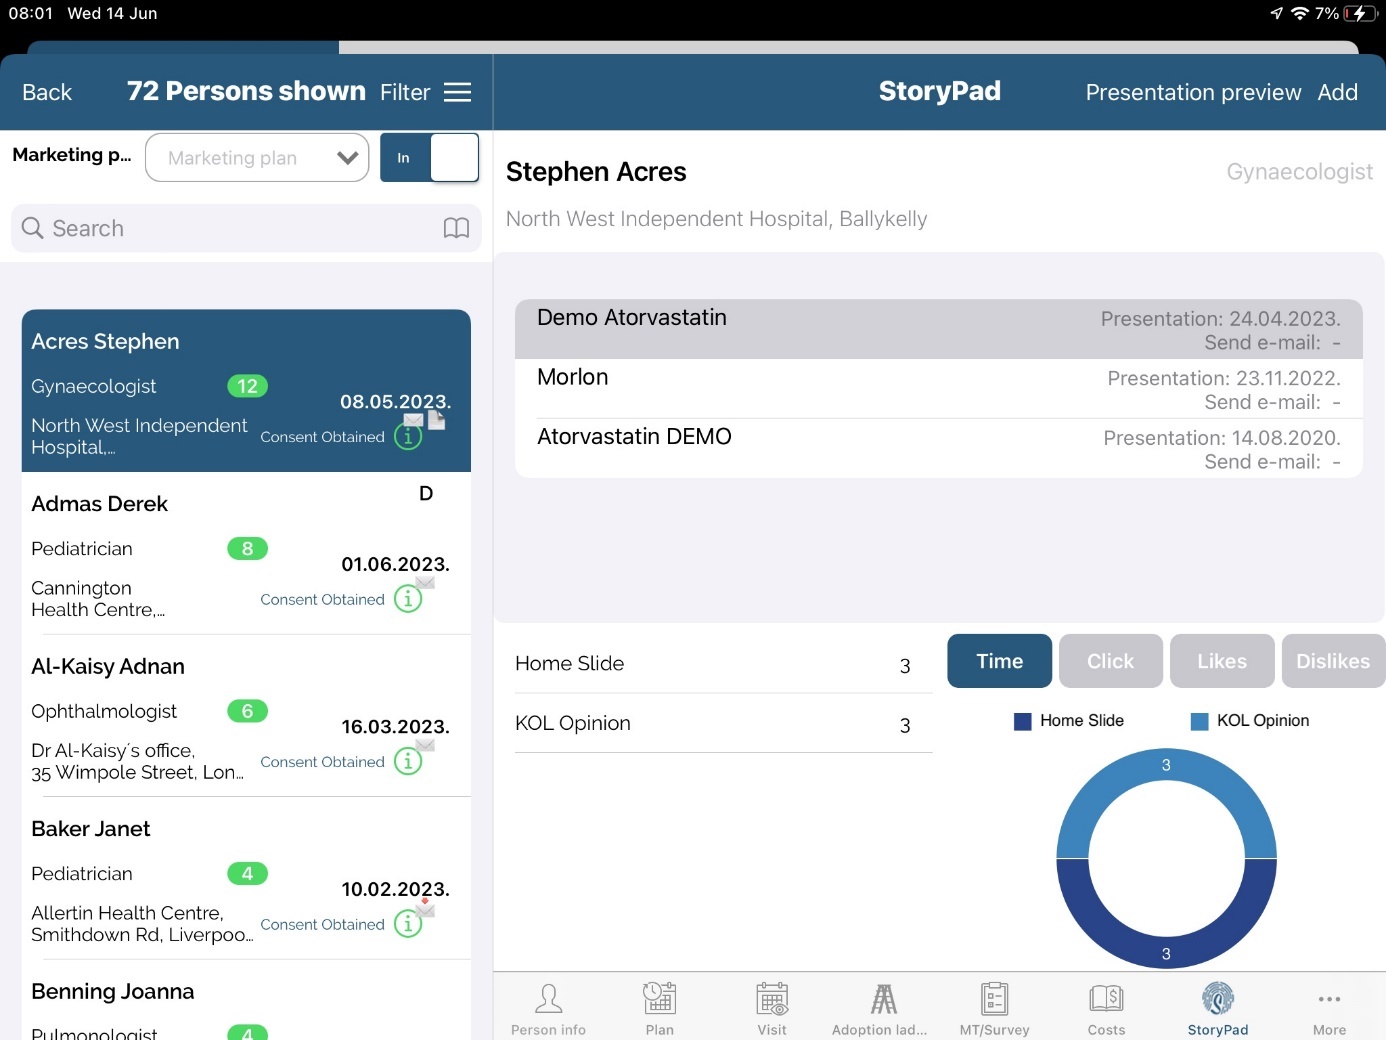
m. Storypad
StoryPad module is used to show different brochures and to keep track of brochures shown to person and institutions.
You can see the name of the presentation, date of presented material, if it was sent by e-mail, some other statistics like time spent on slide, clicks on each one or likes/dislikes for each slide.
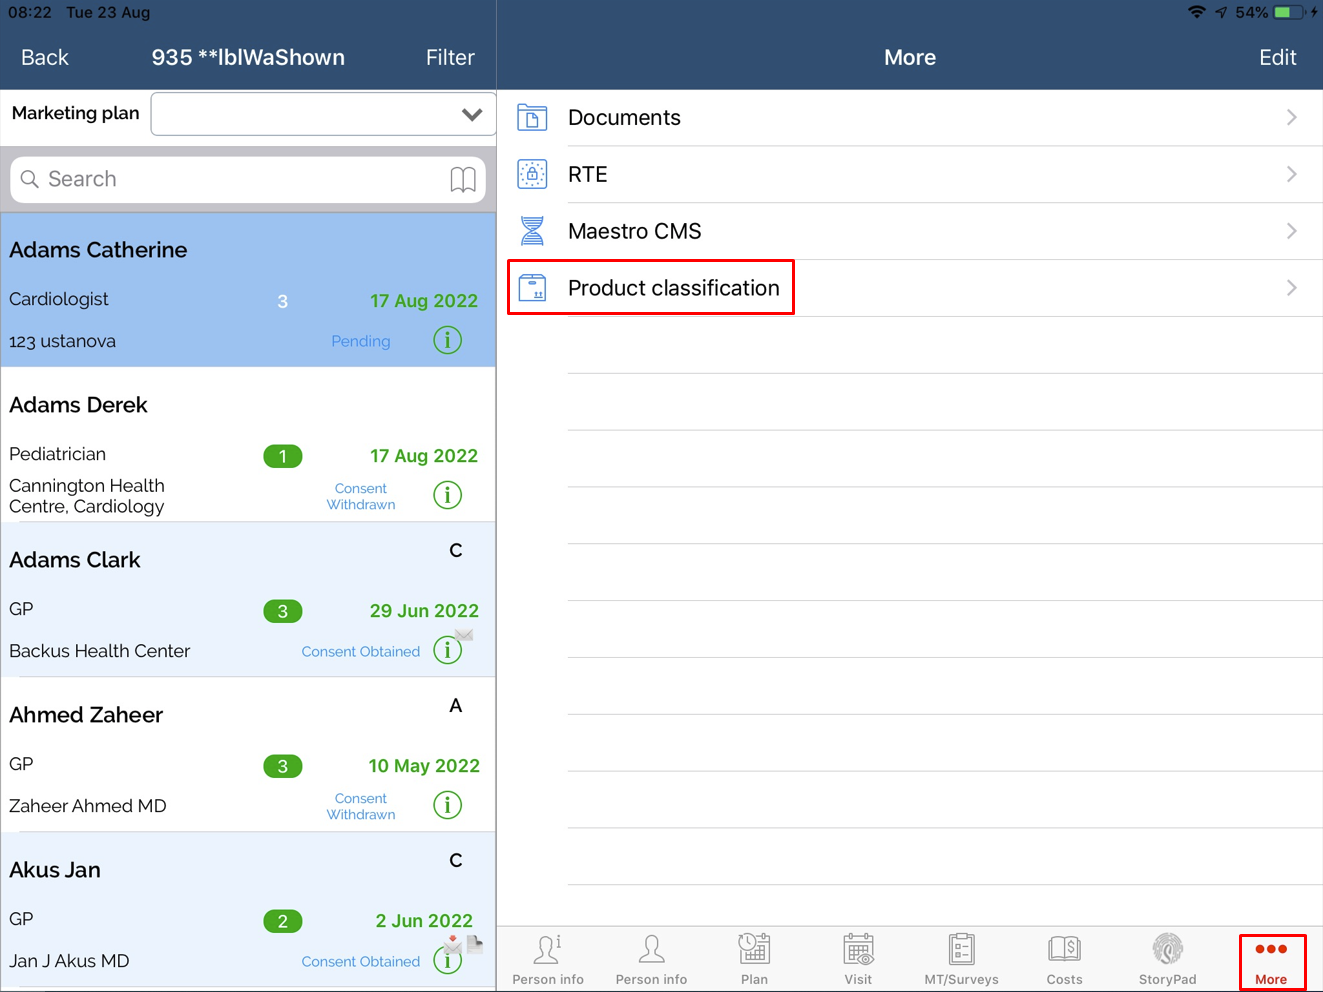
n. More
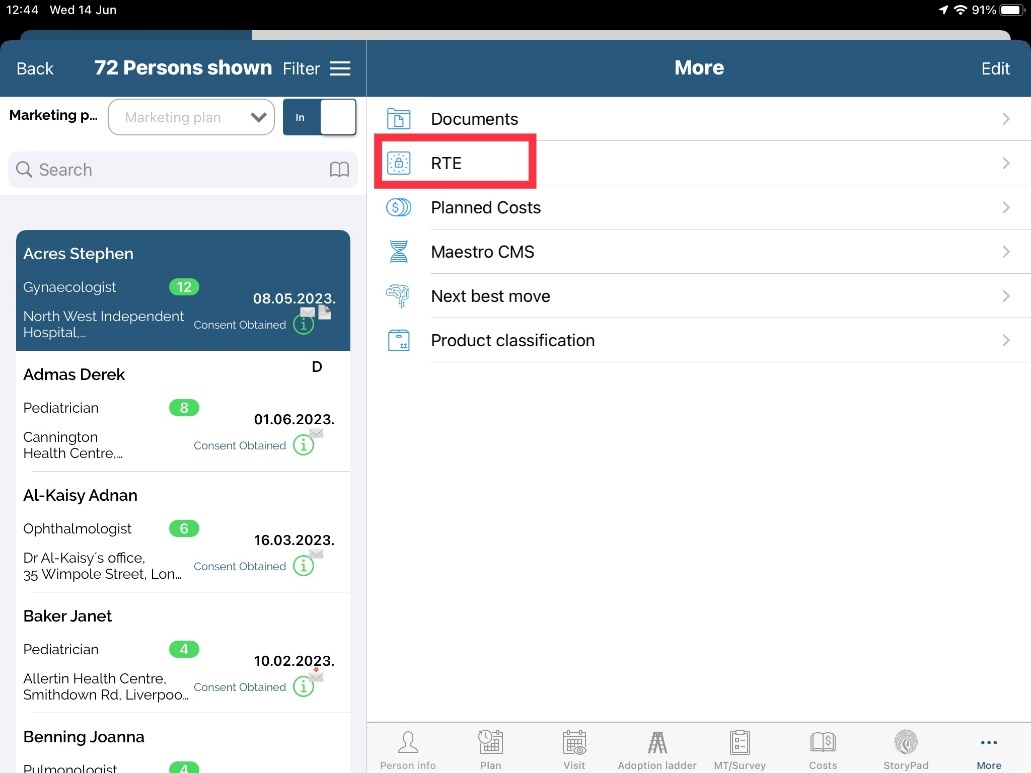
Documents, RTE, Planned Costs, Maestro CMS, Next best move, Product classification
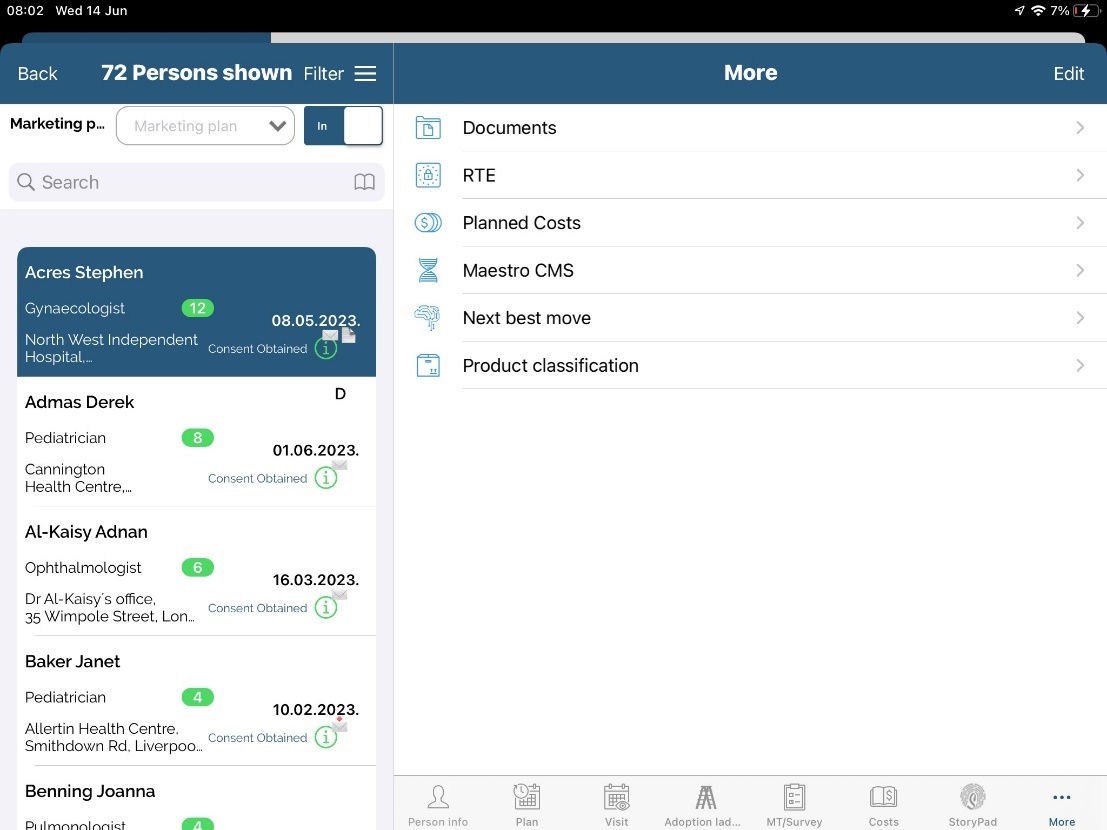
Documents are used to upload and preview images and documents. To access it press Documents.
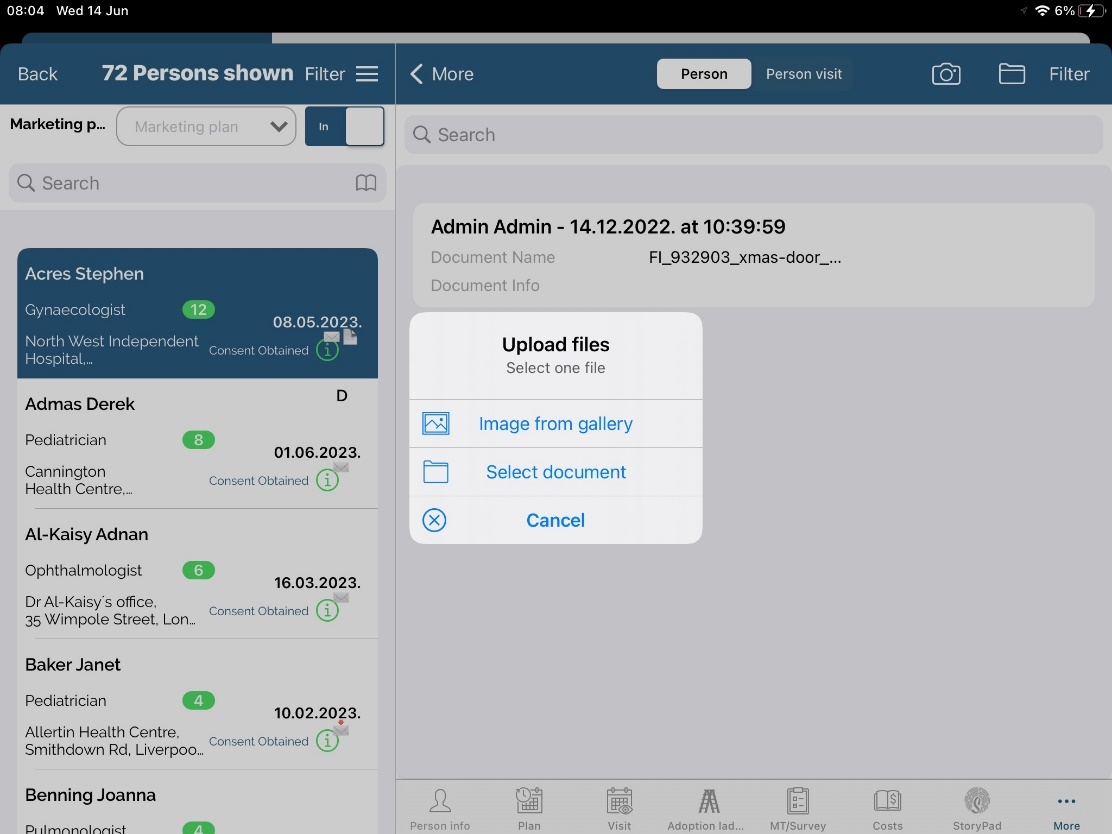
After choosing photo or document to upload, window as one shown below will open.
Document name needs to be entered. After saving, it will start uploading photo to server. It may take some time, depending on internet connection.
When photos or document is uploaded, it is possible to Preview or Edit. To do that, swipe left on desired document and press Preview or Edit.
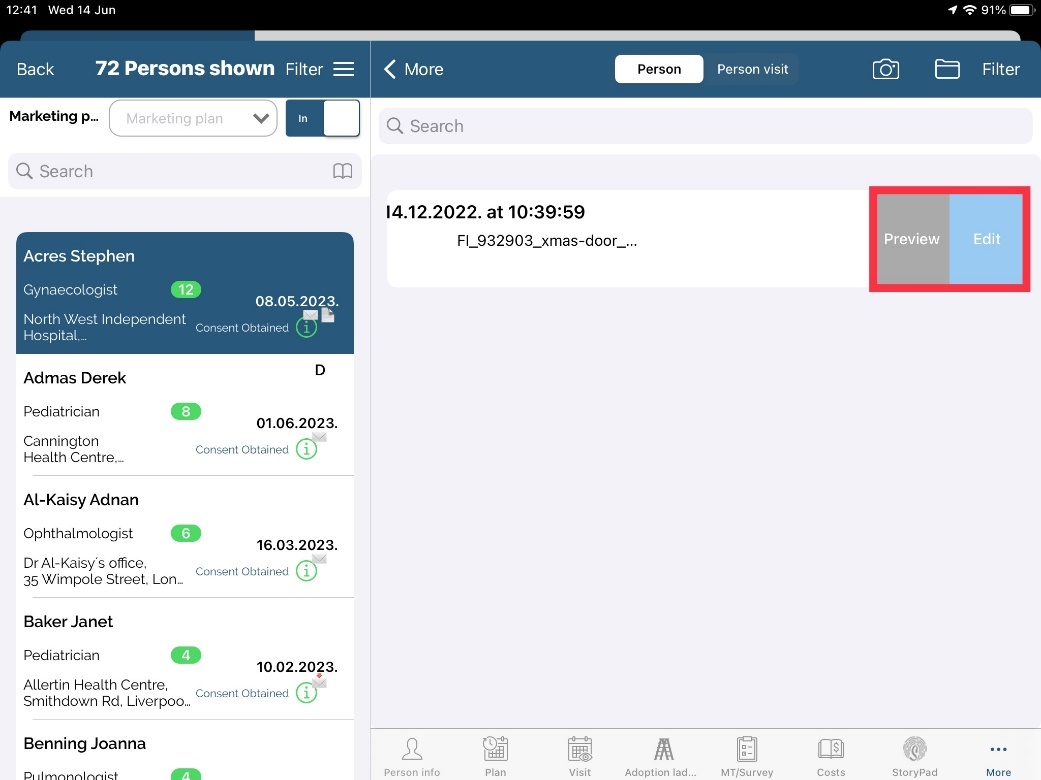

For uploaded documents and pictures is avaliable filter. With this option you can find document or picture you want.
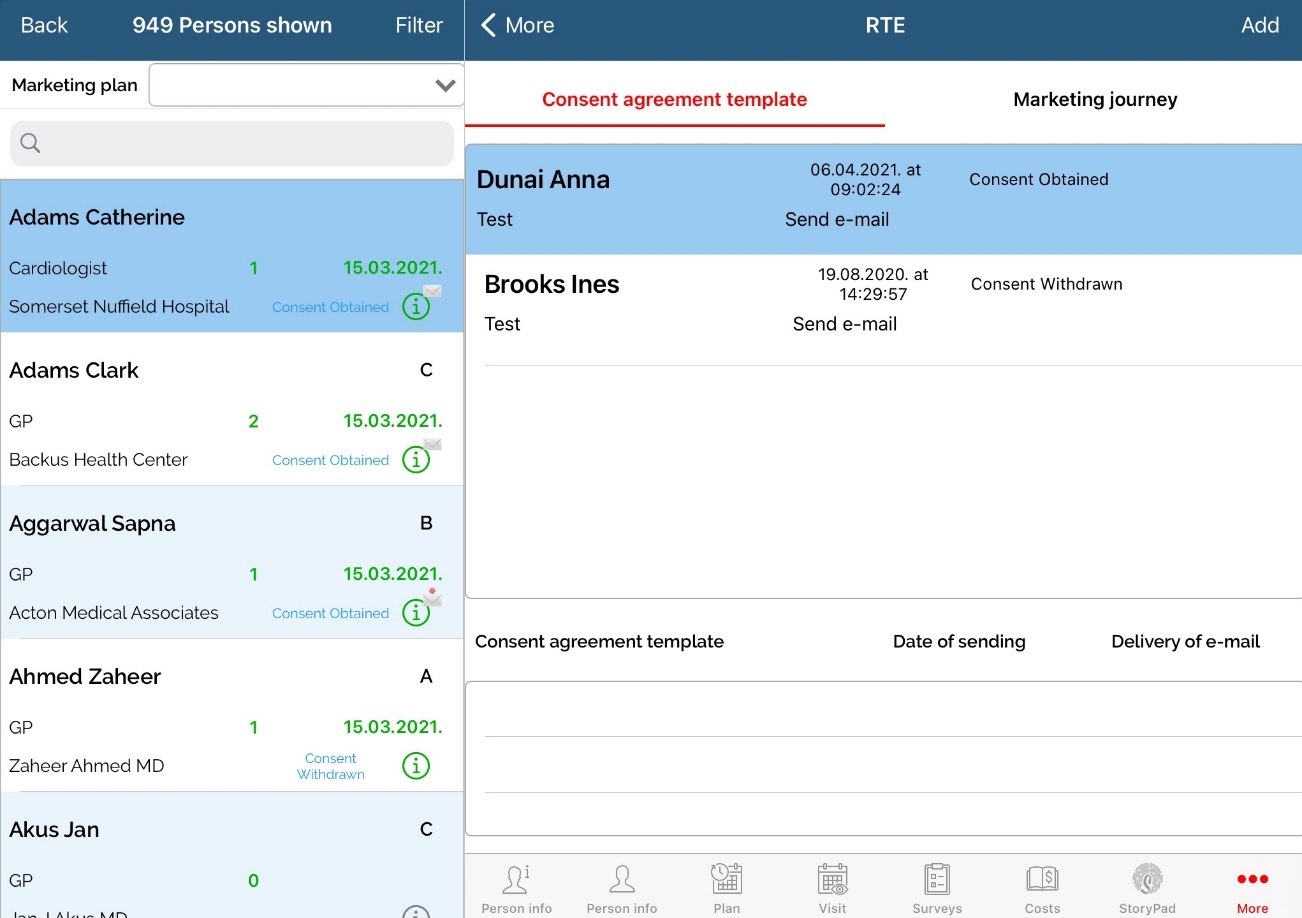
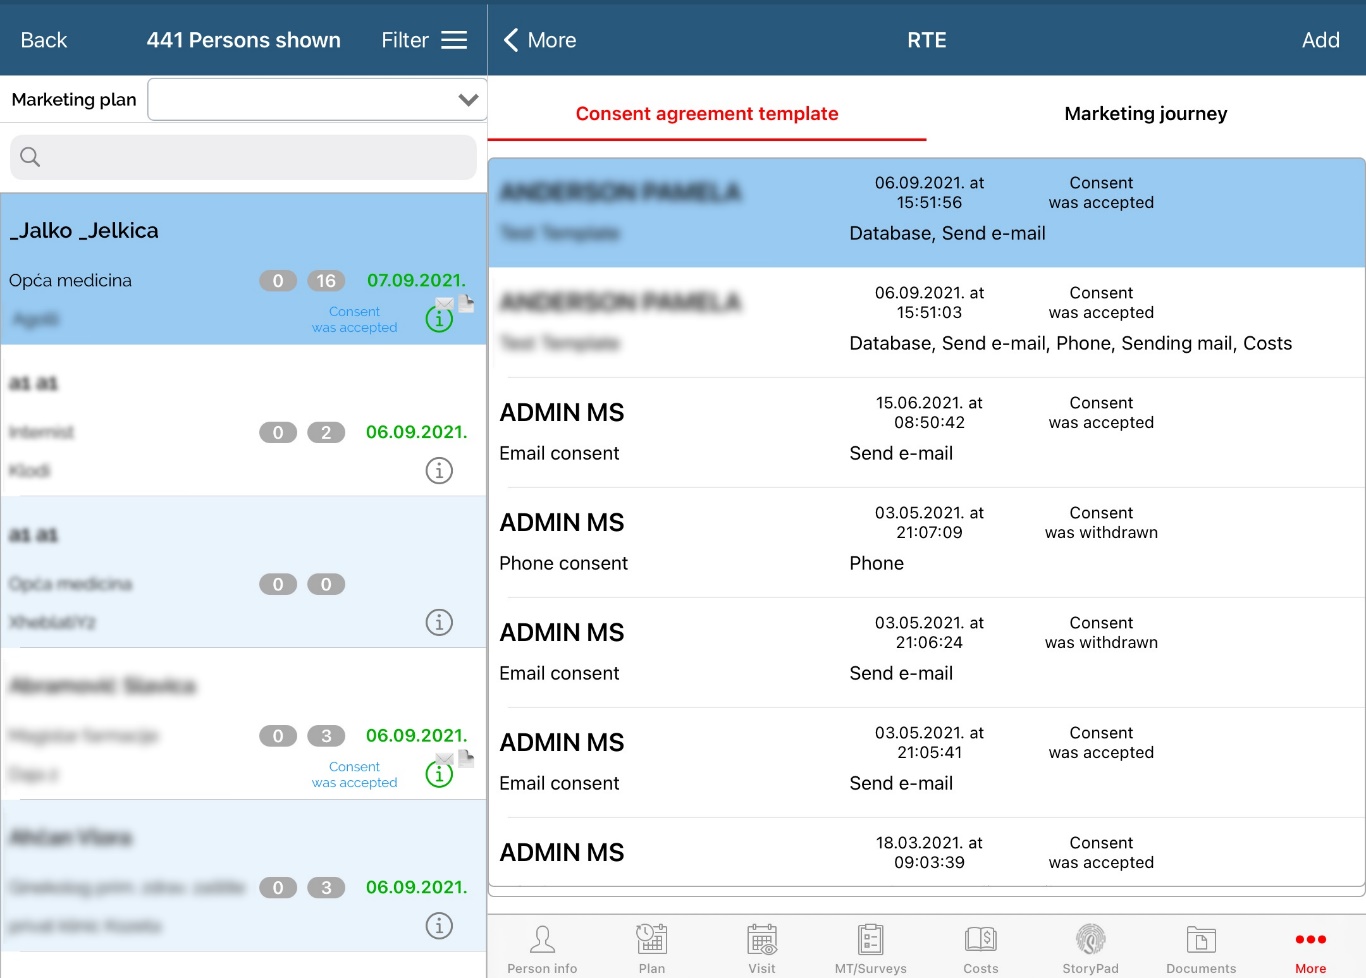
RTE Consent agreement
Process of adding consent agreement status to a person in iPad application is as described below for option used in settings:
Find and select a person you whish to add status of a consent.
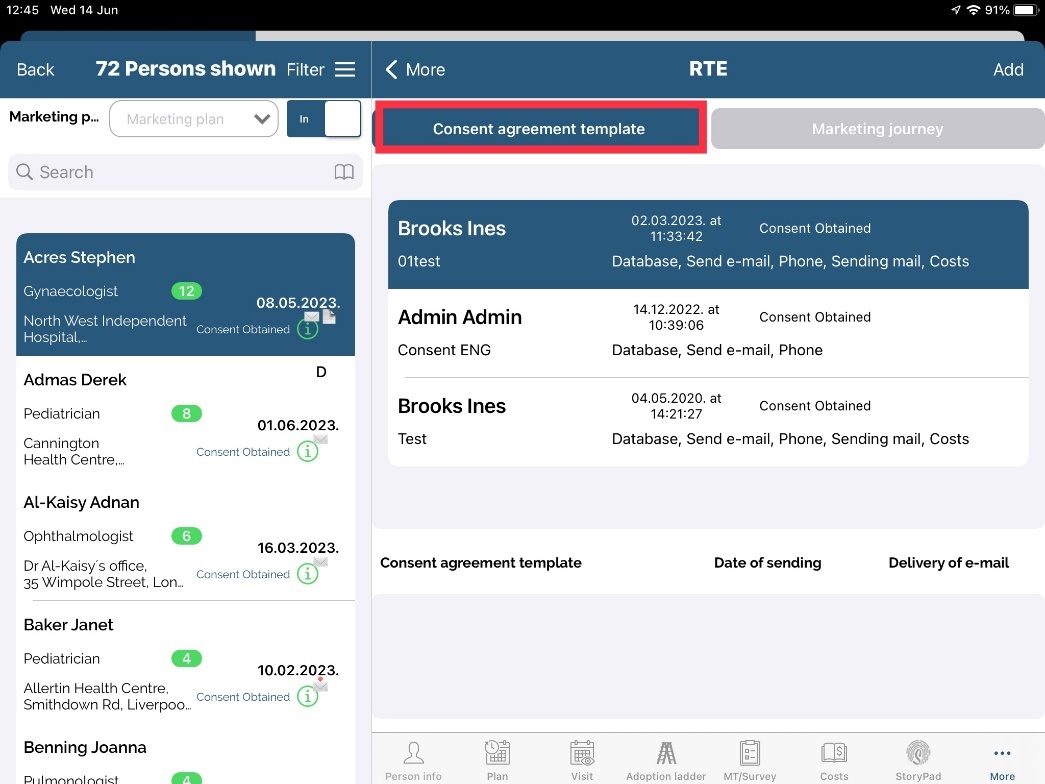
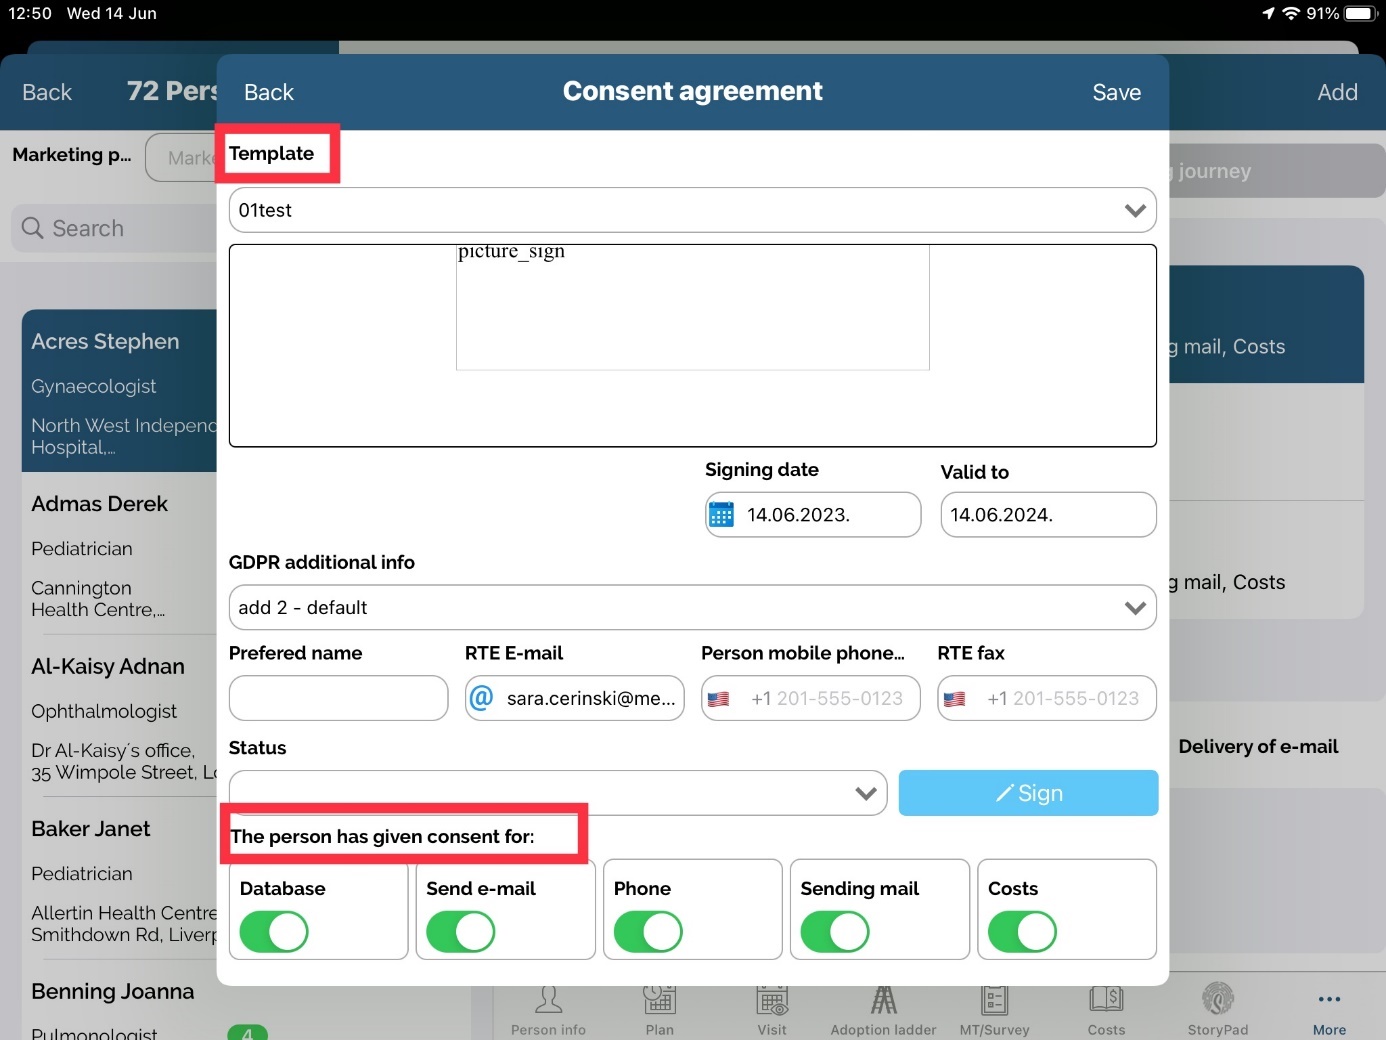
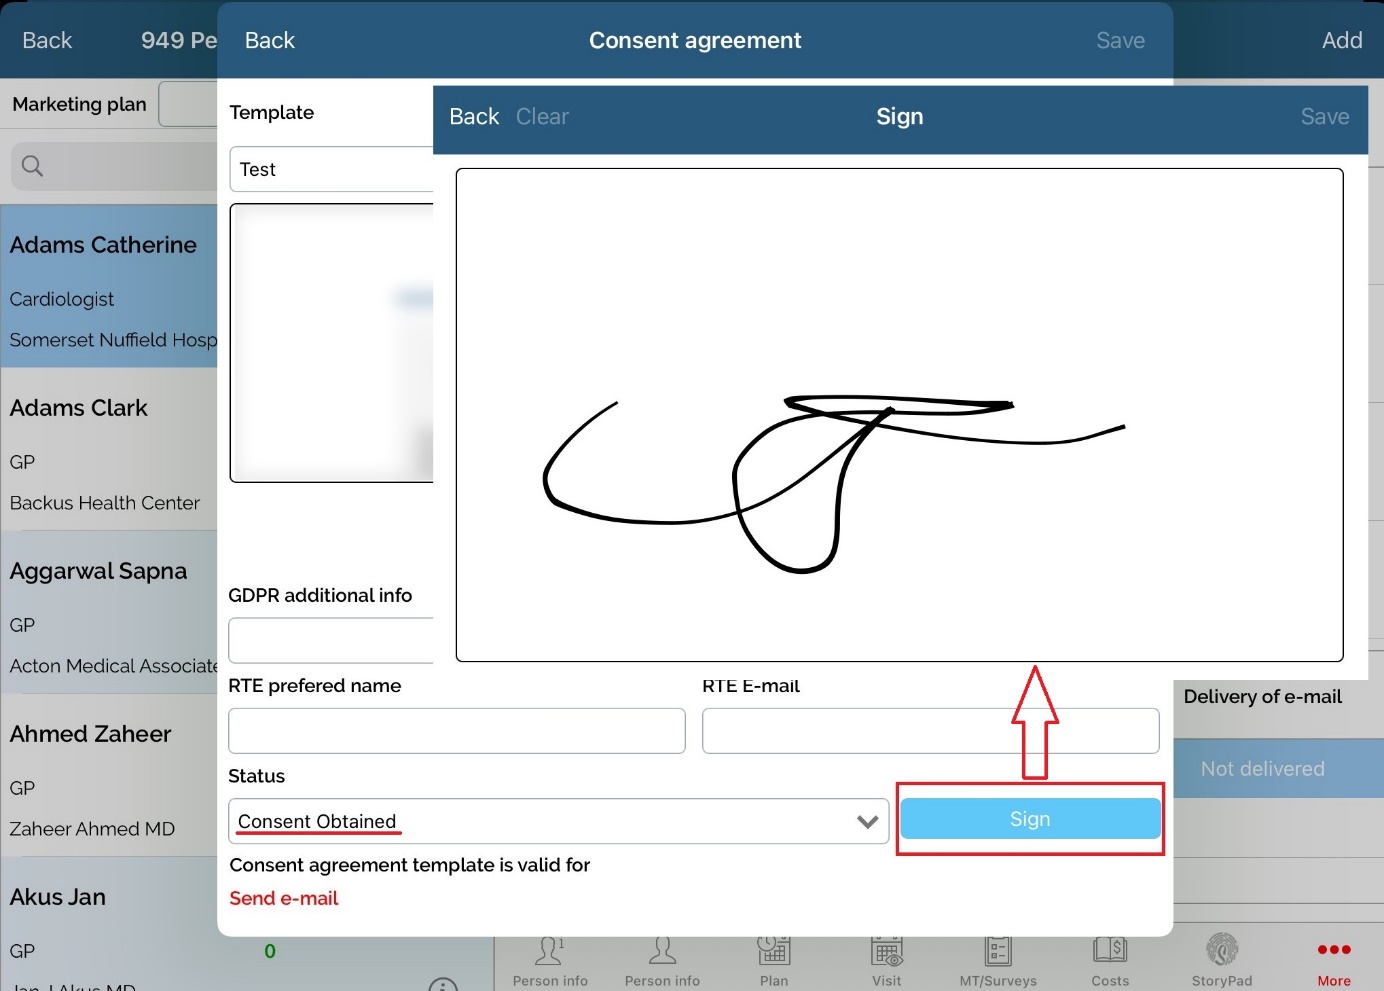
Clik on Consent agreement tab and than click on Add button.
Select consent template you want to use and add person's status. In the lower part of the window you can find information for which type of consent signature is given. Click Save to save your entry.
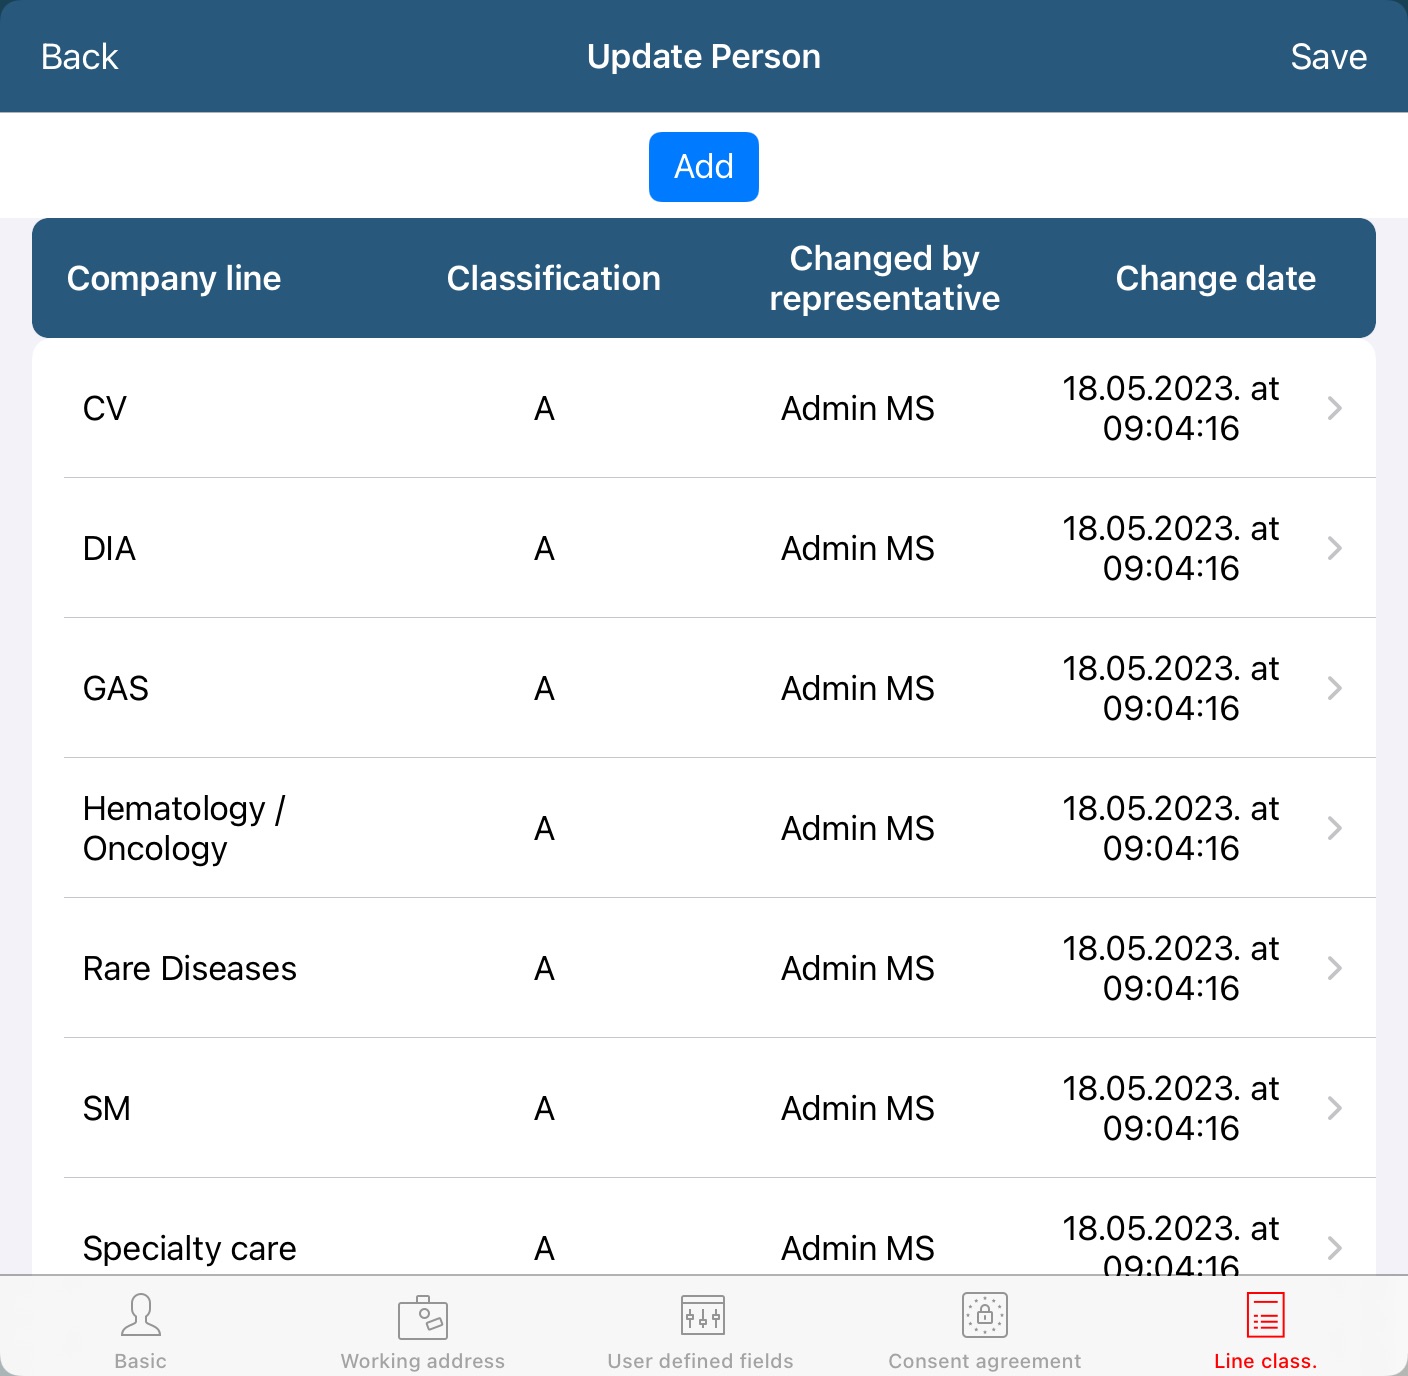
Line classification
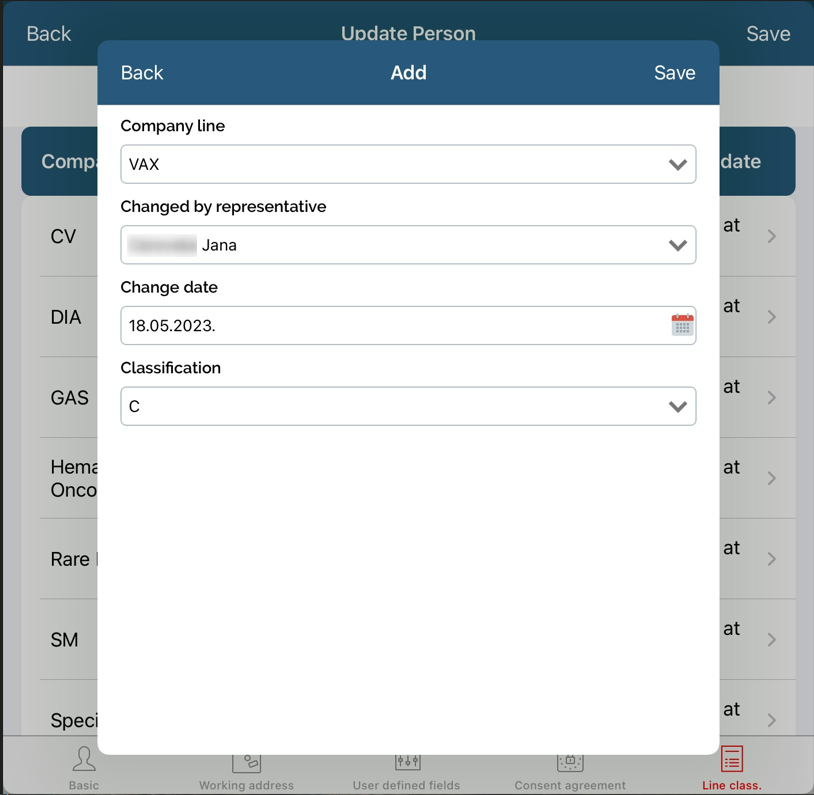
There is a functionality for company line classification - each company line can have their own classification for each Person in database.

User’s company line is marked line in the picture below:
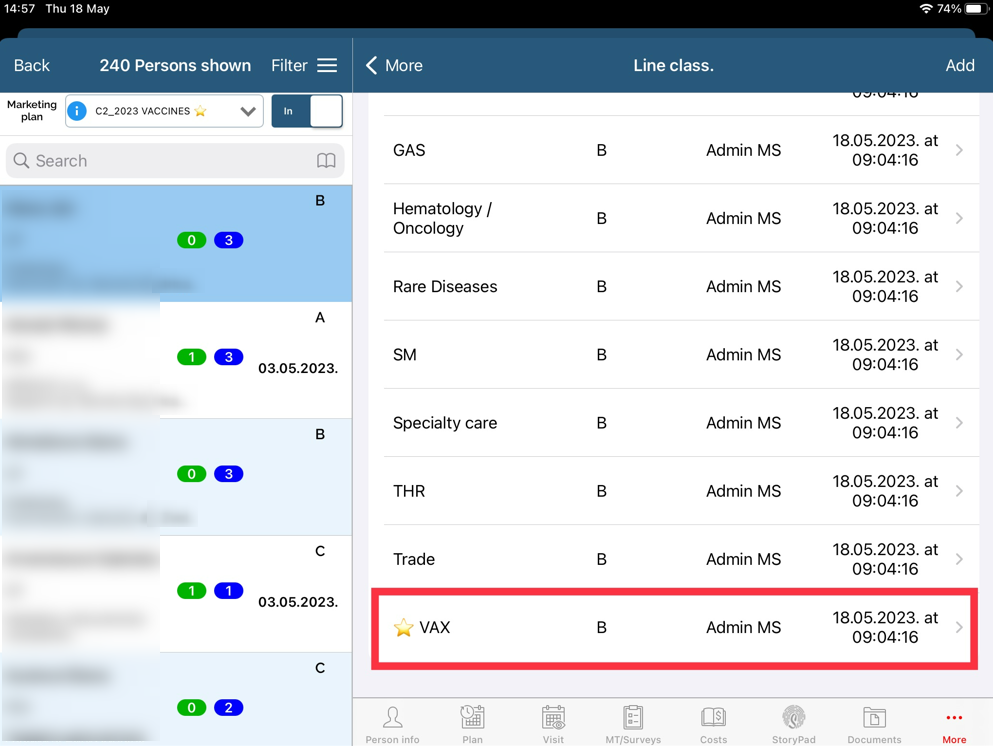
Swiping on the classification enables user to see the History of classification change, info about Person and Change of classification if users’ company line is selected.
Company line of Person can be changed in Change person grid.
Product classification
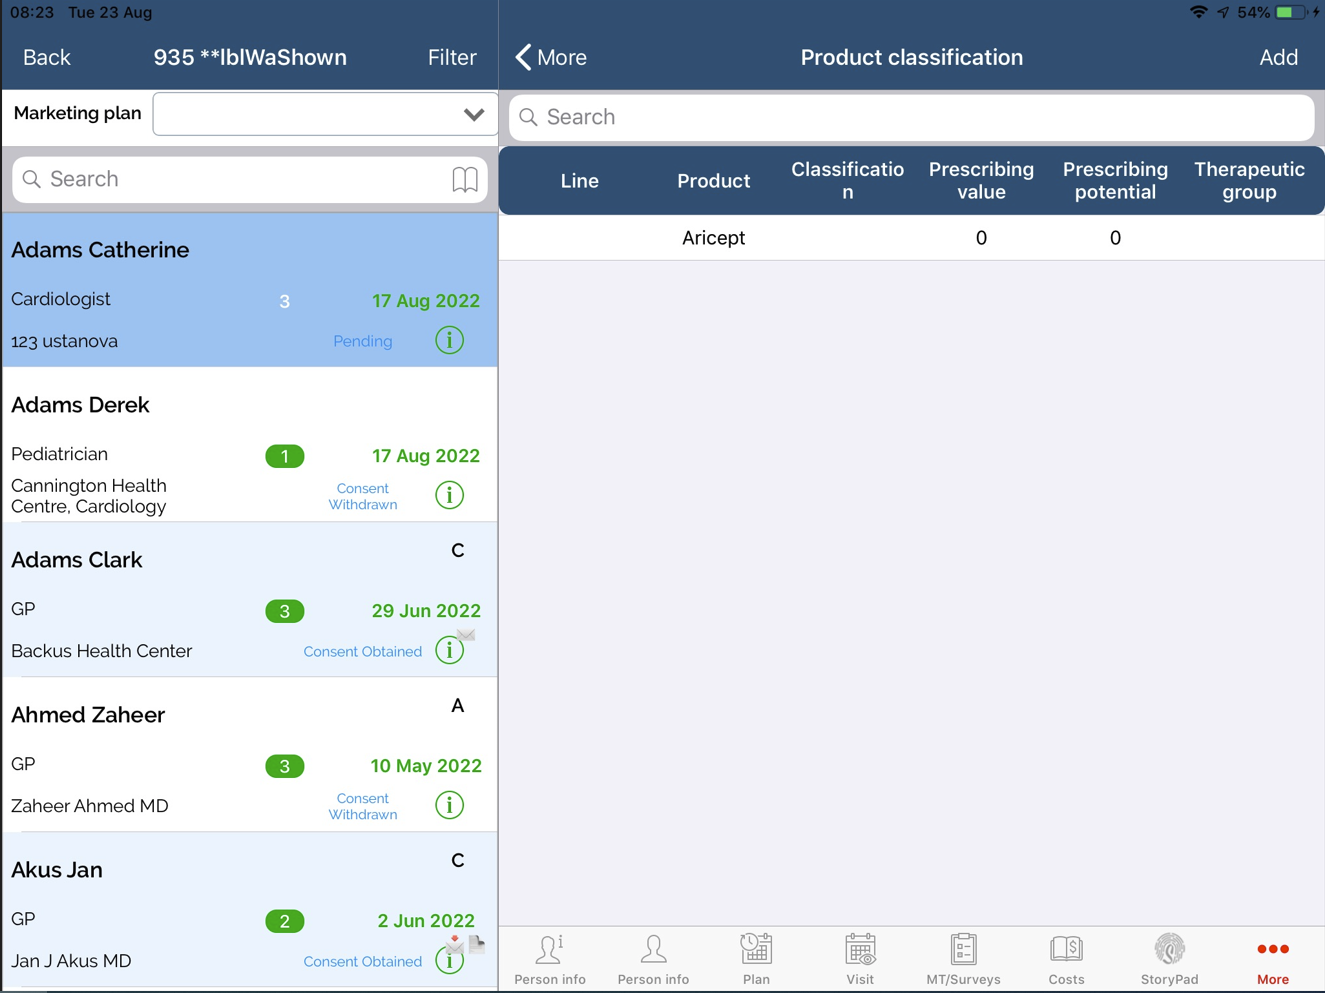
The tab Product classification displays a list containing the following columns for preview:
Line
Product
Classification
Prescription value
Prescription potential
Therapeutic group.
When user will click on the „Add“ button, new window will be opened for entering product classification data.
Status
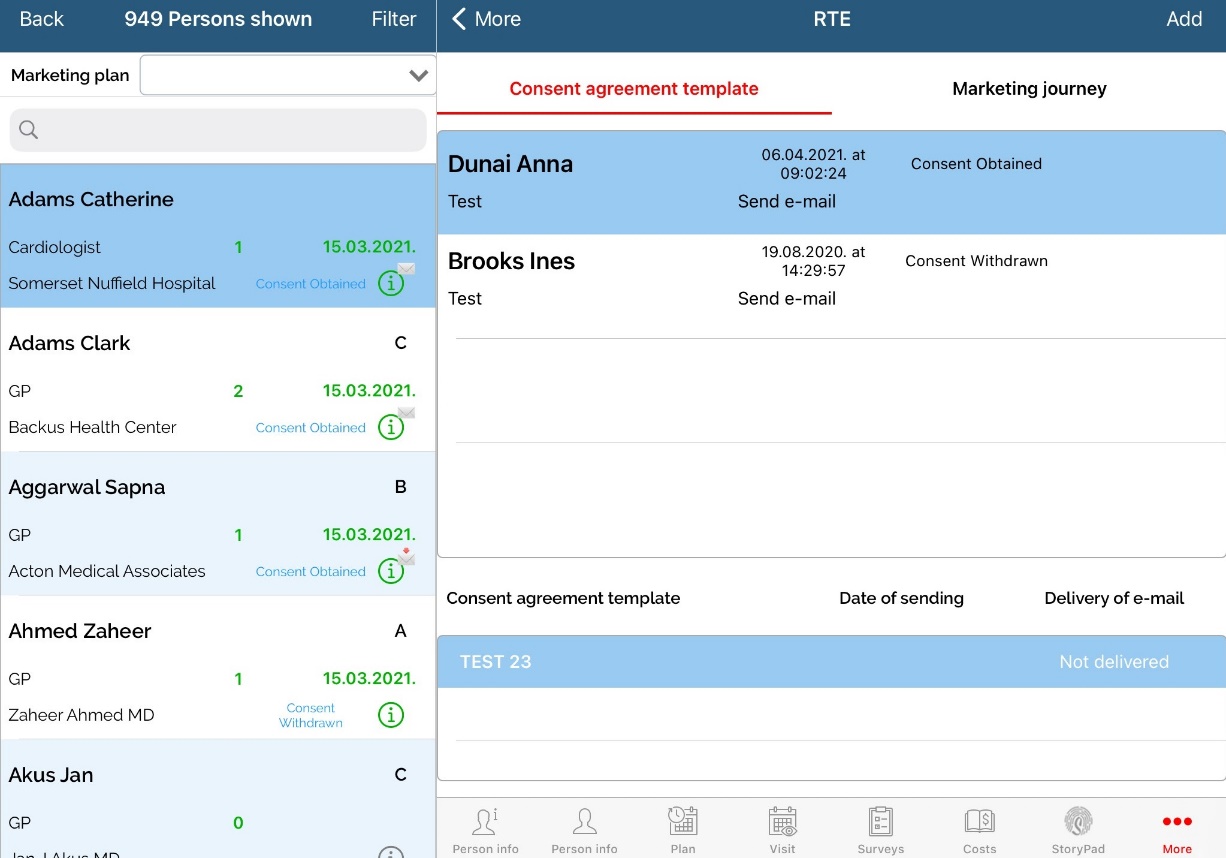
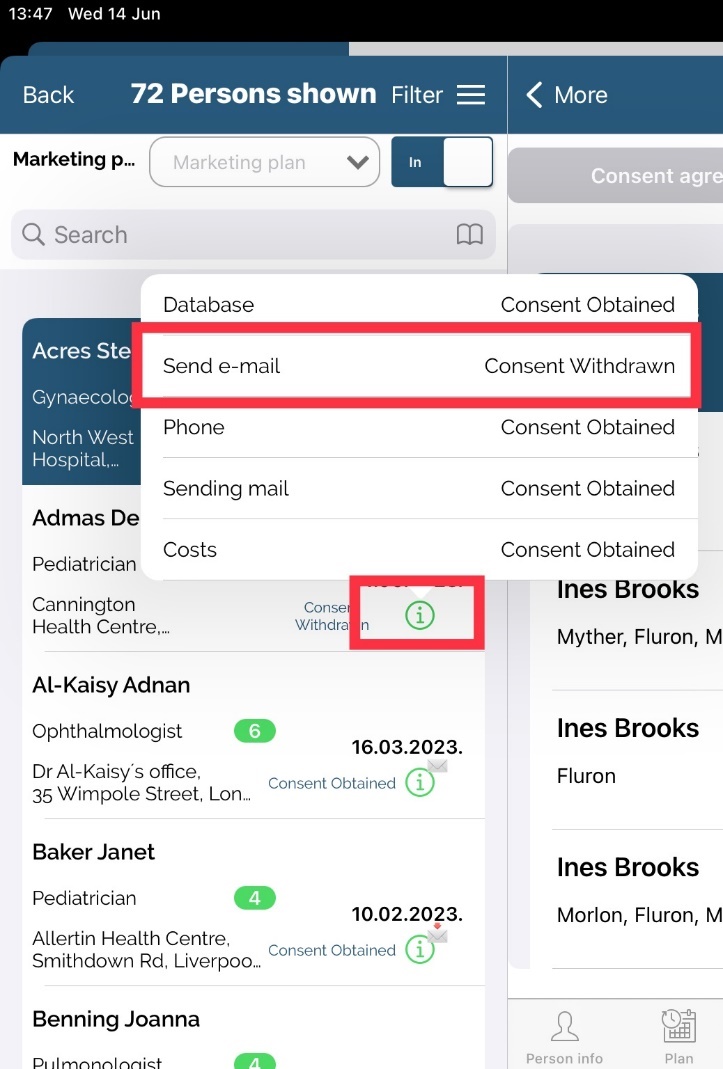
As an example, we have saved two consent agreements with status obtained and one status withdrawn. This can be seen on the pictures below.
After adding status, for selected row, swipe the row to your left and you are given possibility to: Only when a person has Status obtained for Email consent template type, Representative is given a possibility to send a confirmation template (as a thank you email for signing the document). Swipe the row to your left and click on the button Prepare a confirmation e-mail to choose and prepare confirmation email for sending.
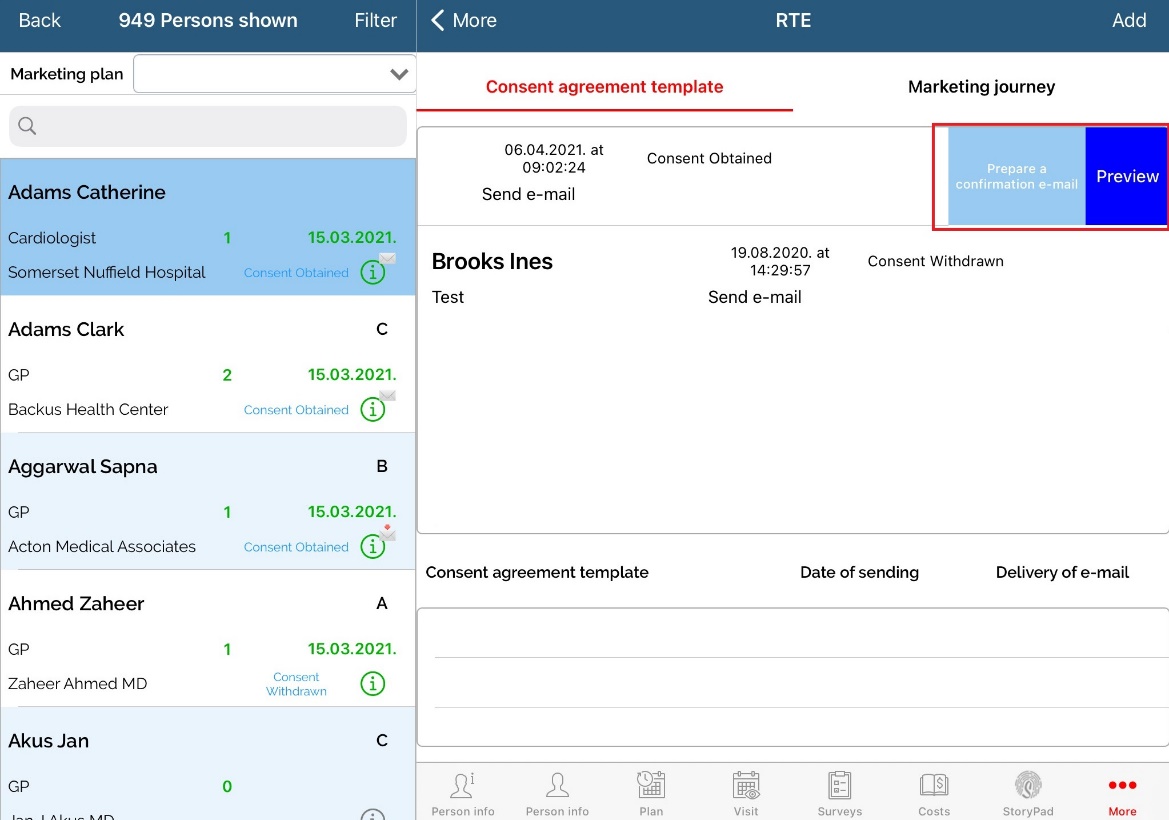
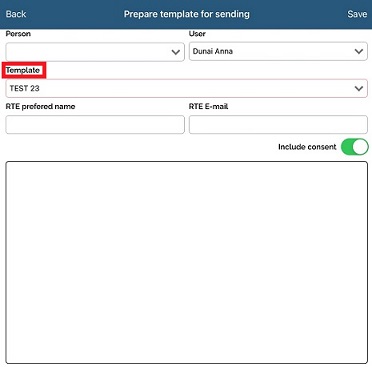
New window will open where you can select which confirmation template you want to send, preview the prepared email and edit RTE email and RTE nickname of a person. Remember that Adminstrator can set anchors/keywords used in template.
If the status of an Email consent agreement is different than status set in Admin for status obtained, representative will not be able to send confirmation mail.
It is possible that button Prepare a confirmation e-mail is not visible if option in SV Admin called Representatives can not send e-mail with the confirmation of consent to persons is turned on.
If way of collecting signature is Electronic signature on device, for ipad version procedure is similar same as desribed above, but when adding consent, field Signature is mandatory and document is uploaded automatically. Representative does not need to upload document manually.
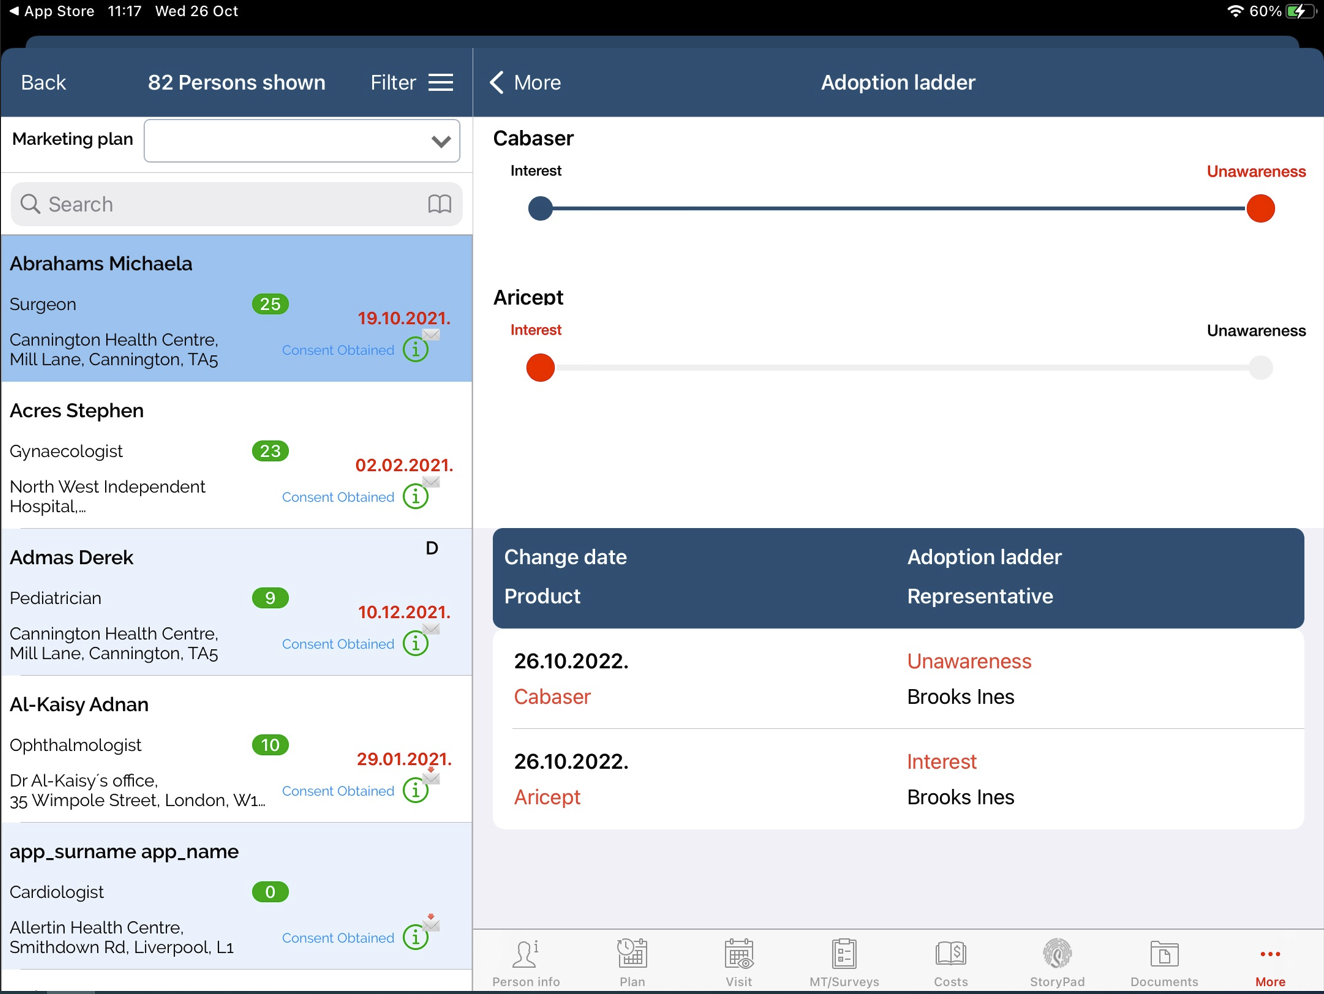
Adoption ladder
A new option that is located at the More tab showing products defined for one particular person with defined code lists.
It gives an overview of the products, their codelist stage, user who has changed the stage status and the date pf the change.
The overview is quite simmliar as on the web application.
Consent agreement selection
There is an option in which the collected consents can be selected. You can choose which consents are going to be valid. Consents for database, send e-mai, phone, costs can be selected.

First person needs to be chosen.
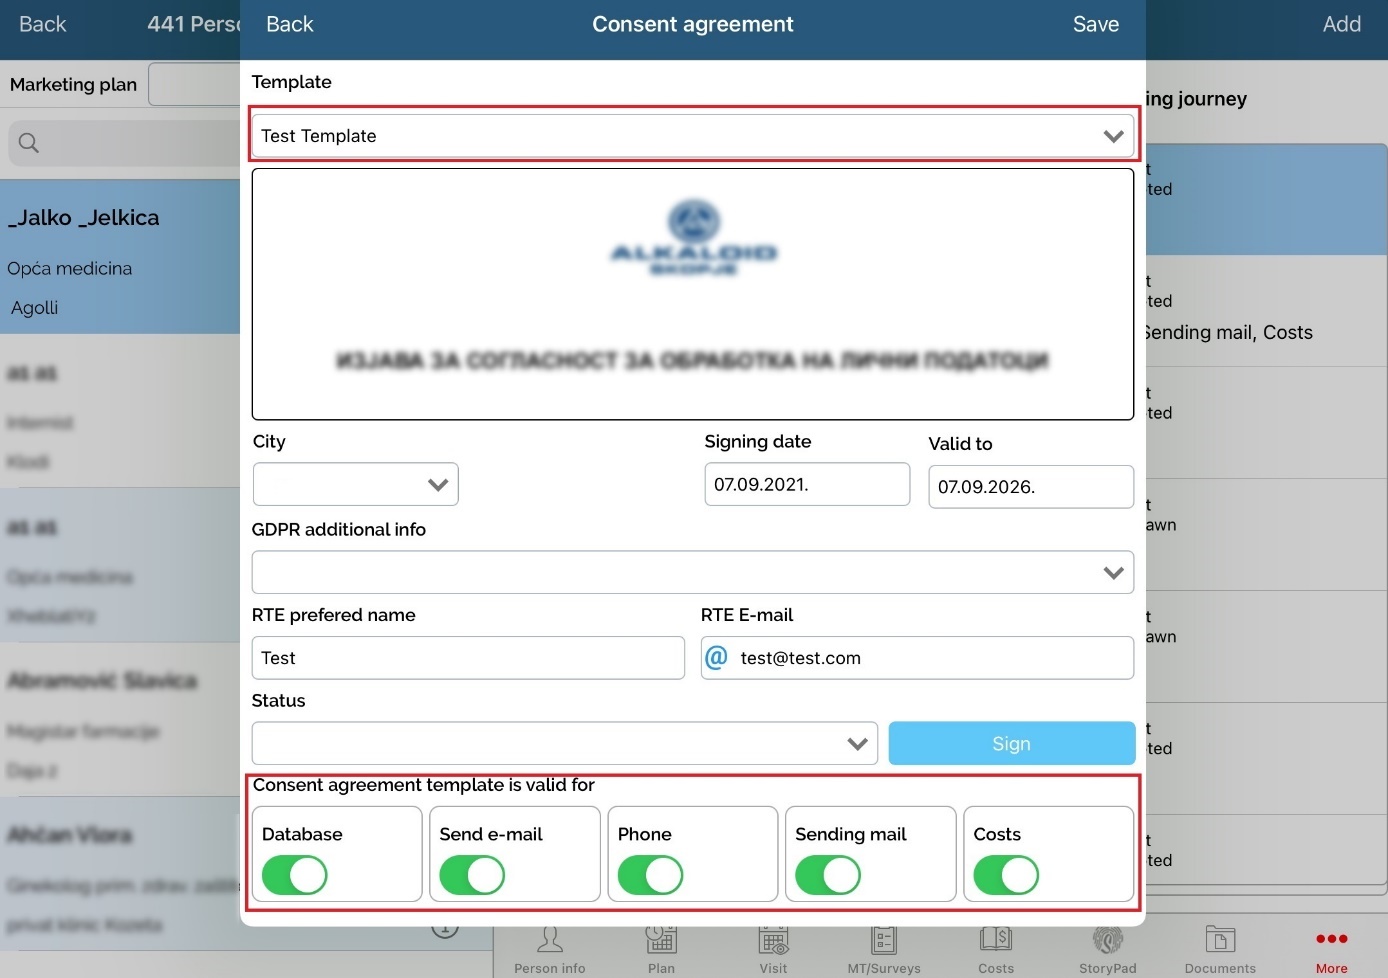
Select “ADD” in upper right corner.Then in drop menu “Templete” select which consent you wold like to chose. With slider you can select which of them you wold like to activate.
Example, person has given you consent agreement for e-mail, you have his mail in database, but with deselecting it, you don’t sent e-mails to this person.
You select Status “ Consent was accepted”, Sign and save.
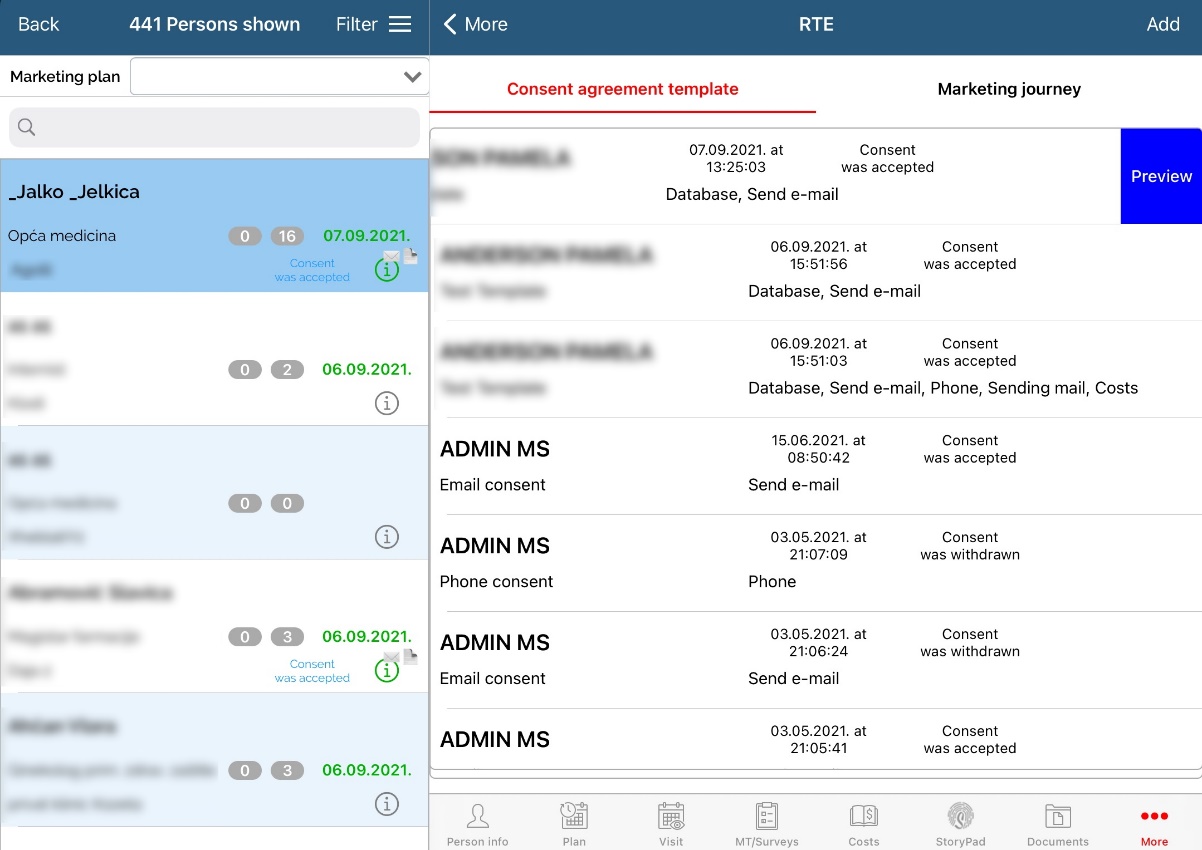
To check which consent are selected, chose person, select consent than swipe to left and click on “Preview”. New window will open with allowed consents.
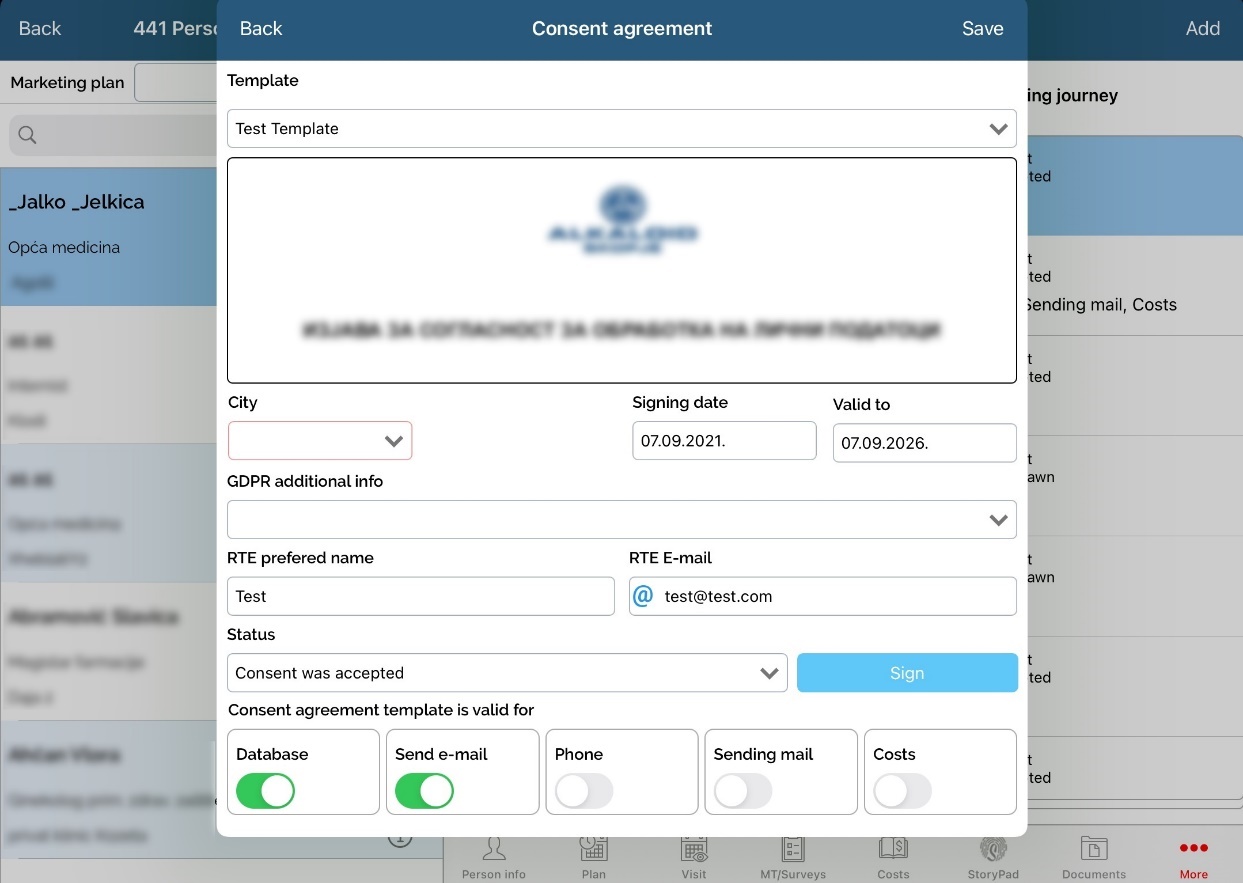
CONSENT AGREEMENT TEMPLATE IS VALID FOR:
Here is shown for which consents is given permission
What happens when a person does not give his/hers consent
As earlier described, Sales Vision differentiates five types of consent:
Database
Phone
Costs
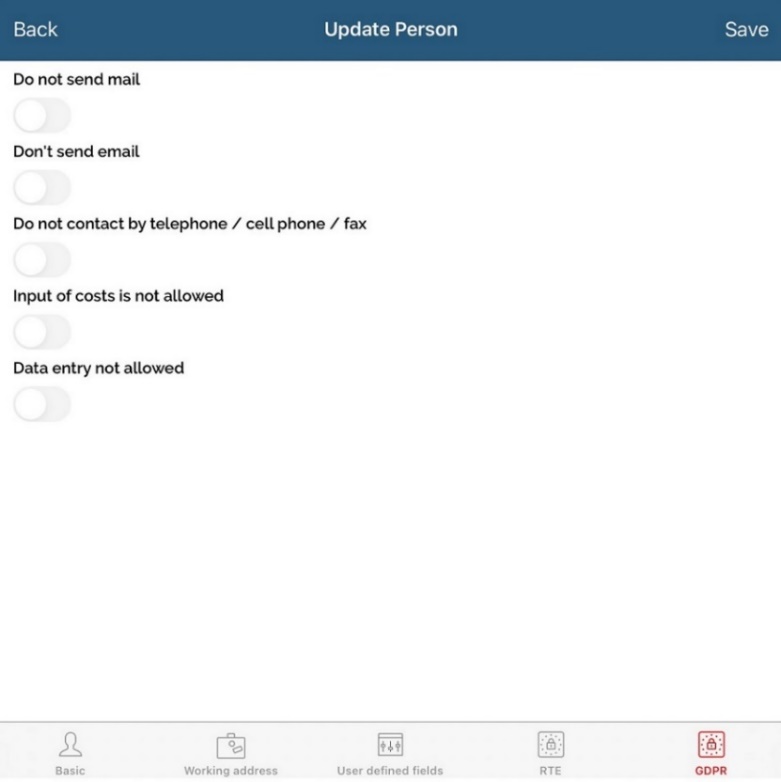
If a person does not consent on one or more types of consent or an existing consent has expired, automatically this person will have a flag on person edit form, System data for each consent type. These five checkboxes are disabled if Consent module is turned on and show user if this person has agreed to be contacted by phone, mail, email etc.
SV Next, person edit form, GDPR tab:
All these five types of consent are related to the rest of Sales Vision application. If a person does not give consent for email, sales representative will not be able to send an email from Samples module (from visits), send an email from Storypad module or by using Direct mailing. If a person does not give consent for cost consent, sales representative will not be able to add direct costs for this person on event, subventions and other additional modules on request (Event & budgets and Expense diaries).
Special type of consent is database type of consent. If a person’s withdraws database type of consent, system will automatically delete this person form database including all plans, visits, samples given to this person, MT, survey etc. In case if a person wants to give database consent, sales representative will have to re-enroll this person as a new one to database. Old visits and plans will not be visible on SV Next calendar (can be checked on the web version shown on calendar with „DATA PROTECTED“ or „D_P).
Deleting all data if database consent agreement is not present is not valid for status defined in option status of a person when a person is not deleted from database.
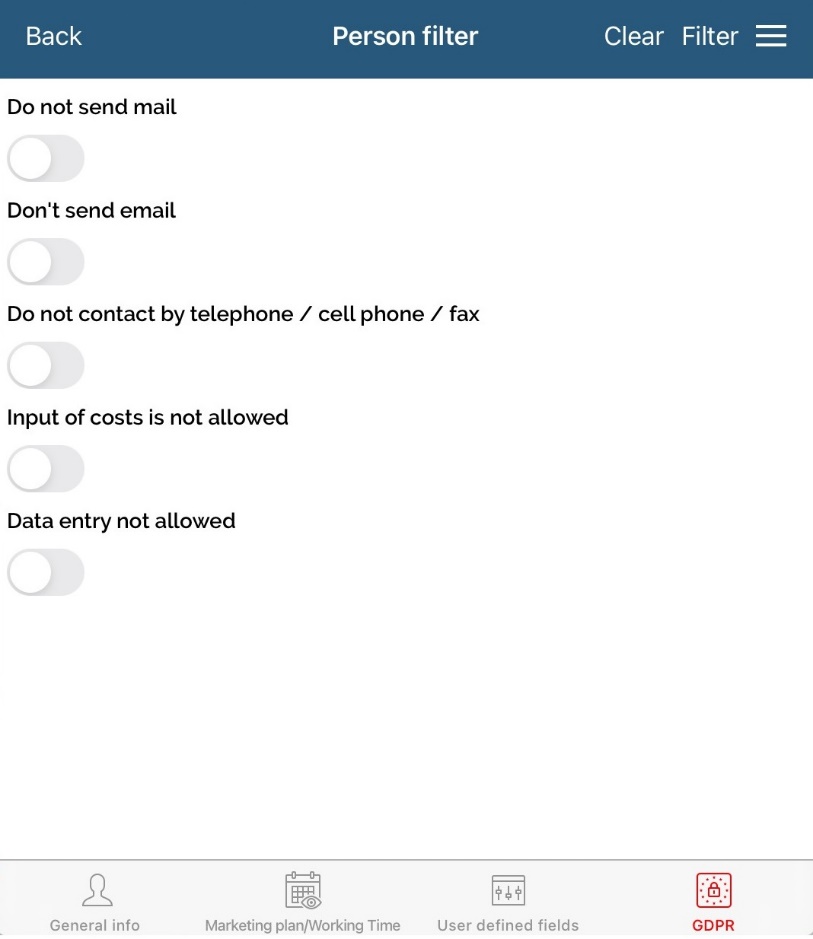
Filter regarding GDPR status consent has been added in Persons module to filter the list of person with or without consent.
SV Next, Person filter, GDPR tab:
Sending Marketing journey email
Sending emails from Marketing journey is possible only to person with status for Email type of consent -> Status obtained.
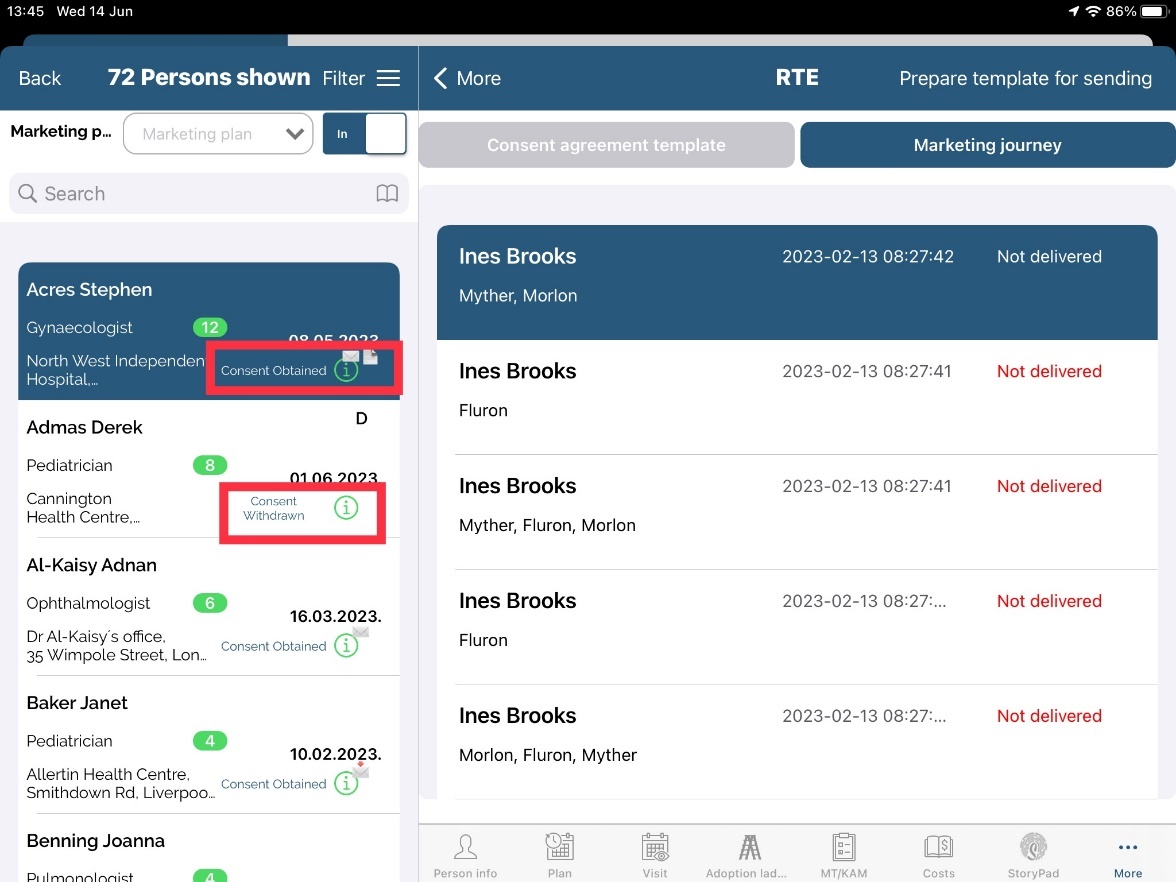
On the persons list, next to each person, you can find status of Email consent:
There are two possibilities in sending marketing journey emails from SV Next.
From Persons module
In Persons module, under tab RTE -> Marketing journey you can prepare emails for sending by clicking on Prepare template for sending and new window will open.
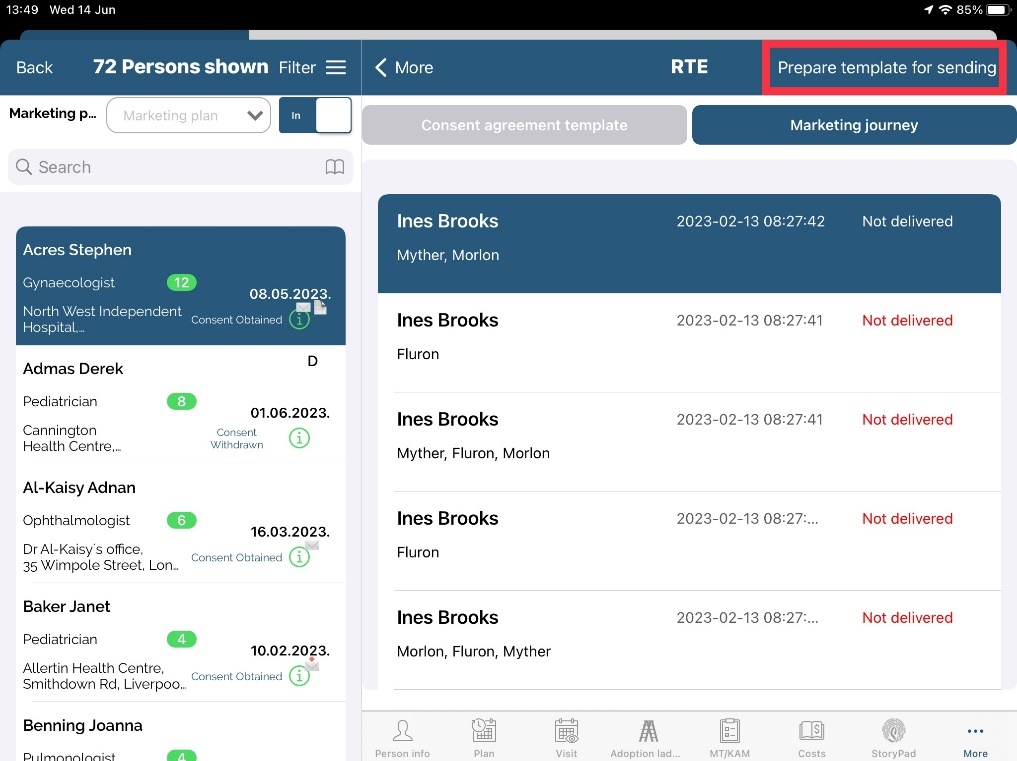
Button Prepare template for sending is visible only if Email consent status for this person is Status obtained.
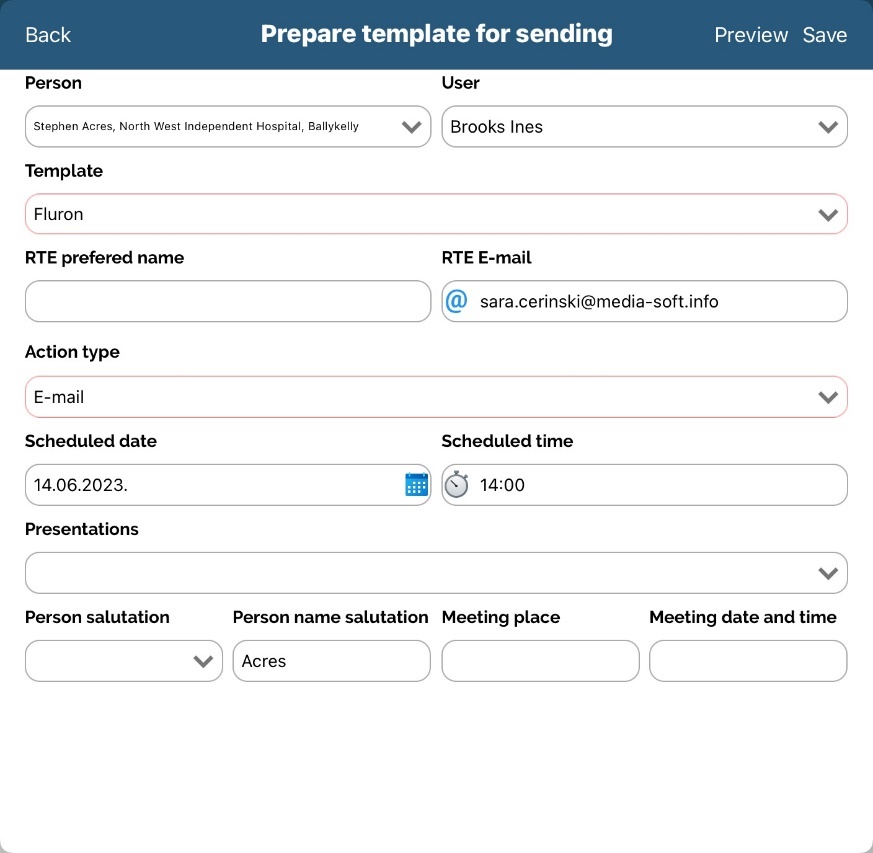
New window will open where you can select which marketing journey template you want to send, preview the prepared email and edit RTE email and RTE nickname of a person. If you are editing a RTE e-mail and RTE preferred name this will be updated on person form, Consent agreement tab for future use. Remember that Adminstrator can set anchors/keywords used in template.
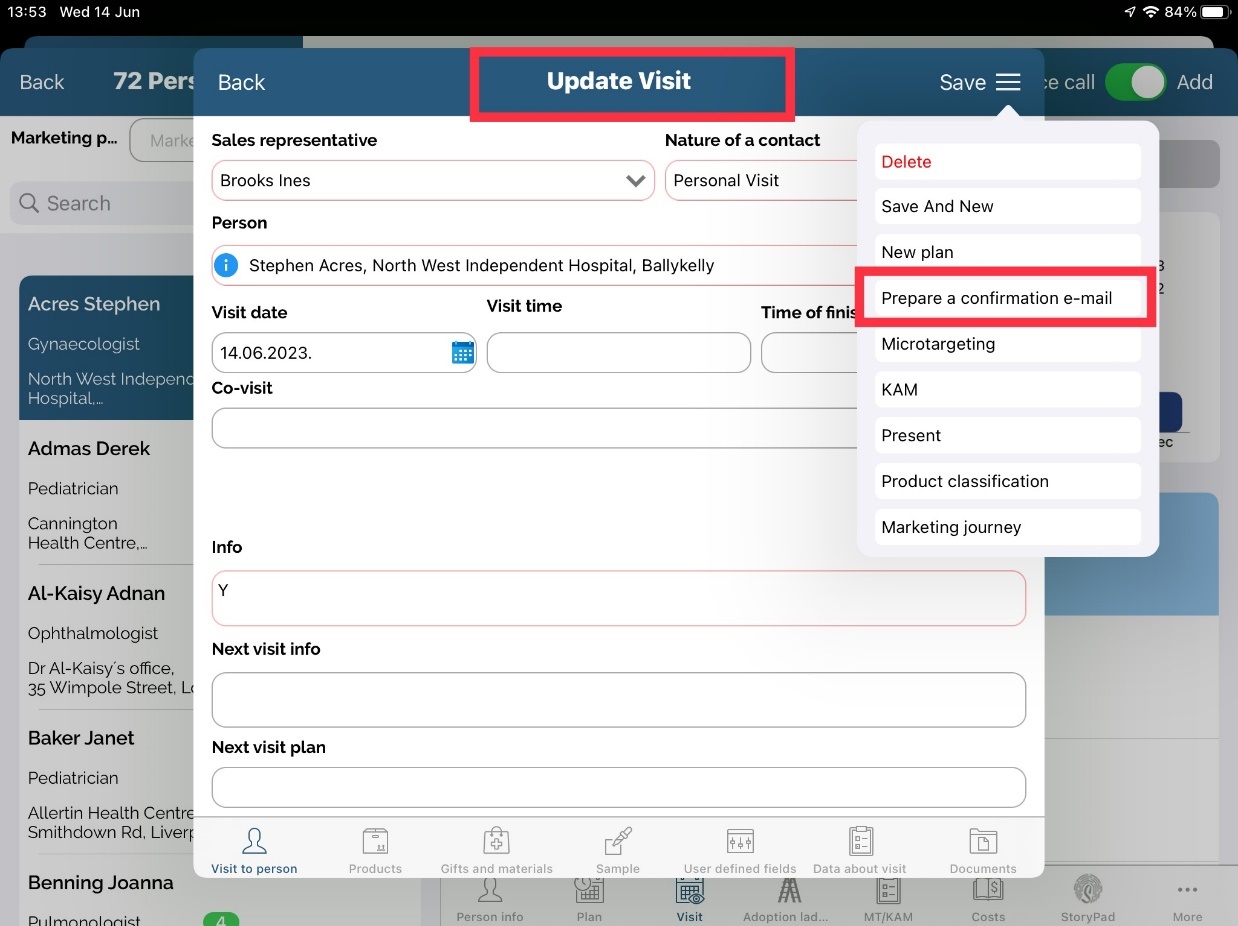
From Visits
Second possibility is to schedule Marketing journey template via Visit form -> Marketing journey tab. To schedule mail for sending, first save your visit. When editing this visit, new button will appear as shown on the picture below. Select template, preview scheduled email and click Save button.
If unsubcribe option is used, template will contain unsubscribe email and by clicking on, HCP will be transferred to unsubcribe page. Status for this type of consent will be the same as set in options (in our example: Consent Withdrawn). This will be updated in Consent agreement tab on Persons module.
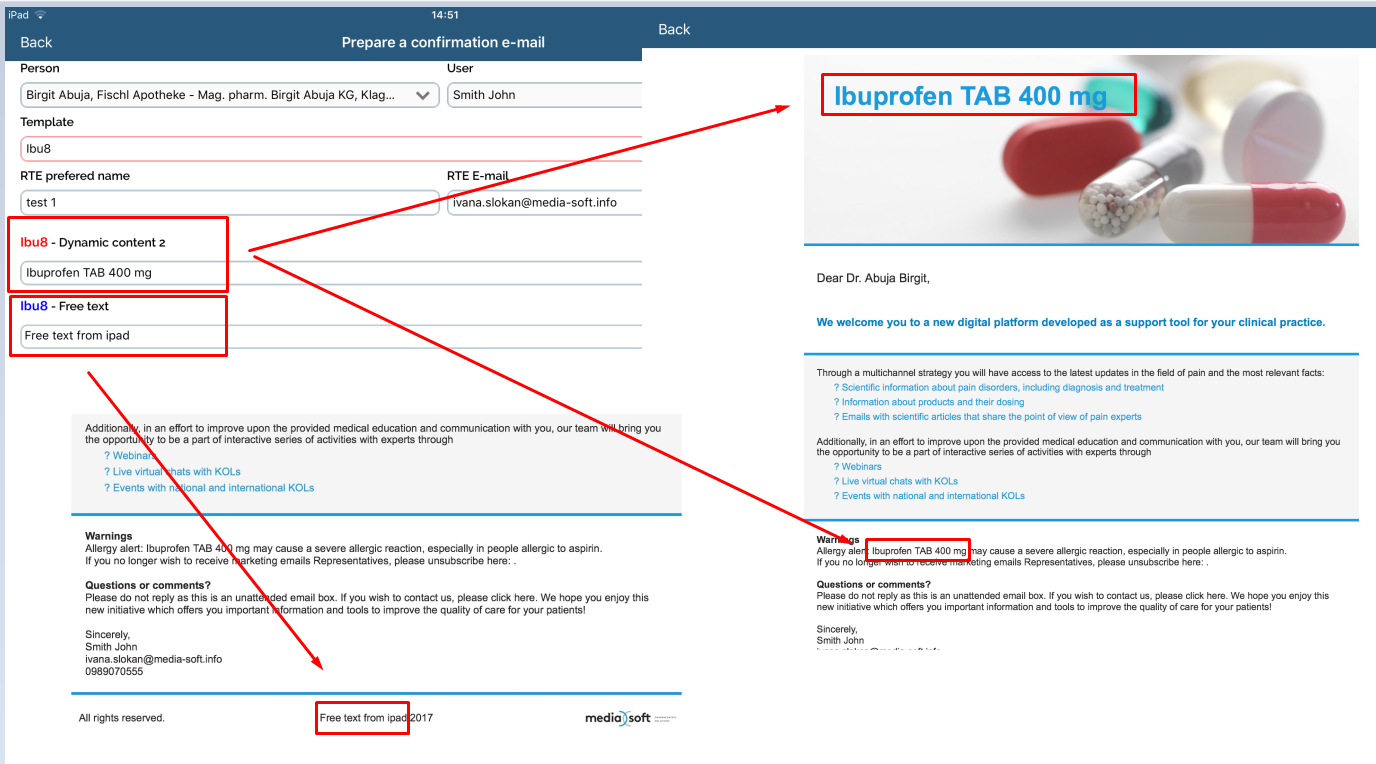
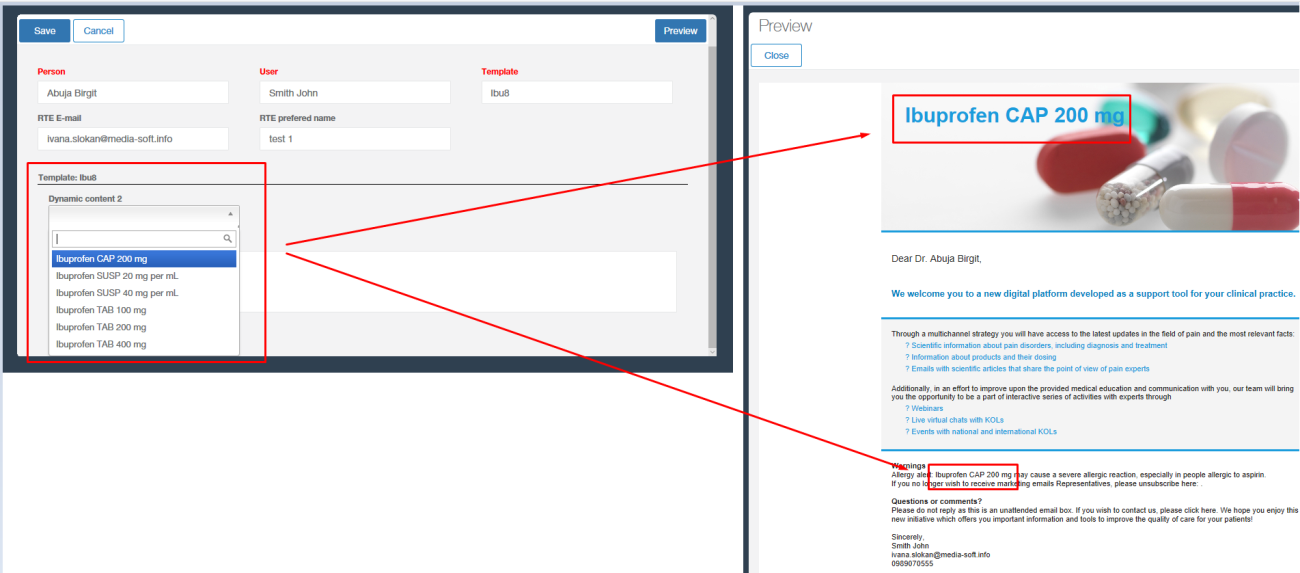
Dynamic content
Administrator can define within the marketing journey template free text fields and dropdown list where user can add free text and/or choose drop down fields. Let's explain it in our example how this functions.
How to define Dynamic content fields?
In SV Admin, under Codelist -> Persons -> codelist nr. 793. Administrator can add different categories as shown on the picture and for each of them Adminstrator can add drop down list.
We have under English name for category Dynamic content 2 defined Ibuprofen as replaceable word and added six dropdown lists.
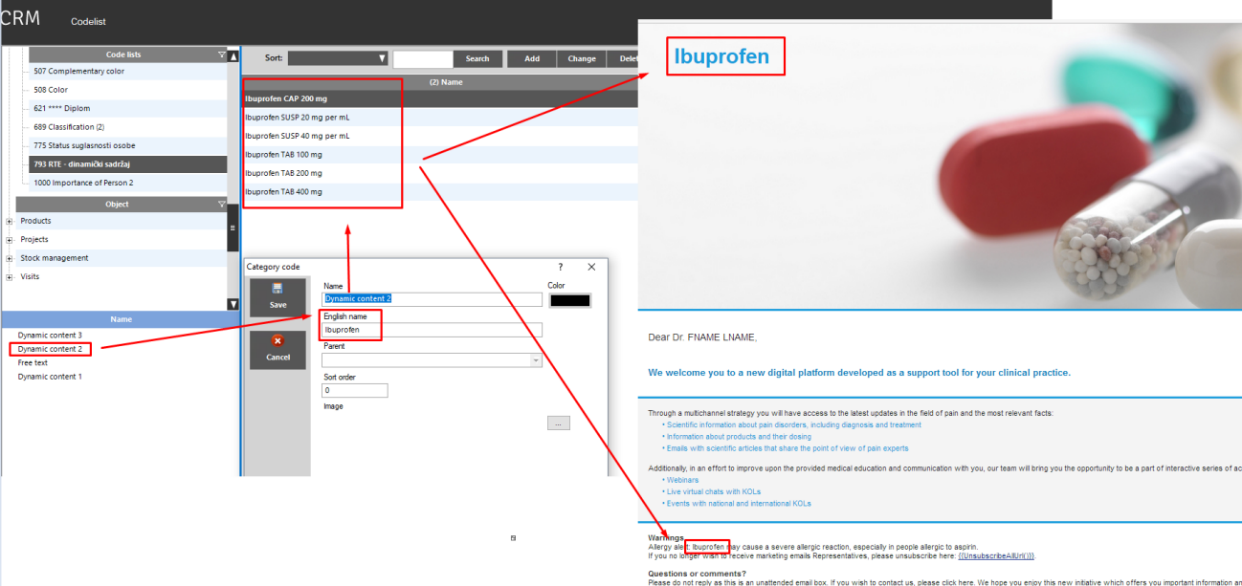
When preparing a template, user can choose which dropdown field will be used.
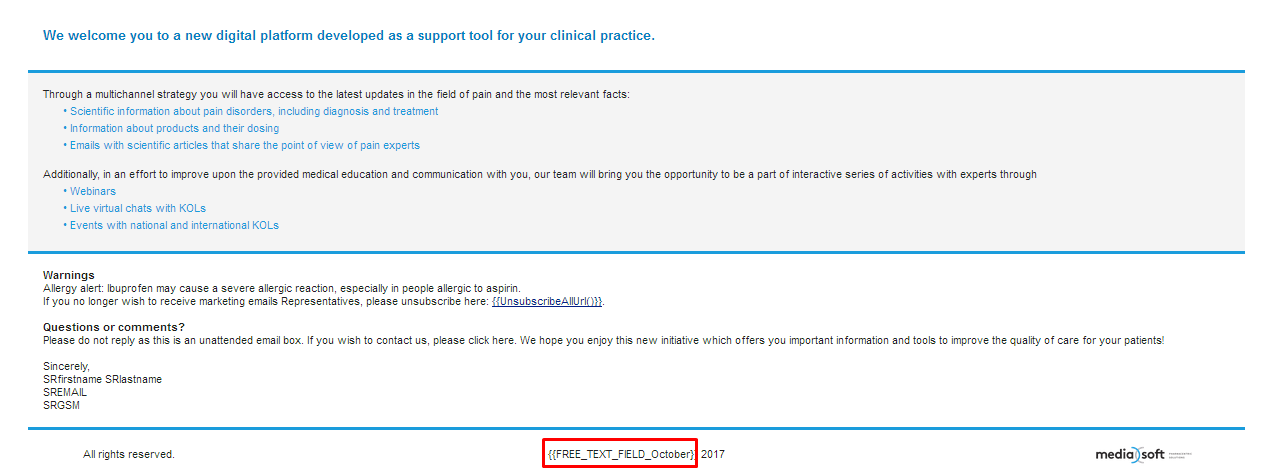
If you want to use Free text field under English name use FREE_TEXT_FIELD_ and word you want to replace as a keyword:
Original HTML:
Example how does it work on SV Next: